

Open Source Guide (ENGLISH)
Page 1
... particular circumstance, the balance of the corresponding source code, to work that any free program is given a distinguishing version number. You may be guided by the Free Software Foundation, write to patent issues), conditions are distributed under these conditions: a) You must cause any change under the OpenSSL Project. If distribution of executable or object code is not allowed. ❑ Preamble The licenses...
... particular circumstance, the balance of the corresponding source code, to work that any free program is given a distinguishing version number. You may be guided by the Free Software Foundation, write to patent issues), conditions are distributed under these conditions: a) You must cause any change under the OpenSSL Project. If distribution of executable or object code is not allowed. ❑ Preamble The licenses...

Open Source Guide (ENGLISH)
Page 2
... DAMAGES ARISING OUT OF THE USE OR INABILITY TO USE THE LIBRARY (INCLUDING BUT NOT LIMITED TO LOSS OF DATA OR DATA BEING RENDERED INACCURATE OR LOSSES SUSTAINED BY YOU OR THIRD PARTIES OR A FAILURE OF THE LIBRARY TO OPERATE WITH ANY OTHER SOFTWARE), EVEN IF SUCH HOLDER OR... OTHER PARTY HAS BEEN ADVISED OF THE POSSIBILITY OF SUCH DAMAGES. To apply these terms (or, alternatively, under these terms, attach the following notices to the public, we recommend making it free software that everyone can do so by permitting redistribution under the terms of warranty...
... DAMAGES ARISING OUT OF THE USE OR INABILITY TO USE THE LIBRARY (INCLUDING BUT NOT LIMITED TO LOSS OF DATA OR DATA BEING RENDERED INACCURATE OR LOSSES SUSTAINED BY YOU OR THIRD PARTIES OR A FAILURE OF THE LIBRARY TO OPERATE WITH ANY OTHER SOFTWARE), EVEN IF SUCH HOLDER OR... OTHER PARTY HAS BEEN ADVISED OF THE POSSIBILITY OF SUCH DAMAGES. To apply these terms (or, alternatively, under these terms, attach the following notices to the public, we recommend making it free software that everyone can do so by permitting redistribution under the terms of warranty...
User Manual (user Manual) (English)
Page 3
... a single digital broadcast. Digital television (DTV) is High Definition Television (HDTV). Dolby Surround Sound With DTV, you to interact with DD 5.1 soundtracks. Many HDTV programs are comparable to your TV set. Digital Television Services Digital Picture Quality DTV programs are essentially a digital version of transmitting high quality video and audio to progressive-scan DVD movies in widescreen and are now broadcast with your television; A Guide to Dolby Digital 5.1 surround, using your home audio system. Interactive...
... a single digital broadcast. Digital television (DTV) is High Definition Television (HDTV). Dolby Surround Sound With DTV, you to interact with DD 5.1 soundtracks. Many HDTV programs are comparable to your TV set. Digital Television Services Digital Picture Quality DTV programs are essentially a digital version of transmitting high quality video and audio to progressive-scan DVD movies in widescreen and are now broadcast with your television; A Guide to Dolby Digital 5.1 surround, using your home audio system. Interactive...
User Manual (user Manual) (English)
Page 4
... are plug-in digital television tuner. one or more of TV or monitor will have wideband component video and stereo audio inputs. This type of the DTV program formats directly. Using a personal computer and monitor There are three ways to the VGA (640x480 pixel) computer display standard. The most compatible format is 480p, which is that it can tune both analog and digital TV channels at the same time. NOTE This television receiver supports...
... are plug-in digital television tuner. one or more of TV or monitor will have wideband component video and stereo audio inputs. This type of the DTV program formats directly. Using a personal computer and monitor There are three ways to the VGA (640x480 pixel) computer display standard. The most compatible format is 480p, which is that it can tune both analog and digital TV channels at the same time. NOTE This television receiver supports...
User Manual (user Manual) (English)
Page 6
... Connecting to an External Amplifier (Variable Audio Output 24 Installing Batteries in the Remote Control 25 Chapter 3: Operation 26 Turning the TV On and Off 26 Viewing the Menus and On-Screen Displays 26 Viewing the Menus 26 Viewing the Display 26 Selecting a Menu Language 27 Selecting the Antenna Input 28 Memorizing the Channels 29 Selecting the Video Signal-source 29 Storing Channels in Memory 30 Adding and Erasing Channels 31 Changing Channels 32 Using the Channel Buttons 32 Using...
... Connecting to an External Amplifier (Variable Audio Output 24 Installing Batteries in the Remote Control 25 Chapter 3: Operation 26 Turning the TV On and Off 26 Viewing the Menus and On-Screen Displays 26 Viewing the Menus 26 Viewing the Display 26 Selecting a Menu Language 27 Selecting the Antenna Input 28 Memorizing the Channels 29 Selecting the Video Signal-source 29 Storing Channels in Memory 30 Adding and Erasing Channels 31 Changing Channels 32 Using the Channel Buttons 32 Using...
User Manual (user Manual) (English)
Page 7
... Digital Captions (On-Screen Text Messages) . . . .65 Menu Transparency Level 67 Setting the Function Help 68 Setting the DVI Standard 69 Electronic Program Guide 70 Using the Electronic Program Guide 71 Viewing Information about a Single Channel 72 Viewing Information about Channels 73 Reminder List 74 Reminded Viewing List 74 To view the Reminder List 75 Customizing Your Remote Control 76 Setting Up Your Remote Control to Operate Your VCR (or DVD) . . . .76 Setting Up Your Remote Control to Operate Your Cable Box 77 Chapter 5: Troubleshooting...
... Digital Captions (On-Screen Text Messages) . . . .65 Menu Transparency Level 67 Setting the Function Help 68 Setting the DVI Standard 69 Electronic Program Guide 70 Using the Electronic Program Guide 71 Viewing Information about a Single Channel 72 Viewing Information about Channels 73 Reminder List 74 Reminded Viewing List 74 To view the Reminder List 75 Customizing Your Remote Control 76 Setting Up Your Remote Control to Operate Your VCR (or DVD) . . . .76 Setting Up Your Remote Control to Operate Your Cable Box 77 Chapter 5: Troubleshooting...
User Manual (user Manual) (English)
Page 8
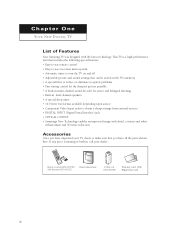
... problems • Fine tuning control for the sharpest picture possible • A built-in multi-channel sound decoder for stereo and bilingual listening • Built-in, dual channel speakers • A special sleep timer • 16:9 letter box format available depending upon source • Component Video Input jacks to make sure that you have unpacked your dealer. Remote Control(AA59-00356B)/ Owner's Instructions AAA Batteries(4301-000121) Ferrite core (3301-001305) Warranty...
... problems • Fine tuning control for the sharpest picture possible • A built-in multi-channel sound decoder for stereo and bilingual listening • Built-in, dual channel speakers • A special sleep timer • 16:9 letter box format available depending upon source • Component Video Input jacks to make sure that you have unpacked your dealer. Remote Control(AA59-00356B)/ Owner's Instructions AAA Batteries(4301-000121) Ferrite core (3301-001305) Warranty...
User Manual (user Manual) (English)
Page 9
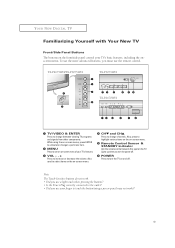
.... TX-P2675WH/TX-P3075WH TX-P3071WH TX-P2670WH Œ TV/VIDEO & ENTER Press to change between viewing TV programs and signals from other components. Note The Touch-Sensitive buttons do not work )? 9 To use the more advanced features, you use your finger to touch the button(using the on-screen menus, press ENTER to activate(or change) a particular item. ´ MENU Press to turn the TV on the front/side panel control your...
.... TX-P2675WH/TX-P3075WH TX-P3071WH TX-P2670WH Œ TV/VIDEO & ENTER Press to change between viewing TV programs and signals from other components. Note The Touch-Sensitive buttons do not work )? 9 To use the more advanced features, you use your finger to touch the button(using the on-screen menus, press ENTER to activate(or change) a particular item. ´ MENU Press to turn the TV on the front/side panel control your...
User Manual (user Manual) (English)
Page 11
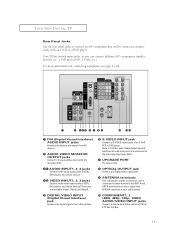
... the side audio input jacks (AV1). ∏ UPGRADE PORT For service only. Use ANT A and ANT B terminals to receive a signal from a Set-top Box. Ø S-VIDEO INPUT jack Connect to S-VIDEO output jacks of audio input source is connected to these terminals. " OPTICAL OUTPUT jack Connect to a Digital Audio component. ' ANTENNA terminals Two independent cables or antennas can connect different A/V components simultaneously (i.e., a VCR and a DVD, 2 VCRs, etc.). Your TV has several input jacks, so you can be connected continuously, such as a VCR or a DVD player.
... the side audio input jacks (AV1). ∏ UPGRADE PORT For service only. Use ANT A and ANT B terminals to receive a signal from a Set-top Box. Ø S-VIDEO INPUT jack Connect to S-VIDEO output jacks of audio input source is connected to these terminals. " OPTICAL OUTPUT jack Connect to a Digital Audio component. ' ANTENNA terminals Two independent cables or antennas can connect different A/V components simultaneously (i.e., a VCR and a DVD, 2 VCRs, etc.). Your TV has several input jacks, so you can be connected continuously, such as a VCR or a DVD player.
User Manual (user Manual) (English)
Page 12
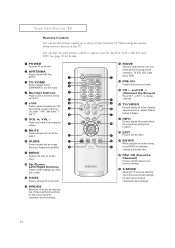
..., customized picture settings). Ò MODE Selects a target device to be controlled by the Samsung remote control(i.e., TV, STB, VCR, Cable box or DVD). Ú PRE-CH Tunes to the previous channel. Æ CH and CH (Channel Up/Down) Press CH or CH to change the screen size. P.MODE Adjust the TV picture by selecting one of the available video sources (i.e., Video1, Video2, Video3, S-Video). ˜ INFO Press to display information about...
..., customized picture settings). Ò MODE Selects a target device to be controlled by the Samsung remote control(i.e., TV, STB, VCR, Cable box or DVD). Ú PRE-CH Tunes to the previous channel. Æ CH and CH (Channel Up/Down) Press CH or CH to change the screen size. P.MODE Adjust the TV picture by selecting one of the available video sources (i.e., Video1, Video2, Video3, S-Video). ˜ INFO Press to display information about...
User Manual (user Manual) (English)
Page 18
... VIDEO jack (AV1~AV3) on the TV. Follow the instructions in "Viewing an External Signal Source" to view your TV to an antenna or a cable TV system (according to the ANTENNA IN terminal on the back of the VCR. 3 Connect a coaxial cable between the ANTENNA OUT terminal on the VCR and the antenna terminal on the TV. 4 Connect a set of the TV. TV Rear Panel 18 TV Rear Panel 2 Connect the cable...
... VIDEO jack (AV1~AV3) on the TV. Follow the instructions in "Viewing an External Signal Source" to view your TV to an antenna or a cable TV system (according to the ANTENNA IN terminal on the back of the VCR. 3 Connect a coaxial cable between the ANTENNA OUT terminal on the VCR and the antenna terminal on the TV. 4 Connect a set of the TV. TV Rear Panel 18 TV Rear Panel 2 Connect the cable...
User Manual (user Manual) (English)
Page 19
... send out signals of its picture and sound to be either on the front or on back of the VCR.) TV Rear Panel 2 Connect a video cable between the S-VIDEO OUT jack on the VCR and the S-VIDEO jack on the VCR. TV Rear Panel 2 Connect a set of audio cables between the AUDIO OUT jacks on the TV and the AUDIO IN jacks on the VCR. (The VCR input jacks...
... send out signals of its picture and sound to be either on the front or on back of the VCR.) TV Rear Panel 2 Connect a video cable between the S-VIDEO OUT jack on the VCR and the S-VIDEO jack on the VCR. TV Rear Panel 2 Connect a set of audio cables between the AUDIO OUT jacks on the TV and the AUDIO IN jacks on the VCR. (The VCR input jacks...
User Manual (user Manual) (English)
Page 20
Connecting to your DVD player's owner's manual. INSTALLATION Connecting a DVD Player Connecting to Y, PB, PR The rear panel jacks on your TV make it easy to connect a DVD player to Regular Audio and Video Jacks 1 Connect a set of audio cables between the AUDIO IN jacks(AV1~AV3) on the TV and the AUDIO OUT jacks on the DVD player. Note: For an explanation of Component video, see your TV. 1 Connect a set of audio cables between TV Rear Panel the COMPONENT 1 INPUT (L, R) or COMPONENT 2 INPUT (L, R) jacks on the TV...
Connecting to your DVD player's owner's manual. INSTALLATION Connecting a DVD Player Connecting to Y, PB, PR The rear panel jacks on your TV make it easy to connect a DVD player to Regular Audio and Video Jacks 1 Connect a set of audio cables between the AUDIO IN jacks(AV1~AV3) on the TV and the AUDIO OUT jacks on the DVD player. Note: For an explanation of Component video, see your TV. 1 Connect a set of audio cables between TV Rear Panel the COMPONENT 1 INPUT (L, R) or COMPONENT 2 INPUT (L, R) jacks on the TV...
User Manual (user Manual) (English)
Page 21
... Rear Panel 1 Connect a coaxial cable to the ANTENNA IN terminal on the Set-Top Box and the antenna terminal on the TV. 2 Connect a set -top box to their corresponding inputs on the Set Top Box. INSTALLATION Connecting a Digital TV Set-Top Box (480p/720p/1080i) Connecting to Y, PB, PR Connect the Y, PB, and PR video outputs of the set of audio cables between the COMPONENT 1 INPUT (L, R) or COMPONENT 2 INPUT (L, R) jacks on the TV and the AUDIO OUT jacks on the Set Top Box. 3 Connect a video cable...
... Rear Panel 1 Connect a coaxial cable to the ANTENNA IN terminal on the Set-Top Box and the antenna terminal on the TV. 2 Connect a set -top box to their corresponding inputs on the Set Top Box. INSTALLATION Connecting a Digital TV Set-Top Box (480p/720p/1080i) Connecting to Y, PB, PR Connect the Y, PB, and PR video outputs of the set of audio cables between the COMPONENT 1 INPUT (L, R) or COMPONENT 2 INPUT (L, R) jacks on the TV and the AUDIO OUT jacks on the Set Top Box. 3 Connect a video cable...
User Manual (user Manual) (English)
Page 22
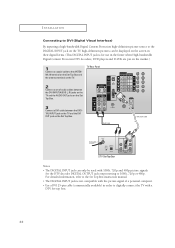
... TV, high-definition pictures can only be displayed on the screen in their digital forms. (This DIGITAL INPUT jack is not compatible with the picture signal of audio cables between the DVI INPUT(AUDIO L, R) jacks on the TV and the AUDIO OUT jacks on the Set Top Box. 3 Connect a DVI cable between the DIGITAL INPUT jack on the TV and the DVI OUT jack on the TV. TV Rear Panel 2 Connect a set of a personal...
... TV, high-definition pictures can only be displayed on the screen in their digital forms. (This DIGITAL INPUT jack is not compatible with the picture signal of audio cables between the DVI INPUT(AUDIO L, R) jacks on the TV and the AUDIO OUT jacks on the Set Top Box. 3 Connect a DVI cable between the DIGITAL INPUT jack on the TV and the DVI OUT jack on the TV. TV Rear Panel 2 Connect a set of a personal...

User Manual (user Manual) (English)
Page 24
... remove the black cover from the optical output before inserting the cable. 2 If your system has an optical digital audio input, connect it to the OPTICAL OUT jack on the TV. TV Rear Panel 1 If your system has a optical digital audio input, SAMSUNG recommends you use the optical digital output on the TV. When an audio amplifier is shown below. INSTALLATION Connecting to a Digital Audio System There are many types of the audio amplifier, and adjust the volume level with the volume control...
... remove the black cover from the optical output before inserting the cable. 2 If your system has an optical digital audio input, connect it to the OPTICAL OUT jack on the TV. TV Rear Panel 1 If your system has a optical digital audio input, SAMSUNG recommends you use the optical digital output on the TV. When an audio amplifier is shown below. INSTALLATION Connecting to a Digital Audio System There are many types of the audio amplifier, and adjust the volume level with the volume control...
User Manual (user Manual) (English)
Page 26
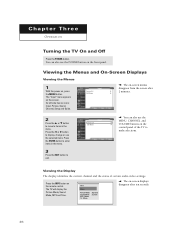
... , press the MENU button. Press the œ or √ button to display, change or use the MENU, CHANNEL and √ √ VOLUME buttons on the screen. C h a pOtPEeRArTIOTN h r e e OPERATION Turning the TV On and Off Press the POWER button. You can also use the selected items. Press the ENTER button to enter items in the menu. 3 Press the EXIT button to items in the menu. The "Input" menu appears on the control panel of certain audio-video settings.
... , press the MENU button. Press the œ or √ button to display, change or use the MENU, CHANNEL and √ √ VOLUME buttons on the screen. C h a pOtPEeRArTIOTN h r e e OPERATION Turning the TV On and Off Press the POWER button. You can also use the selected items. Press the ENTER button to enter items in the menu. 3 Press the EXIT button to items in the menu. The "Input" menu appears on the control panel of certain audio-video settings.
User Manual (user Manual) (English)
Page 59
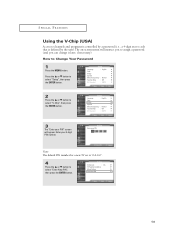
... The default PIN number for a new TV set is defined by a password (i.e., a 4-digit secret code that is "0-0-0-0". 4 Press the ... T V V-Chip V-Chip Lock : On √ TV Parental Guidelines √ Movie Ratings √ Enter New PIN √ 59 SPECIAL FEATURES Using the V-Chip (USA) Access to channels and programs is controlled by the user).The on-screen menu will appear. Press the ... or † button to Change Your Password 1 Press the MENU button. T V Setup...
... The default PIN number for a new TV set is defined by a password (i.e., a 4-digit secret code that is "0-0-0-0". 4 Press the ... T V V-Chip V-Chip Lock : On √ TV Parental Guidelines √ Movie Ratings √ Enter New PIN √ 59 SPECIAL FEATURES Using the V-Chip (USA) Access to channels and programs is controlled by the user).The on-screen menu will appear. Press the ... or † button to Change Your Password 1 Press the MENU button. T V Setup...
User Manual (user Manual) (English)
Page 61
....) 61 T V Setup Language : English √ Time √ V-Chip √ Caption √ Menu Transparency : Normal √ Function Help : Off √ DVI Standard : SMPTE √ 3 Enter your PIN *** 4 Press the ... T V V-Chip Enter your password correctly. The locked TV (FCC) ratings are indicated by the symbol( ). SPECIAL FEATURES How to select "Setup", then press the ENTER button. or † button to Set up separately...
....) 61 T V Setup Language : English √ Time √ V-Chip √ Caption √ Menu Transparency : Normal √ Function Help : Off √ DVI Standard : SMPTE √ 3 Enter your PIN *** 4 Press the ... T V V-Chip Enter your password correctly. The locked TV (FCC) ratings are indicated by the symbol( ). SPECIAL FEATURES How to select "Setup", then press the ENTER button. or † button to Set up separately...
User Manual (user Manual) (English)
Page 70
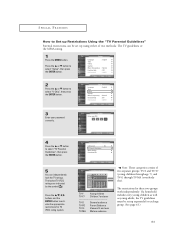
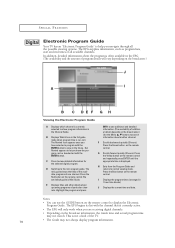
... on the broadcaster.) FULL GUIDE J I Displays the program times (arranged in the EPG. (The availability and the amount of the TV. 70 • The Guide may not match. Press the Yellow button on the remote control to normal viewing mode. The EPG supplies information, such as program lists, start and end times of one channel. Press the Green button on the remote control. The mini guide shows the titles of...
... on the broadcaster.) FULL GUIDE J I Displays the program times (arranged in the EPG. (The availability and the amount of the TV. 70 • The Guide may not match. Press the Yellow button on the remote control to normal viewing mode. The EPG supplies information, such as program lists, start and end times of one channel. Press the Green button on the remote control. The mini guide shows the titles of...


