
User Manual (user Manual) (English)
Page 6
... Connecting to Regular Audio and Video Jacks 20 Connecting a Digital TV Set-Top Box(480p/720p/1080i 21 Connecting to Y, PB, PR 21 Connecting to DVI (Digital Visual Interface 22 Connecting a Camcorder 23 Connecting to a Digital Audio System 24 Connecting to an External Amplifier (Variable Audio Output 24 Installing Batteries in...
... Connecting to Regular Audio and Video Jacks 20 Connecting a Digital TV Set-Top Box(480p/720p/1080i 21 Connecting to Y, PB, PR 21 Connecting to DVI (Digital Visual Interface 22 Connecting a Camcorder 23 Connecting to a Digital Audio System 24 Connecting to an External Amplifier (Variable Audio Output 24 Installing Batteries in...
User Manual (user Manual) (English)
Page 7
... (On-Screen Text Messages) . . . .64 Setting Up Digital Captions (On-Screen Text Messages) . . . .65 Menu Transparency Level 67 Setting the Function Help 68 Setting the DVI Standard 69 Electronic Program Guide 70 Using the Electronic Program Guide 71 Viewing Information about a Single Channel 72 Viewing Information about Channels 73 Reminder List...
... (On-Screen Text Messages) . . . .64 Setting Up Digital Captions (On-Screen Text Messages) . . . .65 Menu Transparency Level 67 Setting the Function Help 68 Setting the DVI Standard 69 Electronic Program Guide 70 Using the Electronic Program Guide 71 Viewing Information about a Single Channel 72 Viewing Information about Channels 73 Reminder List...
User Manual (user Manual) (English)
Page 11
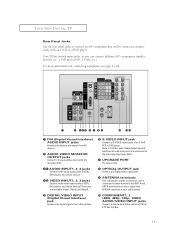
... Connect to the side audio input jacks (AV1). ∏ UPGRADE PORT For service only. For more information on connecting equipment, see page 14~24. Œ DVI (Digital Visual Interface) AUDIO INPUT jacks Receives the digital audio signals from AV devices. ´ AUDIO-VIDEO MONITOR OUTPUT jacks Connect to the audio/video...
... Connect to the side audio input jacks (AV1). ∏ UPGRADE PORT For service only. For more information on connecting equipment, see page 14~24. Œ DVI (Digital Visual Interface) AUDIO INPUT jacks Receives the digital audio signals from AV devices. ´ AUDIO-VIDEO MONITOR OUTPUT jacks Connect to the audio/video...
User Manual (user Manual) (English)
Page 12
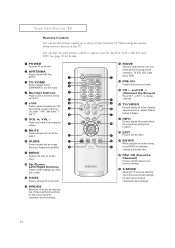
... TV. You can use your remote control to operate your Set-Top Box, VCR, Cable Box and DVD. Press to switch the TV, COMPONENT1, 2 or DVI mode. ¨ Number buttons Press to select channels directly on -screen menus, press ENTER to activate(or change channels. ı TV/VIDEO Press to display... use the remote control up , down, left, or right. Ô P.SIZE Press to change the screen size. P.MODE Adjust the TV picture by the Samsung remote control(i.e., TV, STB, VCR, Cable box or DVD). Ú PRE-CH Tunes to the previous channel. Æ CH and CH (Channel Up/Down) Press...
... TV. You can use your remote control to operate your Set-Top Box, VCR, Cable Box and DVD. Press to switch the TV, COMPONENT1, 2 or DVI mode. ¨ Number buttons Press to select channels directly on -screen menus, press ENTER to activate(or change channels. ı TV/VIDEO Press to display... use the remote control up , down, left, or right. Ô P.SIZE Press to change the screen size. P.MODE Adjust the TV picture by the Samsung remote control(i.e., TV, STB, VCR, Cable box or DVD). Ú PRE-CH Tunes to the previous channel. Æ CH and CH (Channel Up/Down) Press...
User Manual (user Manual) (English)
Page 22
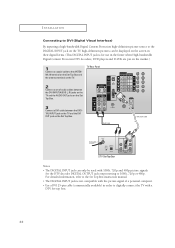
... the market.) 1 Connect a coaxial cable to the ANTENNA IN terminal on the Set-Top Box and the antenna terminal on the TV. INSTALLATION Connecting to DVI (Digital Visual Interface) By inputting a high-bandwidth Digital Content Protection high-definition picture source to the DIGITAL INPUT jack on the TV, high-definition pictures...(AUDIO L, R) jacks on the TV and the AUDIO OUT jacks on the Set Top Box. 3 Connect a DVI cable between the DIGITAL INPUT jack on the TV and the DVI OUT jack on the Set Top Box. Notes • The DIGITAL INPUT jack can be used with a DTV Set-top box. 22 TV...
... the market.) 1 Connect a coaxial cable to the ANTENNA IN terminal on the Set-Top Box and the antenna terminal on the TV. INSTALLATION Connecting to DVI (Digital Visual Interface) By inputting a high-bandwidth Digital Content Protection high-definition picture source to the DIGITAL INPUT jack on the TV, high-definition pictures...(AUDIO L, R) jacks on the TV and the AUDIO OUT jacks on the Set Top Box. 3 Connect a DVI cable between the DIGITAL INPUT jack on the TV and the DVI OUT jack on the Set Top Box. Notes • The DIGITAL INPUT jack can be used with a DTV Set-top box. 22 TV...
User Manual (user Manual) (English)
Page 27
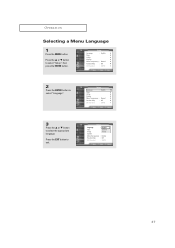
...to select the appropriate language. or † button to select "Language". T V Setup Language Time V-Chip Caption Menu Transparency Function Help DVI Standard : English Spanish French : Normal : Off : SMPTE 27 T V Setup Language : English √ Time √ V-Chip... √ Caption √ Menu Transparency : Normal √ Function Help : Off √ DVI Standard : SMPTE √ 2 Press the ENTER button to select "Setup", then press the ENTER button. T V Setup Language : English √ Time...
...to select the appropriate language. or † button to select "Language". T V Setup Language Time V-Chip Caption Menu Transparency Function Help DVI Standard : English Spanish French : Normal : Off : SMPTE 27 T V Setup Language : English √ Time √ V-Chip... √ Caption √ Menu Transparency : Normal √ Function Help : Off √ DVI Standard : SMPTE √ 2 Press the ENTER button to select "Setup", then press the ENTER button. T V Setup Language : English √ Time...
User Manual (user Manual) (English)
Page 40
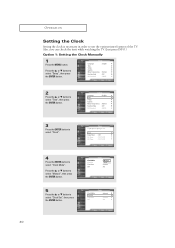
... Setup Language : English √ Time √ V-Chip √ Caption √ Menu Transparency : Normal √ Function Help : Off √ DVI Standard : SMPTE √ 2 Press the ... T V Setup Language : English √ Time √ V-Chip √ Caption √ Menu Transparency : Normal... √ Function Help : Off √ DVI Standard : SMPTE √ 3 Press the ENTER button to select "Clock Set", then press the ENTER button. T V Clock Clock Mode ...
... Setup Language : English √ Time √ V-Chip √ Caption √ Menu Transparency : Normal √ Function Help : Off √ DVI Standard : SMPTE √ 2 Press the ... T V Setup Language : English √ Time √ V-Chip √ Caption √ Menu Transparency : Normal... √ Function Help : Off √ DVI Standard : SMPTE √ 3 Press the ENTER button to select "Clock Set", then press the ENTER button. T V Clock Clock Mode ...
User Manual (user Manual) (English)
Page 42
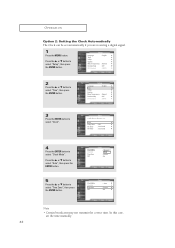
... ... Setup Language : English √ Time √ V-Chip √ Caption √ Menu Transparency : Normal √ Function Help : Off √ DVI Standard : SMPTE √ 2 Press the ... or † button to select "Setup", then press the ENTER button. or † button to select ...: English √ Time √ V-Chip √ Caption √ Menu Transparency : Normal √ Function Help : Off √ DVI Standard : SMPTE √ 3 Press the ENTER button to select "Time", then press the ENTER button. In this case, set automatically if...
... ... Setup Language : English √ Time √ V-Chip √ Caption √ Menu Transparency : Normal √ Function Help : Off √ DVI Standard : SMPTE √ 2 Press the ... or † button to select "Setup", then press the ENTER button. or † button to select ...: English √ Time √ V-Chip √ Caption √ Menu Transparency : Normal √ Function Help : Off √ DVI Standard : SMPTE √ 3 Press the ENTER button to select "Time", then press the ENTER button. In this case, set automatically if...
User Manual (user Manual) (English)
Page 44
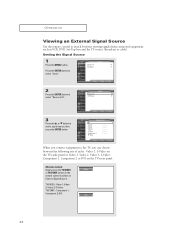
... T V Input Source List √ Edit Name √ 3 Press the ... TV/COMP. : Component 1, Component 2, DVI. Setting the Signal Source 1 Press the MENU button. or † button to select signal source, then press the ENTER button T V Source List TV Video1 Video2 ... ENTER button to switch between the following sets of jacks : Video 1, S-Video on the TV's side panel or Video 1, Video 2, Video 3, S-Video, Component 1, Component 2 or DVI on the TV's rear panel. Press the ENTER button to select "Input". TV/VIDEO : Video 1, Video 2, Video 3, S-Video.
... T V Input Source List √ Edit Name √ 3 Press the ... TV/COMP. : Component 1, Component 2, DVI. Setting the Signal Source 1 Press the MENU button. or † button to select signal source, then press the ENTER button T V Source List TV Video1 Video2 ... ENTER button to switch between the following sets of jacks : Video 1, S-Video on the TV's side panel or Video 1, Video 2, Video 3, S-Video, Component 1, Component 2 or DVI on the TV's rear panel. Press the ENTER button to select "Input". TV/VIDEO : Video 1, Video 2, Video 3, S-Video.

User Manual (user Manual) (English)
Page 45
...V Input Source List √ Edit Name √ 3 Press the ENTER button. Set other signal sources (Video2, Video3, S-Video, Component1, Component2, DVI) using the same method as listed above. Press the EXIT button to select "Input". T V Input Source List √ Edit Name √ 2 ..., AV Receiver, DVD Receiver, GAME, Camcorder, Combo, PC, VOD STB, TV. T V Edit Name Video1 Video2 Video3 S-Video Component 1 Component 2 DVI V-CR- : -D-VD- : -D--V-HS- OPERATION Assigning Names to External sources This feature enables you to name the input source you have connected. 1 Press...
...V Input Source List √ Edit Name √ 3 Press the ENTER button. Set other signal sources (Video2, Video3, S-Video, Component1, Component2, DVI) using the same method as listed above. Press the EXIT button to select "Input". T V Input Source List √ Edit Name √ 2 ..., AV Receiver, DVD Receiver, GAME, Camcorder, Combo, PC, VOD STB, TV. T V Edit Name Video1 Video2 Video3 S-Video Component 1 Component 2 DVI V-CR- : -D-VD- : -D--V-HS- OPERATION Assigning Names to External sources This feature enables you to name the input source you have connected. 1 Press...
User Manual (user Manual) (English)
Page 57
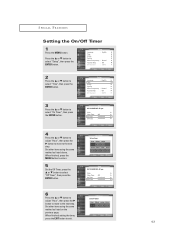
...Setup Language : English √ Time √ V-Chip √ Caption √ Menu Transparency : Normal √ Function Help : Off √ DVI Standard : SMPTE √ 2 Press the ... or † button to adjust "Hour", then press the √ button to move to the ...T V Setup Language : English √ Time √ V-Chip √ Caption √ Menu Transparency : Normal √ Function Help : Off √ DVI Standard : SMPTE √ 3 Press the ... SPECIAL FEATURES Setting the On/Off Timer 1 Press the MENU button. or † button to T V adjust...
...Setup Language : English √ Time √ V-Chip √ Caption √ Menu Transparency : Normal √ Function Help : Off √ DVI Standard : SMPTE √ 2 Press the ... or † button to adjust "Hour", then press the √ button to move to the ...T V Setup Language : English √ Time √ V-Chip √ Caption √ Menu Transparency : Normal √ Function Help : Off √ DVI Standard : SMPTE √ 3 Press the ... SPECIAL FEATURES Setting the On/Off Timer 1 Press the MENU button. or † button to T V adjust...
User Manual (user Manual) (English)
Page 58
... V Setup Language : English √ Time √ V-Chip √ Caption √ Menu Transparency : Normal √ Function Help : Off √ DVI Standard : SMPTE √ 2 Press the ... or † button to the next step. or † button to adjust to the minute you want...T V Setup Language : English √ Time √ V-Chip √ Caption √ Menu Transparency : Normal √ Function Help : Off √ DVI Standard : SMPTE √ 3 Press the ... Press the EXIT button to select "Yes", then press the ENTER button. or † button to exit....
... V Setup Language : English √ Time √ V-Chip √ Caption √ Menu Transparency : Normal √ Function Help : Off √ DVI Standard : SMPTE √ 2 Press the ... or † button to the next step. or † button to adjust to the minute you want...T V Setup Language : English √ Time √ V-Chip √ Caption √ Menu Transparency : Normal √ Function Help : Off √ DVI Standard : SMPTE √ 3 Press the ... Press the EXIT button to select "Yes", then press the ENTER button. or † button to exit....
User Manual (user Manual) (English)
Page 59
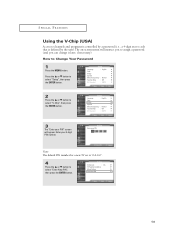
...Setup Language : English √ Time √ V-Chip √ Caption √ Menu Transparency : Normal √ Function Help : Off √ DVI Standard : SMPTE √ 3 The "Enter your PIN" screen will instruct you to assign a password (and you can change it later, if necessary... V Setup Language : English √ Time √ V-Chip √ Caption √ Menu Transparency : Normal √ Function Help : Off √ DVI Standard : SMPTE √ 2 Press the ... Press the ... or † button to select "Setup", then press the ENTER button. or † ...
...Setup Language : English √ Time √ V-Chip √ Caption √ Menu Transparency : Normal √ Function Help : Off √ DVI Standard : SMPTE √ 3 The "Enter your PIN" screen will instruct you to assign a password (and you can change it later, if necessary... V Setup Language : English √ Time √ V-Chip √ Caption √ Menu Transparency : Normal √ Function Help : Off √ DVI Standard : SMPTE √ 2 Press the ... Press the ... or † button to select "Setup", then press the ENTER button. or † ...
User Manual (user Manual) (English)
Page 61
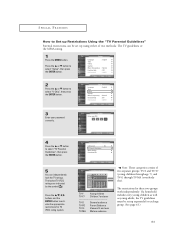
...T V Setup Language : English √ Time √ V-Chip √ Caption √ Menu Transparency : Normal √ Function Help : Off √ DVI Standard : SMPTE √ 2 Press the ... or † button to select "Setup", then press the ENTER button. T V Setup Language : English ...√ Time √ V-Chip √ Caption √ Menu Transparency : Normal √ Function Help : Off √ DVI Standard : SMPTE √ 3 Enter your PIN *** 4 Press the ... The locked TV (FCC) ratings are indicated by the symbol( ). ...
...T V Setup Language : English √ Time √ V-Chip √ Caption √ Menu Transparency : Normal √ Function Help : Off √ DVI Standard : SMPTE √ 2 Press the ... or † button to select "Setup", then press the ENTER button. T V Setup Language : English ...√ Time √ V-Chip √ Caption √ Menu Transparency : Normal √ Function Help : Off √ DVI Standard : SMPTE √ 3 Enter your PIN *** 4 Press the ... The locked TV (FCC) ratings are indicated by the symbol( ). ...

User Manual (user Manual) (English)
Page 62
T V Setup Language : English √ Time √ V-Chip √ Caption √ Menu Transparency : Normal √ Function Help : Off √ DVI Standard : SMPTE √ 2 Press the ... or † button to select "Setup", then press the ENTER button. The locked Movie ratings are coded with objectionable ratings (...
T V Setup Language : English √ Time √ V-Chip √ Caption √ Menu Transparency : Normal √ Function Help : Off √ DVI Standard : SMPTE √ 2 Press the ... or † button to select "Setup", then press the ENTER button. The locked Movie ratings are coded with objectionable ratings (...
User Manual (user Manual) (English)
Page 64
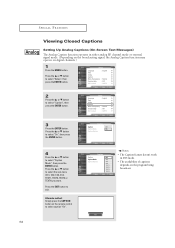
...Setup Language : English √ Time √ V-Chip √ Caption √ Menu Transparency : Normal √ Function Help : Off √ DVI Standard : SMPTE √ 2 Press the ... Press the ... T V Caption Caption Caption Mode Caption Options : OCnC1 : CCCC12 CC3 CC4 TEXT1... : English √ Time √ V-Chip √ Caption √ Menu Transparency : Normal √ Function Help : Off √ DVI Standard : SMPTE √ 3 Press the ENTER button. Press the ... or † button to select caption "On". or † button...
...Setup Language : English √ Time √ V-Chip √ Caption √ Menu Transparency : Normal √ Function Help : Off √ DVI Standard : SMPTE √ 2 Press the ... Press the ... T V Caption Caption Caption Mode Caption Options : OCnC1 : CCCC12 CC3 CC4 TEXT1... : English √ Time √ V-Chip √ Caption √ Menu Transparency : Normal √ Function Help : Off √ DVI Standard : SMPTE √ 3 Press the ENTER button. Press the ... or † button to select caption "On". or † button...
User Manual (user Manual) (English)
Page 65
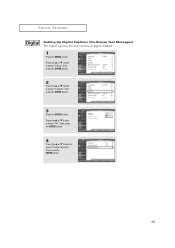
... : SMPTE √ 2 Press the ... T V Setup Language : English √ Time √ V-Chip √ Caption √ Menu Transparency : Normal √ Function Help : Off √ DVI Standard : SMPTE √ 3 Press the ENTER button. T V Caption Caption Caption Mode Caption Options : On √ : CC1 √ √ 65 SPECIAL FEATURES Digital Setting Up Digital ...
... : SMPTE √ 2 Press the ... T V Setup Language : English √ Time √ V-Chip √ Caption √ Menu Transparency : Normal √ Function Help : Off √ DVI Standard : SMPTE √ 3 Press the ENTER button. T V Caption Caption Caption Mode Caption Options : On √ : CC1 √ √ 65 SPECIAL FEATURES Digital Setting Up Digital ...
User Manual (user Manual) (English)
Page 67
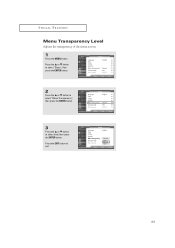
... Setup Language : English √ Time √ V-Chip √ Caption √ Menu Transparency : Normal √ Function Help : Off √ DVI Standard : SMPTE √ 2 Press the ... T V Setup Language : English √ Time √ V-Chip √ Caption √ Menu Transparency : Normal... to select "Menu Transparency", then press the ENTER button. T V Setup Language Time V-Chip Caption Menu Transparency Function Help DVI Standard : English : NOorpmaaqlue : OLfof w : SNHMioPgrThmE al 67 Press the ... SPECIAL FEATURES Menu Transparency Level Adjusts the ...
... Setup Language : English √ Time √ V-Chip √ Caption √ Menu Transparency : Normal √ Function Help : Off √ DVI Standard : SMPTE √ 2 Press the ... T V Setup Language : English √ Time √ V-Chip √ Caption √ Menu Transparency : Normal... to select "Menu Transparency", then press the ENTER button. T V Setup Language Time V-Chip Caption Menu Transparency Function Help DVI Standard : English : NOorpmaaqlue : OLfof w : SNHMioPgrThmE al 67 Press the ... SPECIAL FEATURES Menu Transparency Level Adjusts the ...

User Manual (user Manual) (English)
Page 68
...English √ Time √ V-Chip √ Caption √ Menu Transparency : Normal √ Function Help : Off √ DVI Standard : SMPTE √ 3 Press the ... or † button to select "On, then press the ENTER button Press the ...V-Chip √ Caption √ Menu Transparency : Normal √ Function Help : Off √ DVI Standard : SMPTE √ 2 Press the ... Press the ... T V Setup Language Time V-Chip Caption Menu Transparency Function Help DVI Standard : English : Normal : OOfff : SOMnPTE Activates Help functions for menu items. 68 or ...
...English √ Time √ V-Chip √ Caption √ Menu Transparency : Normal √ Function Help : Off √ DVI Standard : SMPTE √ 3 Press the ... or † button to select "On, then press the ENTER button Press the ...V-Chip √ Caption √ Menu Transparency : Normal √ Function Help : Off √ DVI Standard : SMPTE √ 2 Press the ... Press the ... T V Setup Language Time V-Chip Caption Menu Transparency Function Help DVI Standard : English : Normal : OOfff : SOMnPTE Activates Help functions for menu items. 68 or ...
User Manual (user Manual) (English)
Page 69
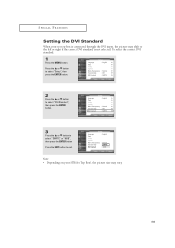
... English √ Time √ V-Chip √ Caption √ Menu Transparency : Normal √ Function Help : Off √ DVI Standard : SMPTE √ 3 Press the ... SPECIAL FEATURES Setting the DVI Standard When your STB(Set Top Box), the picture size may shift to select "Setup", then press the ENTER button. or... † button to the left or right if the correct DVI standard is connected through the DVI input, the picture may vary. 69 To select the correct DVI standard. 1 Press the MENU button. or † button to exit. T V Setup ...
... English √ Time √ V-Chip √ Caption √ Menu Transparency : Normal √ Function Help : Off √ DVI Standard : SMPTE √ 3 Press the ... SPECIAL FEATURES Setting the DVI Standard When your STB(Set Top Box), the picture size may shift to select "Setup", then press the ENTER button. or... † button to the left or right if the correct DVI standard is connected through the DVI input, the picture may vary. 69 To select the correct DVI standard. 1 Press the MENU button. or † button to exit. T V Setup ...
