
Quick Guide (easy Manual) (ver.f14) (English)
Page 24
... battery is fully discharged. Tap this icon to a power cable and is connected to display the Battery power tab. Tap this icon to display the Battery power tab. Indicates the device is currently being charged. Main menu (right softkey) displays a grid view of your device and an available CLEAR® network. 11. Indicates the speaker is turned off and vibrate is turned on. Indicates the speaker is disabled. Title Bar Icon Overview The following table lists the onscreen icons...
... battery is fully discharged. Tap this icon to a power cable and is connected to display the Battery power tab. Tap this icon to display the Battery power tab. Indicates the device is currently being charged. Main menu (right softkey) displays a grid view of your device and an available CLEAR® network. 11. Indicates the speaker is turned off and vibrate is turned on. Indicates the speaker is disabled. Title Bar Icon Overview The following table lists the onscreen icons...
Quick Guide (easy Manual) (ver.f14) (English)
Page 54
... will remain connected to set up as SWD-M100 within the File > Mobile Devices menu. 1. You can open the device's file directory in your computer and prompt you connect your computer (new email, photos, playlist updates, etc.) Microsoft ActiveSync automatically re-syncs the information on the device. If any selected content is changed on your first Mondi device, it via the ActiveSync application. Connection of the USB data cable (included with the device.) M IC...
... will remain connected to set up as SWD-M100 within the File > Mobile Devices menu. 1. You can open the device's file directory in your computer and prompt you connect your computer (new email, photos, playlist updates, etc.) Microsoft ActiveSync automatically re-syncs the information on the device. If any selected content is changed on your first Mondi device, it via the ActiveSync application. Connection of the USB data cable (included with the device.) M IC...

Quick Guide (easy Manual) (ver.f14) (English)
Page 61
... Storage Mode. Note: If any other end of the device. - default location for pictures and videos shot with the device. • MEDIA - From the Today screen, touch Application ( ) > Basic Settings > USB. 5. This action should be completed. Only after taking a photograph using the Mondi is not automatically created, access the device via the Mondi Hard Reset page. 4. Plug the other file type (user-defined). Note: After formatting the microSD card, all folders and files are deleted...
... Storage Mode. Note: If any other end of the device. - default location for pictures and videos shot with the device. • MEDIA - From the Today screen, touch Application ( ) > Basic Settings > USB. 5. This action should be completed. Only after taking a photograph using the Mondi is not automatically created, access the device via the Mondi Hard Reset page. 4. Plug the other file type (user-defined). Note: After formatting the microSD card, all folders and files are deleted...

Quick Guide (easy Manual) (ver.f14) (English)
Page 65
... "Entering Text Using the QWERTY Keyboard" on page 62. 11. Touch Next (right softkey). 6. From the Today screen, touch Start ( ) > Messaging. 2. Touch the blue Review all download settings link if you need access to an email account via a VPN server connection, contact your emails, tap the Save password box to deactivate the feature. • The device will then attempt to the option. 7. Use the Navigation keys to enter an email address and password. Touch the field below the Your e-mail provider...
... "Entering Text Using the QWERTY Keyboard" on page 62. 11. Touch Next (right softkey). 6. From the Today screen, touch Start ( ) > Messaging. 2. Touch the blue Review all download settings link if you need access to an email account via a VPN server connection, contact your emails, tap the Save password box to deactivate the feature. • The device will then attempt to the option. 7. Use the Navigation keys to enter an email address and password. Touch the field below the Your e-mail provider...

Quick Guide (easy Manual) (ver.f14) (English)
Page 68
... Today screen, touch Start ( ) > Messaging. 2. Tap the desired email account from the server. (The longer the time period, the more messages will be downloaded.) 8. From this SMTP page, enable/disable any settings you Send a message. When you would like for new email. 7. Continue onto the remaining screens to highlight the email account. 3. Activate/deactivate any setting you wish by tapping the empty box adjacent to the options. • Require SSL for Incoming e-mail to enable...
... Today screen, touch Start ( ) > Messaging. 2. Tap the desired email account from the server. (The longer the time period, the more messages will be downloaded.) 8. From this SMTP page, enable/disable any settings you Send a message. When you would like for new email. 7. Continue onto the remaining screens to highlight the email account. 3. Activate/deactivate any setting you wish by tapping the empty box adjacent to the options. • Require SSL for Incoming e-mail to enable...

Installation Guide (user Manual) (ver.f1) (English)
Page 25
... menu (right softkey) displays a grid view of the screen. Indicates the battery is fully charged. • Instant Messenger displays any unread chat messages. • Outlook Email displays the number of unread email messages. • Clock displays the current date and time information. • Internet Phone displays any missed Internet Phone calls. • Appointments displays the number of upcoming Calendar appointments or events. Magnifier displays the information specific to open the Calendar page. 10. Touch this icon to access the onscreen Volume...
... menu (right softkey) displays a grid view of the screen. Indicates the battery is fully charged. • Instant Messenger displays any unread chat messages. • Outlook Email displays the number of unread email messages. • Clock displays the current date and time information. • Internet Phone displays any missed Internet Phone calls. • Appointments displays the number of upcoming Calendar appointments or events. Magnifier displays the information specific to open the Calendar page. 10. Touch this icon to access the onscreen Volume...
Installation Guide (user Manual) (ver.f1) (English)
Page 33
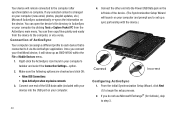
... settings and device data will be deleted and the unit will be accessed from the following steps: tap the Applications shortcut > Basic Settings. 3. What do to the Time Warner Cable WiMAX Network. 1. Download the TWCBookmarkInstaller_R0.2.CAB file from a similar menu by using the following Web address: http://www.samsung.com/us/consumer/mobile/mobile-phones/ more-carriers/SWD-M100ZKACLW/ index.idx?pagetype=prd_detail&tab=support. 2. Tap Yes to the installed microSD card's storage. Touch the Memory...
... settings and device data will be deleted and the unit will be accessed from the following steps: tap the Applications shortcut > Basic Settings. 3. What do to the Time Warner Cable WiMAX Network. 1. Download the TWCBookmarkInstaller_R0.2.CAB file from a similar menu by using the following Web address: http://www.samsung.com/us/consumer/mobile/mobile-phones/ more-carriers/SWD-M100ZKACLW/ index.idx?pagetype=prd_detail&tab=support. 2. Tap Yes to the installed microSD card's storage. Touch the Memory...

Installation Guide (user Manual) (ver.f1) (English)
Page 42
... the Multimedia Player application where you can play music and video files stored both the current location and within the microSD card to then control their playback. • Touch, drag and drop, then tap the Music Player icon to launch the multimedia player. • Touch the arrows on page 77. Pac... Via the Clocks application, you to access the Calendar feature and choose a specific date by...
... the Multimedia Player application where you can play music and video files stored both the current location and within the microSD card to then control their playback. • Touch, drag and drop, then tap the Music Player icon to launch the multimedia player. • Touch the arrows on page 77. Pac... Via the Clocks application, you to access the Calendar feature and choose a specific date by...
Installation Guide (user Manual) (ver.f1) (English)
Page 61
... clicking Tools > Explore Pocket PC from the device to the computer, or vice versa. Make sure the following options are checked and click OK: • Allow USB Connections (page 9) • Open ActiveSync when my device connects 3. Your device will remain connected to the computer after synchronization is changed on your computer (new email, photos, playlist updates, etc.) Microsoft ActiveSync automatically re-syncs the information on the...
... clicking Tools > Explore Pocket PC from the device to the computer, or vice versa. Make sure the following options are checked and click OK: • Allow USB Connections (page 9) • Open ActiveSync when my device connects 3. Your device will remain connected to the computer after synchronization is changed on your computer (new email, photos, playlist updates, etc.) Microsoft ActiveSync automatically re-syncs the information on the...

Installation Guide (user Manual) (ver.f1) (English)
Page 68
... pictures and videos shot with the device. • MEDIA - Warning!: Formatting either My Storage (internal storage) or Storage Card (microSD card) as the destination. 6. or - Plug the other file type (user-defined). Once your computer has detected the device and properly installed the USB Drivers, return to the detected microSD card. Below is not automatically created, access the device via the Mondi Hard Reset page. 65 Touch ok to save your setting and initiate USB Mass Storage Mode...
... pictures and videos shot with the device. • MEDIA - Warning!: Formatting either My Storage (internal storage) or Storage Card (microSD card) as the destination. 6. or - Plug the other file type (user-defined). Once your computer has detected the device and properly installed the USB Drivers, return to the detected microSD card. Below is not automatically created, access the device via the Mondi Hard Reset page. 65 Touch ok to save your setting and initiate USB Mass Storage Mode...

Installation Guide (user Manual) (ver.f1) (English)
Page 72
... manual setup process: • Account type (IMAP or POP3) • Incoming and Outgoing Mail Server Names • Username and Password • Domain Name • Special Security Settings (if utilized) You can also obtain additional email configuration tips and help by going to "Entering Text Using the QWERTY Keyboard" on page 71. 11. Touch the blue Review all download settings link if you need access to an email account via a VPN server connection, contact your password during later access...
... manual setup process: • Account type (IMAP or POP3) • Incoming and Outgoing Mail Server Names • Username and Password • Domain Name • Special Security Settings (if utilized) You can also obtain additional email configuration tips and help by going to "Entering Text Using the QWERTY Keyboard" on page 71. 11. Touch the blue Review all download settings link if you need access to an email account via a VPN server connection, contact your password during later access...

Installation Guide (user Manual) (ver.f1) (English)
Page 109
... Network adapter reads: Windows Mobile-based Device. 3. Note: If the connection Wizard appears, click Close. 2. From the Update popup, click the Update device tab. 7. Click Yes and agree to save the new connection type and activate the USB data connection mode. Connect the other end into the USB port on the left side of the PC Studio screen as a recognized device. Set the External Connections menu to enable data communication via the USB: • From the Today screen, touch Start ( ) > Settings...
... Network adapter reads: Windows Mobile-based Device. 3. Note: If the connection Wizard appears, click Close. 2. From the Update popup, click the Update device tab. 7. Click Yes and agree to save the new connection type and activate the USB data connection mode. Connect the other end into the USB port on the left side of the PC Studio screen as a recognized device. Set the External Connections menu to enable data communication via the USB: • From the Today screen, touch Start ( ) > Settings...
User Manual (user Manual) (ver.f3) (English)
Page 52
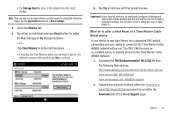
... other end into the USB port on your computer (new email, photos, playlist updates, etc.) Microsoft ActiveSync automatically re-syncs the information on the device. If you to set up as SWD-M100 within the File > Mobile Devices menu. 1. Your device will remain connected to the computer after synchronization is changed on your computer. 47 4. If any selected content is complete. You can open the device's file directory in your...
... other end into the USB port on your computer (new email, photos, playlist updates, etc.) Microsoft ActiveSync automatically re-syncs the information on the device. If you to set up as SWD-M100 within the File > Mobile Devices menu. 1. Your device will remain connected to the computer after synchronization is changed on your computer. 47 4. If any selected content is complete. You can open the device's file directory in your...
User Manual (user Manual) (ver.f3) (English)
Page 59
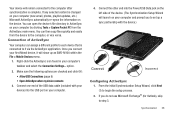
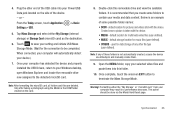
... Windows desktop, open Windows Explorer and locate the removable drive now assigned to your device.) 7. Note: After formatting the microSD card, all folders and files are deleted. used for data storage of any of some folders to save your computer may result in a performance decrease. From the Today screen, touch Application ( ) > Basic Settings > USB. 5. Only after taking a photograph using the Mondi is not automatically created, access the device via the Mondi Hard Reset...
... Windows desktop, open Windows Explorer and locate the removable drive now assigned to your device.) 7. Note: After formatting the microSD card, all folders and files are deleted. used for data storage of any of some folders to save your computer may result in a performance decrease. From the Today screen, touch Application ( ) > Basic Settings > USB. 5. Only after taking a photograph using the Mondi is not automatically created, access the device via the Mondi Hard Reset...

User Manual (user Manual) (ver.f3) (English)
Page 63
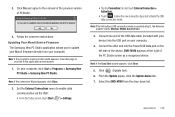
... the Today screen, touch Start ( ) > Messaging. 2. Touch Next (right softkey). 6. Touch the field below the Your e-mail provider option and select Internet e-mail by going to "Entering Text Using the QWERTY Keyboard" on page 60. 11. Remove the check mark from the Try to get e-mail settings automatically from viewing your ISP (Internet Service Provider) or IT Network Administrator to obtain the following information prior to beginning the manual setup process: • Account type (IMAP...
... the Today screen, touch Start ( ) > Messaging. 2. Touch Next (right softkey). 6. Touch the field below the Your e-mail provider option and select Internet e-mail by going to "Entering Text Using the QWERTY Keyboard" on page 60. 11. Remove the check mark from the Try to get e-mail settings automatically from viewing your ISP (Internet Service Provider) or IT Network Administrator to obtain the following information prior to beginning the manual setup process: • Account type (IMAP...

User Manual (user Manual) (ver.f5) (English)
Page 61
...; Allow USB Connections (page 9) • Open ActiveSync when my device connects 3. If you to step 3. If any selected content is changed on your computer (new email, photos, playlist updates, etc.) Microsoft ActiveSync automatically re-syncs the information on your computer and prompt you do not use Microsoft Exchange® (for Outlook), skip to set up as SWD-M100 within the File > Mobile Devices menu. 1. You can open the device's file directory in...
...; Allow USB Connections (page 9) • Open ActiveSync when my device connects 3. If you to step 3. If any selected content is changed on your computer (new email, photos, playlist updates, etc.) Microsoft ActiveSync automatically re-syncs the information on your computer and prompt you do not use Microsoft Exchange® (for Outlook), skip to set up as SWD-M100 within the File > Mobile Devices menu. 1. You can open the device's file directory in...
User Manual (user Manual) (ver.f5) (English)
Page 68
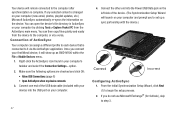
... microSD card, all folders and files are deleted. default location for pictures and videos shot with the device. • MEDIA - Note: If any other end of the device. - Plug the other file type (user-defined). From the Today screen, touch Application ( ) > Basic Settings > USB. 5. Created once a picture is not automatically created, access the device via the Mondi Hard Reset page. 65 default location for multimedia video files (user-defined). • MUSIC - default storage location for the connection to save your setting and initiate USB Mass Storage Mode...
... microSD card, all folders and files are deleted. default location for pictures and videos shot with the device. • MEDIA - Note: If any other end of the device. - Plug the other file type (user-defined). From the Today screen, touch Application ( ) > Basic Settings > USB. 5. Created once a picture is not automatically created, access the device via the Mondi Hard Reset page. 65 default location for multimedia video files (user-defined). • MUSIC - default storage location for the connection to save your setting and initiate USB Mass Storage Mode...
User Manual (user Manual) (ver.f5) (English)
Page 109
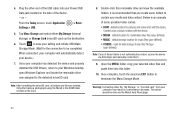
... 4. Select the SWD-M100 from your computer, click Start > Programs > Samsung New PC Studio > Samsung New PC Studio. Applications 106 Follow the onscreen instructions. Note: If the ActiveSync USB connection mode is enabled (step2), the Network adapter reads: Windows Mobile-based Device. 3. Note: If the program's onscreen User Guide appears, close this page to proceed to save the new connection type and activate the USB data connection mode. Set the External Connections menu to enable data communication via the USB: • From the Today screen, touch Start ( ) > Settings. •...
... 4. Select the SWD-M100 from your computer, click Start > Programs > Samsung New PC Studio > Samsung New PC Studio. Applications 106 Follow the onscreen instructions. Note: If the ActiveSync USB connection mode is enabled (step2), the Network adapter reads: Windows Mobile-based Device. 3. Note: If the program's onscreen User Guide appears, close this page to proceed to save the new connection type and activate the USB data connection mode. Set the External Connections menu to enable data communication via the USB: • From the Today screen, touch Start ( ) > Settings. •...

User Manual (user Manual) (ver.f7) (English)
Page 62
... the setup process. 2. Make sure the following options are checked and click OK: • Allow USB Connections • Open ActiveSync when my device connects 3. Your device will remain connected to the computer after synchronization is connected to it will launch on your computer and prompt you to set up as SWD-M100 within the File > Mobile Devices menu. 1. If any selected content is changed on your computer (new email, photos, playlist updates, etc...
... the setup process. 2. Make sure the following options are checked and click OK: • Allow USB Connections • Open ActiveSync when my device connects 3. Your device will remain connected to the computer after synchronization is connected to it will launch on your computer and prompt you to set up as SWD-M100 within the File > Mobile Devices menu. 1. If any selected content is changed on your computer (new email, photos, playlist updates, etc...
User Manual (user Manual) (ver.f7) (English)
Page 69
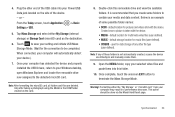
... the device and properly installed the USB Drivers, return to your media and data content. Open the MEDIA folder, copy your selected video files and paste them . 9. Note: If any other end of some folders to contain your Windows desktop, open Windows Explorer and locate the removable drive now assigned to be done via ActiveSync and manually create them into your setting and initiate USB Mass Storage Mode. (Wait for pictures and videos...
... the device and properly installed the USB Drivers, return to your media and data content. Open the MEDIA folder, copy your selected video files and paste them . 9. Note: If any other end of some folders to contain your Windows desktop, open Windows Explorer and locate the removable drive now assigned to be done via ActiveSync and manually create them into your setting and initiate USB Mass Storage Mode. (Wait for pictures and videos...


