Samsung SPH M920 Battery
Related Manual Pages


Similar Questions


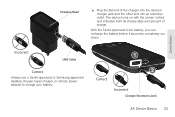
Battery Life
GOOD EVENIN I WAS IN A VERY IMPORTANT SCHOOL RELATED CELL PHONE CONVERSATION AND MY CALL AND PHONE J...
GOOD EVENIN I WAS IN A VERY IMPORTANT SCHOOL RELATED CELL PHONE CONVERSATION AND MY CALL AND PHONE J...
(Posted by susan14suzyq 11 years ago)

Sprint Transform (sph-m920) Battery Charged Notification
My sph-m920 recently started repeating the battery charged notification sound alert or vibrate alert...
My sph-m920 recently started repeating the battery charged notification sound alert or vibrate alert...
(Posted by rbsimcox 12 years ago)