
User Guide
Page 2
... liquid of power source indicated on a bed, sofa, rug or other hazards. Cleaning : Unplug this monitor. - 2 - This monitor should not be placed in a built-in installation such as opening or removing cover may touch dangerous voltage points or short-out parts that produce heat. 11.Power Sources : This monitor should be of sufficient magnitude to constitute a risk of important operating and maintenance (servicing) instructions in the...
... liquid of power source indicated on a bed, sofa, rug or other hazards. Cleaning : Unplug this monitor. - 2 - This monitor should not be placed in a built-in installation such as opening or removing cover may touch dangerous voltage points or short-out parts that produce heat. 11.Power Sources : This monitor should be of sufficient magnitude to constitute a risk of important operating and maintenance (servicing) instructions in the...
User Guide
Page 3
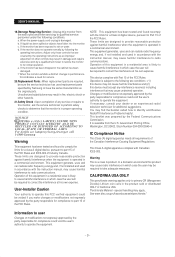
a. When the monitor exhibits a distinct change in proper operating condition. Unauthorized substitutions may result in fire, electric shock or other controls may cause radio interference in damage and require extensive work by the operating instructions as the original parts. This equipment generate, uses and can radiate radio frequency energy and, if not installed and used in accordance with the instruction manual, may cause...
a. When the monitor exhibits a distinct change in proper operating condition. Unauthorized substitutions may result in fire, electric shock or other controls may cause radio interference in damage and require extensive work by the operating instructions as the original parts. This equipment generate, uses and can radiate radio frequency energy and, if not installed and used in accordance with the instruction manual, may cause...
User Guide
Page 4
USER'S MANUAL Contents Important Safety Instructions 2 Unpacking 5 Viewing the Control Panels 5 Front View...5 Rear & Left Side View...6 Remote Controller 7 Connecting to External Devices 8 OSD Menu Configurations 9 No Signal Display...9 OSD Menu Selection ...9 Picture Menu ...9 Sound Menu...11 Setup Menu ...12 Input Menu ...16 Specifications 17 - 4 -
USER'S MANUAL Contents Important Safety Instructions 2 Unpacking 5 Viewing the Control Panels 5 Front View...5 Rear & Left Side View...6 Remote Controller 7 Connecting to External Devices 8 OSD Menu Configurations 9 No Signal Display...9 OSD Menu Selection ...9 Picture Menu ...9 Sound Menu...11 Setup Menu ...12 Input Menu ...16 Specifications 17 - 4 -
User Guide
Page 5
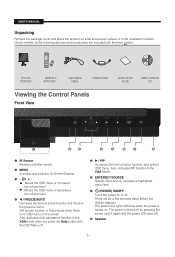
... the previous menu. TFT-LCD MONITOR REMOTE & BATTERIES VGA SIGNAL CABLE POWER CORD QUICK SETUP GUIDE USER'S MANUAL CD Viewing the Control Panels Front View IR Sensor Remote controller sensor. ENTER / SOURCE Selects input source, activates a highlighted menu item. (POWER) ON/OFF Turns the power on . There will be a few seconds delay before the display appears. Still picture function in the VGA mode when you press the Auto button with the main system. Also, Activates PIP function in the installation location. USER'S MANUAL Unpacking Remove the package cover and...
... the previous menu. TFT-LCD MONITOR REMOTE & BATTERIES VGA SIGNAL CABLE POWER CORD QUICK SETUP GUIDE USER'S MANUAL CD Viewing the Control Panels Front View IR Sensor Remote controller sensor. ENTER / SOURCE Selects input source, activates a highlighted menu item. (POWER) ON/OFF Turns the power on . There will be a few seconds delay before the display appears. Still picture function in the VGA mode when you press the Auto button with the main system. Also, Activates PIP function in the installation location. USER'S MANUAL Unpacking Remove the package cover and...
User Guide
Page 6
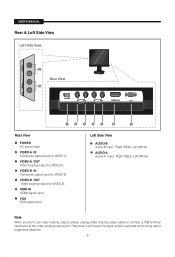
VGA VGA signal input Left Side View AUDIO-B Audio-B input : Right (RED), Left (White) AUDIO-A Audio-A input : Right (RED), Left (White) Note When you don't use video looping output ,please unplug video looping output cable or connect a 75Ω terminal resistance at the video looping output jack .Otherwise,it will cause the signal scope oversized which bring about brightness distortion. - 6 - VIDEO-A OUT Video looping output for VIDEO B. VIDEO-B OUT Video looping output for VIDEO A. HDMI IN HDMI signal input. VIDEO-B IN Composite signal input for VIDEO A. USER'S MANUAL Rear & ...
VGA VGA signal input Left Side View AUDIO-B Audio-B input : Right (RED), Left (White) AUDIO-A Audio-A input : Right (RED), Left (White) Note When you don't use video looping output ,please unplug video looping output cable or connect a 75Ω terminal resistance at the video looping output jack .Otherwise,it will cause the signal scope oversized which bring about brightness distortion. - 6 - VIDEO-A OUT Video looping output for VIDEO B. VIDEO-B OUT Video looping output for VIDEO A. HDMI IN HDMI signal input. VIDEO-B IN Composite signal input for VIDEO A. USER'S MANUAL Rear & ...
User Guide
Page 7
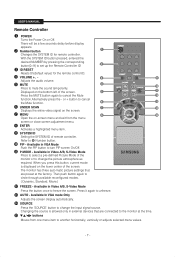
... SYSTEM ID button pressed, entered the desired NUMBER by pressing the corresponding button(0~9) to turn PIP screen On/Off. Available in Video A/B, S-Video Mode Press to change the input signal source. Available in VGA Mode Push the PIP button to set up the Remote Controller ID ID RESET Resets 01(default value) for remote controller. UNDER SCAN Displays the entire video signal on -screen menu and exit from one menu item to the monitor at the factory. PIP - AUTO - USER'S MANUAL Remote Controller POWER Turns the Power On or...
... SYSTEM ID button pressed, entered the desired NUMBER by pressing the corresponding button(0~9) to turn PIP screen On/Off. Available in Video A/B, S-Video Mode Press to change the input signal source. Available in VGA Mode Push the PIP button to set up the Remote Controller ID ID RESET Resets 01(default value) for remote controller. UNDER SCAN Displays the entire video signal on -screen menu and exit from one menu item to the monitor at the factory. PIP - AUTO - USER'S MANUAL Remote Controller POWER Turns the Power On or...
User Guide
Page 8
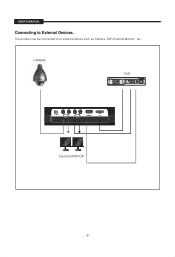
The product can be connected to External Devices. CAMERA DVR HDMI IN External MONITOR - 8 - USER'S MANUAL Connecting to an external device such as Camera, DVR, External Monitor, etc.
The product can be connected to External Devices. CAMERA DVR HDMI IN External MONITOR - 8 - USER'S MANUAL Connecting to an external device such as Camera, DVR, External Monitor, etc.
User Guide
Page 9
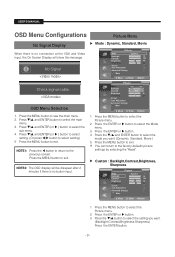
... the MENU button to the factory defaults picture settings by selecting the "Reset". You can return to exit. Custom : Backlight,Contrast,Brightness, Sharpness Picture Mode : Dynamic Backlight 10 Contrast 100 Brightness 45 Sharpness 50 Screen Auto Adjustment Advanced Settings More Move Enter Return 1. Press the ENTER or button. 3. Press the MENU button to select the mode you want . (Dynamic, Standard, Movie ) 5. No Signal Check signal cable. Press the ENTER or button. 4. Press the / and ENTER button to select the Picture menu...
... the MENU button to the factory defaults picture settings by selecting the "Reset". You can return to exit. Custom : Backlight,Contrast,Brightness, Sharpness Picture Mode : Dynamic Backlight 10 Contrast 100 Brightness 45 Sharpness 50 Screen Auto Adjustment Advanced Settings More Move Enter Return 1. Press the ENTER or button. 3. Press the MENU button to select the mode you want . (Dynamic, Standard, Movie ) 5. No Signal Check signal cable. Press the ENTER or button. 4. Press the / and ENTER button to select the Picture menu...
User Guide
Page 10
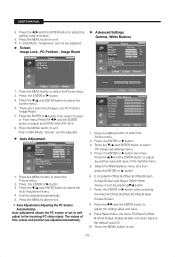
...be adjusted. Press the MENU button to select the Picture menu. 2. Select these menus in VGA Mode, "Screen" can not be adjusted. Press the MENU button to select the Picture menu. 2. Press the MENU button to exit. Press the MENU button to select the Screen menu . 4. The values of set to selfadjust to adjust the setting value and save . 6. USER'S MANUAL 4. Screen Image Lock , PC Position , Image Reset Screen Image Lock PC Position Image Reset Advanced Settings Gamma, White Balance Picture Mode : Dynamic Backlight 10 Contrast 100 Brightness 45 Sharpness 50 Screen Auto...
...be adjusted. Press the MENU button to select the Picture menu. 2. Select these menus in VGA Mode, "Screen" can not be adjusted. Press the MENU button to select the Picture menu. 2. Press the MENU button to exit. Press the MENU button to select the Screen menu . 4. The values of set to selfadjust to adjust the setting value and save . 6. USER'S MANUAL 4. Screen Image Lock , PC Position , Image Reset Screen Image Lock PC Position Image Reset Advanced Settings Gamma, White Balance Picture Mode : Dynamic Backlight 10 Contrast 100 Brightness 45 Sharpness 50 Screen Auto...
User Guide
Page 11
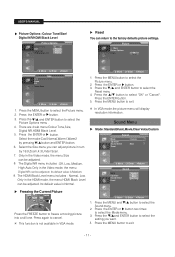
..., High,Auto.Only in turn by pressing / button and ENTER button. 6. Only in the HDMI mode, the menu HDMI Black Level can adjust picture in the Video mode, the menu Digital NR can be adjusted. Move Enter Return 1. Press again to select the Reset menu . 4. Press the ENTER or button. Its default value is not available in the Video mode, the menu Size can return to the factory defaults picture settings. Press the ENTER button. 5. In VGA mode,the picture menu will display resolution information...
..., High,Auto.Only in turn by pressing / button and ENTER button. 6. Only in the HDMI mode, the menu HDMI Black Level can adjust picture in the Video mode, the menu Digital NR can be adjusted. Move Enter Return 1. Press again to select the Reset menu . 4. Press the ENTER or button. Its default value is not available in the Video mode, the menu Size can return to the factory defaults picture settings. Press the ENTER button. 5. In VGA mode,the picture menu will display resolution information...
User Guide
Page 12
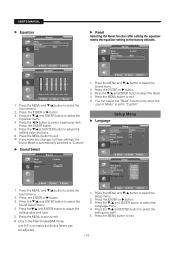
... Return Setup Language Blue Screen Melody Energy Saving PIP System ID No Signal OSD : English : Français : Español : Português ೠҴয : 日本語 Deutsch : Italiano Move Enter Return 1. Move Enter Return 1. Press the / and ENTER button to select the Sound menu. 2. Press the MENU and / button to exit. Press the ENTER button. 5. Only in the VGA mode/HDMI mode, and PIP is set...
... Return Setup Language Blue Screen Melody Energy Saving PIP System ID No Signal OSD : English : Français : Español : Português ೠҴয : 日本語 Deutsch : Italiano Move Enter Return 1. Move Enter Return 1. Press the / and ENTER button to select the Sound menu. 2. Press the MENU and / button to exit. Press the ENTER button. 5. Only in the VGA mode/HDMI mode, and PIP is set...
User Guide
Page 13
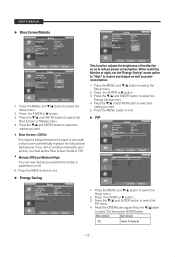
... Enter PIP Source Size Position PIP : Off : Video A : : Return Energy Saving Setup Language Blue Screen Melody Energy Saving PIP System ID No Signal OSD : English : Off : Medium : Off : 1 : On Move Enter Return Enter Return 1. Press the ENTER or button. 3. Setup Language Blue Screen Melody Energy Saving PIP System ID No Signal OSD : English : Off : Medium : Off Low : 0 Medium : On High Move Enter Return This function adjusts the brightness of the Monitor so as power consumption. 1. Press...
... Enter PIP Source Size Position PIP : Off : Video A : : Return Energy Saving Setup Language Blue Screen Melody Energy Saving PIP System ID No Signal OSD : English : Off : Medium : Off : 1 : On Move Enter Return Enter Return 1. Press the ENTER or button. 3. Setup Language Blue Screen Melody Energy Saving PIP System ID No Signal OSD : English : Off : Medium : Off Low : 0 Medium : On High Move Enter Return This function adjusts the brightness of the Monitor so as power consumption. 1. Press...

User Guide
Page 14
... MENU button to select "Source", then press ENTER button. When the control panel window appears, click on the Windows start menu. 2. The correct size setting (resolution): Optimum- 1280 x 1024 If a vertical-frequency option exists on your computer manufacturer or Samsung Dealer.) The interlace mode is not supported. Display Modes Both screen position and size will apply in the table are recommended. (All resolutions between the supported limits are supported.) Note: is selected. The set -up Your PC Software (Based...
... MENU button to select "Source", then press ENTER button. When the control panel window appears, click on the Windows start menu. 2. The correct size setting (resolution): Optimum- 1280 x 1024 If a vertical-frequency option exists on your computer manufacturer or Samsung Dealer.) The interlace mode is not supported. Display Modes Both screen position and size will apply in the table are recommended. (All resolutions between the supported limits are supported.) Note: is selected. The set -up Your PC Software (Based...
User Guide
Page 15
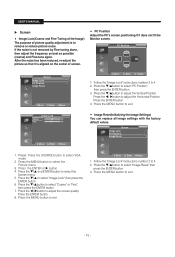
... the "Image Lock" instructions number 2 to select VGA mode. 2. Preset: Press the SOURCE button to 4. 2. Press the / button to exit. • Image Reset(Initializing the Image Settings) You can replace all image settings with the factory default values. Press the MENU button to adjust the screen quality. PC Position Screen Image Lock PC Position Image Reset Move Enter Return Image Lock Coarse 50 Fine 45 Move Enter Return Move Enter Return 1. Screen Image Lock PC Position Image Reset 1. Follow the "Image Lock" instructions number 2 to select "Image Lock",then...
... the "Image Lock" instructions number 2 to select VGA mode. 2. Preset: Press the SOURCE button to 4. 2. Press the / button to exit. • Image Reset(Initializing the Image Settings) You can replace all image settings with the factory default values. Press the MENU button to adjust the screen quality. PC Position Screen Image Lock PC Position Image Reset Move Enter Return Image Lock Coarse 50 Fine 45 Move Enter Return Move Enter Return 1. Screen Image Lock PC Position Image Reset 1. Follow the "Image Lock" instructions number 2 to select "Image Lock",then...
User Guide
Page 16
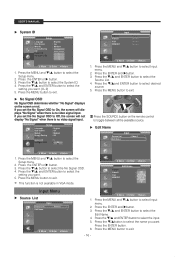
... MENU button to toggle between all the available source. Video A Video B VGA HDMI/DVI Input Move Enter Return 1. No Signal OSD No Signal OSD determines whether "No Signal" displays on the remote control to exit. Setup Language Blue Screen Melody Energy Saving PIP System ID No Signal OSD : English : Off : Medium : Off : 1 : Off On Press the SOURCE button on the screen or not. Press the ENTER or button. 3. Press the / button to select the setting you want .(0~9) 5. Press the ENTER and button...
... MENU button to toggle between all the available source. Video A Video B VGA HDMI/DVI Input Move Enter Return 1. No Signal OSD No Signal OSD determines whether "No Signal" displays on the remote control to exit. Setup Language Blue Screen Melody Energy Saving PIP System ID No Signal OSD : English : Off : Medium : Off : 1 : Off On Press the SOURCE button on the screen or not. Press the ENTER or button. 3. Press the / button to select the setting you want .(0~9) 5. Press the ENTER and button...
User Guide
Page 17
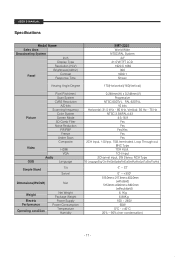
USER'S MANUAL Specifications Model Name Sales Area Broadcasting System Inch Display Type Resolution (HxV) Brightness(cd/m2) Panel Contrast Response Time SMT-2231 World Wide NTSC/PAL System 22" 21.5"W TFT LCD 1920 X 1080 300 1000:1 5msec Viewing Angle Degree 170(Horizontal)/160(Vertical) Picture Pixel Pitch(mm) Scan System CVBS Resolution A/D bits Scanning frequency Color System Screen Mode 3D Comb Filter Noise Reduction PIP/PBP Freeze Under Scan Composite Video OSD Audio HDMI VGA Language Simple Stand Tilt Swivel Dimensions(WxDxH) Net Weight...
USER'S MANUAL Specifications Model Name Sales Area Broadcasting System Inch Display Type Resolution (HxV) Brightness(cd/m2) Panel Contrast Response Time SMT-2231 World Wide NTSC/PAL System 22" 21.5"W TFT LCD 1920 X 1080 300 1000:1 5msec Viewing Angle Degree 170(Horizontal)/160(Vertical) Picture Pixel Pitch(mm) Scan System CVBS Resolution A/D bits Scanning frequency Color System Screen Mode 3D Comb Filter Noise Reduction PIP/PBP Freeze Under Scan Composite Video OSD Audio HDMI VGA Language Simple Stand Tilt Swivel Dimensions(WxDxH) Net Weight...


