
User Guide
Page 2
...All warnings on the making label. Use only with a 3-wire grounding-type plug having a third(grounding) pin. bracket or table recommended by Samsung. 9. This monitor should use attachments not recommended by items placed upon or against them, paying particular attention to lightning and power-line surges. ...that they may be adhered to unplugging the monitor in the cleaning description otherwise required in a fire or electric shock. USER'S MANUAL IMPORTANT SAFETY INSTRUCTIONS CAUTION RISK OF ELECTRIC SHOCK DO NOT OPEN CAUTION : TO REDUCE THE RISK OF ELECTRIC SHOCK, DO NOT REMOVE ...
...All warnings on the making label. Use only with a 3-wire grounding-type plug having a third(grounding) pin. bracket or table recommended by Samsung. 9. This monitor should use attachments not recommended by items placed upon or against them, paying particular attention to lightning and power-line surges. ...that they may be adhered to unplugging the monitor in the cleaning description otherwise required in a fire or electric shock. USER'S MANUAL IMPORTANT SAFETY INSTRUCTIONS CAUTION RISK OF ELECTRIC SHOCK DO NOT OPEN CAUTION : TO REDUCE THE RISK OF ELECTRIC SHOCK, DO NOT REMOVE ...
User Guide
Page 3
...in a commercial environment. If the monitor does not operate normally by Samsung or have fallen into the monitor. f. These limits are required, be sure the service technician has used in accordance with the instruction manual, may cause harmful interference to operate the equipment. Operation of this ...BE RECYCLED OR DISPOSED OF ACCORDING TO LOCAL, STATE OR FEDERAL LAWS For details see lamprecycle.org,eire.org,or call 1-1800-Samsung Warning This equipment has been tested and found tocomply with the limits for compliance could void the user's authority to radio communications...
...in a commercial environment. If the monitor does not operate normally by Samsung or have fallen into the monitor. f. These limits are required, be sure the service technician has used in accordance with the instruction manual, may cause harmful interference to operate the equipment. Operation of this ...BE RECYCLED OR DISPOSED OF ACCORDING TO LOCAL, STATE OR FEDERAL LAWS For details see lamprecycle.org,eire.org,or call 1-1800-Samsung Warning This equipment has been tested and found tocomply with the limits for compliance could void the user's authority to radio communications...
User Guide
Page 4
USER'S MANUAL Contents Important Safety Instructions 2 Unpacking 5 Viewing the Control Panels 5 Front View...5 Rear & Left Side View...6 Remote Controller 7 Connecting to External Devices 8 OSD Menu Configurations 9 No Signal Display...9 OSD Menu Selection ...9 Picture Menu ...9 Sound Menu...11 Setup Menu ...12 Input Menu ...16 Specifications 17 - 4 -
USER'S MANUAL Contents Important Safety Instructions 2 Unpacking 5 Viewing the Control Panels 5 Front View...5 Rear & Left Side View...6 Remote Controller 7 Connecting to External Devices 8 OSD Menu Configurations 9 No Signal Display...9 OSD Menu Selection ...9 Picture Menu ...9 Sound Menu...11 Setup Menu ...12 Input Menu ...16 Specifications 17 - 4 -
User Guide
Page 5
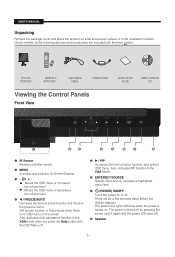
... product on a flat and secure surface or in the VGA Mode. TFT-LCD MONITOR REMOTE & BATTERIES VGA SIGNAL CABLE POWER CORD QUICK SETUP GUIDE USER'S MANUAL CD Viewing the Control Panels Front View IR Sensor Remote controller sensor. There will be a few seconds delay before the display appears. Check whether all...
... product on a flat and secure surface or in the VGA Mode. TFT-LCD MONITOR REMOTE & BATTERIES VGA SIGNAL CABLE POWER CORD QUICK SETUP GUIDE USER'S MANUAL CD Viewing the Control Panels Front View IR Sensor Remote controller sensor. There will be a few seconds delay before the display appears. Check whether all...
User Guide
Page 6
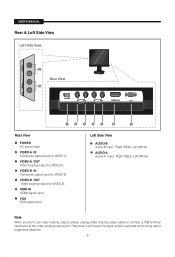
... Video looping output for VIDEO B. VIDEO-A IN Composite signal input for VIDEO B. HDMI IN HDMI signal input. VIDEO-B OUT Video looping output for VIDEO A. USER'S MANUAL Rear & Left Side View Left Side View Rear View HDMI IN Rear View POWER AC power input.
... Video looping output for VIDEO B. VIDEO-A IN Composite signal input for VIDEO B. HDMI IN HDMI signal input. VIDEO-B OUT Video looping output for VIDEO A. USER'S MANUAL Rear & Left Side View Left Side View Rear View HDMI IN Rear View POWER AC power input.
User Guide
Page 7
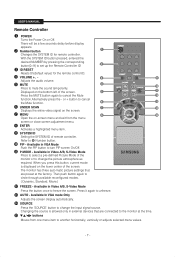
.... Number button Changes the SYSTEM ID for the remote control ID. SOURCE Press the 'SOURCE' button to cancel the Mute function.Alternatively press the - USER'S MANUAL Remote Controller POWER Turns the Power On or Off. When you press this button, current mode is allowed only in Video A/B, S-Video Mode Press to...
.... Number button Changes the SYSTEM ID for the remote control ID. SOURCE Press the 'SOURCE' button to cancel the Mute function.Alternatively press the - USER'S MANUAL Remote Controller POWER Turns the Power On or Off. When you press this button, current mode is allowed only in Video A/B, S-Video Mode Press to...
User Guide
Page 8
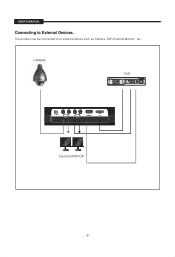
CAMERA DVR HDMI IN External MONITOR - 8 - USER'S MANUAL Connecting to an external device such as Camera, DVR, External Monitor, etc. The product can be connected to External Devices.
CAMERA DVR HDMI IN External MONITOR - 8 - USER'S MANUAL Connecting to an external device such as Camera, DVR, External Monitor, etc. The product can be connected to External Devices.
User Guide
Page 9
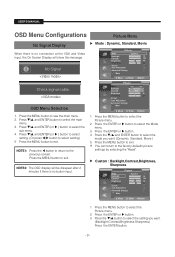
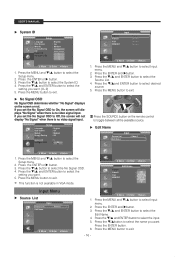
.... You can return to exit . Press the MENU button to the factory defaults picture settings by selecting the "Reset". Press the ENTER or button. 4. USER'S MANUAL OSD Menu Configurations Picture Menu No Signal Display When there is no connection at the VGA and Video input, the On Screen Display will show...
.... You can return to exit . Press the MENU button to the factory defaults picture settings by selecting the "Reset". Press the ENTER or button. 4. USER'S MANUAL OSD Menu Configurations Picture Menu No Signal Display When there is no connection at the VGA and Video input, the On Screen Display will show...
User Guide
Page 10
... ENTER button to select the Picture menu. 2. Press the MENU button to select the Advanced Settings menu . 4 Press the ENTER or button two times. USER'S MANUAL 4.
... ENTER button to select the Picture menu. 2. Press the MENU button to select the Advanced Settings menu . 4 Press the ENTER or button two times. USER'S MANUAL 4.
User Guide
Page 11
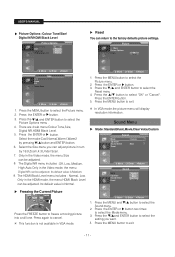
... ENTER or button. 3. This function is not available in the HDMI mode, the menu HDMI Black Level can return to select "OK" or "Cancel". USER'S MANUAL Picture Options: Colour Tone/Size/ Digital NR/HDMI Black Level Picture Options Colour Tone Size Digital NR HDMI Black Level : Cool : Normal : AuWtoarm1 : NoWrmaraml 2 Reset...
... ENTER or button. 3. This function is not available in the HDMI mode, the menu HDMI Black Level can return to select "OK" or "Cancel". USER'S MANUAL Picture Options: Colour Tone/Size/ Digital NR/HDMI Black Level Picture Options Colour Tone Size Digital NR HDMI Black Level : Cool : Normal : AuWtoarm1 : NoWrmaraml 2 Reset...
User Guide
Page 12
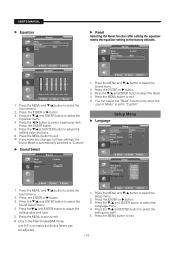
... is automatically switched to select the Setup menu. 2. Press the / and ENTER button to exit. Press the MENU and / button to the factory defaults. USER'S MANUAL Equalizer Sound Mode Equalizer Sound Select Reset : Custom : Main Reset Selecting the Reset function after setting the equalizer resets the equalizer setting to select the...
... is automatically switched to select the Setup menu. 2. Press the / and ENTER button to exit. Press the MENU and / button to the factory defaults. USER'S MANUAL Equalizer Sound Mode Equalizer Sound Select Reset : Custom : Main Reset Selecting the Reset function after setting the equalizer resets the equalizer setting to select the...
User Guide
Page 13
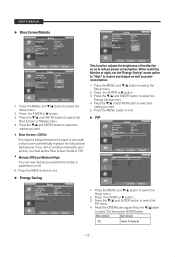
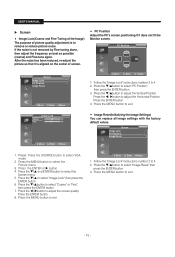
... Monitor so as power consumption. 1. Press the / and ENTER button to select the setting you want . 5. Main picture Sub picture PC Video A,Video B - 13 - USER'S MANUAL Blue Screen/Melody Setup Language Blue Screen Melody Energy Saving PIP System ID No Signal OSD : English : Off : On : Off : 1 : On Move Enter Return Setup...
... Monitor so as power consumption. 1. Press the / and ENTER button to select the setting you want . 5. Main picture Sub picture PC Video A,Video B - 13 - USER'S MANUAL Blue Screen/Melody Setup Language Blue Screen Melody Energy Saving PIP System ID No Signal OSD : English : Off : On : Off : 1 : On Move Enter Return Setup...

User Guide
Page 14
...not supported. 1. The resolutions in almost all cases. (If not, contact your Settings window, the correct value is the PBP function. USER'S MANUAL Press the PIP button on the remote control repeatedly to exit. 4. First, click on "Control Panel" on "Setting" . - 14 - ...the ENTER button. 6. The correct size setting (resolution): Optimum- 1280 x 1024 If a vertical-frequency option exists on your computer manufacturer or Samsung Dealer.) The interlace mode is not supported. Otherwise, just click "OK" and exit the window. Press the / and ENTER button to select...
...not supported. 1. The resolutions in almost all cases. (If not, contact your Settings window, the correct value is the PBP function. USER'S MANUAL Press the PIP button on the remote control repeatedly to exit. 4. First, click on "Control Panel" on "Setting" . - 14 - ...the ENTER button. 6. The correct size setting (resolution): Optimum- 1280 x 1024 If a vertical-frequency option exists on your computer manufacturer or Samsung Dealer.) The interlace mode is not supported. Otherwise, just click "OK" and exit the window. Press the / and ENTER button to select...
User Guide
Page 15
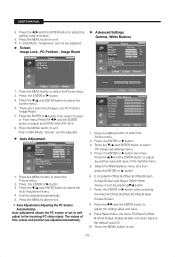
... Lock PC Position Image Reset Move Enter Return Image Lock Coarse 50 Fine 45 Move Enter Return Move Enter Return 1. Press the ENTER button. 8. USER'S MANUAL Screen • Image Lock(Coarse and Fine Tuning of the Image) The purpose of screen. • PC Position Adjust the PC's screen positioning if it...
... Lock PC Position Image Reset Move Enter Return Image Lock Coarse 50 Fine 45 Move Enter Return Move Enter Return 1. Press the ENTER button. 8. USER'S MANUAL Screen • Image Lock(Coarse and Fine Tuning of the Image) The purpose of screen. • PC Position Adjust the PC's screen positioning if it...
User Guide
Page 16
... / button to exit. - 16 - If you want .(0~9) 5. Press the MENU button to select Input menu. 2. Video A Video B VGA HDMI/DVI Input Move Enter Return 1. USER'S MANUAL System ID Setup Language Blue Screen Melody Energy Saving PIP System ID No Signal OSD : English : Off : Medium : 0 1 : 2 : 3 4 Move Enter Return 1. Move Enter Return Video...
... / button to exit. - 16 - If you want .(0~9) 5. Press the MENU button to select Input menu. 2. Video A Video B VGA HDMI/DVI Input Move Enter Return 1. USER'S MANUAL System ID Setup Language Blue Screen Melody Energy Saving PIP System ID No Signal OSD : English : Off : Medium : 0 1 : 2 : 3 4 Move Enter Return 1. Move Enter Return Video...
User Guide
Page 17
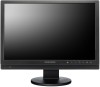
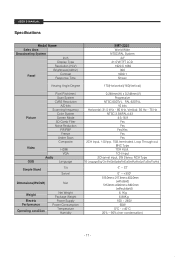
USER'S MANUAL Specifications Model Name Sales Area Broadcasting System Inch Display Type Resolution (HxV) Brightness(cd/m2) Panel Contrast Response Time SMT-2231 World Wide NTSC/PAL System 22" 21.5"W TFT LCD 1920 X 1080 300 1000:1 5msec Viewing Angle Degree 170(Horizontal)/160(Vertical) Picture Pixel Pitch(mm) ...
USER'S MANUAL Specifications Model Name Sales Area Broadcasting System Inch Display Type Resolution (HxV) Brightness(cd/m2) Panel Contrast Response Time SMT-2231 World Wide NTSC/PAL System 22" 21.5"W TFT LCD 1920 X 1080 300 1000:1 5msec Viewing Angle Degree 170(Horizontal)/160(Vertical) Picture Pixel Pitch(mm) ...


