

Owners Manual
Page 11
Table of Contents Chapter 8: Troubleshooting 113 Appendix: Specifications 115 Specifications for DIRECTV® Receiver model SIR-S310W 115 Specifications for DIRECTV Receiver model SIR-S300W 116 Index...117 4
Table of Contents Chapter 8: Troubleshooting 113 Appendix: Specifications 115 Specifications for DIRECTV® Receiver model SIR-S310W 115 Specifications for DIRECTV Receiver model SIR-S300W 116 Index...117 4
Owners Manual
Page 12
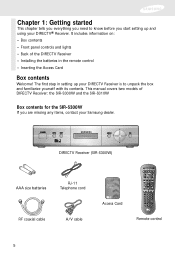
...covers two models of the DIRECTV Receiver • Installing the batteries in setting up and using your DIRECTV® Receiver. DIRECTV Receiver (SIR-S300W) AAA size batteries RJ-11 Telephone cord RF coaxial cable A/V cable Access Card Remote control 5 Chapter 1: Getting started This chapter ... controls and lights • Back of DIRECTV Receiver: the SIR-S300W and the SIR-S310W Box contents for the SIR-S300W If you start setting up your DIRECTV Receiver is to know before you are missing any items, contact your Samsung dealer. The first step in the remote control • ...
...covers two models of the DIRECTV Receiver • Installing the batteries in setting up and using your DIRECTV® Receiver. DIRECTV Receiver (SIR-S300W) AAA size batteries RJ-11 Telephone cord RF coaxial cable A/V cable Access Card Remote control 5 Chapter 1: Getting started This chapter ... controls and lights • Back of DIRECTV Receiver: the SIR-S300W and the SIR-S310W Box contents for the SIR-S300W If you start setting up your DIRECTV Receiver is to know before you are missing any items, contact your Samsung dealer. The first step in the remote control • ...

Owners Manual
Page 14
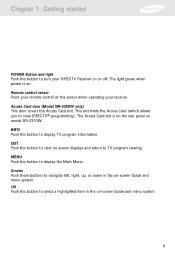
SIR-S300W INFO Remote Access Card Arrows OK control sensor door POWER button EXIT Menu and light SIR-S310W POWER button and light Remote control sensor INFO Menu OK EXIT Arrows 7 Chapter 1: Getting started Front panel controls and lights Now that you've unpacked the box, take a moment to take a look at the buttons and lights on the front of your DIRECTV Receiver.
SIR-S300W INFO Remote Access Card Arrows OK control sensor door POWER button EXIT Menu and light SIR-S310W POWER button and light Remote control sensor INFO Menu OK EXIT Arrows 7 Chapter 1: Getting started Front panel controls and lights Now that you've unpacked the box, take a moment to take a look at the buttons and lights on the front of your DIRECTV Receiver.
Owners Manual
Page 15
... Card slot is on or off. Chapter 1: Getting started POWER Button and light Push this button to view DIRECTV® programming). Access Card door (Model SIR-S300W only) This door covers the Access Card slot. INFO Push this button to select a highlighted item in the on model... SIR-S310W. OK Push this button to clear on -screen Guide and menu system. 8 The light glows when power is on the rear panel on -screen ...
... Card slot is on or off. Chapter 1: Getting started POWER Button and light Push this button to view DIRECTV® programming). Access Card door (Model SIR-S300W only) This door covers the Access Card slot. INFO Push this button to select a highlighted item in the on model... SIR-S310W. OK Push this button to clear on -screen Guide and menu system. 8 The light glows when power is on the rear panel on -screen ...
Owners Manual
Page 16
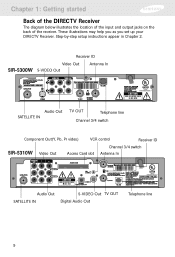
Receiver ID Video Out SIR-S300W S-VIDEO Out Antenna In Audio Out SATELLITE IN TV OUT Telephone line Channel 3/4 switch Component Out(Y, Pb, Pr video) VCR control Receiver ID SIR-S310W Video Out Channel 3/4 switch Access Card slot Antenna In Audio Out S-VIDEO Out TV OUT SATELLITE IN Digital Audio Out Telephone line 9 These...
Receiver ID Video Out SIR-S300W S-VIDEO Out Antenna In Audio Out SATELLITE IN TV OUT Telephone line Channel 3/4 switch Component Out(Y, Pb, Pr video) VCR control Receiver ID SIR-S310W Video Out Channel 3/4 switch Access Card slot Antenna In Audio Out S-VIDEO Out TV OUT SATELLITE IN Digital Audio Out Telephone line 9 These...

Owners Manual
Page 17
...accepts optical digital audio input. Channel 3/4 switch This switch sets the channel for viewing the TV Out signal on the front of model SIR-S300W. 10 Chapter 1: Getting started Satellite In The RG-6 cable from the satellite dish) connects to this jack. Digital audio out... antenna (not from the satellite dish connects to an audio receiver that accepts high-quality ("component") video input. Component Out (Y, Pb, Pr video) (SIR-S310W only) Using standard A/V cables, these jacks connect the DIRECTV Receiver to your TV or VCR. Telephone line A telephone line connected to this jack ...
...accepts optical digital audio input. Channel 3/4 switch This switch sets the channel for viewing the TV Out signal on the front of model SIR-S300W. 10 Chapter 1: Getting started Satellite In The RG-6 cable from the satellite dish) connects to this jack. Digital audio out... antenna (not from the satellite dish connects to an audio receiver that accepts high-quality ("component") video input. Component Out (Y, Pb, Pr video) (SIR-S310W only) Using standard A/V cables, these jacks connect the DIRECTV Receiver to your TV or VCR. Telephone line A telephone line connected to this jack ...

Owners Manual
Page 19
... slot is located on the back of the DIRECTV Receiver, behind the Access Card door. The Access Card should only be inserted when you . Model SIR-S300W Model SIR-S310W Access Card (Top view) 12 Make sure the side with a new one provided by DIRECTV or your program provider. Chapter 1: Getting started Inserting...
... slot is located on the back of the DIRECTV Receiver, behind the Access Card door. The Access Card should only be inserted when you . Model SIR-S300W Model SIR-S310W Access Card (Top view) 12 Make sure the side with a new one provided by DIRECTV or your program provider. Chapter 1: Getting started Inserting...

Owners Manual
Page 25
Chapter 2: Setting up and connecting Note: DIRECTV Receiver model SIR-S310W shown; connections are the same for model SIR-S300W. 18
Chapter 2: Setting up and connecting Note: DIRECTV Receiver model SIR-S310W shown; connections are the same for model SIR-S300W. 18

Owners Manual
Page 27
connections are the same for model SIR-S300W. 20 Chapter 2: Setting up and connecting Note: DIRECTV Receiver model SIR-S310W shown;
connections are the same for model SIR-S300W. 20 Chapter 2: Setting up and connecting Note: DIRECTV Receiver model SIR-S310W shown;

Owners Manual
Page 29
connections are the same for model SIR-S300W. 22 Chapter 2: Setting up and connecting Note: DIRECTV Receiver model SIR-S310W shown;
connections are the same for model SIR-S300W. 22 Chapter 2: Setting up and connecting Note: DIRECTV Receiver model SIR-S310W shown;

Owners Manual
Page 31
Chapter 2: Setting up and connecting Note: DIRECTV Receiver model SIR-S310W shown; connections are the same for model SIR-S300W. 24
Chapter 2: Setting up and connecting Note: DIRECTV Receiver model SIR-S310W shown; connections are the same for model SIR-S300W. 24

Owners Manual
Page 33
connections are the same for model SIR-S300W. 26 Chapter 2: Setting up and connecting Note: DIRECTV Receiver model SIR-S310W shown;
connections are the same for model SIR-S300W. 26 Chapter 2: Setting up and connecting Note: DIRECTV Receiver model SIR-S310W shown;

Owners Manual
Page 56
... channel entry in the Guide. To return to the Grid Guide, highlight the Back item from the on-screen list and press the button on SIR-S310W. 2 To move up and down in the channel list, or forward and backward in time. To see more information about the channels and programs... Grid Guide directly to a specific channel, press the 0-9 number buttons on your remote control to see future program listings for up to 3 days on model SIR-S300W, or up or down through the channel list a full page at a time, press the CH+ and CH-
... channel entry in the Guide. To return to the Grid Guide, highlight the Back item from the on-screen list and press the button on SIR-S310W. 2 To move up and down in the channel list, or forward and backward in time. To see more information about the channels and programs... Grid Guide directly to a specific channel, press the 0-9 number buttons on your remote control to see future program listings for up to 3 days on model SIR-S300W, or up or down through the channel list a full page at a time, press the CH+ and CH-
Owners Manual
Page 73
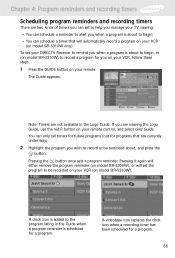
... available in the Guide when a program reminder is scheduled for you on your VCR, follow these steps: 1 Press the GUIDE button on model SIR-S310W only). The Guide appears. You can schedule a timer that are currently under way). 2 Highlight the program you wish to record or be...remote control, and select Grid Guide. Pressing the button once sets a program reminder. Pressing it again will either remove the program reminder (on model SIR-S300W), or will automatically record a program on your VCR (on your remote. A videotape icon replaces the clock icon when a recording timer has been ...
... available in the Guide when a program reminder is scheduled for you on your VCR, follow these steps: 1 Press the GUIDE button on model SIR-S310W only). The Guide appears. You can schedule a timer that are currently under way). 2 Highlight the program you wish to record or be...remote control, and select Grid Guide. Pressing the button once sets a program reminder. Pressing it again will either remove the program reminder (on model SIR-S300W), or will automatically record a program on your VCR (on your remote. A videotape icon replaces the clock icon when a recording timer has been ...

Owners Manual
Page 122
Specifications for both models of DIRECTV® Receiver: SIR-S310W and SIR-S300W. Appendix: Specifications This appendix presents the technical specifications for model SIR-S310W Power supply Input Voltage: AC 120V, 60Hz (SMPS type) Power Consumption: 24W max Physical Specification Size: 12.13 in.(W) x 2.36 in.(H) x 9.25 in.(D) (308mm x ...
Specifications for both models of DIRECTV® Receiver: SIR-S310W and SIR-S300W. Appendix: Specifications This appendix presents the technical specifications for model SIR-S310W Power supply Input Voltage: AC 120V, 60Hz (SMPS type) Power Consumption: 24W max Physical Specification Size: 12.13 in.(W) x 2.36 in.(H) x 9.25 in.(D) (308mm x ...

Owners Manual
Page 123
Specifications for model SIR-S300W Power supply Input Voltage: AC 120V, 60Hz (SMPS type) Power Consumption: 24W max Physical Specification Size 10.24 in.(W) x 1.96 in.(H) x 7.17 in.(D) (260mm x 50mm x ...
Specifications for model SIR-S300W Power supply Input Voltage: AC 120V, 60Hz (SMPS type) Power Consumption: 24W max Physical Specification Size 10.24 in.(W) x 1.96 in.(H) x 7.17 in.(D) (260mm x 50mm x ...
