
User Manual
Page 1
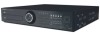
To receive a more complete service, please register your product at www.samsungsecurity.com SHR-7080/7082/7160/7162 SHR-8080/8082/8160/8162 8 Channel/16 Channel DVR User's Manual imagine the possibilities Thanks you for purchasing this Samsung product.
To receive a more complete service, please register your product at www.samsungsecurity.com SHR-7080/7082/7160/7162 SHR-8080/8082/8160/8162 8 Channel/16 Channel DVR User's Manual imagine the possibilities Thanks you for purchasing this Samsung product.
User Manual
Page 2
overview FEATURES This DVR (Digital Video Recorder) employs MPEG-4 video encoding for 8 or 16 channels of camera input and G.723 audio encoding for SHR-7080/7160/8080/8160) • Simultaneous Record and Play of HDD information and status by Windows Network Viewer (Net-I/Web viewer) 2_ overview... • D1 Size (NTSC: 704*480, PAL: 704*576) Recording in 480 IPS speed (SHR-8XXX) • CIF(S) Size (NTSC: 352*240, PAL: 352*288) Recording in 480 IPS speed (SHR-7XXX) • 8/16-channel Loop Through Video port connection • Hard Disk overwrite function • Mass storage hard disk ...
overview FEATURES This DVR (Digital Video Recorder) employs MPEG-4 video encoding for 8 or 16 channels of camera input and G.723 audio encoding for SHR-7080/7160/8080/8160) • Simultaneous Record and Play of HDD information and status by Windows Network Viewer (Net-I/Web viewer) 2_ overview... • D1 Size (NTSC: 704*480, PAL: 704*576) Recording in 480 IPS speed (SHR-8XXX) • CIF(S) Size (NTSC: 352*240, PAL: 352*288) Recording in 480 IPS speed (SHR-7XXX) • 8/16-channel Loop Through Video port connection • Hard Disk overwrite function • Mass storage hard disk ...

User Manual
Page 9
... for backward frame-by -frame search while in the PTZ Mode. split screen, PIP, and auto sequence mode in progress. Channel Jog shuttle Used to 16-, 9-, 4-, 6-, 8-, 13- Shuttle : Fast playback forward or backward. BACKUP : Displays when Backup is going off . Runs the TELE function in the ...Forward () : Used for quick forward playback. (x2, x4, x8, x16, x32, x64) Step Forward ( ) : Used for SHR-7082/7162/8082/8162 only) Power LED : Displays the power ON/OFF status. BACKUP(VIEW) : Runs the BACKUP function. Cancels the ALARM LED and the audible alarm ...
... for backward frame-by -frame search while in the PTZ Mode. split screen, PIP, and auto sequence mode in progress. Channel Jog shuttle Used to 16-, 9-, 4-, 6-, 8-, 13- Shuttle : Fast playback forward or backward. BACKUP : Displays when Backup is going off . Runs the TELE function in the ...Forward () : Used for quick forward playback. (x2, x4, x8, x16, x32, x64) Step Forward ( ) : Used for SHR-7082/7162/8082/8162 only) Power LED : Displays the power ON/OFF status. BACKUP(VIEW) : Runs the BACKUP function. Cancels the ALARM LED and the audible alarm ...
User Manual
Page 11
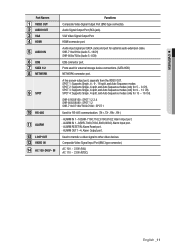
... IN: Alarm Reset port. - Audio input signal port (RCA Jack) and port for 13 ~ 16 CH). ALARM IN 1~16(SHR-7160,7162,8160,8162): Alarm Input port. - SPOT 1: Supports Single, 4-, 9-, 16-split, and Auto Sequence modes SPOT 2: Supports Single, 4-split, and Auto Sequence modes (only for...Output Port (BNC type connector). HDMI connector port. Ports used for 5 ~ 8 CH). SHR-8162/8160 : SPOT 1,2,3,4 SHR-8082/8080 : SPOT 1,2 SHR-7162/7160/7082/7080 : SPOT 1 Used for 9 ~ 12 CH). ALARM IN 1~8(SHR-7080,7082,8080,8082): Alarm Input port. - Composite Video Signal Input Port (BNC type connector...
... IN: Alarm Reset port. - Audio input signal port (RCA Jack) and port for 13 ~ 16 CH). ALARM IN 1~16(SHR-7160,7162,8160,8162): Alarm Input port. - SPOT 1: Supports Single, 4-, 9-, 16-split, and Auto Sequence modes SPOT 2: Supports Single, 4-split, and Auto Sequence modes (only for...Output Port (BNC type connector). HDMI connector port. Ports used for 5 ~ 8 CH). SHR-8162/8160 : SPOT 1,2,3,4 SHR-8082/8080 : SPOT 1,2 SHR-7162/7160/7082/7080 : SPOT 1 Used for 9 ~ 12 CH). ALARM IN 1~8(SHR-7080,7082,8080,8082): Alarm Input port. - Composite Video Signal Input Port (BNC type connector...
User Manual
Page 12
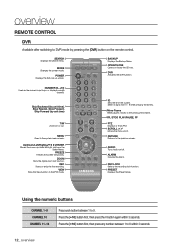
.../CLOSE Opens or closes the CD tray. Move Frame While paused, moves to the previous screen. Using the numeric buttons CHANNEL 1-9 CHANNEL 10 CHANNEL 11-16 Press each button between 1 to 6 within 3 seconds. Press the [+10] button first, then press the 0 button again within 3 seconds. 12_ overview NUMBER [0~+10] Used...
.../CLOSE Opens or closes the CD tray. Move Frame While paused, moves to the previous screen. Using the numeric buttons CHANNEL 1-9 CHANNEL 10 CHANNEL 11-16 Press each button between 1 to 6 within 3 seconds. Press the [+10] button first, then press the 0 button again within 3 seconds. 12_ overview NUMBER [0~+10] Used...
User Manual
Page 21
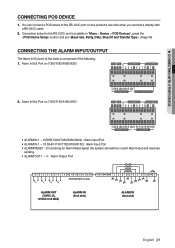
... of the following. 1. You can connect a POS device to the RS-232C port on 7160/7162/8160/8162 • ALARM IN 1 ~ 8 (SHR-7080/7082/8080/8082) : Alarm Input Port • ALARM IN 1 ~ 16 (SHR-7160/7162/8160/8162) : Alarm Input Port • ALARM RESET : On receiving an Alarm Reset signal, the system cancels the current...
... of the following. 1. You can connect a POS device to the RS-232C port on 7160/7162/8160/8162 • ALARM IN 1 ~ 8 (SHR-7080/7082/8080/8082) : Alarm Input Port • ALARM IN 1 ~ 16 (SHR-7160/7162/8160/8162) : Alarm Input Port • ALARM RESET : On receiving an Alarm Reset signal, the system cancels the current...

User Manual
Page 28
... . 2. Freeze Freezes the Live screen temporarily. In Live mode, right-click to the right. The indication of AM/PM is highlighted in the sequence of 16-, 9-, 4-, 6-, 8-, 13-split, PIP and Auto Sequence. Zoom Enlarges the selected area. Record Start/End recording the Live screen. 28_ live Alarm Stops the alarm if...
... . 2. Freeze Freezes the Live screen temporarily. In Live mode, right-click to the right. The indication of AM/PM is highlighted in the sequence of 16-, 9-, 4-, 6-, 8-, 13-split, PIP and Auto Sequence. Zoom Enlarges the selected area. Record Start/End recording the Live screen. 28_ live Alarm Stops the alarm if...
User Manual
Page 29
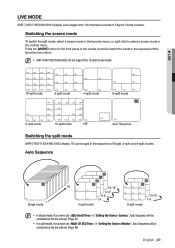
...CH3 CH4 CH5 CH6 6-split mode CH1 Auto Sequence Switching the split mode SHR-7160/7162/8160/8162 display 16 Live images in the sequence of the launcher menu items. M SHR-7080/7082/8080/8082 do not support the 16-split screen mode. Press the [MODE] button on the front panel ... remote control to select a screen mode in the sequence of Single, 4-split and 9-split modes. LIVE LIVE MODE SHR-7160/7162/8160/8162 display Live images from 16 channels in "Setting the Device>Monitor", Auto Sequence will be conducted at the set interval. (Page 46) English _29 Switching the...
...CH3 CH4 CH5 CH6 6-split mode CH1 Auto Sequence Switching the split mode SHR-7160/7162/8160/8162 display 16 Live images in the sequence of the launcher menu items. M SHR-7080/7082/8080/8082 do not support the 16-split screen mode. Press the [MODE] button on the front panel ... remote control to select a screen mode in the sequence of Single, 4-split and 9-split modes. LIVE LIVE MODE SHR-7160/7162/8160/8162 display Live images from 16 channels in "Setting the Device>Monitor", Auto Sequence will be conducted at the set interval. (Page 46) English _29 Switching the...

User Manual
Page 30
... to display the key to the next split mode. • If pressing the right [►] button in 9-split mode: 9-split (CH 1~9) mode 9-split (CH 10~16) mode Auto Sequence CH1 CH2 CH3 CH4 CH5 CH6 CH7 CH8 CH9 CH10 CH11 CH12 CH13 CH14 CH15 CH16 CH1 CH2 CH3 CH1 CH2 CH3... CH7 CH8 CH9 CH10 CH11 CH12 CH13 CH14 CH15 CH16 Channel Setting CH1 CH2 CH1 CH2 CH1 CH2 CH3 CH4 CH1 CH2 CH3 CH4 13-16 9-12 CH3 CH4 5-8 CH3 CH4 1-4 You can select a different channel. 3. The current channel will be switched to the selected one. Ex : if switching CH...
... to display the key to the next split mode. • If pressing the right [►] button in 9-split mode: 9-split (CH 1~9) mode 9-split (CH 10~16) mode Auto Sequence CH1 CH2 CH3 CH4 CH5 CH6 CH7 CH8 CH9 CH10 CH11 CH12 CH13 CH14 CH15 CH16 CH1 CH2 CH3 CH1 CH2 CH3... CH7 CH8 CH9 CH10 CH11 CH12 CH13 CH14 CH15 CH16 Channel Setting CH1 CH2 CH1 CH2 CH1 CH2 CH3 CH4 CH1 CH2 CH3 CH4 13-16 9-12 CH3 CH4 5-8 CH3 CH4 1-4 You can select a different channel. 3. The current channel will be switched to the selected one. Ex : if switching CH...

User Manual
Page 31
... 3 or pressing the number "3" on the front panel or the remote control to switch to the SPOT OUT source. (Page 47) SPOT OUT 1 : Supports 16-, 9-, 4-split, Auto Sequence and Single modes. SPOT OUT 2, 3, 4 : Supports 4-split, Auto Sequence and Single modes. For the SPOT OUT port of ...OUT Audio Off Freeze Stop Alarm Record Play Search Backup Main Menu Shutdown Launcher hide Logout SPOT OUT 1 SPOT OUT 2 SPOT OUT 3 SPOT OUT 4 16-split 9-split 4-split Auto Sequence Single CH1 CH2 CH3 CH4 CH5 CH6 CH7 CH8 CH9 CH10 CH11 CH12 CH13 CH14 CH15 CH16 < Multichannel Live Menu...
... 3 or pressing the number "3" on the front panel or the remote control to switch to the SPOT OUT source. (Page 47) SPOT OUT 1 : Supports 16-, 9-, 4-split, Auto Sequence and Single modes. SPOT OUT 2, 3, 4 : Supports 4-split, Auto Sequence and Single modes. For the SPOT OUT port of ...OUT Audio Off Freeze Stop Alarm Record Play Search Backup Main Menu Shutdown Launcher hide Logout SPOT OUT 1 SPOT OUT 2 SPOT OUT 3 SPOT OUT 4 16-split 9-split 4-split Auto Sequence Single CH1 CH2 CH3 CH4 CH5 CH6 CH7 CH8 CH9 CH10 CH11 CH12 CH13 CH14 CH15 CH16 < Multichannel Live Menu...
User Manual
Page 33
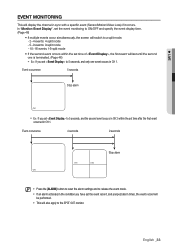
... in CH 2 within the set time of , the first event will also apply to a split mode. - 2~4 events: 4-split mode - 5~9 events: 9-split mode - 10~16 events: 16-split mode • If the second event occurs within the set the event record, and pre/post alarm times, the event record will be performed...
... in CH 2 within the set time of , the first event will also apply to a split mode. - 2~4 events: 4-split mode - 5~9 events: 9-split mode - 10~16 events: 16-split mode • If the second event occurs within the set the event record, and pre/post alarm times, the event record will be performed...

User Manual
Page 35
... Date/Time/Language Date/Time/Language Holiday 2009 Jan SettSiunng HMoolindayTue Wed Thu Fri Sat 1 2 3 1 / 12 4 5 6 7 8 9 10 Jan 2nd Mon 11 12 13 14 15 16 17 18 19 2O0K 21 Can2c2el 23 24 25 26 27 28 29 30 31 OK Cancel Using the Calendar Using the mouse may help... is done, press . Date/Time/Language Date/Time/Language Holiday 2009 Jan Sun Mon Tue Wed Thu Fri Sat 1 2 3 4 5 6 7 8 9 10 11 12 13 14 15 16 17 18 19 20 21 22 23 24 25 26 27 28 29 30 31 6. Use direction buttons to select a date and press [ENTER] button...
... Date/Time/Language Date/Time/Language Holiday 2009 Jan SettSiunng HMoolindayTue Wed Thu Fri Sat 1 2 3 1 / 12 4 5 6 7 8 9 10 Jan 2nd Mon 11 12 13 14 15 16 17 18 19 2O0K 21 Can2c2el 23 24 25 26 27 28 29 30 31 OK Cancel Using the Calendar Using the mouse may help... is done, press . Date/Time/Language Date/Time/Language Holiday 2009 Jan Sun Mon Tue Wed Thu Fri Sat 1 2 3 4 5 6 7 8 9 10 11 12 13 14 15 16 17 18 19 20 21 22 23 24 25 26 27 28 29 30 31 6. Use direction buttons to select a date and press [ENTER] button...

User Manual
Page 46
...4 5 No preset 11 12 13 No preset OKNo presetCancel No preset No preset POS Device Setup Port/Ethernet None None None 6 7 8 None 14 15 16 None None None None Previous/Next Page OK Cancel POS Device PrPeOsSeUtSSE etup POS Device Setup POS 1No. 2 3 4 5 6 7 8 CH NNAaomdneed Preset ... using the DVR • CH : Select the camera to be synchronized to the monitor, video may help easy setup. 3. Use the up to 16 cameras (channels), and a channel can configure information to , and press [ENTER] button. If the output setting of and . Select . 5....
...4 5 No preset 11 12 13 No preset OKNo presetCancel No preset No preset POS Device Setup Port/Ethernet None None None 6 7 8 None 14 15 16 None None None None Previous/Next Page OK Cancel POS Device PrPeOsSeUtSSE etup POS Device Setup POS 1No. 2 3 4 5 6 7 8 CH NNAaomdneed Preset ... using the DVR • CH : Select the camera to be synchronized to the monitor, video may help easy setup. 3. Use the up to 16 cameras (channels), and a channel can configure information to , and press [ENTER] button. If the output setting of and . Select . 5....
User Manual
Page 47
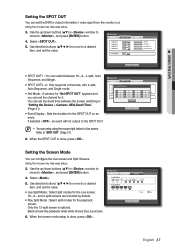
...] button. 4. Refer to the SPOT OUT. Live Play OK Cancel 6. When the screen mode setup is done, press . You can set the dwell time between 16-, 9-, 4-split, Auto Sequence, and Single. • SPOT OUT2~4 : Only supports 4 channels, with 4-split, Auto Sequence, and Single mode. • Set Mode : A window for "Set ... OFF 14 OK Set Mode Set Mode Set Mode 3 Se7t Mode 11 15 ALL CH CH 5,6,7,8 CH 9,10,11,12 4 CH 813,14,15,16 12 16 OK Cancel Setting the Screen Mode You can setup using the mouse right button in "Setting the Device > Camera> SEQ-Dwell Time". (Page 41) &#...
...] button. 4. Refer to the SPOT OUT. Live Play OK Cancel 6. When the screen mode setup is done, press . You can set the dwell time between 16-, 9-, 4-split, Auto Sequence, and Single. • SPOT OUT2~4 : Only supports 4 channels, with 4-split, Auto Sequence, and Single mode. • Set Mode : A window for "Set ... OFF 14 OK Set Mode Set Mode Set Mode 3 Se7t Mode 11 15 ALL CH CH 5,6,7,8 CH 9,10,11,12 4 CH 813,14,15,16 12 16 OK Cancel Setting the Screen Mode You can setup using the mouse right button in "Setting the Device > Camera> SEQ-Dwell Time". (Page 41) &#...

User Manual
Page 48
...fied time. Record Recording Schedule Event Record Duration REC Quality & Resolution Record Option 4. Recording Schedule CH1 All 0 1 2 3 4 5 6 7 8 9 10 11 12 13 14 15 16 17 18 19 20 21 22 23 Sun Mon Tue Wed Thu Fri Sat Hol No Recording Continuous Event Both(Cont&Evnt) Apply to All...OK Cancel • Apply to All CH : If selected , "Apply to , and press [ENTER] button. Recording Schedule CH1 All 0 1 2 3 4 5 6 7 8 9 10 11 12 13 14 15 16 17 18 19 20 21 22 23 Sun Mon Apply to All CH Tue Wed Apply recording schedule to all channels? Logout Exit 2. A window of...
...fied time. Record Recording Schedule Event Record Duration REC Quality & Resolution Record Option 4. Recording Schedule CH1 All 0 1 2 3 4 5 6 7 8 9 10 11 12 13 14 15 16 17 18 19 20 21 22 23 Sun Mon Tue Wed Thu Fri Sat Hol No Recording Continuous Event Both(Cont&Evnt) Apply to All...OK Cancel • Apply to All CH : If selected , "Apply to , and press [ENTER] button. Recording Schedule CH1 All 0 1 2 3 4 5 6 7 8 9 10 11 12 13 14 15 16 17 18 19 20 21 22 23 Sun Mon Apply to All CH Tue Wed Apply recording schedule to all channels? Logout Exit 2. A window of...

User Manual
Page 51
... 6 5 OFF 7 OFF 6 8 OFF 7 Preset 1 None 2 None 3 None 4 None 5 None 6 7 None 8 None 8 None OK Alarm CH None N9one 1N0one N11one 1N2one 1N3one None 14 None 15 16 Cancel Duration PresetOFF NoneOFF NoneOFF NoneOFF NoneOFF NoneOFF OFF None OFF None PreNvioonues/Next Page OK Cancel English _51 Sensor Detection You can be connected...
... 6 5 OFF 7 OFF 6 8 OFF 7 Preset 1 None 2 None 3 None 4 None 5 None 6 7 None 8 None 8 None OK Alarm CH None N9one 1N0one N11one 1N2one 1N3one None 14 None 15 16 Cancel Duration PresetOFF NoneOFF NoneOFF NoneOFF NoneOFF NoneOFF OFF None OFF None PreNvioonues/Next Page OK Cancel English _51 Sensor Detection You can be connected...

User Manual
Page 53
... output, refer to "HDD Alarm > Alarm". (Page 44) • : Marked in orange, and always generates alarm on Alarm1 All 0 1 2 3 4 5 6 7 8 9 10 11 12 13 14 15 16 17 18 19 20 21 22 23 Sun Mon Tue Wed Thu Fri Sat Hol OFF ON Event Sync Apply to All Alarm scheduled time... the alarm by canceling the schedule. 6. When the video loss detection setup is done, press . Alarm Schedule Alarm1 All 0 1 2 3 4 5 6 7 8 9 10 11 12 13 14 15 16 17 18 19 20 21 22 23 Sun Mon Apply to All Alarm Tue Wed Apply the alarm scheduling to "HDD Alarm > Alarm". (Page 44...
... output, refer to "HDD Alarm > Alarm". (Page 44) • : Marked in orange, and always generates alarm on Alarm1 All 0 1 2 3 4 5 6 7 8 9 10 11 12 13 14 15 16 17 18 19 20 21 22 23 Sun Mon Tue Wed Thu Fri Sat Hol OFF ON Event Sync Apply to All Alarm scheduled time... the alarm by canceling the schedule. 6. When the video loss detection setup is done, press . Alarm Schedule Alarm1 All 0 1 2 3 4 5 6 7 8 9 10 11 12 13 14 15 16 17 18 19 20 21 22 23 Sun Mon Apply to All Alarm Tue Wed Apply the alarm scheduling to "HDD Alarm > Alarm". (Page 44...
User Manual
Page 54
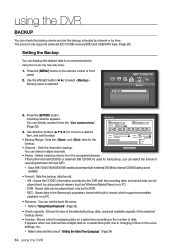
...the size of the selected backup data, used for the backup. SEC : Saves data in the Samsung's proprietary format with the recording data, and saved data can be played back only by time. using...08:25:45 Overlap List0 CH 1 2 3 4 5 6 7 8 ALL 9 10 11 12 13 14 15 16 Device Folder None \20090101\ Check capacity Format Filename AVI 0001 Change Backup Used Free • Channel : Sets the channel ... backup, you can select the format of recording between AVI and SEC. Since SHR-7080/7160/8080/8160 models do not have built-in internal CD/DVD or external USB CD...
...the size of the selected backup data, used for the backup. SEC : Saves data in the Samsung's proprietary format with the recording data, and saved data can be played back only by time. using...08:25:45 Overlap List0 CH 1 2 3 4 5 6 7 8 ALL 9 10 11 12 13 14 15 16 Device Folder None \20090101\ Check capacity Format Filename AVI 0001 Change Backup Used Free • Channel : Sets the channel ... backup, you can select the format of recording between AVI and SEC. Since SHR-7080/7160/8080/8160 models do not have built-in internal CD/DVD or external USB CD...
User Manual
Page 65
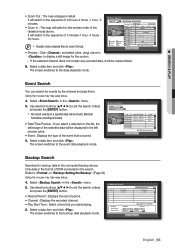
... Record Period Play Start Time Previous/Next Page 16190000 Channel 1 2009-01-01 01:01:01 - 2009-01-01 01:01:10 2009-01-01 16:30:52 Play Cancel English _65 Select a data item and click . The screen switches to Last Overlapped Data List0 00:01:17 Channel 2009/01...
... Record Period Play Start Time Previous/Next Page 16190000 Channel 1 2009-01-01 01:01:01 - 2009-01-01 01:01:10 2009-01-01 16:30:52 Play Cancel English _65 Select a data item and click . The screen switches to Last Overlapped Data List0 00:01:17 Channel 2009/01...
User Manual
Page 67
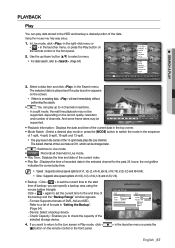
... press the [MODE] button to the Live screen in "Setting the Backup". (Page 54) - The default channel of 1-split, 4-split, 9-split, 16-split and 13-split. The grey area in the selected channel for the past 24 hours; Check Capacity : Enables you can specify a backup...start immediately without performing the search. • : You can play time. M Speed : Supports various speed options of x1, x2(-2), x4(-4), x8(-8), x16(-16), x32(-32) and x64(-64). Slow : Supports slow speed options of x1/2(-1/2), x1/4(-1/4) and x1/8(-1/8). • Backup : Click < > to set ...
... press the [MODE] button to the Live screen in "Setting the Backup". (Page 54) - The default channel of 1-split, 4-split, 9-split, 16-split and 13-split. The grey area in the selected channel for the past 24 hours; Check Capacity : Enables you can specify a backup...start immediately without performing the search. • : You can play time. M Speed : Supports various speed options of x1, x2(-2), x4(-4), x8(-8), x16(-16), x32(-32) and x64(-64). Slow : Supports slow speed options of x1/2(-1/2), x1/4(-1/4) and x1/8(-1/8). • Backup : Click < > to set ...