
User Manual
Page 1
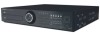
To receive a more complete service, please register your product at www.samsungsecurity.com SHR-7080/7082/7160/7162 SHR-8080/8082/8160/8162 8 Channel/16 Channel DVR User's Manual imagine the possibilities Thanks you for purchasing this Samsung product.
To receive a more complete service, please register your product at www.samsungsecurity.com SHR-7080/7082/7160/7162 SHR-8080/8082/8160/8162 8 Channel/16 Channel DVR User's Manual imagine the possibilities Thanks you for purchasing this Samsung product.
User Manual
Page 2
overview FEATURES This DVR (Digital Video Recorder) employs MPEG-4 video encoding for 8 or 16 channels of camera input and G.723 audio encoding for SHR-7080/7160/8080/8160) • Simultaneous Record and Play of HDD information and status by using HDD SMART • D1 Size (NTSC: 704*480, PAL...: 704*576) Recording in 480 IPS speed (SHR-8XXX) • CIF(S) Size (NTSC: 352*240, PAL: 352*288) Recording in 480 IPS speed (SHR-7XXX) • 8/16-channel Loop Through Video port connection • Hard Disk overwrite function • Mass storage...
overview FEATURES This DVR (Digital Video Recorder) employs MPEG-4 video encoding for 8 or 16 channels of camera input and G.723 audio encoding for SHR-7080/7160/8080/8160) • Simultaneous Record and Play of HDD information and status by using HDD SMART • D1 Size (NTSC: 704*480, PAL...: 704*576) Recording in 480 IPS speed (SHR-8XXX) • CIF(S) Size (NTSC: 352*240, PAL: 352*288) Recording in 480 IPS speed (SHR-7XXX) • 8/16-channel Loop Through Video port connection • Hard Disk overwrite function • Mass storage...

User Manual
Page 9
... and data transfer status. Fast Rewind () : Used for forward frame-by -frame search while in progress. PLAY/PAUSE : Used to turn the DVR ON/OFF. MODE AUDIO ALARM Each button press in Play. (-x2,-x4,-x8,-x16,-x32,-x64) STOP : Used to stop the playback. In Play ... when the alarm is in order. (1 live channel + (N-1) live channel) Sets Audio ON/OFF. English _9 Step Rewind ( ) : Used for SHR-7082/7162/8082/8162 only) Power LED : Displays the power ON/OFF status. When a scroll bar appears in each press of the button will switch the screen mode...
... and data transfer status. Fast Rewind () : Used for forward frame-by -frame search while in progress. PLAY/PAUSE : Used to turn the DVR ON/OFF. MODE AUDIO ALARM Each button press in Play. (-x2,-x4,-x8,-x16,-x32,-x64) STOP : Used to stop the playback. In Play ... when the alarm is in order. (1 live channel + (N-1) live channel) Sets Audio ON/OFF. English _9 Step Rewind ( ) : Used for SHR-7082/7162/8082/8162 only) Power LED : Displays the power ON/OFF status. When a scroll bar appears in each press of the button will switch the screen mode...
User Manual
Page 15
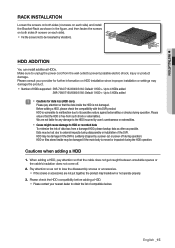
... breakdown or not operate properly. 3. HDD ADDITION You can install additional HDDs. Before adding a HDD, please check the compatibility with this DVR product. English _15 Cautions when adding a HDD 1. INSTALLATION RACK INSTALLATION Loosen the screws on both sides (4 screws on HDD installation... since improper installation or settings may damage the product. Number of HDDs supported : SHR-7082/7162/8082/8162: Default 1 HDD + Up to 4 HDDs added SHR-7080/7160/8080/8160: Default 1 HDD + Up to HDD or recorded data To minimize the risk of ...
... breakdown or not operate properly. 3. HDD ADDITION You can install additional HDDs. Before adding a HDD, please check the compatibility with this DVR product. English _15 Cautions when adding a HDD 1. INSTALLATION RACK INSTALLATION Loosen the screws on both sides (4 screws on HDD installation... since improper installation or settings may damage the product. Number of HDDs supported : SHR-7082/7162/8082/8162: Default 1 HDD + Up to 4 HDDs added SHR-7080/7160/8080/8160: Default 1 HDD + Up to HDD or recorded data To minimize the risk of ...

User Manual
Page 17
... Loosen the screws (x4) in the left/right and upper sides to remove the upper bracket and loosen the lower screws (x2) to SHR-7082, 7162, 8082 & 8162 2. When the installation of additional HDDs is done, connect the power cable and connect the HDD signal cables (SATA Cable) to do with... Bracket 6. Just make arrangements of the connectors considering the length of the HDD data cable is done, insert the lower and upper brackets into the DVR and fix them with the operation. Upper Bracket Lower Bracket English _17 Refer to "Storage Device > HDD Map". (Page 43) Note ...
... Loosen the screws (x4) in the left/right and upper sides to remove the upper bracket and loosen the lower screws (x2) to SHR-7082, 7162, 8082 & 8162 2. When the installation of additional HDDs is done, connect the power cable and connect the HDD signal cables (SATA Cable) to do with... Bracket 6. Just make arrangements of the connectors considering the length of the HDD data cable is done, insert the lower and upper brackets into the DVR and fix them with the operation. Upper Bracket Lower Bracket English _17 Refer to "Storage Device > HDD Map". (Page 43) Note ...
User Manual
Page 50
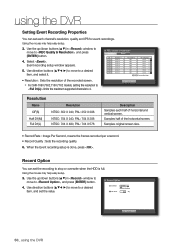
...to a desired item, and set the value. Disk End Mode Auto Delete Overwrite Disk End Beep 1 day OK Cancel 50_ using the DVR Setting Event Recording Properties You can set each half of the horizontal screen. Samples half of horizontal and vertical screen. Record Option You can...8 Full D1(L) Record Rate 30ips 30ips 30ips 30ips 30ips 30ips 30ips 30ips • Resolution : Sets the resolution of the recorded screen. For SHR-7080,7082,7160,7162 models, setting the resolution to limits the maximum supported channels to stop or overwrite when the HDD is done, press .
...to a desired item, and set the value. Disk End Mode Auto Delete Overwrite Disk End Beep 1 day OK Cancel 50_ using the DVR Setting Event Recording Properties You can set each half of the horizontal screen. Samples half of horizontal and vertical screen. Record Option You can...8 Full D1(L) Record Rate 30ips 30ips 30ips 30ips 30ips 30ips 30ips 30ips • Resolution : Sets the resolution of the recorded screen. For SHR-7080,7082,7160,7162 models, setting the resolution to limits the maximum supported channels to stop or overwrite when the HDD is done, press .
User Manual
Page 54
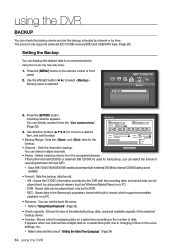
...8226; Format : Sets the backup data format. - You can be played back only by the DVR with built-in internal DVD Writer, internal CD/DVD backup is selected. You can be played ...Select a backup device from the "Live screen menu". (Page 26) 4. SEC : Saves data in the Samsung's proprietary format with the recording data, and saved data can directly access it from the recognized devices. Press the...for the backup, you can select the format of recording between AVI and SEC. Since SHR-7080/7160/8080/8160 models do not have built-in viewer, which supports immediate playback on a PC...
...8226; Format : Sets the backup data format. - You can be played back only by the DVR with built-in internal DVD Writer, internal CD/DVD backup is selected. You can be played ...Select a backup device from the "Live screen menu". (Page 26) 4. SEC : Saves data in the Samsung's proprietary format with the recording data, and saved data can directly access it from the recognized devices. Press the...for the backup, you can select the format of recording between AVI and SEC. Since SHR-7080/7160/8080/8160 models do not have built-in viewer, which supports immediate playback on a PC...
User Manual
Page 59
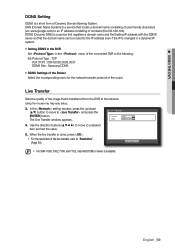
... Quality CIF(S) Low 4. When the live transfer, refer to "Resolution". (Page 50) OK Cancel M For SHR-7080,7082,7160 and 7162, only Half D1(M) or lower is transferred from the DVR to and press the [ENTER] button. Live Transfer Sets the quality of the image that routes a domain name... in the menu of the connected DVR to a desired item and set the value. 5. In the setting window, press the up/down (▲▼) button to move to the following: Ex) Protocol Type : TCP Port (TCP) : 0554,0555,0556,0557 DDNS Site : Samsung DDNS • DDNS Settings of the Router...
... Quality CIF(S) Low 4. When the live transfer, refer to "Resolution". (Page 50) OK Cancel M For SHR-7080,7082,7160 and 7162, only Half D1(M) or lower is transferred from the DVR to and press the [ENTER] button. Live Transfer Sets the quality of the image that routes a domain name... in the menu of the connected DVR to a desired item and set the value. 5. In the setting window, press the up/down (▲▼) button to move to the following: Ex) Protocol Type : TCP Port (TCP) : 0554,0555,0556,0557 DDNS Site : Samsung DDNS • DDNS Settings of the Router...


