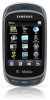
User Manual (user Manual) (ver.f6) (English)
Page 3
...SET FORTH IN THE EXPRESS WARRANTY CONTAINED ON THE WARRANTY PAGE ENCLOSED WITH THE PRODUCT, THE PURCHASER TAKES THE PRODUCT "AS IS", AND SAMSUNG MAKES NO EXPRESS OR IMPLIED WARRANTY OF ANY KIND WHATSOEVER WITH RESPECT TO THE PRODUCT, INCLUDING BUT NOT LIMITED TO THE MERCHANTABILITY OF ...source code covered under the open source licenses. Openwave® is covered by U.S. IN ADDITION, SAMSUNG SHALL NOT BE LIABLE FOR ANY DAMAGES OF ANY KIND RESULTING FROM THE PURCHASE OR USE OF THE PRODUCT OR ARISING FROM THE BREACH OF THE EXPRESS WARRANTY, INCLUDING INCIDENTAL, SPECIAL OR CONSEQUENTIAL...
User Manual (user Manual) (ver.f6) (English)
Page 6
... QWERTY Keyboard 66 Changing the Text Input Mode 67 Using T9 Mode 69 Using ABC Mode 70 Using Numeric 70 Using Symbols 70 Section 7: Understanding Your Contacts List 72 Using Mobile Address Book 72 Storing a Number in the Phone's Memory 72 Storing a Number on the SIM Card 73 Finding a Contact Entry 74 Adding a New Caller...
User Manual (user Manual) (ver.f6) (English)
Page 7
... Managing your Music Files 117 Section 10: Applications 119 Files 119 Games and Apps 125 Alarm Clock 126 Voice Recognition 128 Tasks 128 Memo 129 Using the Voice Recorder 130 Calculator 131 World Clock 131 Converter 132 Timer 133 Stopwatch 133 Birthday Widget 133 Calendar 134 Analog Clock 135 Digital Clock... 135 Downloads 136 Google Maps 136 My Account 136 My Album Online 136 Searching for Information 137 Tips 137 Weather 138 Section 11: Camera 139 Using the Camera 139 Take and Send Photos 139 4
User Manual (user Manual) (ver.f6) (English)
Page 8
Photos 142 Using the Camcorder 147 Recording and Sending a Video 147 Videos 150 My Album Online 151 Section 12: Web Applications and Social Buzz 152 Accessing the Web ...
User Manual (user Manual) (ver.f6) (English)
Page 9
... Health and Safety Information 183 Please Note the Following Information When Using Your Handset 184 Samsung Mobile Products and Recycling 185 UL Certified Travel Adapter 185 Consumer Information on Wireless Phones 185 Road Safety 191 Responsible Listening 192 Operating Environment 194 Using Your Phone Near Other Electronic Devices 195 FCC Hearing-Aid Compatibility...
User Manual (user Manual) (ver.f6) (English)
Page 10
... down until the power-off the phone (3) 3. Place your PIN, available optional services, and many others features. Activating Your Phone When you subscribe to start using your phone by first configuring your hardware, activating your service, and then setting up your Voicemail. Removing the Cover 1. Section 1: Getting Started This section explains...
User Manual (user Manual) (ver.f6) (English)
Page 13
... the microSD card into the slot (as those illustrated. 2. Installing or Removing the Memory Card Your phone supports an optional memory card (microSD™) for use with this mobile phone and other files. Ensure the microSD's gold contact pins face downward and the card is designed for data storage of such..., pictures, video or other devices. Getting Started 10 Push the microSD card with your thumb or finger until you hear a light click sound. Note: The Samsung device supports up to eject it from the slot.
User Manual (user Manual) (ver.f6) (English)
Page 15
... the left side of the phone (as indicated) and plug in approximately 4 hours. 1. A wall charger, which is used for charging the battery, is included with your local Samsung dealer for further details. You can use the phone while the battery is connected, the handset power cycles continuously, preventing proper operation. A discharged battery recharges...
User Manual (user Manual) (ver.f6) (English)
Page 16
... until the phone switches on the upper center of talk time remain; If the phone asks for your network. 13 The phone searches for a PIN, use the keypad to "Check PIN code" on your network and after finding it, the term "T-Mobile" displays on . 2. until the power-off the ...may be prompted to set up voice mail: 1. Now you remove the battery can make or receive calls. 4. When you to enter the phone password, use the keypad to create a password, a greeting, and your phone conserves its remaining battery power, not by turning off image displays. From the Home screen,...
User Manual (user Manual) (ver.f6) (English)
Page 17
... by either pressing and holding on the keypad, by pressing the Voice Mail icon in order to chronological order. To access Voice Mail using the phone's menu, or by using the menu: 1. From the Home screen, touch Dialer then press and hold until the phone dials voice mail. 2. Important!: You must set... up your account. From the Home screen, press then touch Messaging ➔ Voicemail. 2. When you select Yes to setup your Voice Mail before using this feature. When connected, follow the voice prompts from the voice mail center. Getting Started 14
User Manual (user Manual) (ver.f6) (English)
Page 18
Section 2: Understanding Your Phone This section outlines some key features of the features included in use and offers many significant features. It also displays the screen and the icons that display when the phone is lightweight, easy-to 32GB • Assisted ...; MP3 Music Player • Pre-loaded online widgets • Social Buzz application (MySpace, Facebook, Twitter) • Bluetooth Wireless Technology • Expandable Memory Slot, up to -use . Features of Your Phone Your phone is in your phone.
User Manual (user Manual) (ver.f6) (English)
Page 19
Front View of Your Phone The following illustrations show the main elements of your phone. 2. Receiver allows you to hear the other callers to hear you clearly when you to make voice note recordings. Press and hold to them. Understanding Your Phone 16 Microphone is also used during phone calls and allows other caller and the different ring tones or sounds offered by your phone: 1 6 5 2 4 3 Keys The following list correlates to make or answer a call. It is used to the illustrations. 1. Send key allows you are speaking to dial the last contact entered. 3.
User Manual (user Manual) (ver.f6) (English)
Page 22
... provides quick access to the items you to the Home screen where the time, date, and Widget bar display. 19 The Home icon returns you use most frequently (Web, Photo, Message inbox, IM, Tips, Telenav, Voice recognition, Calendar, Bluetooth, Today, Message composer, Games and apps, Voice mail, Widget memo, Digital clock...
User Manual (user Manual) (ver.f6) (English)
Page 24
... 10 minutes. 4. Display Your phone has a display on the fly while traveling, at a specified time when an alarm was set the brightness levels. 1. Help Help uses the Web to select the brightness level. 4. To specify the length of the phone which indicates when you press any key, the backlight turns on...
User Manual (user Manual) (ver.f6) (English)
Page 26
... menu navigation for docking widgets, folders, shortcuts or applications. Each Home screen displays a different wallpaper to aid you which panel is the starting point for using the applications or widgets on the screen to provide three workspaces for your finger horizontally to the left beyond the initial display width to view...
User Manual (user Manual) (ver.f6) (English)
Page 27
... the Widget bar. From the Home screen, press then touch Photos. 3. Widgets and the Widget Bar The Widget bar provides quick access to frequently-used features via Widgets, which act as ➔ Wallpaper once you drop a widget onto the Home screen, press, hold and drag the widget back ...to replace. - For more information about widgets, see "Using Shortcuts" on page 36. Tap the Widget bar tab, located on the left side of the individual panels. Displays 24 or - 2. By default, 19 ...
User Manual (user Manual) (ver.f6) (English)
Page 29
... page 178.) ᮣ Press and hold the lock button on page 178. Note: Smart unlock must be accessed by scrolling using the Navigation keys or by using menus and sub-menus. If you can tailor the phone's range of all the available menus associated with your phone. It also... includes an outline of functions to your needs using the shortcuts. For more information, refer to permanently unlock the phone: ᮣ From the Home screen, press then touch Settings ➔ Phone ...
User Manual (user Manual) (ver.f6) (English)
Page 31
Touch the - The following conventions are used in the procedures. Touch Save to remove the selected applications or Cancel to return to describe the navigation action in this manual to the menu. ... a menu list, tapping an item causes different functions, depending on which item you want to delete. Touch the icon in a list, tap the item: Navigation Using the touch screen display and the keys, you can navigate the features of applications.
User Manual (user Manual) (ver.f6) (English)
Page 34
Accessing a Menu Function using Press and Hold Some buttons and keys require you to press and hold them to activate a feature, for example, you press the Lock key to lock and unlock the phone. 31
User Manual (user Manual) (ver.f6) (English)
Page 35
Accessing a Menu Function by Touching Use a brief touch to select items on the display or to open the application. Navigation 32 For example: touch a widget to enter text on the virtual QWERTY keyboard.