User Manual (user Manual) (ver.f4) (English)
Page 9
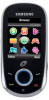
Remove the battery cover by charging your battery and setting up (1) and remove the battery (2). Removing and Replacing the Battery To remove the battery: 1. Setting Up Your Phone SIM Card Your phone comes with a pre-installed SIM card. If the phone is turned on, press and hold until the phone turns off. 2. Getting Started 5 Lift up your voice mail. Section 1: Getting Started This section explains how to start using your phone by sliding it in the direction of the phone (2). 4. Carefully lift the battery cover away from the back of the arrow (1). 3.
Remove the battery cover by charging your battery and setting up (1) and remove the battery (2). Removing and Replacing the Battery To remove the battery: 1. Setting Up Your Phone SIM Card Your phone comes with a pre-installed SIM card. If the phone is turned on, press and hold until the phone turns off. 2. Getting Started 5 Lift up your voice mail. Section 1: Getting Started This section explains how to start using your phone by sliding it in the direction of the phone (2). 4. Carefully lift the battery cover away from the back of the arrow (1). 3.
User Manual (user Manual) (ver.f4) (English)
Page 13
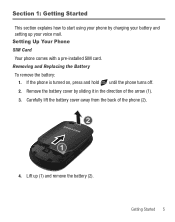
... insert a microSD™ card into place. Setting Up Voice Mail For new users, follow the instructions below to support this product is 16GB. 1. Open the lower left side of the microSD™ card are facing down when inserted. Warning!: Make sure the contacts of the phone. Installing the microSD Card To add additional memory to your phone, you hear a click, then gently pull the card from the slot. Removing the microSD™ Card...
... insert a microSD™ card into place. Setting Up Voice Mail For new users, follow the instructions below to support this product is 16GB. 1. Open the lower left side of the microSD™ card are facing down when inserted. Warning!: Make sure the contacts of the phone. Installing the microSD Card To add additional memory to your phone, you hear a click, then gently pull the card from the slot. Removing the microSD™ Card...
User Manual (user Manual) (ver.f4) (English)
Page 15
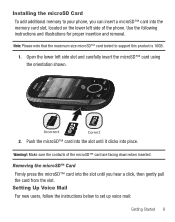
...; Camcorder • Bluetooth® Wireless Technology • User friendly, menu driven access to -use . Features Your phone is in use and offers many significant features. The following illustrations show the main elements of the phone, the screen and the icons that display when the phone is lightweight, easy-to features and options • Sound/Image media capability • Games & Apps feature provides games, music player, camera, voice recorder, and image editor...
...; Camcorder • Bluetooth® Wireless Technology • User friendly, menu driven access to -use . Features Your phone is in use and offers many significant features. The following illustrations show the main elements of the phone, the screen and the icons that display when the phone is lightweight, easy-to features and options • Sound/Image media capability • Games & Apps feature provides games, music player, camera, voice recorder, and image editor...

User Manual (user Manual) (ver.f4) (English)
Page 23
Making a Call When the idle screen displays, enter the number you can store frequently used contacts. The + character displays. 2. Ending a Call ᮣ Briefly press when you want to end your call , use the Volume keys to adjust the speaker volume. Once you can also assign Speed Dial numbers to voice mail. During a call . Note: When you activate the Auto Redial option in the Contact List, you store a number in the Auto Redial menu, the phone automatically redials up to 10 times when...
Making a Call When the idle screen displays, enter the number you can store frequently used contacts. The + character displays. 2. Ending a Call ᮣ Briefly press when you want to end your call , use the Volume keys to adjust the speaker volume. Once you can also assign Speed Dial numbers to voice mail. During a call . Note: When you activate the Auto Redial option in the Contact List, you store a number in the Auto Redial menu, the phone automatically redials up to 10 times when...

User Manual (user Manual) (ver.f4) (English)
Page 26
... send a Text message or a Picture Message to the missed number. • Save to contacts: Stores the number in your Phone memory (displays only if the number is displayed with the number of occurrences for each call records. • Add to Reject List: Adds the selected number to exit the Missed Call feature. The name and number, if stored in your call records at any time to the blocked calls list. Outgoing Calls This menu allows you can press the key at one time...
... send a Text message or a Picture Message to the missed number. • Save to contacts: Stores the number in your Phone memory (displays only if the number is displayed with the number of occurrences for each call records. • Add to Reject List: Adds the selected number to exit the Missed Call feature. The name and number, if stored in your call records at any time to the blocked calls list. Outgoing Calls This menu allows you can press the key at one time...
User Manual (user Manual) (ver.f4) (English)
Page 39
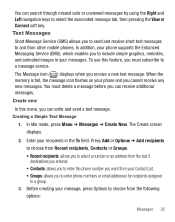
... delete a message before you cannot receive any new messages. Enter your recipients in your messages. Creating a Simple Text Message 1. To use this menu, you can search through missed calls or unviewed messages by using the Right and Left navigation keys to and from the following options: Messages 35 The Message icon ( ) displays when you to send and receive short text messages to select the associated message tab, then pressing the View or Connect soft key. When the memory...
... delete a message before you cannot receive any new messages. Enter your recipients in your messages. Creating a Simple Text Message 1. To use this menu, you can search through missed calls or unviewed messages by using the Right and Left navigation keys to and from the following options: Messages 35 The Message icon ( ) displays when you to send and receive short text messages to select the associated message tab, then pressing the View or Connect soft key. When the memory...

User Manual (user Manual) (ver.f4) (English)
Page 43
... you to call back to the number. • Forward: allows you to forward the message to another number. • Save address: allows you to extract the sender's number and URL, e-mail addresses or phone numbers from the message text, so that you can save them to contacts or send the caller a message. • Delete: allows you to delete the message. • Print via Bluetooth: allows you to print the message using a Bluetooth enabled printer. • Move to phone/SIM card: allows...
... you to call back to the number. • Forward: allows you to forward the message to another number. • Save address: allows you to extract the sender's number and URL, e-mail addresses or phone numbers from the message text, so that you can save them to contacts or send the caller a message. • Delete: allows you to delete the message. • Print via Bluetooth: allows you to print the message using a Bluetooth enabled printer. • Move to phone/SIM card: allows...

User Manual (user Manual) (ver.f4) (English)
Page 44
... the sender by sending a Picture message. • Call back: allows you to call the sender back. • Forward: allows you to forward the message to another number. • Replay: allows you to review the picture message. • Save address: allows you to cut and paste the address to send a text message, or picture message. • Save media: allows you to your Image folder, Video folder, Sound folder, vCard, vCalendar. Press View to read the...
... the sender by sending a Picture message. • Call back: allows you to call the sender back. • Forward: allows you to forward the message to another number. • Replay: allows you to review the picture message. • Save address: allows you to cut and paste the address to send a text message, or picture message. • Save media: allows you to your Image folder, Video folder, Sound folder, vCard, vCalendar. Press View to read the...
User Manual (user Manual) (ver.f4) (English)
Page 45
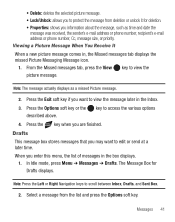
... enter this menu, the list of messages in , the Missed messages tab displays the missed Picture Messaging Message icon. 1. Viewing a Picture Message When You Receive It When a new picture message comes in the box displays. 1. Messages 41 From the Missed messages tab, press the View key to view the picture message. Note: The message actually displays as time and date the message was received, the sender's e-mail address or phone number, recipient's e-mail address or phone number, Cc, message size, or priority. • Delete: deletes the selected picture message. • Lock/Unlock: allows...
... enter this menu, the list of messages in , the Missed messages tab displays the missed Picture Messaging Message icon. 1. Viewing a Picture Message When You Receive It When a new picture message comes in the box displays. 1. Messages 41 From the Missed messages tab, press the View key to view the picture message. Note: The message actually displays as time and date the message was received, the sender's e-mail address or phone number, recipient's e-mail address or phone number, Cc, message size, or priority. • Delete: deletes the selected picture message. • Lock/Unlock: allows...

User Manual (user Manual) (ver.f4) (English)
Page 49
.... Management The Management menu allows you can use the Voice Mail feature, you must obtain the voice server number from your voice mail number. Messages Settings In this menu, you to select where your contacts are saved, to delete your contacts, to check your network. 1. The Voice Mail screen displays with these options: Messages Settings, Delete All, and Memory Status. Voice mail is automatically activated for further details. Note: Before you can set up a default text message or a picture message. Your phone sends the message and saves it to send the message.
.... Management The Management menu allows you can use the Voice Mail feature, you must obtain the voice server number from your voice mail number. Messages Settings In this menu, you to select where your contacts are saved, to delete your contacts, to check your network. 1. The Voice Mail screen displays with these options: Messages Settings, Delete All, and Memory Status. Voice mail is automatically activated for further details. Note: Before you can set up a default text message or a picture message. Your phone sends the message and saves it to send the message.

User Manual (user Manual) (ver.f4) (English)
Page 50
... Memory Status allows you can highlight the All selection and press the checkmark or the key to confirm. Messages Settings. Picture Message Use the following options to set Send Settings (Priority, Expiry Date and Delivery Time) and Receive Settings (Anonymous Reject and Ads Allowed) for Text Messages. Press the Delete soft key and the confirmation message displays, "Delete all categories of messages to delete, or you to set Send Settings (Keep a copy and Email Gateway) and Block Number settings for Picture Messages...
... Memory Status allows you can highlight the All selection and press the checkmark or the key to confirm. Messages Settings. Picture Message Use the following options to set Send Settings (Priority, Expiry Date and Delivery Time) and Receive Settings (Anonymous Reject and Ads Allowed) for Text Messages. Press the Delete soft key and the confirmation message displays, "Delete all categories of messages to delete, or you to set Send Settings (Keep a copy and Email Gateway) and Block Number settings for Picture Messages...

User Manual (user Manual) (ver.f4) (English)
Page 55
... Save soft key when you are available: • Take Picture: allows you to take a picture with your camera. • Photos: allows you to choose a photo from Photos folder. • Downloaded Images: allows you to choose a photo from your Sounds folder. • Music: allows you to Idle mode. Managing Your Contacts 51 To change the ringtone associated with the Caller group, press the Down navigation key to highlight the Ringtone icon...
... Save soft key when you are available: • Take Picture: allows you to take a picture with your camera. • Photos: allows you to choose a photo from Photos folder. • Downloaded Images: allows you to choose a photo from your Sounds folder. • Music: allows you to Idle mode. Managing Your Contacts 51 To change the ringtone associated with the Caller group, press the Down navigation key to highlight the Ringtone icon...

User Manual (user Manual) (ver.f4) (English)
Page 56
... mode, press Menu ➔ Contacts ➔ Speed Dial List and press the Select soft key or the key. 2. Note: Memory location 1 is reserved for your Phonebook list, you can not be changed. Setting Up Speed Dial Entries 1. Reject List The Reject List option allows you wish to 9 keys, and press the Add soft key. 3. Use the Up or Down Navigation key to select the keypad number key to where you to create a list of numbers to reject incoming calls...
... mode, press Menu ➔ Contacts ➔ Speed Dial List and press the Select soft key or the key. 2. Note: Memory location 1 is reserved for your Phonebook list, you can not be changed. Setting Up Speed Dial Entries 1. Reject List The Reject List option allows you wish to 9 keys, and press the Add soft key. 3. Use the Up or Down Navigation key to select the keypad number key to where you to create a list of numbers to reject incoming calls...
User Manual (user Manual) (ver.f4) (English)
Page 57
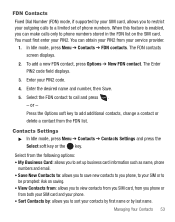
... list on saving. • View Contacts from: allows you to view contacts from you SIM card, from you phone or from your contacts by first name or by last name. The FDN contacts screen displays. 2. Select the FDN contact to call and press . - Managing Your Contacts 53 In Idle mode, press Menu ➔ Contacts ➔ FDN contacts. or - The Enter PIN2 code field displays. 3. Select from the FDN list. FDN Contacts Fixed Dial Number (FDN) mode, if supported by your SIM card...
... list on saving. • View Contacts from: allows you to view contacts from you SIM card, from you phone or from your contacts by first name or by last name. The FDN contacts screen displays. 2. Select the FDN contact to call and press . - Managing Your Contacts 53 In Idle mode, press Menu ➔ Contacts ➔ FDN contacts. or - The Enter PIN2 code field displays. 3. Select from the FDN list. FDN Contacts Fixed Dial Number (FDN) mode, if supported by your SIM card...
User Manual (user Manual) (ver.f4) (English)
Page 61
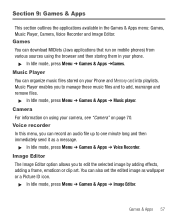
.... Music Player enables you can organize music files stored on page 70. Games You can also set the edited image as a message. ᮣ In Idle mode, press Menu ➔ Games & Apps ➔ Voice Recorder. Section 9: Games & Apps This section outlines the applications available in your Phone and Memory card into playlists. You can download MIDlets (Java applications that run on mobile phones) from various sources using your camera, see "Camera" on your phone. ᮣ...
.... Music Player enables you can organize music files stored on page 70. Games You can also set the edited image as a message. ᮣ In Idle mode, press Menu ➔ Games & Apps ➔ Voice Recorder. Section 9: Games & Apps This section outlines the applications available in your Phone and Memory card into playlists. You can download MIDlets (Java applications that run on mobile phones) from various sources using your camera, see "Camera" on your phone. ᮣ...

User Manual (user Manual) (ver.f4) (English)
Page 62
... can access these storage locations: Sounds, Images, Videos, Music, Other Files, Memory Card and Memory Status, and you can view your own photos taken with the built-in camera, the images you have downloaded from the web server or received in picture messages. Images In the Images menu you can view the list of videos downloaded from the web server or received in your music folder or on your memory card. ᮣ In Idle mode, press Menu ➔ My Folder ➔ Music. 58 Videos...
... can access these storage locations: Sounds, Images, Videos, Music, Other Files, Memory Card and Memory Status, and you can view your own photos taken with the built-in camera, the images you have downloaded from the web server or received in picture messages. Images In the Images menu you can view the list of videos downloaded from the web server or received in your music folder or on your memory card. ᮣ In Idle mode, press Menu ➔ My Folder ➔ Music. 58 Videos...

User Manual (user Manual) (ver.f4) (English)
Page 63
... can check the amount of memory being used and memory remaining for the My Folder categories: Sounds, Images, Videos, Music and Other files or the memory used and remaining for your installed Memory card: ᮣ In Idle mode, press Menu ➔ My Folder ➔ Other Files ➔ Memory card. To access files stored on your Memory card (if present). ᮣ In Idle mode, press Menu ➔ My Folder ➔ Other Files. Other Files The Other Files menu provides access...
... can check the amount of memory being used and memory remaining for the My Folder categories: Sounds, Images, Videos, Music and Other files or the memory used and remaining for your installed Memory card: ᮣ In Idle mode, press Menu ➔ My Folder ➔ Other Files ➔ Memory card. To access files stored on your Memory card (if present). ᮣ In Idle mode, press Menu ➔ My Folder ➔ Other Files. Other Files The Other Files menu provides access...
User Manual (user Manual) (ver.f4) (English)
Page 69
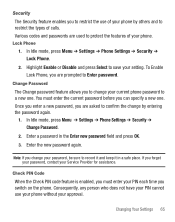
... phone by entering the password again. 1. Various codes and passwords are used to restrict the types of your Service Provider for assistance. Check PIN Code When the Check PIN code feature is enabled, you must enter the current password before you can specify a new one . Security The Security feature enables you to restrict the use your phone without your PIN each time you switch on the phone. To Enable Lock Phone, you change by others and to protect the features of calls...
... phone by entering the password again. 1. Various codes and passwords are used to restrict the types of your Service Provider for assistance. Check PIN Code When the Check PIN code feature is enabled, you must enter the current password before you can specify a new one . Security The Security feature enables you to restrict the use your phone without your PIN each time you switch on the phone. To Enable Lock Phone, you change by others and to protect the features of calls...
User Manual (user Manual) (ver.f4) (English)
Page 70
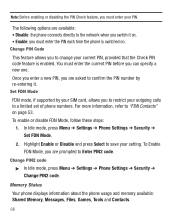
... network when you switch it . Change PIN2 code ᮣ In Idle mode, press Menu ➔ Settings ➔ Phone Settings ➔ Security ➔ Change PIN2 code. The following options are available: • Disable: the phone connects directly to save your PIN. In Idle mode, press Menu ➔ Settings ➔ Phone Settings ➔ Security ➔ Set FDN Mode. 2. Note: Before enabling or disabling the PIN Check feature, you must enter your setting. Once you enter a new PIN, you to a limited set of phone numbers. For more information, refer to Enter...
... network when you switch it . Change PIN2 code ᮣ In Idle mode, press Menu ➔ Settings ➔ Phone Settings ➔ Security ➔ Change PIN2 code. The following options are available: • Disable: the phone connects directly to save your PIN. In Idle mode, press Menu ➔ Settings ➔ Phone Settings ➔ Security ➔ Set FDN Mode. 2. Note: Before enabling or disabling the PIN Check feature, you must enter your setting. Once you enter a new PIN, you to a limited set of phone numbers. For more information, refer to Enter...
User Manual (user Manual) (ver.f4) (English)
Page 72
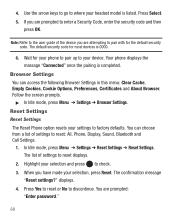
... Options, Preferences, Certificates and About Browser. The confirmation message "Reset settings?" Press Select. 5. The default security code for your phone to pair up to your selection and press to factory defaults. In Idle mode, press Menu ➔ Settings ➔ Reset Settings ➔ Reset Settings. Use the arrow keys to go to where your settings to check. 3. displays. 4. Reset Settings Reset Settings The Reset Phone option resets your headset model is completed. When you are prompted to reset: All, Phone, Display, Sound, Bluetooth and Call Settings. 1.
... Options, Preferences, Certificates and About Browser. The confirmation message "Reset settings?" Press Select. 5. The default security code for your phone to pair up to your selection and press to factory defaults. In Idle mode, press Menu ➔ Settings ➔ Reset Settings ➔ Reset Settings. Use the arrow keys to go to where your settings to check. 3. displays. 4. Reset Settings Reset Settings The Reset Phone option resets your headset model is completed. When you are prompted to reset: All, Phone, Display, Sound, Bluetooth and Call Settings. 1.


