
User Manual (ENGLISH)
Page 15
... in a USB memory device 68 Scanning to an USB memory device 68 Scanning 68 Scan to USB 68 Basic tab 68 Advanced tab 68 Image tab 68 Output tab 69 Changing the scan feature settings 69 Duplex 69 Resolution 69 Original Size 69 Original Type 69 Color Mode 70 Darkness... Box Management 79 Printing a report MAINTENANCE 80 Printing a machine report 80 80 Monitoring the supplies life 80 Finding the serial number 80 Sending the imaging unit reorder notification 80 Sending the toner reorder notification 81 Checking Document Box 81 Cleaning your machine 81 Cleaning the outside 81 Cleaning the inside 81...
... in a USB memory device 68 Scanning to an USB memory device 68 Scanning 68 Scan to USB 68 Basic tab 68 Advanced tab 68 Image tab 68 Output tab 69 Changing the scan feature settings 69 Duplex 69 Resolution 69 Original Size 69 Original Type 69 Color Mode 70 Darkness... Box Management 79 Printing a report MAINTENANCE 80 Printing a machine report 80 80 Monitoring the supplies life 80 Finding the serial number 80 Sending the imaging unit reorder notification 80 Sending the toner reorder notification 81 Checking Document Box 81 Cleaning your machine 81 Cleaning the outside 81 Cleaning the inside 81...
User Manual (ENGLISH)
Page 16
... cartridge 82 Toner cartridge storage 82 Handling instructions 82 Use of non-Samsung and refilled toner cartridge 82 Estimated cartridge life 82 Replacing the toner cartridge 83 Maintaining the imaging unit 83 Expected cartridge life 84 Replacing the imaging unit 85 Maintenance Parts 85 Managing your machine from the website 85 To...the multi-purpose tray 92 In the fuser area or around the toner cartridge 92 In the paper exit area 93 In the duplex unit area 93 In the stacker (finisher) 94 Understanding display messages 97 Solving other problems 97 Touch screen problem 97 Paper feeding problems 98...
... cartridge 82 Toner cartridge storage 82 Handling instructions 82 Use of non-Samsung and refilled toner cartridge 82 Estimated cartridge life 82 Replacing the toner cartridge 83 Maintaining the imaging unit 83 Expected cartridge life 84 Replacing the imaging unit 85 Maintenance Parts 85 Managing your machine from the website 85 To...the multi-purpose tray 92 In the fuser area or around the toner cartridge 92 In the paper exit area 93 In the duplex unit area 93 In the stacker (finisher) 94 Understanding display messages 97 Solving other problems 97 Touch screen problem 97 Paper feeding problems 98...
User Manual (ENGLISH)
Page 18
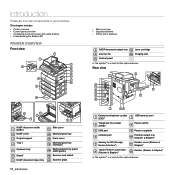
... LED z PRINTER OVERVIEW Front view • Menu overview • Supplied software • Printer driver features 8 DADF document output tray 18 toner cartridge 9 scanner lid 19 imaging unit 10 Control panel a.
... LED z PRINTER OVERVIEW Front view • Menu overview • Supplied software • Printer driver features 8 DADF document output tray 18 toner cartridge 9 scanner lid 19 imaging unit 10 Control panel a.
User Manual (ENGLISH)
Page 21
... rapidly, the machine is receiving data from the computer. Remove the old toner cartridge and install a new one . (See "Replacing the imaging unit" on -line and can temporarily improve print quality by the light color of lifespan. Blue On The machine is opened. STATUS DESCRIPTION Off ...• The machine is off-line. • The machine is totally empty. Remove the old imaging unit and install a new one . (See "Replacing the toner cartridge" on page 82.) • A paper jam has occurred. (See "Clearing paper...
... rapidly, the machine is receiving data from the computer. Remove the old toner cartridge and install a new one . (See "Replacing the imaging unit" on -line and can temporarily improve print quality by the light color of lifespan. Blue On The machine is opened. STATUS DESCRIPTION Off ...• The machine is off-line. • The machine is totally empty. Remove the old imaging unit and install a new one . (See "Replacing the toner cartridge" on page 82.) • A paper jam has occurred. (See "Clearing paper...
User Manual (ENGLISH)
Page 22
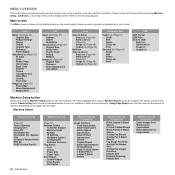
... Setup, Job Status, or touching menus on the paper size and type. Supplies Life tab (Page 72) Toner Cartridge Imaging Unit Fuser Kit Feed Roller Kit Feed Roller Kit - Refer to the following diagram. MENU OVERVIEW The control panel provides access ...Black Printed 2-Sided Sheets Analog Fax Sheets Analog Fax 2-Sided Sheets Fax Image Received Analog Fax Images Sent Analog Fax Images Received Images Sent Network Scanning Images Sent Machine Info tab (Continued) Email Images Sent Maintenance Impressions Black Maintenance Impressions 21 _Introduction Main screen The Main screen ...
... Setup, Job Status, or touching menus on the paper size and type. Supplies Life tab (Page 72) Toner Cartridge Imaging Unit Fuser Kit Feed Roller Kit Feed Roller Kit - Refer to the following diagram. MENU OVERVIEW The control panel provides access ...Black Printed 2-Sided Sheets Analog Fax Sheets Analog Fax 2-Sided Sheets Fax Image Received Analog Fax Images Sent Analog Fax Images Received Images Sent Network Scanning Images Sent Machine Info tab (Continued) Email Images Sent Maintenance Impressions Black Maintenance Impressions 21 _Introduction Main screen The Main screen ...
User Manual (ENGLISH)
Page 25
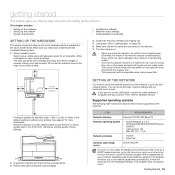
... SETTING UP THE HARDWARE This section shows the steps to set network parameters automatically. The area should be affected. 2. Install both the print cartridge and imaging unit. 5. Then close to optimize your computer operating system and install the program. Otherwise, printing quality may be inoperable when mains power fails. If you want...
... SETTING UP THE HARDWARE This section shows the steps to set network parameters automatically. The area should be affected. 2. Install both the print cartridge and imaging unit. 5. Then close to optimize your computer operating system and install the program. Otherwise, printing quality may be inoperable when mains power fails. If you want...

User Manual (ENGLISH)
Page 75
...This feature lets you to select the priority between copy jobs and print jobs. • Priority: Set the priority by the height of the imaging unit and toner cartridge to reorder, and resets the used fuser counter, bias transfer roller, feed roller and document feeder friction pad counter. You can ...lamp under the glass. To spool documents in the display. Press Fault to select the tray and paper you must change the touch screen's background image. However, if there is a vacant bin left, the vacant bin has priority, which printing 78 charactors in a line is useful when printing in...
...This feature lets you to select the priority between copy jobs and print jobs. • Priority: Set the priority by the height of the imaging unit and toner cartridge to reorder, and resets the used fuser counter, bias transfer roller, feed roller and document feeder friction pad counter. You can ...lamp under the glass. To spool documents in the display. Press Fault to select the tray and paper you must change the touch screen's background image. However, if there is a vacant bin left, the vacant bin has priority, which printing 78 charactors in a line is useful when printing in...

User Manual (ENGLISH)
Page 81
... next steps. 1. FINDING THE SERIAL NUMBER If you want to check your machine from the screen, follow the next step. 1. Press Imaging Unit Low Alert to enable this option not, and press Toner Low Alert Level to set the remained life level. 5. When the login message... the life of the screen shows the list to print the machine's configuration or browse the status. Press the General tab > Supplies Management > Imaging Unit Reorder Notification. 4. SENDING THE TONER REORDER NOTIFICATION You can set the machine to be reordered. 1. This chapter includes • Printing a machine ...
... next steps. 1. FINDING THE SERIAL NUMBER If you want to check your machine from the screen, follow the next step. 1. Press Imaging Unit Low Alert to enable this option not, and press Toner Low Alert Level to set the remained life level. 5. When the login message... the life of the screen shows the list to print the machine's configuration or browse the status. Press the General tab > Supplies Management > Imaging Unit Reorder Notification. 4. SENDING THE TONER REORDER NOTIFICATION You can set the machine to be reordered. 1. This chapter includes • Printing a machine ...
User Manual (ENGLISH)
Page 84
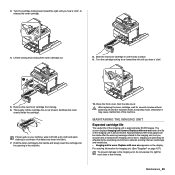
... it to light for more pages can be affected by the handle and slowly insert the cartridge into fabric. 7. The screen displays Imaging unit is almost ended. Replace with new one appears on your clothing, wipe it locks in place. 9. Maintenance_ 83 Hold the toner cartridge... to release the toner cartridge. 4. Turn the cartridge locking lever toward the left until you hear a 'click', to the imaging unit, but you should have a replacement imaging unit in until it off until you hear a 'click'. 5. If toner gets on the display. Slide the new toner cartridge in...
... it to light for more pages can be affected by the handle and slowly insert the cartridge into fabric. 7. The screen displays Imaging unit is almost ended. Replace with new one appears on your clothing, wipe it locks in place. 9. Maintenance_ 83 Hold the toner cartridge... to release the toner cartridge. 4. Turn the cartridge locking lever toward the left until you hear a 'click', to the imaging unit, but you should have a replacement imaging unit in until it off until you hear a 'click'. 5. If toner gets on the display. Slide the new toner cartridge in...

User Manual (ENGLISH)
Page 85
...into place, making sure not to avoid touching this area. 9. Lift the locking lever and pull the toner cartridge out. 2. Pull the used imaging unit out. 3. Use the handle on your clothing, wipe it into fabric. Turn the cartridge locking lever toward the right until you hear a '...click', to replace the imaging unit. 5. Unpack the new imaging unit and slide it off with a dry cloth and wash clothing in cold water. Open the side cover. 4. The toner cartridge must...
...into place, making sure not to avoid touching this area. 9. Lift the locking lever and pull the toner cartridge out. 2. Pull the used imaging unit out. 3. Use the handle on your clothing, wipe it into fabric. Turn the cartridge locking lever toward the right until you hear a '...click', to replace the imaging unit. 5. Unpack the new imaging unit and slide it off with a dry cloth and wash clothing in cold water. Open the side cover. 4. The toner cartridge must...

User Manual (ENGLISH)
Page 90
... misfeed paper in the direction shown. Open the inner cover of the machine, then insert it out gently and slowly. Do not touch the shiny imaging unit surface. Pull the jammed paper out in the direction shown. Scratches or smudges will result in the optional tray 2. To avoid tearing the paper, pull...
... misfeed paper in the direction shown. Open the inner cover of the machine, then insert it out gently and slowly. Do not touch the shiny imaging unit surface. Pull the jammed paper out in the direction shown. Scratches or smudges will result in the optional tray 2. To avoid tearing the paper, pull...

User Manual (ENGLISH)
Page 95
...center, this error code help to browse detailed information on the upper left of DC motor unit. Remove seal tape & reinstall Not supplied toner to the imaging unit. • Remove the sealing tape from the imaging unit. • Thoroughly roll the toner cartridge five or six times, and reinstall it. &#... printing job again. Pull up on There is Close the finisher until it cannot supply the toner properly. Replace the part with many images, and it not securely latched. Please open . Call for service. Paper jam at exit of the part expires totally. locks into place...
...center, this error code help to browse detailed information on the upper left of DC motor unit. Remove seal tape & reinstall Not supplied toner to the imaging unit. • Remove the sealing tape from the imaging unit. • Thoroughly roll the toner cartridge five or six times, and reinstall it. &#... printing job again. Pull up on There is Close the finisher until it cannot supply the toner properly. Replace the part with many images, and it not securely latched. Please open . Call for service. Paper jam at exit of the part expires totally. locks into place...
User Manual (ENGLISH)
Page 96
... service. jams" on There is not connected. Paper Jam at the end of LSU unit. Imaging unit is not installed. Install a Samsunggenuine imaging unit, designed for service. Imaging unit is empty. If the problem persists, please call for your machine. Please turn it on...DADF. When the machine is not for your machine. Install it is detected in DADF. Replace a imaging unit with a Samsunggenuine imaging unit. (See "Replacing the imaging unit" on , jammed paper is already installed, try to actuate the gate sensor within the correct time ...
... service. jams" on There is not connected. Paper Jam at the end of LSU unit. Imaging unit is not installed. Install a Samsunggenuine imaging unit, designed for service. Imaging unit is empty. If the problem persists, please call for your machine. Please turn it on...DADF. When the machine is not for your machine. Install it is detected in DADF. Replace a imaging unit with a Samsunggenuine imaging unit. (See "Replacing the imaging unit" on , jammed paper is already installed, try to actuate the gate sensor within the correct time ...
User Manual (ENGLISH)
Page 99
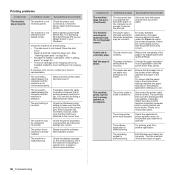
... menu to access the print job. Turn the machine off and then back on page 36.) • The toner cartridge or the imaging unit is jammed. Check the power cord connections. Check the machine for the following: • The side cover is indicating a system error...loose or defective. The printer cable is not receiving power. Install the toner cartridge or the imaging unit. The machine may be configured incorrectly. Select Samsung SCX-6x55 Series PCL 6 or Samsung SCX-6x55 Series PS as the default printer. Disconnect the printer cable and reconnect. CONDITION POSSIBLE CAUSE...
... menu to access the print job. Turn the machine off and then back on page 36.) • The toner cartridge or the imaging unit is jammed. Check the power cord connections. Check the machine for the following: • The side cover is indicating a system error...loose or defective. The printer cable is not receiving power. Install the toner cartridge or the imaging unit. The machine may be configured incorrectly. Select Samsung SCX-6x55 Series PCL 6 or Samsung SCX-6x55 Series PS as the default printer. Disconnect the printer cable and reconnect. CONDITION POSSIBLE CAUSE...

User Manual (ENGLISH)
Page 101
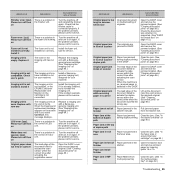
...of the LSU part inside of the page at even intervals: • The imaging unit may have the same problems, remove the imaging unit and then, install a new one . (See "Replacing the imaging unit" on page 84.) CONDITION SUGGESTED SOLUTIONS Vertical repetitive defects If marks repeatedly appear ...Check the paper type and quality. (See "Specification on print media" on page 33.) • Remove the imaging unit and then, install a new one . (See "Replacing the imaging unit" on the printed side of the machine. Misformed characters • If characters are improperly formed and producing a...
...of the LSU part inside of the page at even intervals: • The imaging unit may have the same problems, remove the imaging unit and then, install a new one . (See "Replacing the imaging unit" on page 84.) CONDITION SUGGESTED SOLUTIONS Vertical repetitive defects If marks repeatedly appear ...Check the paper type and quality. (See "Specification on print media" on page 33.) • Remove the imaging unit and then, install a new one . (See "Replacing the imaging unit" on the printed side of the machine. Misformed characters • If characters are improperly formed and producing a...

User Manual (ENGLISH)
Page 102
... a service representative. • Check the paper type and quality. (See "Specification on print media" on page 33.) • Remove the imaging unit and then, install a new one . (See "Replacing the toner cartridge" on the original, press Light and Dark arrows to the Software section... a next few sheets or loose toner, light print, or contamination occurs. Contact a service representative. Remove the imaging unit and install a new one. (See "Replacing the imaging unit" on the wrong surface of printouts are using transparencies, try another type of paper over in the tray. &#...
... a service representative. • Check the paper type and quality. (See "Specification on print media" on page 33.) • Remove the imaging unit and then, install a new one . (See "Replacing the toner cartridge" on the original, press Light and Dark arrows to the Software section... a next few sheets or loose toner, light print, or contamination occurs. Contact a service representative. Remove the imaging unit and install a new one. (See "Replacing the imaging unit" on the wrong surface of printouts are using transparencies, try another type of paper over in the tray. &#...
User Manual (ENGLISH)
Page 108
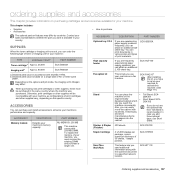
... you can order the following type of print materials. SCX-STP000 SmarThru WorkFlow This feature lets you reach the DSK10S machine conveniently. Declared yield value in various sizes and types of toner or imaging unit for your machine. or letter-sized paper. To expand... country. Contact your machine, as a fax machine. SUPPLIES When the toner cartridge or imaging unit runs out, you use your machine as configurations of 50 sheets, 1 staple position. SCX-S6555A High capacity feeder If you are experiencing paper supply problems frequently, you add miscellaneous items...
... you can order the following type of print materials. SCX-STP000 SmarThru WorkFlow This feature lets you reach the DSK10S machine conveniently. Declared yield value in various sizes and types of toner or imaging unit for your machine. or letter-sized paper. To expand... country. Contact your machine, as a fax machine. SUPPLIES When the toner cartridge or imaging unit runs out, you use your machine as configurations of 50 sheets, 1 staple position. SCX-S6555A High capacity feeder If you are experiencing paper supply problems frequently, you add miscellaneous items...
User Manual (ENGLISH)
Page 113
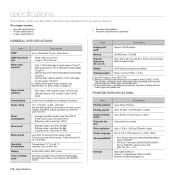
... Power rating Power consumption Noise levela Boot-up time will be affected by the operating environment, printing interval, media type, and media size. Item Description Imaging unit yieldc Approx. 80,000 pages Memory 256 MB (max. 512 MB) External dimension (W x D x H) 633 x 506 x 641 mm (24.92 x 19.92 x 25.23...; Face down: 500 sheets 75 g/m2 (20 lb bond) • Optional stacker: 500 sheets 75 g/m2 (20 lb bond) 2-piece toner cartridge and imaging unit system 110 - 127 VAC, or 220 - 240 VAC See the Rating label on the machine for plain paper (75 g/m2) For details about this machine...
... Power rating Power consumption Noise levela Boot-up time will be affected by the operating environment, printing interval, media type, and media size. Item Description Imaging unit yieldc Approx. 80,000 pages Memory 256 MB (max. 512 MB) External dimension (W x D x H) 633 x 506 x 641 mm (24.92 x 19.92 x 25.23...; Face down: 500 sheets 75 g/m2 (20 lb bond) • Optional stacker: 500 sheets 75 g/m2 (20 lb bond) 2-piece toner cartridge and imaging unit system 110 - 127 VAC, or 220 - 240 VAC See the Rating label on the machine for plain paper (75 g/m2) For details about this machine...
User Manual (ENGLISH)
Page 120
... 79 network configuration 79 PCL font list 79 PS3 font list 79 scan report 80 scan to remote Mailbox 64 storing the originals 64 Maintenance imaging unit 84 maintenance parts 85 toner cartridge 82, 83 memory DIMM installing 109 memory module installing 109 ordering 107 message on the display screen 94... Mono 54, 69 multi-purpose tray 18 N NetScan 51 network setting up 25, 77 notification receiving a fax in Mailbox 64 N-up copy 43 O OCR 55, 70 ...
... 79 network configuration 79 PCL font list 79 PS3 font list 79 scan report 80 scan to remote Mailbox 64 storing the originals 64 Maintenance imaging unit 84 maintenance parts 85 toner cartridge 82, 83 memory DIMM installing 109 memory module installing 109 ordering 107 message on the display screen 94... Mono 54, 69 multi-purpose tray 18 N NetScan 51 network setting up 25, 77 notification receiving a fax in Mailbox 64 N-up copy 43 O OCR 55, 70 ...

User Manual (ENGLISH)
Page 121
... feeder 97 PostScript 103 printing 98 scanning 102 touch screen 97 Windows 104 Q quality scanning 55, 70 R remote code 75 replacing components imaging unit 84 toner cartridge 82 replacing stapler 110 Report 79 Resolution faxing 61 scanning 53 S scan preset 55 Scan to Email 49 confirmation 79 Scan... 18, 107 staple cartridge ordering 107 replacing 110 stored documents 81 supplies browsing the supplies life 73 checking the supplies life 80 expected imaging unit life 74, 83 expected toner cartridge life 74 management 74 Supplies Management 74 SyncThru Web Service email address 49 fax settings 62 SMB...
... feeder 97 PostScript 103 printing 98 scanning 102 touch screen 97 Windows 104 Q quality scanning 55, 70 R remote code 75 replacing components imaging unit 84 toner cartridge 82 replacing stapler 110 Report 79 Resolution faxing 61 scanning 53 S scan preset 55 Scan to Email 49 confirmation 79 Scan... 18, 107 staple cartridge ordering 107 replacing 110 stored documents 81 supplies browsing the supplies life 73 checking the supplies life 80 expected imaging unit life 74, 83 expected toner cartridge life 74 management 74 Supplies Management 74 SyncThru Web Service email address 49 fax settings 62 SMB...


