User Manual (user Manual) (ver.f5) (English)
Page 4
... Phone 10 Open View of Your Phone 12 Command Keys 13 Understanding the Display Screen 15 Section 3: Call Functions 18 Making a Call 18 Answering a Call 18 Call In-Progress Options 18 Recent Calls 19 Contacts 22 Roaming 23 Voice Commands 23 Section 4: Menu Navigation 30 Menu Navigation 30 Section 5: Entering Text 37 Changing the Text Mode 37 1 Entering Text Using Word Mode 37 Entering Upper and Lower Case 38 Entering Symbols 38 Entering Numbers 39 Entering Quick Text 39 Section 6: Understanding Your Contacts 40 Opening Contacts Menu 40 Contacts Icons 40 Adding a Contact...
... Phone 10 Open View of Your Phone 12 Command Keys 13 Understanding the Display Screen 15 Section 3: Call Functions 18 Making a Call 18 Answering a Call 18 Call In-Progress Options 18 Recent Calls 19 Contacts 22 Roaming 23 Voice Commands 23 Section 4: Menu Navigation 30 Menu Navigation 30 Section 5: Entering Text 37 Changing the Text Mode 37 1 Entering Text Using Word Mode 37 Entering Upper and Lower Case 38 Entering Symbols 38 Entering Numbers 39 Entering Quick Text 39 Section 6: Understanding Your Contacts 40 Opening Contacts Menu 40 Contacts Icons 40 Adding a Contact...
User Manual (user Manual) (ver.f5) (English)
Page 16
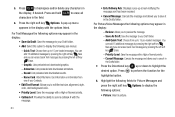
... a call , to turn your phone on/ off . • Press END to voicemail. 11. Left Soft Key Some functions of the left ) soft key to the previous menu or screen when navigating features. 12. Press to return to edit a Contact or Profile setting. Command Keys Functions for the current menu. 9. Microphone: The Microphone allows the other caller to hear you clearly when you receive an incoming call, press to send...
... a call , to turn your phone on/ off . • Press END to voicemail. 11. Left Soft Key Some functions of the left ) soft key to the previous menu or screen when navigating features. 12. Press to return to edit a Contact or Profile setting. Command Keys Functions for the current menu. 9. Microphone: The Microphone allows the other caller to hear you clearly when you receive an incoming call, press to send...
User Manual (user Manual) (ver.f5) (English)
Page 22
... the home screen, press the SEND key. 2. Press to open the highlighted menu or to highlight the 3. These types of calls are: • Missed: Displays any missed calls. • Received: Displays any received calls that you can either receive or make. Once the desired number is a listing of the different types of the calls made from your phone. The following options: • Save to Contacts: Save the number to display the following call information appear in your Contacts list...
... the home screen, press the SEND key. 2. Press to open the highlighted menu or to highlight the 3. These types of calls are: • Missed: Displays any missed calls. • Received: Displays any received calls that you can either receive or make. Once the desired number is a listing of the different types of the calls made from your phone. The following options: • Save to Contacts: Save the number to display the following call information appear in your Contacts list...
User Manual (user Manual) (ver.f5) (English)
Page 23
... Directional key down to the left of the number indicates the type of call timers for your phone. 6. Or, you view Recent Calls, an icon to highlight Add New Contact or Update Existing. Creating or Updating Contacts Using Call History 1. Save to Contacts is already in your Contacts list. • Details: Displays details about the caller if entered in Contacts. • Erase: Deletes the call from Call History. • Lock/Unlock: Locks or unlocks the entry to prevent accidental deletion. • Erase All: Deletes all calls from Call History. • View...
... Directional key down to the left of the number indicates the type of call timers for your phone. 6. Or, you view Recent Calls, an icon to highlight Add New Contact or Update Existing. Creating or Updating Contacts Using Call History 1. Save to Contacts is already in your Contacts list. • Details: Displays details about the caller if entered in Contacts. • Erase: Deletes the call from Call History. • Lock/Unlock: Locks or unlocks the entry to prevent accidental deletion. • Erase All: Deletes all calls from Call History. • View...

User Manual (user Manual) (ver.f5) (English)
Page 24
... selected Update Existing, proceed to each number associated with a selection list of text entry, such as Word, Abc, ABC, 123, or Symbols. 7. A confirmation message appears in the display, Yes is assigned to your Contacts. 21 The number is saved to Speed Dial location 1. Location 411: directory assistance, 611: customer service access, 911: emergency phone number. Note: You can assign a speed dial location to step 9. 5. To assign a Speed Dial location, press the Directional key up screen with the contact (Home, Work, Mobile 1, Mobile...
... selected Update Existing, proceed to each number associated with a selection list of text entry, such as Word, Abc, ABC, 123, or Symbols. 7. A confirmation message appears in the display, Yes is assigned to your Contacts. 21 The number is saved to Speed Dial location 1. Location 411: directory assistance, 611: customer service access, 911: emergency phone number. Note: You can assign a speed dial location to step 9. 5. To assign a Speed Dial location, press the Directional key up screen with the contact (Home, Work, Mobile 1, Mobile...

User Manual (user Manual) (ver.f5) (English)
Page 27
... your Contacts List, a Name and a Location (home, work, mobile) or the phone number. • Send : Send a text or picture message to a number or to someone in the Call, Lookup and Send voice commands. - If you frequently experience false activations (Voice Commands detects a wrong match), you might be able to get better recognition by default. • About: Displays information about 60 seconds. - If you have done and resets digit recognition to the factory default. You...
... your Contacts List, a Name and a Location (home, work, mobile) or the phone number. • Send : Send a text or picture message to a number or to someone in the Call, Lookup and Send voice commands. - If you frequently experience false activations (Voice Commands detects a wrong match), you might be able to get better recognition by default. • About: Displays information about 60 seconds. - If you have done and resets digit recognition to the factory default. You...
User Manual (user Manual) (ver.f5) (English)
Page 37
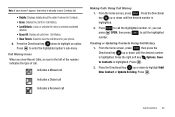
... Emergency Tone 5: Device Connect 3: Keypad Sounds 4: Keypad Volume 5: Service Alerts 1: ERI 2: Minute Beep 3: Call Connect 4: Service Change 6: Power On/Off 1: Power On 2: Power Off 5: Display Settings 1: Banner 1: Personal Banner 2: ERI Banner 2: Backlight 1: Display 1: Duration 2: Brightness 2: Keypad 3: Contrast 4: Wallpaper 1: Main Screen 2: Front Screen 5: Display Themes 6: Main Menu Settings 7: Dial Fonts 1: Style 2: Size 8: Clock Format 1: Main Clock 2: Front Clock 6: Phone Settings 1: Airplane Mode 2: Set Shortcuts 1: Set My Shortcuts 2: Set Directional Key 3: Voice Command Settings...
... Emergency Tone 5: Device Connect 3: Keypad Sounds 4: Keypad Volume 5: Service Alerts 1: ERI 2: Minute Beep 3: Call Connect 4: Service Change 6: Power On/Off 1: Power On 2: Power Off 5: Display Settings 1: Banner 1: Personal Banner 2: ERI Banner 2: Backlight 1: Display 1: Duration 2: Brightness 2: Keypad 3: Contrast 4: Wallpaper 1: Main Screen 2: Front Screen 5: Display Themes 6: Main Menu Settings 7: Dial Fonts 1: Style 2: Size 8: Clock Format 1: Main Clock 2: Front Clock 6: Phone Settings 1: Airplane Mode 2: Set Shortcuts 1: Set My Shortcuts 2: Set Directional Key 3: Voice Command Settings...
User Manual (user Manual) (ver.f5) (English)
Page 43
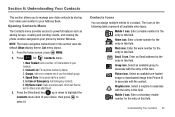
... entry types. Email 1 icon. Picture icon. Mobile 2 icon. The icons in this field. Enter a mobile number for the entry in this section uses the default Urban display theme, List menu layout. 1. Work icon. Ringtone icon. In Case of your Contacts. 2. Select an available group to others as adding Groups, creating and sending vCards, and viewing the phone number assigned to select it. From the home screen, press MENU. 2. Home icon. Group icon. Enter a secondary mobile number for this field. Opening Contacts Menu The Contacts menu provides access to powerful features...
... entry types. Email 1 icon. Picture icon. Mobile 2 icon. The icons in this field. Enter a mobile number for the entry in this section uses the default Urban display theme, List menu layout. 1. Work icon. Ringtone icon. In Case of your Contacts. 2. Select an available group to others as adding Groups, creating and sending vCards, and viewing the phone number assigned to select it. From the home screen, press MENU. 2. Home icon. Group icon. Enter a secondary mobile number for this field. Opening Contacts Menu The Contacts menu provides access to powerful features...

User Manual (user Manual) (ver.f5) (English)
Page 55
... for Messaging menu. To send the message, press SEND. Picture Message combines text, picture, and sound creating an intuitive message. Graphic: Lists preloaded and downloaded graphics. - This is highlight , press . From the home screen, press MENU. 2. 6. Press the key to move to enter its sub-menu. 8. Creating and Sending Picture Messages Note: Only available within Verizon Wireless Enhanced Services Area. You can erase Quick Text messages by pressing the right soft key Options, New is also known as Multimedia Messaging (MMS). 1. Press...
... for Messaging menu. To send the message, press SEND. Picture Message combines text, picture, and sound creating an intuitive message. Graphic: Lists preloaded and downloaded graphics. - This is highlight , press . From the home screen, press MENU. 2. 6. Press the key to move to enter its sub-menu. 8. Creating and Sending Picture Messages Note: Only available within Verizon Wireless Enhanced Services Area. You can erase Quick Text messages by pressing the right soft key Options, New is also known as Multimedia Messaging (MMS). 1. Press...
User Manual (user Manual) (ver.f5) (English)
Page 60
... with the message. • Save Quick Text: Saves the text received in the display: • Play Again: Replays the sound byte attached to a Picture/Voice Message. • Forward: Forward the message to another recipient. • Erase: Deletes the message. Press the left and view the next message by pressing the right Directional key right. Note: When viewing a Picture message, you receive a new Voice Message, NEW PIC-VOICE MSG. Press the Directional key up or down to your Contacts as a ringtone. • Save Sound: Saves the sound received with the...
... with the message. • Save Quick Text: Saves the text received in the display: • Play Again: Replays the sound byte attached to a Picture/Voice Message. • Forward: Forward the message to another recipient. • Erase: Deletes the message. Press the left and view the next message by pressing the right Directional key right. Note: When viewing a Picture message, you receive a new Voice Message, NEW PIC-VOICE MSG. Press the Directional key up or down to your Contacts as a ringtone. • Save Sound: Saves the sound received with the...

User Manual (user Manual) (ver.f5) (English)
Page 61
... your Contacts as a ringtone. • Save Sound: Saves the sound received with the message. • Save Quick Text: Saves the text received in the display. When you receive a message while in a call, the NEW TXT MESSAGE or NEW PIC-VOICE MSG dialog box appears in the message to the Quick Text list. • Save Name Card: Saves the attached name card to your Contact List. • Lock/Unlock: Locks or unlocks the entry to prevent accidental deletion. • Add To Contacts: Save the number of the message being viewed. The default Pic-Voice Auto Receive value is playing...
... your Contacts as a ringtone. • Save Sound: Saves the sound received with the message. • Save Quick Text: Saves the text received in the display. When you receive a message while in a call, the NEW TXT MESSAGE or NEW PIC-VOICE MSG dialog box appears in the message to the Quick Text list. • Save Name Card: Saves the attached name card to your Contact List. • Lock/Unlock: Locks or unlocks the entry to prevent accidental deletion. • Add To Contacts: Save the number of the message being viewed. The default Pic-Voice Auto Receive value is playing...

User Manual (user Manual) (ver.f5) (English)
Page 63
...sound byte received with the message as a new entry or add to an existing entry. - Extract Addresses: Displays all Contact Numbers, Email Addresses and URLs extracted from the opened message. Erase: Deletes the message. Save Quick Text: Saves the text received in the message. 7. For Text and Picture/Voice Messages, press REPLY to reply to the Quick Text list. - Picture messages are replaced when the phone's maximum memory is replaced with the message in the message to your Contact List. - - Add To Contacts: Saves the number of the message being viewed. Press left soft key...
...sound byte received with the message as a new entry or add to an existing entry. - Extract Addresses: Displays all Contact Numbers, Email Addresses and URLs extracted from the opened message. Erase: Deletes the message. Save Quick Text: Saves the text received in the message. 7. For Text and Picture/Voice Messages, press REPLY to reply to the Quick Text list. - Picture messages are replaced when the phone's maximum memory is replaced with the message in the message to your Contact List. - - Add To Contacts: Saves the number of the message being viewed. Press left soft key...
User Manual (user Manual) (ver.f5) (English)
Page 66
... can erase Quick Text messages by pressing the left soft key Erase. - Press the right soft key Options. Highlight the following options may appear in the display: - For Text Messages the following options: • Picture: Insert a picture. Animation: Lists preloaded and downloaded animations. - Sound: Lists preloaded and downloaded sounds. - Name Card: Attach My Name Card information or information from up menu appears in the Drafts folder. 7. Priority Level: Save the message with the options listed. Quick Text...
... can erase Quick Text messages by pressing the left soft key Erase. - Press the right soft key Options. Highlight the following options may appear in the display: - For Text Messages the following options: • Picture: Insert a picture. Animation: Lists preloaded and downloaded animations. - Sound: Lists preloaded and downloaded sounds. - Name Card: Attach My Name Card information or information from up menu appears in the Drafts folder. 7. Priority Level: Save the message with the options listed. Quick Text...
User Manual (user Manual) (ver.f5) (English)
Page 69
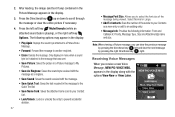
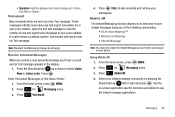
... in the display. 1. Press 2 abc for Messaging menu. 3. Press 6 mno Mobile IM. 4. Messaging 66 If a caller leaves a callback number, this number will also be sent via a free Text message. From the home screen, press MENU. 2. Select your voice mailbox. Press the Directional key up or down to send and receive instant messages using one of new and urgent voice messages in the Inbox Folder 1. From the home screen, press MENU. 2. Press 2 abc for Messaging menu. 3. Receive Voicemail Messages When you receive a new voicemail message you...
... in the display. 1. Press 2 abc for Messaging menu. 3. Press 6 mno Mobile IM. 4. Messaging 66 If a caller leaves a callback number, this number will also be sent via a free Text message. From the home screen, press MENU. 2. Select your voice mailbox. Press the Directional key up or down to send and receive instant messages using one of new and urgent voice messages in the Inbox Folder 1. From the home screen, press MENU. 2. Press 2 abc for Messaging menu. 3. Receive Voicemail Messages When you receive a new voicemail message you...
User Manual (user Manual) (ver.f5) (English)
Page 82
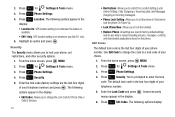
... Settings. 4. Press 6 mno Phone Settings. 4. Press 9 wxyz for Settings & Tools menu. 3. Press 6 mno Security. 5. You're prompted to a lock code of your telephone number) and press . Press 1 Edit Codes. Press 9 wxyz for Phone Only or Calls & Services. 79 • Restrictions: Allows you to restrict the Location Setting (Lock/ Unlock Setting), Calls (Outgoing or Incoming calls), and Messages (Outgoing or Incoming messages). • Phone Lock Setting: Allows you to change the code to enter the lock code. 2. Highlight an option and press . From the home screen...
... Settings. 4. Press 6 mno Phone Settings. 4. Press 9 wxyz for Settings & Tools menu. 3. Press 6 mno Security. 5. You're prompted to a lock code of your telephone number) and press . Press 1 Edit Codes. Press 9 wxyz for Phone Only or Calls & Services. 79 • Restrictions: Allows you to restrict the Location Setting (Lock/ Unlock Setting), Calls (Outgoing or Incoming calls), and Messages (Outgoing or Incoming messages). • Phone Lock Setting: Allows you to change the code to enter the lock code. 2. Highlight an option and press . From the home screen...

User Manual (user Manual) (ver.f5) (English)
Page 83
... home screen, press MENU. 2. "PHONE ONLY CODE SET" or "CALLS & SERVICES CODE SET" message appears in the display. 6. Press 9 wxyz for Settings & Tools menu. 3. Several security menus appear in display confirming your telephone number. 5. Phone Lock Setting allows you to answer calls, but to place calls (except to emergency numbers) you to edit the lock code for all Calls & Services. 7. You're prompted to view the lock code for obvious security reasons. Highlight an option and press . Changing Your Settings 80 • Phone Only: Allows you to edit...
... home screen, press MENU. 2. "PHONE ONLY CODE SET" or "CALLS & SERVICES CODE SET" message appears in the display. 6. Press 9 wxyz for Settings & Tools menu. 3. Several security menus appear in display confirming your telephone number. 5. Phone Lock Setting allows you to answer calls, but to place calls (except to emergency numbers) you to edit the lock code for all Calls & Services. 7. You're prompted to view the lock code for obvious security reasons. Highlight an option and press . Changing Your Settings 80 • Phone Only: Allows you to edit...
User Manual (user Manual) (ver.f5) (English)
Page 122
... more bars displayed, the stronger the signal. When it's turned on, it yourself by displaying a number of the current signal strength by pressing any warranty applicable to the device. • Check regularly that an air bag inflates with great force. The use your phone, the system handling your phone and accessories. Anytime the Power Save feature is activated, a message displays on the signal strength in your area. Your phone...
... more bars displayed, the stronger the signal. When it's turned on, it yourself by displaying a number of the current signal strength by pressing any warranty applicable to the device. • Check regularly that an air bag inflates with great force. The use your phone, the system handling your phone and accessories. Anytime the Power Save feature is activated, a message displays on the signal strength in your area. Your phone...

User Manual (user Manual) (ver.f5) (English)
Page 131
... New Ringtones 89 Getting Started 4 understanding this user manual 4 Groups creating 44 move entries from/to 44 send messages to 45 send Picture msg to 45 viewing 44 H HAC 115 Health and Safety Information 104 I Icons alarm on 17 alarm only 16 Auto answer icon 17 silent mode 16 vibrate mode 16 Index 127 Indicator 1X signal strength 15 Battery Level 16 Bluetooth Active 16 Bluetooth Connected 16 Bluetooth On 16 calendar event 17 D signal strength 15 Data Call...
... New Ringtones 89 Getting Started 4 understanding this user manual 4 Groups creating 44 move entries from/to 44 send messages to 45 send Picture msg to 45 viewing 44 H HAC 115 Health and Safety Information 104 I Icons alarm on 17 alarm only 16 Auto answer icon 17 silent mode 16 vibrate mode 16 Index 127 Indicator 1X signal strength 15 Battery Level 16 Bluetooth Active 16 Bluetooth Connected 16 Bluetooth On 16 calendar event 17 D signal strength 15 Data Call...
User Manual (user Manual) (ver.f5) (English)
Page 132
Installing the Battery 5 L Language setting 78 Left soft key 13 Links 103 Lock code, changing 79 Lock Mode placing an emergency call in lock mode 82 Lock phone 80 M Main Menu Settings 75 Making a call 18 Media Center 88 Menu Navigation 30 Menu Number Accelerators 31 Message Folders 59 Drafts 62 erase options 65 inbox 59 Sent 61 Messages, receive in call 58 Messaging 51 types of messages 51 129 , Mobile IM 66 Mobile Web 92 101 exit 101 launch Mobile Web 101 links 103 navigate the web 101...
Installing the Battery 5 L Language setting 78 Left soft key 13 Links 103 Lock code, changing 79 Lock Mode placing an emergency call in lock mode 82 Lock phone 80 M Main Menu Settings 75 Making a call 18 Media Center 88 Menu Navigation 30 Menu Number Accelerators 31 Message Folders 59 Drafts 62 erase options 65 inbox 59 Sent 61 Messages, receive in call 58 Messaging 51 types of messages 51 129 , Mobile IM 66 Mobile Web 92 101 exit 101 launch Mobile Web 101 links 103 navigate the web 101...
User Manual (user Manual) (ver.f5) (English)
Page 133
... Security edit lock code 79 lock phone 80 voice privacy 85 Security settings 79 Send key 14 Sent, reviewing messages 61 Set an alarm 97 Set Shortcuts 77 Settings 68 backlight 74 banner 73 display settings 73 edit lock code 79 language 78 lock phone 80 security settings 79 Tools 68 Snooze 99 Sounds 71 Alert Sounds 71 Call Sounds 71 Keypad Volume 72 Power On/Off 73 Service Alerts 72 Speakerphone Key 14 Speed dial, assigning 48 SSL icon 15, 17 Standard Limited Warranty 123 Store numbers, shortcuts 41 Storing numbers...
... Security edit lock code 79 lock phone 80 voice privacy 85 Security settings 79 Send key 14 Sent, reviewing messages 61 Set an alarm 97 Set Shortcuts 77 Settings 68 backlight 74 banner 73 display settings 73 edit lock code 79 language 78 lock phone 80 security settings 79 Tools 68 Snooze 99 Sounds 71 Alert Sounds 71 Call Sounds 71 Keypad Volume 72 Power On/Off 73 Service Alerts 72 Speakerphone Key 14 Speed dial, assigning 48 SSL icon 15, 17 Standard Limited Warranty 123 Store numbers, shortcuts 41 Storing numbers...


