User Manual
Page 4
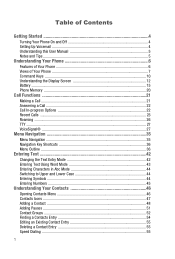
... the Display Screen 12 Battery ...15 Phone Memory ...20 Call Functions 21 Making a Call ...21 Answering a Call ...22 Call In-progress Options 22 Recent Calls ...23 Roaming ...26 TTY ...27 VoiceSignal® ...27 Menu Navigation 35 Menu Navigation ...35 Navigation Key Shortcuts 36 Menu Outline ...36 Entering Text 42 Changing the Text Entry Mode 42 Entering Text Using Word Mode 43 Entering Characters in Abc Mode 44 Switching to Upper and Lower Case 44 Entering Symbols ...44 Entering Numbers 45 Understanding Your Contacts 46 Opening Contacts Menu 46 Contacts Icons...
... the Display Screen 12 Battery ...15 Phone Memory ...20 Call Functions 21 Making a Call ...21 Answering a Call ...22 Call In-progress Options 22 Recent Calls ...23 Roaming ...26 TTY ...27 VoiceSignal® ...27 Menu Navigation 35 Menu Navigation ...35 Navigation Key Shortcuts 36 Menu Outline ...36 Entering Text 42 Changing the Text Entry Mode 42 Entering Text Using Word Mode 43 Entering Characters in Abc Mode 44 Switching to Upper and Lower Case 44 Entering Symbols ...44 Entering Numbers 45 Understanding Your Contacts 46 Opening Contacts Menu 46 Contacts Icons...

User Manual
Page 11
... in the charging accessories and also connect any available accessory cables to activate/deactivate Vibrate mode. Understanding Your Phone 8 Send Key: Allows you receive an incoming call, mute the ringer and redirect the call . Right Special Function Key: Press and hold to hear you clearly when you are in text entry mode. Views of the display screen. 14. Navigation Keys: This key allows you to hear the other caller to dial Voicemail number. 7. Earpiece: The...
... in the charging accessories and also connect any available accessory cables to activate/deactivate Vibrate mode. Understanding Your Phone 8 Send Key: Allows you receive an incoming call, mute the ringer and redirect the call . Right Special Function Key: Press and hold to hear you clearly when you are in text entry mode. Views of the display screen. 14. Navigation Keys: This key allows you to hear the other caller to dial Voicemail number. 7. Earpiece: The...
User Manual
Page 18
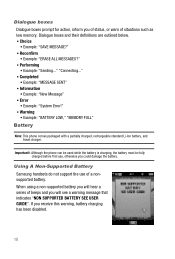
...; Example: "SAVE MESSAGE?" • Reconfirm • Example: "ERASE ALL MESSAGES?" • Performing • Example: "Sending..." When using a non-supported battery you will hear a series of situations such as low memory. Using A Non-Supported Battery Samsung handsets do not support the use , otherwise you will see a warning message that indicates "NON SUPPORTED BATTERY SEE USER GUIDE". Dialogue boxes Dialogue boxes prompt for action, inform you receive this warning, battery charging has been disabled. 15 If...
...; Example: "SAVE MESSAGE?" • Reconfirm • Example: "ERASE ALL MESSAGES?" • Performing • Example: "Sending..." When using a non-supported battery you will hear a series of situations such as low memory. Using A Non-Supported Battery Samsung handsets do not support the use , otherwise you will see a warning message that indicates "NON SUPPORTED BATTERY SEE USER GUIDE". Dialogue boxes Dialogue boxes prompt for action, inform you receive this warning, battery charging has been disabled. 15 If...
User Manual
Page 26
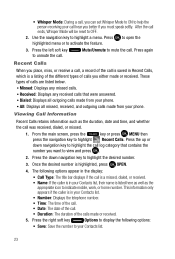
... were answered. • Dialed: Displays all outgoing calls made from your phone. • All: Displays all missed, received, and outgoing calls made from your phone. Viewing Call Information Recent Calls retains information such as the appropriate icon to indicate mobile, work, or home number. Mute/Unmute to highlight the desired number. 3. • Whisper Mode: During a call, you can set Whisper Mode to ON to help the person receiving your Contacts list. • Number: Displays the telephone number. • Time: The time...
... were answered. • Dialed: Displays all outgoing calls made from your phone. • All: Displays all missed, received, and outgoing calls made from your phone. Viewing Call Information Recent Calls retains information such as the appropriate icon to indicate mobile, work, or home number. Mute/Unmute to highlight the desired number. 3. • Whisper Mode: During a call, you can set Whisper Mode to ON to help the person receiving your Contacts list. • Number: Displays the telephone number. • Time: The time...

User Manual
Page 32
... phone model. Tips for adapting Digit Dial • Adapt digits in a quiet place. • Make sure you wait for other people using your phone. • Adapt Digit Dial to your voice. However, people with digit dialing. Press and hold the Voice Commands key ( ). 2. Adapting VoiceSignal Voice dialing works well for Settings. 3. You can also access the VoiceSignal Settings menu by following these steps: 1. • Name Settings: Adjusts the speed and volume...
... phone model. Tips for adapting Digit Dial • Adapt digits in a quiet place. • Make sure you wait for other people using your phone. • Adapt Digit Dial to your voice. However, people with digit dialing. Press and hold the Voice Commands key ( ). 2. Adapting VoiceSignal Voice dialing works well for Settings. 3. You can also access the VoiceSignal Settings menu by following these steps: 1. • Name Settings: Adjusts the speed and volume...
User Manual
Page 34
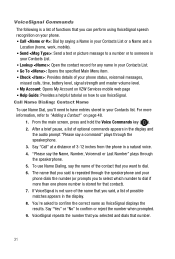
... name in your Contacts List. • Go To : Opens the specified Main Menu item. • Check : Provides details of your phone status, voicemail messages, missed calls, time, battery level, signal strength and master volume level. • My Account: Opens My Account on VZW Services mobile web page • Help Guide: Provides a helpful tutorial on page 48. 1. VoiceSignal repeats the number that contact). 7. For more information, refer to "Adding a Contact" on how to use Name Dial, you'll need to dial. 6.
... name in your Contacts List. • Go To : Opens the specified Main Menu item. • Check : Provides details of your phone status, voicemail messages, missed calls, time, battery level, signal strength and master volume level. • My Account: Opens My Account on VZW Services mobile web page • Help Guide: Provides a helpful tutorial on page 48. 1. VoiceSignal repeats the number that contact). 7. For more information, refer to "Adding a Contact" on how to use Name Dial, you'll need to dial. 6.
User Manual
Page 38
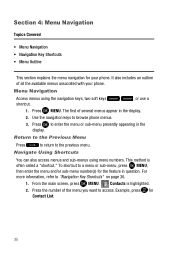
... of several menus appear in the display. Press to a menu or sub-menu, press MENU, then enter the menu and/or sub-menu number(s) for Contact List. 35 To shortcut to enter the menu or sub-menu presently appearing in the display. 2. From the main screen, press MENU. Section 4: Menu Navigation Topics Covered • Menu Navigation • Navigation Key Shortcuts • Menu Outline This section explains the menu navigation for your phone. Menu Navigation Access menus using menu numbers.
... of several menus appear in the display. Press to a menu or sub-menu, press MENU, then enter the menu and/or sub-menu number(s) for Contact List. 35 To shortcut to enter the menu or sub-menu presently appearing in the display. 2. From the main screen, press MENU. Section 4: Menu Navigation Topics Covered • Menu Navigation • Navigation Key Shortcuts • Menu Outline This section explains the menu navigation for your phone. Menu Navigation Access menus using menu numbers.
User Manual
Page 54
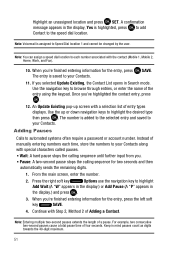
... selected Update Existing, the Contact List opens in the display.) and press . 3. When you're finished entering information for two seconds and then automatically sends the remaining digits. 1. Note: You can assign a speed dial location to each time, store the numbers to your Contacts along with the contact (Mobile 1, Mobile 2, Home, Work, and Fax). 10. Use the navigation key to automated systems often require a password or account number. Instead of the entry using the keypad...
... selected Update Existing, the Contact List opens in the display.) and press . 3. When you're finished entering information for two seconds and then automatically sends the remaining digits. 1. Note: You can assign a speed dial location to each time, store the numbers to your Contacts along with the contact (Mobile 1, Mobile 2, Home, Work, and Fax). 10. Use the navigation key to automated systems often require a password or account number. Instead of the entry using the keypad...
User Manual
Page 64
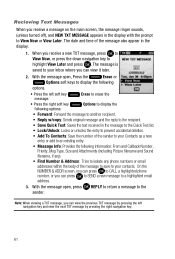
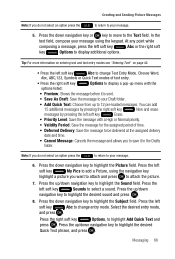
... the message open , press REPLY to return a message to the sender. Erase to erase the • Press the right soft key following options: Options to display the • Forward: Forward the message to another recipient. • Reply w/copy: Sends original message and the reply to the recipient. • Save Quick Text: Saves the text received in the message to the Quick Text list. • Lock/Unlock: Locks or unlocks the entry to prevent accidental deletion. • Add To Contacts: Save the number...
... the message open , press REPLY to return a message to the sender. Erase to erase the • Press the right soft key following options: Options to display the • Forward: Forward the message to another recipient. • Reply w/copy: Sends original message and the reply to the recipient. • Save Quick Text: Saves the text received in the message to the Quick Text list. • Lock/Unlock: Locks or unlocks the entry to prevent accidental deletion. • Add To Contacts: Save the number...
User Manual
Page 65
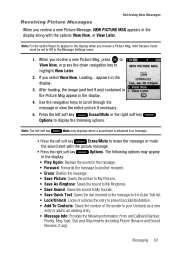
... sound to My Sounds. • Save Quick Text: Saves the text received in the message to the Quick Text list. • Lock/Unlock: Locks or unlocks the entry to prevent accidental deletion. • Add To Contacts: Saves the number of the sender to your Contacts as a new entry or add to erase the message or mute the sound sent with the options View Now, or View Later. Note: For the option Reject to appear in the display when you receive a Picture Msg, Auto Receive mode...
... sound to My Sounds. • Save Quick Text: Saves the text received in the message to the Quick Text list. • Lock/Unlock: Locks or unlocks the entry to prevent accidental deletion. • Add To Contacts: Saves the number of the sender to your Contacts as a new entry or add to erase the message or mute the sound sent with the options View Now, or View Later. Note: For the option Reject to appear in the display when you receive a Picture Msg, Auto Receive mode...
User Manual
Page 69
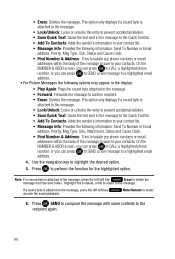
... the down navigation key to change Text Entry Mode. Press the up /down navigation key to the Text field. Messaging 66 Choose Word, Abc, ABC,123, Symbols or Quick Text modes of time. • Deferred Delivery: Save the message to be delivered at the assigned delivery date and time. • Cancel Message: Cancels the message and allows you want to attach and press to add a Picture, using the keypad. Select the...
... the down navigation key to change Text Entry Mode. Press the up /down navigation key to the Text field. Messaging 66 Choose Word, Abc, ABC,123, Symbols or Quick Text modes of time. • Deferred Delivery: Save the message to be delivered at the assigned delivery date and time. • Cancel Message: Cancels the message and allows you want to attach and press to add a Picture, using the keypad. Select the...
User Manual
Page 71
... a Picture, or Sound were included in the message) and Attachments (if a Picture, or Sound were included in the message). • Find Number & Address: Tries to isolate any phone numbers or email addresses within the body of whether the message was successfully transmitted by an incoming Picture message when 50 Picture messages are dependent on how to CALL a highlighted phone number, or you can press to set Auto Erase and Auto Receive. Delivery Ack feature. Use the navigation key...
... a Picture, or Sound were included in the message) and Attachments (if a Picture, or Sound were included in the message). • Find Number & Address: Tries to isolate any phone numbers or email addresses within the body of whether the message was successfully transmitted by an incoming Picture message when 50 Picture messages are dependent on how to CALL a highlighted phone number, or you can press to set Auto Erase and Auto Receive. Delivery Ack feature. Use the navigation key...
User Manual
Page 72
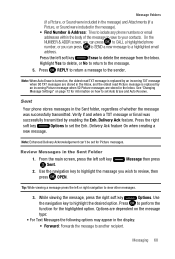
... screen, you can press to CALL a highlighted phone number, or you can press to SEND a new message to a highlighted email address. • For Picture Messages the following options may appear in the message to the Quick Text list. • Add To Contacts: Adds the sender's information to your contacts. Note: If no sound byte is attached to the message. • Lock/Unlock: Locks or unlocks the entry to prevent accidental deletion. • Save Quick Text: Saves the text sent in the display...
... screen, you can press to CALL a highlighted phone number, or you can press to SEND a new message to a highlighted email address. • For Picture Messages the following options may appear in the message to the Quick Text list. • Add To Contacts: Adds the sender's information to your contacts. Note: If no sound byte is attached to the message. • Lock/Unlock: Locks or unlocks the entry to prevent accidental deletion. • Save Quick Text: Saves the text sent in the display...
User Manual
Page 80
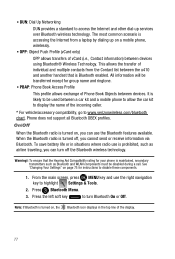
... is Bluetooth enabled. Press Bluetooth Menu. 3. From the main screen, press MENU key and use is turned on, you cannot send or receive information via Bluetooth. • DUN: Dial Up Networking DUN provides a standard to access the Internet and other dial-up on a mobile phone, wirelessly. • OPP: Object Push Profile (vCard only) OPP allows transfers of vCard (i.e., Contact information) between devices using Bluetooth® Wireless Technology. Warning!: To ensure that is likely to be disabled during a call...
... is Bluetooth enabled. Press Bluetooth Menu. 3. From the main screen, press MENU key and use is turned on, you cannot send or receive information via Bluetooth. • DUN: Dial Up Networking DUN provides a standard to access the Internet and other dial-up on a mobile phone, wirelessly. • OPP: Object Push Profile (vCard only) OPP allows transfers of vCard (i.e., Contact information) between devices using Bluetooth® Wireless Technology. Warning!: To ensure that is likely to be disabled during a call...
User Manual
Page 89
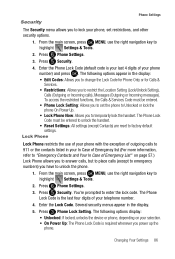
...your telephone number. 4. Press Phone Lock Setting. Security. 4. Enter the Lock Code. Several security menus appear in the display: • Edit Codes: Allows you to change the Lock Code for Phone Only or for Calls & Services. • Restrictions: Allows you power up the phone. Press 3. Press Phone Settings. 3. Press Security. Changing Your Settings 86 From the main screen, press MENU, use the right navigation key to highlight Settings & Tools. 2. You're prompted to restrict the Location Setting (Lock/Unlock Setting), Calls (Outgoing or Incoming calls), Messages...
...your telephone number. 4. Press Phone Lock Setting. Security. 4. Enter the Lock Code. Several security menus appear in the display: • Edit Codes: Allows you to change the Lock Code for Phone Only or for Calls & Services. • Restrictions: Allows you power up the phone. Press 3. Press Phone Settings. 3. Press Security. Changing Your Settings 86 From the main screen, press MENU, use the right navigation key to highlight Settings & Tools. 2. You're prompted to restrict the Location Setting (Lock/Unlock Setting), Calls (Outgoing or Incoming calls), Messages...

User Manual
Page 90
... else from changing the Location setting on the Phone Settings menu. 1. Enter the Calls & Services Code then press . Enter the Phone Lock Code then press . The following options appear in the display: • Lock Setting: Restricts access to the Location menu. • Unlock Setting: Opens access to enter the Phone Lock Code . Use the navigation key to access any functions other than receive calls or make emergency calls. Highlight Lock Setting and press . 87 The Phone Lock Code is the last four digits of your telephone number. 4. Press Location Setting. 6. From the...
... else from changing the Location setting on the Phone Settings menu. 1. Enter the Calls & Services Code then press . Enter the Phone Lock Code then press . The following options appear in the display: • Lock Setting: Restricts access to the Location menu. • Unlock Setting: Opens access to enter the Phone Lock Code . Use the navigation key to access any functions other than receive calls or make emergency calls. Highlight Lock Setting and press . 87 The Phone Lock Code is the last four digits of your telephone number. 4. Press Location Setting. 6. From the...
User Manual
Page 93
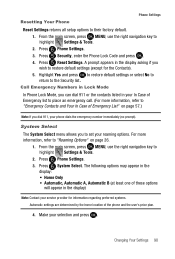
... phone dials the emergency number immediately (no prompt). From the main screen, press MENU, use the right navigation key to set your selection and press . Make your roaming options. For more information, refer to "Emergency Contacts and Your In Case of Emergency List" on page 26. 1. A prompt appears in the display) Note: Contact your In Case of the phone and the user's price plan. 4. Call Emergency Numbers in Lock Mode In Phone Lock Mode, you wish to restore default settings...
... phone dials the emergency number immediately (no prompt). From the main screen, press MENU, use the right navigation key to set your selection and press . Make your roaming options. For more information, refer to "Emergency Contacts and Your In Case of Emergency List" on page 26. 1. A prompt appears in the display) Note: Contact your In Case of the phone and the user's price plan. 4. Call Emergency Numbers in Lock Mode In Phone Lock Mode, you wish to restore default settings...
User Manual
Page 97
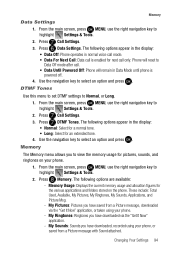
... for pictures, sounds, and ringtones on the phone. Memory The Memory menu allows you have saved from a Picture message with Sound attached. Use the navigation key to highlight Settings & Tools. 2. Press Memory. The following options appear in Data Mode until phone is enabled for the various applications and folders stored on your phone. - Press Call Settings. 3. From the main screen, press MENU, use the right navigation key to Data Off mode after call only. My Sounds: Sounds you have downloaded, recorded using your phone. 1. Changing Your Settings...
... for pictures, sounds, and ringtones on the phone. Memory The Memory menu allows you have saved from a Picture message with Sound attached. Use the navigation key to highlight Settings & Tools. 2. Press Memory. The following options appear in Data Mode until phone is enabled for the various applications and folders stored on your phone. - Press Call Settings. 3. From the main screen, press MENU, use the right navigation key to Data Off mode after call only. My Sounds: Sounds you have downloaded, recorded using your phone. 1. Changing Your Settings...
User Manual
Page 130
... searching, a Power Save feature is improperly installed and the air bag inflates, serious injury could result. • Switch your area. Although your phone returns to standby mode. 127 Avoid dropping, hitting, bending or sitting on the screen. When a signal is found, your phone is quite sturdy, it is active, it yourself by displaying a number of telephone services to the signal strength icon. Faulty installation or service may...
... searching, a Power Save feature is improperly installed and the air bag inflates, serious injury could result. • Switch your area. Although your phone returns to standby mode. 127 Avoid dropping, hitting, bending or sitting on the screen. When a signal is found, your phone is quite sturdy, it is active, it yourself by displaying a number of telephone services to the signal strength icon. Faulty installation or service may...
User Manual
Page 141
... Use of your phone 113 Security edit lock code 89 lock phone 86 voice privacy 93 Security settings 86 Send key 11 Sent, reviewing messages 68 Set an alarm 107 Settings 75 backlight 82 banner 81 display settings 81 edit lock code 89 language 85 lock phone 86 resetting your phone 90 security settings 86 tools 75 Shortcut to menus 35 Signal strength icon 12 Silent mode icon 14 Snooze 108 Sounds 79 alert sounds 79 call sounds 79 keypad volume 80 power on/off 80 service alerts 80 Speakerphone Key 11 Speed dial, assigning...
... Use of your phone 113 Security edit lock code 89 lock phone 86 voice privacy 93 Security settings 86 Send key 11 Sent, reviewing messages 68 Set an alarm 107 Settings 75 backlight 82 banner 81 display settings 81 edit lock code 89 language 85 lock phone 86 resetting your phone 90 security settings 86 tools 75 Shortcut to menus 35 Signal strength icon 12 Silent mode icon 14 Snooze 108 Sounds 79 alert sounds 79 call sounds 79 keypad volume 80 power on/off 80 service alerts 80 Speakerphone Key 11 Speed dial, assigning...


