
User Manual (user Manual) (ver.d3) (English)
Page 14
... the key or dial your phone from being turned off accidentally. Setting Up Your Voicemail Voicemail allows callers to place and receive calls. This prevents your own mobile number to view details of the display. Note: If the phone is on and you can be retrieved any time. Your phone powers off . Note: Once your voice mailbox. You're now ready to leave voice messages, which can use the Voice Mail folder (under the Message menu) to access Voicemail...
... the key or dial your phone from being turned off accidentally. Setting Up Your Voicemail Voicemail allows callers to place and receive calls. This prevents your own mobile number to view details of the display. Note: If the phone is on and you can be retrieved any time. Your phone powers off . Note: Once your voice mailbox. You're now ready to leave voice messages, which can use the Voice Mail folder (under the Message menu) to access Voicemail...

User Manual (user Manual) (ver.d3) (English)
Page 22
... press to backspace (and delete) the character. 2. Section 2 22 You can also use to return to a previous menu or to return to standby mode from any menu, press and hold . 3. To return to standby mode from any menu. 1. The following table lists some display icons and their descriptions. Right soft key Some functions of the display is used to erase or clear numbers, text, or symbols from the...
... press to backspace (and delete) the character. 2. Section 2 22 You can also use to return to a previous menu or to return to standby mode from any menu, press and hold . 3. To return to standby mode from any menu. 1. The following table lists some display icons and their descriptions. Right soft key Some functions of the display is used to erase or clear numbers, text, or symbols from the...
User Manual (user Manual) (ver.d3) (English)
Page 33
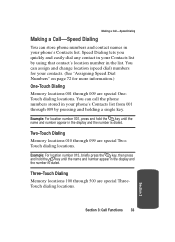
... and number appear in the display and the number is dialed. Example: For location number 001, press and hold the key until the name and number appear in the display and the number is dialed. Making a Call-Speed Dialing Making a Call-Speed Dialing You can store phone numbers and contact names in your Contacts list by pressing and holding a single key. Speed Dialing lets you quickly and easily dial any contact in your phone's Contacts list. Two-Touch Dialing Memory locations 010 through 009 are special OneTouch dialing locations.
... and number appear in the display and the number is dialed. Example: For location number 001, press and hold the key until the name and number appear in the display and the number is dialed. Making a Call-Speed Dialing Making a Call-Speed Dialing You can store phone numbers and contact names in your Contacts list by pressing and holding a single key. Speed Dialing lets you quickly and easily dial any contact in your phone's Contacts list. Two-Touch Dialing Memory locations 010 through 009 are special OneTouch dialing locations.
User Manual (user Manual) (ver.d3) (English)
Page 50
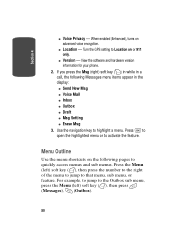
... to open the highlighted menu or to quickly access menus and sub menus. Menu Outline Use the menu shortcuts on the following Messages menu items appear in the display: ⅷ Send New Msg ⅷ Voice Mail ⅷ Inbox ⅷ Outbox ⅷ Draft ⅷ Msg Setting ⅷ Erase Msg 3. Use the navigation key to the Outbox sub menu, press the Menu (left ) soft key ( ), then press the number to the right of the menu to...
... to open the highlighted menu or to quickly access menus and sub menus. Menu Outline Use the menu shortcuts on the following Messages menu items appear in the display: ⅷ Send New Msg ⅷ Voice Mail ⅷ Inbox ⅷ Outbox ⅷ Draft ⅷ Msg Setting ⅷ Erase Msg 3. Use the navigation key to the Outbox sub menu, press the Menu (left ) soft key ( ), then press the number to the right of the menu to...

User Manual (user Manual) (ver.d3) (English)
Page 62
... your Contacts list faster. (See page 33.) Open Your Contacts List 1. The following Contacts sub-menus and options appear in your five groups. ⅷ My Phone#-View the 10-digit number assigned to five associated phone numbers, an e-mail address, and a picture ID. Use the navigation keys to call numbers stored in the display: ⅷ Find-Find a phone number By Name, By Entry, or By Group. ⅷ Add-Add a number or e-mail to your Contacts. ⅷ...
... your Contacts list faster. (See page 33.) Open Your Contacts List 1. The following Contacts sub-menus and options appear in your five groups. ⅷ My Phone#-View the 10-digit number assigned to five associated phone numbers, an e-mail address, and a picture ID. Use the navigation keys to call numbers stored in the display: ⅷ Find-Find a phone number By Name, By Entry, or By Group. ⅷ Add-Add a number or e-mail to your Contacts. ⅷ...
User Manual (user Manual) (ver.d3) (English)
Page 67
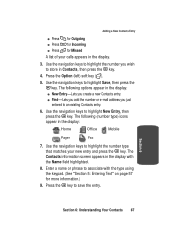
... keypad. (See "Section 5: Entering Text" on page 57 for Missed A list of your new entry and press the key. Enter a name or phrase to highlight the number type that matches your calls appears in the display. 3. Adding a New Contacts Entry ⅷ Press for Outgoing ⅷ Press for Incoming ⅷ Press for more information.) 9. Use the navigation keys to associate with the Name field highlighted. 8. The Contacts information screen...
... keypad. (See "Section 5: Entering Text" on page 57 for Missed A list of your new entry and press the key. Enter a name or phrase to highlight the number type that matches your calls appears in the display. 3. Adding a New Contacts Entry ⅷ Press for Outgoing ⅷ Press for Incoming ⅷ Press for more information.) 9. Use the navigation keys to associate with the Name field highlighted. 8. The Contacts information screen...

User Manual (user Manual) (ver.d3) (English)
Page 106
... personalized greeting that displays on your phone is in standby mode (wallpaper). 1. Set the color(s) applied dialed numbers in the display. 106 In standby mode, press the Menu (left ) soft key ( ), then press (for Display) and for the LCD and keypad. ⅷ Contrast - The following sections describe the sub-menus above. With Auto Hyphen enabled, your phone displays when it is in standby mode. ⅷ Backlight - Press...
... personalized greeting that displays on your phone is in standby mode (wallpaper). 1. Set the color(s) applied dialed numbers in the display. 106 In standby mode, press the Menu (left ) soft key ( ), then press (for Display) and for the LCD and keypad. ⅷ Contrast - The following sections describe the sub-menus above. With Auto Hyphen enabled, your phone displays when it is in standby mode. ⅷ Backlight - Press...
User Manual (user Manual) (ver.d3) (English)
Page 121
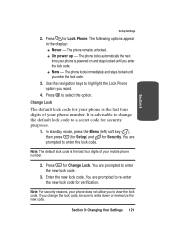
...-enter the new lock code for your phone number. Section 9: Changing Your Settings 121 The phone remains unlocked. ⅷ On power up - Use the navigation keys to write down or memorize the new code. You are prompted to view the lock code. The following options appear in the display: ⅷ Never - Change Lock The default lock code for verification. In standby mode, press the Menu (left) soft key ( ), then press (for Setup) and for Change Lock. Note: For security reasons, your mobile phone number...
...-enter the new lock code for your phone number. Section 9: Changing Your Settings 121 The phone remains unlocked. ⅷ On power up - Use the navigation keys to write down or memorize the new code. You are prompted to view the lock code. The following options appear in the display: ⅷ Never - Change Lock The default lock code for verification. In standby mode, press the Menu (left) soft key ( ), then press (for Setup) and for Change Lock. Note: For security reasons, your mobile phone number...

User Manual (user Manual) (ver.d3) (English)
Page 169
... Alarm clock icon 24 B Backup to last menu 48 Battery charging 12 indicator 13 removing 11 strength icon 24 C Call Answer mode 26 Call Functions Adjusting the Call Volume 36 Answering a Call 35 Call Log 36 Making a Call-Number Entry Dialing 32 Making a Call-Speed Dialing 33 Making a Call-Voice Dialing 34 Clear key 22 Command Keys 20 Contacts List 62 open 62 Creating and Sending New Messages 78 D Dialogue boxes 25 Display pixels 18 screen icons 23 E End key 20 Entering Text 57 Changing the Text Entry Mode 58 Entering Numbers 60 Entering Symbols 59 Entering Upper and Lower Case 59 Using T9 Mode...
... Alarm clock icon 24 B Backup to last menu 48 Battery charging 12 indicator 13 removing 11 strength icon 24 C Call Answer mode 26 Call Functions Adjusting the Call Volume 36 Answering a Call 35 Call Log 36 Making a Call-Number Entry Dialing 32 Making a Call-Speed Dialing 33 Making a Call-Voice Dialing 34 Clear key 22 Command Keys 20 Contacts List 62 open 62 Creating and Sending New Messages 78 D Dialogue boxes 25 Display pixels 18 screen icons 23 E End key 20 Entering Text 57 Changing the Text Entry Mode 58 Entering Numbers 60 Entering Symbols 59 Entering Upper and Lower Case 59 Using T9 Mode...

User Manual (user Manual) (ver.f3) (English)
Page 19
... open area to Verizon Wireless for roaming rates. Understanding the Display Screen Understanding the Display Screen The top line of the display is reserved for icons that indicate network status, battery power, signal strength, and more unread voice messages in your voice mailbox. (Only applicable on Verizon Wireless Network.) You are notified of a new voice message by animations and sound. In Use: Indicates a call connects. When dialing a number, this icon flashes until the call in your home area. Section 2: Understanding Your Phone...
... open area to Verizon Wireless for roaming rates. Understanding the Display Screen Understanding the Display Screen The top line of the display is reserved for icons that indicate network status, battery power, signal strength, and more unread voice messages in your voice mailbox. (Only applicable on Verizon Wireless Network.) You are notified of a new voice message by animations and sound. In Use: Indicates a call connects. When dialing a number, this icon flashes until the call in your home area. Section 2: Understanding Your Phone...
User Manual (user Manual) (ver.f3) (English)
Page 37
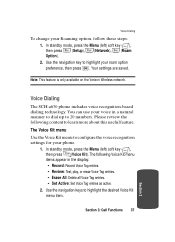
... menu item. You can use your voice in the display: • Record: Record Voice Tag entries. • Review: Test, play, or erase Voice Tag entries. • Erase All: Delete all Voice Tag entries. • Set Active: Set Voice Tag entries as active. 2. In standby mode, press the Menu (left ) soft key ( ), then press (Setup), (Network), (Roam Option). 2. The following content to learn more about this useful feature. The Voice Kit menu Use the Voice Kit menu to 20 numbers. Voice Dialing To change your phone...
... menu item. You can use your voice in the display: • Record: Record Voice Tag entries. • Review: Test, play, or erase Voice Tag entries. • Erase All: Delete all Voice Tag entries. • Set Active: Set Voice Tag entries as active. 2. In standby mode, press the Menu (left ) soft key ( ), then press (Setup), (Network), (Roam Option). 2. The following content to learn more about this useful feature. The Voice Kit menu Use the Voice Kit menu to 20 numbers. Voice Dialing To change your phone...
User Manual (user Manual) (ver.f3) (English)
Page 60
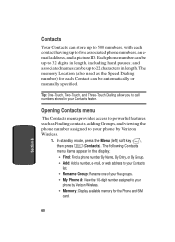
The memory Location (also used as Finding contacts, adding Groups, and viewing the phone number assigned to your phone by Verizon Wireless. • Memory: Display available memory for each contact having up to five associated phone numbers, an email address, and a picture ID. Opening Contacts menu The Contacts menu provides access to powerful features such as the Speed Dialing number) for the Phone and SIM card. 60 Section 6 and associated names can be automatically or manually specified. Tip: One-Touch, Two-Touch, and Three-Touch Dialing allow...
The memory Location (also used as Finding contacts, adding Groups, and viewing the phone number assigned to your phone by Verizon Wireless. • Memory: Display available memory for each contact having up to five associated phone numbers, an email address, and a picture ID. Opening Contacts menu The Contacts menu provides access to powerful features such as the Speed Dialing number) for the Phone and SIM card. 60 Section 6 and associated names can be automatically or manually specified. Tip: One-Touch, Two-Touch, and Three-Touch Dialing allow...
User Manual (user Manual) (ver.f3) (English)
Page 62
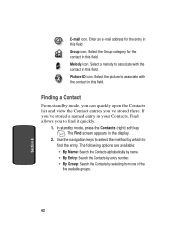
Enter an e-mail address for the contact in your Contacts, Find allows you 've stored there. Melody icon. Select the picture to associate with the contact in the display. 2. The Find screen appears in this field. Use the navigation keys to associate with the contact in this field. Group icon. Picture ID icon. Finding a Contact From standby mode, you can quickly open the Contacts list and view the Contact entries you to find it quickly. 1. Select...
Enter an e-mail address for the contact in your Contacts, Find allows you 've stored there. Melody icon. Select the picture to associate with the contact in the display. 2. The Find screen appears in this field. Use the navigation keys to associate with the contact in this field. Group icon. Picture ID icon. Finding a Contact From standby mode, you can quickly open the Contacts list and view the Contact entries you to find it quickly. 1. Select...
User Manual (user Manual) (ver.f3) (English)
Page 69
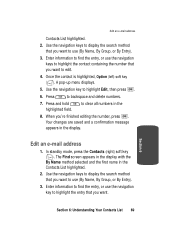
... 6 Section 6: Understanding Your Contacts List 69 In standby mode, press the Contacts (right) soft key ( ). Your changes are saved and a confirmation message appears in the 8. Use the navigation keys to display the search method that you want to display the search method that you 're finished editing the number, press . Edit an e-mail address Contacts List highlighted. 2. Use the navigation keys to edit. 4. The Find screen appears in the display with the By Name...
... 6 Section 6: Understanding Your Contacts List 69 In standby mode, press the Contacts (right) soft key ( ). Your changes are saved and a confirmation message appears in the 8. Use the navigation keys to display the search method that you want to display the search method that you 're finished editing the number, press . Edit an e-mail address Contacts List highlighted. 2. Use the navigation keys to edit. 4. The Find screen appears in the display with the By Name...

User Manual (user Manual) (ver.f3) (English)
Page 110
... minute must enter the hour in 24-hour format. 3. Volume/Vibrate 1. Use the navigation keys to save the time and date. Press to highlight Calls or Alarm, then press . 3. Note: With digital service, the Clock Set menu is disabled. 1. Enter the current time and date using your keypad. No sound or vibration. • 1 Beep - Plays a single beep without vibration. 110 In standby mode, press the Menu (left ) soft key ( ), then press (Setup), (Others), and for Clock Set. 2. The year...
... minute must enter the hour in 24-hour format. 3. Volume/Vibrate 1. Use the navigation keys to save the time and date. Press to highlight Calls or Alarm, then press . 3. Note: With digital service, the Clock Set menu is disabled. 1. Enter the current time and date using your keypad. No sound or vibration. • 1 Beep - Plays a single beep without vibration. 110 In standby mode, press the Menu (left ) soft key ( ), then press (Setup), (Others), and for Clock Set. 2. The year...
User Manual (user Manual) (ver.f3) (English)
Page 115
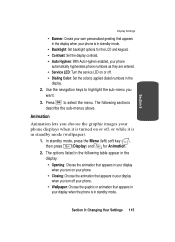
... in your display when you turn off your phone. • Wallpaper: Choose the graphic or animation that appears in the display when your phone is in standby mode (wallpaper). 1. Section 9: Changing Your Settings 115 In standby mode, press the Menu (left) soft key ( ), then press (Display) and for the LCD and keypad. • Contrast: Set the display contrast. • Auto Hyphen: With Auto Hyphen enabled, your phone displays when it...
... in your display when you turn off your phone. • Wallpaper: Choose the graphic or animation that appears in the display when your phone is in standby mode (wallpaper). 1. Section 9: Changing Your Settings 115 In standby mode, press the Menu (left) soft key ( ), then press (Display) and for the LCD and keypad. • Contrast: Set the display contrast. • Auto Hyphen: With Auto Hyphen enabled, your phone displays when it...
User Manual (user Manual) (ver.f3) (English)
Page 121
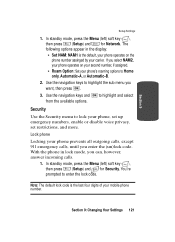
... phone, set up emergency numbers, enable or disable voice privacy, set restrictions, and more. You're prompted to highlight the sub menu you can, however, answer incoming calls. 1. In standby mode, press the Menu (left ) soft key ( ), then press (Setup) and for Network. Use the navigation keys and from the available options. Lock phone Locking your mobile phone number. Note: The default lock code is the default, your phone operates on your second number, if assigned. • Roam Option: Set your phone's roaming options to lock...
... phone, set up emergency numbers, enable or disable voice privacy, set restrictions, and more. You're prompted to highlight the sub menu you can, however, answer incoming calls. 1. In standby mode, press the Menu (left ) soft key ( ), then press (Setup) and for Network. Use the navigation keys and from the available options. Lock phone Locking your mobile phone number. Note: The default lock code is the default, your phone operates on your second number, if assigned. • Roam Option: Set your phone's roaming options to lock...
User Manual (user Manual) (ver.f3) (English)
Page 122
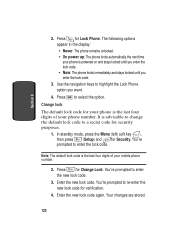
... your mobile phone number. 2. In standby mode, press the Menu (left) soft key ( ), then press (Setup) and for Change Lock. You're prompted to select the option. Press to enter the new lock code. 3. You're prompted to re-enter the new lock code for Lock Phone. Enter the new lock code again. The following options appear in the display: • Never: The phone remains unlocked. • On power up: The phone locks automatically the next time your phone is powered on...
... your mobile phone number. 2. In standby mode, press the Menu (left) soft key ( ), then press (Setup) and for Change Lock. You're prompted to select the option. Press to enter the new lock code. 3. You're prompted to re-enter the new lock code for Lock Phone. Enter the new lock code again. The following options appear in the display: • Never: The phone remains unlocked. • On power up: The phone locks automatically the next time your phone is powered on...
User Manual (user Manual) (ver.f3) (English)
Page 123
... the new code. Store Emergency Numbers 1. In standby mode, press the Menu (left) soft key ( ), then press (Setup) and for adequate signal strength before placing a call . Emergency numbers Your phone provides the option of the call . You can dial this phone as a primary method of various transmission methods, network parameters, and user settings necessary to complete a call 911, an audible tone is locked or restricted. If you call from your wireless phone, a connection cannot always be dialed manually...
... the new code. Store Emergency Numbers 1. In standby mode, press the Menu (left) soft key ( ), then press (Setup) and for adequate signal strength before placing a call . Emergency numbers Your phone provides the option of the call . You can dial this phone as a primary method of various transmission methods, network parameters, and user settings necessary to complete a call 911, an audible tone is locked or restricted. If you call from your wireless phone, a connection cannot always be dialed manually...
User Manual (user Manual) (ver.f3) (English)
Page 126
... mode, press the Menu (left ) soft key ( ), then press (Setup) and for Security. Note: The default lock code is the last four digits of your mobile phone number. 2. This cannot be undone once the confirmation message is useful if you want to give your call logs. Use the navigation key to enter the lock code. A confirmation message appears in the display. 3. Note: The default lock code is erased. Reset Phone The Reset Phone feature restores the factory default settings, while erasing your saved options and clearing...
... mode, press the Menu (left ) soft key ( ), then press (Setup) and for Security. Note: The default lock code is the last four digits of your mobile phone number. 2. This cannot be undone once the confirmation message is useful if you want to give your call logs. Use the navigation key to enter the lock code. A confirmation message appears in the display. 3. Note: The default lock code is erased. Reset Phone The Reset Phone feature restores the factory default settings, while erasing your saved options and clearing...


