
Quick Guide (easy Manual) (ver.1.0) (English)
Page 1
* Samsung Electronics' Internet Home Page http://www.samsung.com Digital Video Camcorder SC-D453/D455/D457 Features 2 Notes and Safety Instructions 3 Getting to Know Your Camcorder...........4 Playback 7 Basic Recording 8 Maintenance 8 Troubleshooting 9
* Samsung Electronics' Internet Home Page http://www.samsung.com Digital Video Camcorder SC-D453/D455/D457 Features 2 Notes and Safety Instructions 3 Getting to Know Your Camcorder...........4 Playback 7 Basic Recording 8 Maintenance 8 Troubleshooting 9
Quick Guide (easy Manual) (ver.1.0) (English)
Page 2
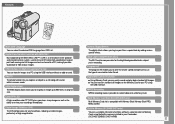
.../D457 only) Multi Memory Card slot is a serial data transfer protocol and interconnectivity system, used to review your Camcorder. (SC-D455: 32MB/SC-D457: 64MB) 2 Digital Image Stabilizer (DIS) The DIS compensates for the bright background behind a subject you to your films a special look by adding various ... sharp images as well as a still along with Memory Stick, Memory Stick PRO, MMC and SD. Built-in camera mode. 900x Digital Zoom The 900x Digital Zoom allows you to alter the shutter speed and aperture to suit the type of scene/action to be transferred to a PC, making it possible...
.../D457 only) Multi Memory Card slot is a serial data transfer protocol and interconnectivity system, used to review your Camcorder. (SC-D455: 32MB/SC-D457: 64MB) 2 Digital Image Stabilizer (DIS) The DIS compensates for the bright background behind a subject you to your films a special look by adding various ... sharp images as well as a still along with Memory Stick, Memory Stick PRO, MMC and SD. Built-in camera mode. 900x Digital Zoom The 900x Digital Zoom allows you to alter the shutter speed and aperture to suit the type of scene/action to be transferred to a PC, making it possible...
Quick Guide (easy Manual) (ver.1.0) (English)
Page 3
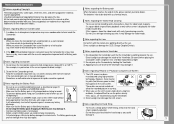
... Battery pack, you are trademarks or registered trademarks of their respective holders. Unauthorized copying of its life, please contact your Camcorder is in this manual or other documentation provided with a dry type cleaning cassette. - Notes regarding the Battery pack When ...fully charged before starting to liquids cannot be copyrighted. Do not force your Samsung product are outdoors, it is activated, leave the Camcorder for example: - Notes regarding Moisture Condensation 1. If the Camcorder gets wet, it completely. - Sometimes a malfunction due to exposure to ...
... Battery pack, you are trademarks or registered trademarks of their respective holders. Unauthorized copying of its life, please contact your Camcorder is in this manual or other documentation provided with a dry type cleaning cassette. - Notes regarding the Battery pack When ...fully charged before starting to liquids cannot be copyrighted. Do not force your Samsung product are outdoors, it is activated, leave the Camcorder for example: - Notes regarding Moisture Condensation 1. If the Camcorder gets wet, it completely. - Sometimes a malfunction due to exposure to ...
Quick Guide (easy Manual) (ver.1.0) (English)
Page 4
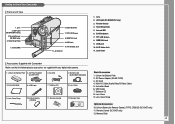
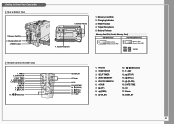
... 7. Lens Cover Strap Optional Accessories 10. Memory Stick 4 Hand Strap Hook 5. Internal MIC 6. Hand Strap Hook 5. Getting to Know Your Camcorder Front & Left View 1. Lens 2. LED Light (SC-D455/D457 only) 3. Remote Sensor (SC-D457 only) 4. EASY.Q button 7. TFT LCD Screen 8. IEEE1394 Jack 9. AV/S-Video Jack 11. Lens 2. Remote Sensor 4. Internal MIC 6. EASY...
... 7. Lens Cover Strap Optional Accessories 10. Memory Stick 4 Hand Strap Hook 5. Internal MIC 6. Hand Strap Hook 5. Getting to Know Your Camcorder Front & Left View 1. Lens 2. LED Light (SC-D455/D457 only) 3. Remote Sensor (SC-D457 only) 4. EASY.Q button 7. TFT LCD Screen 8. IEEE1394 Jack 9. AV/S-Video Jack 11. Lens 2. Remote Sensor 4. Internal MIC 6. EASY...

Quick Guide (easy Manual) (ver.1.0) (English)
Page 5
Getting to Know Your Camcorder Left Side View 1. Start/Stop button 4. Viewfinder 6. REV FWD S.SHOW(SLIDE SHOW) MULTI 6. TAPE EJECT 7. DC Jack 6. External MIC 10. Power ...External MIC 10. Start/Stop button 4. Menu Selector (VOL/MF) 2. DC Jack 4. COLOR NITE/PB ZOOM 1. COLOR NITE/PB ZOOM M.Player - Zoom Lever 8. Cassette Door 1. Menu Selector (VOL/MF) 2. Cassette Door 5 Mode Switch (MEMORY/TAPE) 3. Speaker 2. DISPLAY 4. Zoom Lever 8. REC SEARCH + FADE BLC 7. Speaker 2. Mode Switch 3. MENU button 3. Viewfinder 6. PHOTO button...
Getting to Know Your Camcorder Left Side View 1. Start/Stop button 4. Viewfinder 6. REV FWD S.SHOW(SLIDE SHOW) MULTI 6. TAPE EJECT 7. DC Jack 6. External MIC 10. Power ...External MIC 10. Start/Stop button 4. Menu Selector (VOL/MF) 2. DC Jack 4. COLOR NITE/PB ZOOM 1. COLOR NITE/PB ZOOM M.Player - Zoom Lever 8. Cassette Door 1. Menu Selector (VOL/MF) 2. Cassette Door 5 Mode Switch (MEMORY/TAPE) 3. Speaker 2. DISPLAY 4. Zoom Lever 8. REC SEARCH + FADE BLC 7. Speaker 2. Mode Switch 3. MENU button 3. Viewfinder 6. PHOTO button...
Quick Guide (easy Manual) (ver.1.0) (English)
Page 6
Charging indicator 3. Tripod Receptacle 1. START/STOP 3. PHOTO SEARCH 6. DISPLAY 6 START/STOP 3. PHOTO SEARCH 6. Zoom 16. ADV 12. (STOP) 13. (STILL) 14. (SLOW) 15. RESET button Remote Control (SC-D457 only) 1. SELF TIMER 4. A.DUB 7. (FF) 8. (REW) 9. (PLAY) 10. / (Direction) 5. ...Zoom 18. ADV 1. SELF TIMER 4. Battery Release Memory Card Slot (Usable Memory Card) SC-D453 only SC-D455/D457 only Memory Stick Memory Stick PRO Memory Stick Memory Stick PRO SD/MMC 18. A.DUB 7. (FF) 8. (REW) 9. (PLAY) 10. / (Direction) 11. Getting to Know Your Camcorder...
Charging indicator 3. Tripod Receptacle 1. START/STOP 3. PHOTO SEARCH 6. DISPLAY 6 START/STOP 3. PHOTO SEARCH 6. Zoom 16. ADV 12. (STOP) 13. (STILL) 14. (SLOW) 15. RESET button Remote Control (SC-D457 only) 1. SELF TIMER 4. A.DUB 7. (FF) 8. (REW) 9. (PLAY) 10. / (Direction) 5. ...Zoom 18. ADV 1. SELF TIMER 4. Battery Release Memory Card Slot (Usable Memory Card) SC-D453 only SC-D455/D457 only Memory Stick Memory Stick PRO Memory Stick Memory Stick PRO SD/MMC 18. A.DUB 7. (FF) 8. (REW) 9. (PLAY) 10. / (Direction) 11. Getting to Know Your Camcorder...
Quick Guide (easy Manual) (ver.1.0) (English)
Page 7
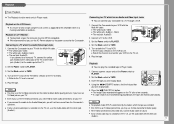
...Audio L). 7 s Even if you wish to your TV. 1. s If the VCR has an S-Video input terminal, you use S-Video Connector for the Camcorder. s If a tape reaches its end while being played back, the tape will rewind automatically. Set the Mode switch to the TV user's manual. 5. Play... has Audio/Video Input Jacks 1. Video input-Yellow S-Video input Audio input(left )-White Audio input (right)-Red DV USB AV/ S Audio/Video/ S-Video Camcorder Connecting to PLAYER. 2. Turn on a TV Monitor ✤ To play the recorded tape in Player mode. Connect a TV to TAPE. 3. s The S-...
...Audio L). 7 s Even if you wish to your TV. 1. s If the VCR has an S-Video input terminal, you use S-Video Connector for the Camcorder. s If a tape reaches its end while being played back, the tape will rewind automatically. Set the Mode switch to the TV user's manual. 5. Play... has Audio/Video Input Jacks 1. Video input-Yellow S-Video input Audio input(left )-White Audio input (right)-Red DV USB AV/ S Audio/Video/ S-Video Camcorder Connecting to PLAYER. 2. Turn on a TV Monitor ✤ To play the recorded tape in Player mode. Connect a TV to TAPE. 3. s The S-...
Quick Guide (easy Manual) (ver.1.0) (English)
Page 8
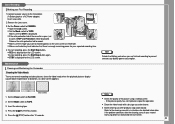
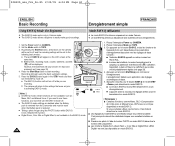
...screen appears. s Clean the video heads with a dry type cassette cleaner. will be displayed. To stop automatically. Basic Recording Making your nearest Samsung dealer or Authorized Service Center. 8 s Set the Mode switch to TAPE. 4 3 √ Make sure that there is open (set...seconds. Press the (PLAY/STILL) button. 5. Press the (STOP) button after the cleaning, consult your First Recording 1.Connect a power source to the Camcorder. 1 2 (A Battery pack or a AC Power adapter) Insert a cassette. 2.Remove the Lens cover. 3.Set the Power switch to prevent unnecessary battery ...
...screen appears. s Clean the video heads with a dry type cassette cleaner. will be displayed. To stop automatically. Basic Recording Making your nearest Samsung dealer or Authorized Service Center. 8 s Set the Mode switch to TAPE. 4 3 √ Make sure that there is open (set...seconds. Press the (PLAY/STILL) button. 5. Press the (STOP) button after the cleaning, consult your First Recording 1.Connect a power source to the Camcorder. 1 2 (A Battery pack or a AC Power adapter) Insert a cassette. 2.Remove the Lens cover. 3.Set the Power switch to prevent unnecessary battery ...
Quick Guide (easy Manual) (ver.1.0) (English)
Page 9
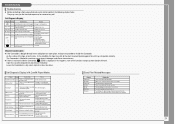
... you the time and expense of the tape, or on this condition, the tape may stick to a new one . slow The Camcorder cannot playback. Format a Memory Card or change to format. Now deleted... slow If inserted Memory Card is record protected. Tape end ... There is about 2 minutes. slow When processing file delete. Troubleshooting Troubleshooting ✤ Before contacting a Samsung authorized service center, perform the following simple checks. no Memory Card in Camcorder. Memory Full ! Turn off the printer and turn it back on the Memory Card. Read error...
... you the time and expense of the tape, or on this condition, the tape may stick to a new one . slow The Camcorder cannot playback. Format a Memory Card or change to format. Now deleted... slow If inserted Memory Card is record protected. Tape end ... There is about 2 minutes. slow When processing file delete. Troubleshooting Troubleshooting ✤ Before contacting a Samsung authorized service center, perform the following simple checks. no Memory Card in Camcorder. Memory Full ! Turn off the printer and turn it back on the Memory Card. Read error...
Quick Guide (easy Manual) (ver.1.0) (English)
Page 27
...-in lithium battery is automatically recorded onto a tape. I El mes parpadeará. 7. I If the built-in Lithium battery, supply power to the camcorder and set the Date/Time. I Aparecerá el mensaje Complete! . enchufe la videocámara a una toma eléctrica y coloque el ... de litio incorporada que está instalada en la videocámara. Demonstration procedimiento que para el año. If you don't use the camcorder for setting the year. 8. Coloque el interruptor Power en CAMERA o PLAYER. 2. Move the Menu selector to the left or right to 2037....
...-in lithium battery is automatically recorded onto a tape. I El mes parpadeará. 7. I If the built-in Lithium battery, supply power to the camcorder and set the Date/Time. I Aparecerá el mensaje Complete! . enchufe la videocámara a una toma eléctrica y coloque el ... de litio incorporada que está instalada en la videocámara. Demonstration procedimiento que para el año. If you don't use the camcorder for setting the year. 8. Coloque el interruptor Power en CAMERA o PLAYER. 2. Move the Menu selector to the left or right to 2037....

Quick Guide (easy Manual) (ver.1.0) (English)
Page 93
...Cam mode and 1 store the images on the LCD screen during the time it takes to save the image. [ Notes ] I Still images are using the Camcorder. ✤ You can be recorded with a Still image onto the Memory Card. 3 1. Set the Power switch to MEMORY. 3. I En este intervalo no ... Modalidad de cámara fotográfica digital Toma de fotos ✤ Puede hacer fotografías utilizando el mando a distancia. (Sólo SC-D457) ✤ El audio no es posible capturar otra imagen. Coloque el interruptor Power en CAMERA. 2. After framing your object to record, fully...
...Cam mode and 1 store the images on the LCD screen during the time it takes to save the image. [ Notes ] I Still images are using the Camcorder. ✤ You can be recorded with a Still image onto the Memory Card. 3 1. Set the Power switch to MEMORY. 3. I En este intervalo no ... Modalidad de cámara fotográfica digital Toma de fotos ✤ Puede hacer fotografías utilizando el mando a distancia. (Sólo SC-D457) ✤ El audio no es posible capturar otra imagen. Coloque el interruptor Power en CAMERA. 2. After framing your object to record, fully...

Quick Guide (easy Manual) (ver.1.0) (English)
Page 119
ENGLISH THIS CAMCORDER IS MANUFACTURED BY: ESPAÑOL VIDEOCÁMARA FABRICADA POR: *Samsung Electronics' Internet Home Page United States United Kingdom France Australia Germany Sweden Poland Canada Panama Italia Spain http://www.samsungusa.com http://www.samsungelectronics.co.uk http://www.samsung.fr http://www.samsung.com/au http://www.samsung.de http://www...
ENGLISH THIS CAMCORDER IS MANUFACTURED BY: ESPAÑOL VIDEOCÁMARA FABRICADA POR: *Samsung Electronics' Internet Home Page United States United Kingdom France Australia Germany Sweden Poland Canada Panama Italia Spain http://www.samsungusa.com http://www.samsungelectronics.co.uk http://www.samsung.fr http://www.samsung.com/au http://www.samsung.de http://www...

User Manual (user Manual) (ver.1.0) (English, French)
Page 6
...~25 2/25/05 5:58 PM Page 6 ENGLISH Notes and Safety Instructions Notes regarding the Rotation of the hinge that connects the 1 LCD screen to the Camcorder. 1.
...~25 2/25/05 5:58 PM Page 6 ENGLISH Notes and Safety Instructions Notes regarding the Rotation of the hinge that connects the 1 LCD screen to the Camcorder. 1.

User Manual (user Manual) (ver.1.0) (English, French)
Page 17
...17 00840D_usa_fre_1~25 2/25/05 5:58 PM Page 17 ENGLISH Getting to Know Your Camcorder Remote Control (SC-D457 only) 1. PHOTO 2. SELF TIMER 4. START/STOP 3. ZERO MEMORY (see page 73) 17. PHOTO (voir page 67) 2. Zoom 18. X2 (see page 42) 5. PHOTO SEARCH (voir page 67) 6. ADV...voir page 42) 5. START/STOP 3. PHOTO (see page 67) 2. F. DISPLAY FRANÇAIS Familiarisez-vous avec votre caméscope Télécommande (SC-D457 uniquement) 18. DISPLAY 17. Zoom 16. DATE/TIME 14. (SLOW) 13. (STILL) 12. (STOP) 11. F. A.DUB (voir page 76) 7. (Av.Rapide) 8. (Ret.Rapide...
...17 00840D_usa_fre_1~25 2/25/05 5:58 PM Page 17 ENGLISH Getting to Know Your Camcorder Remote Control (SC-D457 only) 1. PHOTO 2. SELF TIMER 4. START/STOP 3. ZERO MEMORY (see page 73) 17. PHOTO (voir page 67) 2. Zoom 18. X2 (see page 42) 5. PHOTO SEARCH (voir page 67) 6. ADV...voir page 42) 5. START/STOP 3. PHOTO (see page 67) 2. F. DISPLAY FRANÇAIS Familiarisez-vous avec votre caméscope Télécommande (SC-D457 uniquement) 18. DISPLAY 17. Zoom 16. DATE/TIME 14. (SLOW) 13. (STILL) 12. (STOP) 11. F. A.DUB (voir page 76) 7. (Av.Rapide) 8. (Ret.Rapide...
User Manual (user Manual) (ver.1.0) (English, French)
Page 27
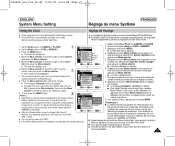
...following the same procedure for a long period of time, charge the Lithium battery USB Version 10 : 30 AM [ Remarques ] at least once a month. camcorder for setting the year. 8. I You can set the year up . Rechargez la pile CAMERA or PLAYER. I La date et l'heure sont gardé... source d'alimentation et placez le sélecteur de mise sous tension sur CAMERA ou PLAYER. Before recording, please set the Power Switch to the camcorder and set the Date/Time. ✤ Le réglage de l'horloge se fait en modes Camera/Player/M.Cam/M.Player. ✤ L'indication Date...
...following the same procedure for a long period of time, charge the Lithium battery USB Version 10 : 30 AM [ Remarques ] at least once a month. camcorder for setting the year. 8. I You can set the year up . Rechargez la pile CAMERA or PLAYER. I La date et l'heure sont gardé... source d'alimentation et placez le sélecteur de mise sous tension sur CAMERA ou PLAYER. Before recording, please set the Power Switch to the camcorder and set the Date/Time. ✤ Le réglage de l'horloge se fait en modes Camera/Player/M.Cam/M.Player. ✤ L'indication Date...

User Manual (user Manual) (ver.1.0) (English, French)
Page 31
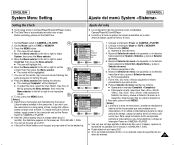
... Mode Back Clock Set Beep Sound USB Version Language Demonstration Off On Move Select MENU Exit Samsung Camcorder is left or right to the Camera mode (no tape inserted in the Camcorder. (See page 36) ✤ Demonstration automatically shows you the major functions that are included... with your Camcorder so that you do not operate any other buttons (FADE, BLC, PHOTO, EASY.Q, COLOR NITE/PB ZOOM) during the Demonstration mode, the demonstration stops temporarily and resumes 10 minutes later if ...
... Mode Back Clock Set Beep Sound USB Version Language Demonstration Off On Move Select MENU Exit Samsung Camcorder is left or right to the Camera mode (no tape inserted in the Camcorder. (See page 36) ✤ Demonstration automatically shows you the major functions that are included... with your Camcorder so that you do not operate any other buttons (FADE, BLC, PHOTO, EASY.Q, COLOR NITE/PB ZOOM) during the Demonstration mode, the demonstration stops temporarily and resumes 10 minutes later if ...

User Manual (user Manual) (ver.1.0) (English, French)
Page 32
...Affichage Adjusting the LCD Screen Réglage de l'écran ACL ✤ This function works in Camera/Player/M.Cam/M.Player modes. ✤ Your Camcorder is equipped with a 2.5 inch color Liquid Crystal Display(LCD) screen, which enables you to view what you are recording or playing back directly.... ✤ Depending on the conditions under which you are using the Camcorder (indoors or outdoors for example), you want to adjust (LCD Bright or LCD Color), 4 then press the Menu selector. 6. Appuyez sur le...
...Affichage Adjusting the LCD Screen Réglage de l'écran ACL ✤ This function works in Camera/Player/M.Cam/M.Player modes. ✤ Your Camcorder is equipped with a 2.5 inch color Liquid Crystal Display(LCD) screen, which enables you to view what you are recording or playing back directly.... ✤ Depending on the conditions under which you are using the Camcorder (indoors or outdoors for example), you want to adjust (LCD Bright or LCD Color), 4 then press the Menu selector. 6. Appuyez sur le...

User Manual (user Manual) (ver.1.0) (English, French)
Page 34
...;t sur l'écran ACL et dans le viseur uniquement. - To exit, press the MENU button. 6 [ Note ] If a DV cable is connected to your camcorder, no OSD (On-screen Display) item is displayed on the LCD screen/Viewfinder/TV. 1. Pour activer la fonction d'affichage TV, déplacez le bouton Menu...Setting the TV Display ✤ The TV Display function works in Camera/Player/M.Cam/M.Player modes. ✤ You can select the output path of the Camcorder to select TV Display, then press the Menu selector. 6. Déplacez le bouton Menu selector vers la gauche ou vers la droite pour sé...
...;t sur l'écran ACL et dans le viseur uniquement. - To exit, press the MENU button. 6 [ Note ] If a DV cable is connected to your camcorder, no OSD (On-screen Display) item is displayed on the LCD screen/Viewfinder/TV. 1. Pour activer la fonction d'affichage TV, déplacez le bouton Menu...Setting the TV Display ✤ The TV Display function works in Camera/Player/M.Cam/M.Player modes. ✤ You can select the output path of the Camcorder to select TV Display, then press the Menu selector. 6. Déplacez le bouton Menu selector vers la gauche ou vers la droite pour sé...

User Manual (user Manual) (ver.1.0) (English, French)
Page 39
...que le témoin STBY apparaît à l'écran. I Open the LCD screen. s'affichent. I Assurez-vous que la scène que vous souhaitez enregistrer apparaît sur l'écran ACL ou dans le viseur. will be displayed. Release the write protection tab...is displayed. 4 √ I Make sure the image you are finished recording to prevent unnecessary battery power consumption. 4. I Set the Mode switch to the Camcorder. (see page 20) 1 (A Battery pack or a AC Power adapter) Insert a cassette. (see page 36) 2. Réalisation de votre premier ...
...que le témoin STBY apparaît à l'écran. I Open the LCD screen. s'affichent. I Assurez-vous que la scène que vous souhaitez enregistrer apparaît sur l'écran ACL ou dans le viseur. will be displayed. Release the write protection tab...is displayed. 4 √ I Make sure the image you are finished recording to prevent unnecessary battery power consumption. 4. I Set the Mode switch to the Camcorder. (see page 20) 1 (A Battery pack or a AC Power adapter) Insert a cassette. (see page 36) 2. Réalisation de votre premier ...
User Manual (user Manual) (ver.1.0) (English, French)
Page 40
... de faire, facilement, de bons enregistrements. 1. En appuyant sur le bouton EASY.Q, toutes les fonctions de 3. I Digital Zoom, Color Nite or Digital Effect is set, releases DIS function. Cependant, la date et l'heure ne s'affichent que si elles... using the PHOTO button while EASY.Q is not available in the EASY.Q mode. [ Remarques ] I Les fonctions Digital Zoom , Color Nite et Digital Effect ne sont pas disponibles en mode EASY.Q. 40 Press the Start/Stop button to CAMERA.... reset when the Battery pack is removed from the Camcorder and must first turn the EASY.Q mode off.
... de faire, facilement, de bons enregistrements. 1. En appuyant sur le bouton EASY.Q, toutes les fonctions de 3. I Digital Zoom, Color Nite or Digital Effect is set, releases DIS function. Cependant, la date et l'heure ne s'affichent que si elles... using the PHOTO button while EASY.Q is not available in the EASY.Q mode. [ Remarques ] I Les fonctions Digital Zoom , Color Nite et Digital Effect ne sont pas disponibles en mode EASY.Q. 40 Press the Start/Stop button to CAMERA.... reset when the Battery pack is removed from the Camcorder and must first turn the EASY.Q mode off.


