
User Manual (ENGLISH)
Page 9
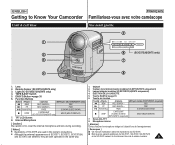
... [ Caution ] Be careful not to Know Your Camcorder Front & Left View FRANÇAIS Familiarisez-vous avec votre caméscope Vue avant gauche % ! @ ^ (SC-D375(H)/D975 only) # & $ * 1. ENGLISH Getting to cover the internal microphone and lens during recording. [ Notes ] I Illustrations of SC-D371, SC-D372, SC-D375(H) and SC-D975 are different, they are used in the...
... [ Caution ] Be careful not to Know Your Camcorder Front & Left View FRANÇAIS Familiarisez-vous avec votre caméscope Vue avant gauche % ! @ ^ (SC-D375(H)/D975 only) # & $ * 1. ENGLISH Getting to cover the internal microphone and lens during recording. [ Notes ] I Illustrations of SC-D371, SC-D372, SC-D375(H) and SC-D975 are different, they are used in the...
User Manual (ENGLISH)
Page 11
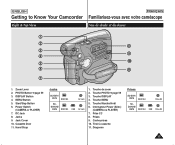
... IEEE1394 AV Jack SCD375(H)/ D975 IEEE1394 USB AV Jack 1. Touche MENU 5. Cache-prises 10. Dragonne Prises SC-D371/ D372 IEEE1394 Prise AV SCD375(H)/ D975 IEEE1394 USB Prise AV 11 ENGLISH Getting to Know Your Camcorder Right & Top View FRANÇAIS Familiarisez-vous avec votre caméscope Vue de droite et...
... IEEE1394 AV Jack SCD375(H)/ D975 IEEE1394 USB AV Jack 1. Touche MENU 5. Cache-prises 10. Dragonne Prises SC-D371/ D372 IEEE1394 Prise AV SCD375(H)/ D975 IEEE1394 USB Prise AV 11 ENGLISH Getting to Know Your Camcorder Right & Top View FRANÇAIS Familiarisez-vous avec votre caméscope Vue de droite et...
User Manual (ENGLISH)
Page 13
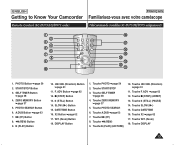
...;√ (FF) 8. Touche ❙❙ (STILL) (PAUSE) 14. Touche SELF TIMER ➥page 38 4. Touche Direction) ➥page 61 11. ENGLISH Getting to Know Your Camcorder Remote Control (SC-D375(H)/D975 only) FRANÇAIS Familiarisez-vous avec votre caméscope Télécommande (modèles...
...;√ (FF) 8. Touche ❙❙ (STILL) (PAUSE) 14. Touche SELF TIMER ➥page 38 4. Touche Direction) ➥page 61 11. ENGLISH Getting to Know Your Camcorder Remote Control (SC-D375(H)/D975 only) FRANÇAIS Familiarisez-vous avec votre caméscope Télécommande (modèles...

User Manual (ENGLISH)
Page 20
... être utilisée qu'avec la fonction QUICK MENU ➥page 46 I Mise au point (Focus) ➥ page 47 Mode M.Player (modèles SC-D375(H)/D975 uniquement) I Réglage de la vitesse de l'obturateur (Shutter) - Press the [L / M] button to select desired mode , 2. Appuyez sur la touche [L /...]. 3. votre caméscope à l'aide de la touche [Q.MENU]. ✤ QUICK MENU provides easier access to frequently used to access camcorder functions by using the QUICK MENU are as below: Camera Mode I Setting the Back Light Compensation (BLC) ➥page 57 I Setting the ...
... être utilisée qu'avec la fonction QUICK MENU ➥page 46 I Mise au point (Focus) ➥ page 47 Mode M.Player (modèles SC-D375(H)/D975 uniquement) I Réglage de la vitesse de l'obturateur (Shutter) - Press the [L / M] button to select desired mode , 2. Appuyez sur la touche [L /...]. 3. votre caméscope à l'aide de la touche [Q.MENU]. ✤ QUICK MENU provides easier access to frequently used to access camcorder functions by using the QUICK MENU are as below: Camera Mode I Setting the Back Light Compensation (BLC) ➥page 57 I Setting the ...

User Manual (ENGLISH)
Page 29
...LCD Color) ✤ Adjusting the LCD Screen works in /// modes. ➥page 19 ✤ Your Camcorder is equipped with a 2.5 inch (SC-D371 only) / 2.7 inch wide (SC-D372/D375(H)/D975 only) color Liquid Crystal Display (LCD) Screen, which enables you to view what you are recording... or playing back directly. ✤ Depending on the conditions under which you are using the Camcorder (indoors or outdoors for and between ~ . 7. Set the [Power] switch to [TAPE] or [CARD]. (SC-D375(H)/D975 only) 3. Set the [Mode] switch to [CAMERA] or [PLAYER]. 2. Press the [MENU...
...LCD Color) ✤ Adjusting the LCD Screen works in /// modes. ➥page 19 ✤ Your Camcorder is equipped with a 2.5 inch (SC-D371 only) / 2.7 inch wide (SC-D372/D375(H)/D975 only) color Liquid Crystal Display (LCD) Screen, which enables you to view what you are recording... or playing back directly. ✤ Depending on the conditions under which you are using the Camcorder (indoors or outdoors for and between ~ . 7. Set the [Power] switch to [TAPE] or [CARD]. (SC-D375(H)/D975 only) 3. Set the [Mode] switch to [CAMERA] or [PLAYER]. 2. Press the [MENU...

User Manual (ENGLISH)
Page 34
... nouveau sur la touche [Start/Stop]. I is displayed on the LCD Screen. I Placez l'interrupteur [Mode] sur [TAPE]. [TAPE]. (modèles SC-D375(H)/ (SC-D375(H)/D975 only) D975 uniquement) Make sure that there is displayed on the LCD Screen. I Set the [Mode] switch to save), and will be displayed....votre premier enregistrement 1. Pour commencer l'enregistrement, appuyez sur la touche [Start/Stop]. Set the [Power] switch to the Camcorder. 1. I Make sure the image you finish the recordings to record appears on the LCD Screen or Viewfinder. I Assurez-vous que la...
... nouveau sur la touche [Start/Stop]. I is displayed on the LCD Screen. I Placez l'interrupteur [Mode] sur [TAPE]. [TAPE]. (modèles SC-D375(H)/ (SC-D375(H)/D975 only) D975 uniquement) Make sure that there is displayed on the LCD Screen. I Set the [Mode] switch to save), and will be displayed....votre premier enregistrement 1. Pour commencer l'enregistrement, appuyez sur la touche [Start/Stop]. Set the [Power] switch to the Camcorder. 1. I Make sure the image you finish the recordings to record appears on the LCD Screen or Viewfinder. I Assurez-vous que la...
User Manual (ENGLISH)
Page 42
... switch to [CAMERA]. 1 2. I Ne l'utilisez pas à proximité de matières inflammables ou explosives. I Do not place the Camcorder into the carrying case immediately after turning it remains extremely hot for some time. I The range of the LIGHT is limited. (up to use near... en cours d'enregistrement. Placez l'interrupteur [Power] sur [CAMERA]. 3. ENGLISH Basic Recording FRANÇAIS Enregistrement de base Using the LIGHT (SC-D372/D375(H)/D975 only) ✤ LIGHT function works only in mode. ➥page 19 ✤ The LIGHT enables you are recording.
... switch to [CAMERA]. 1 2. I Ne l'utilisez pas à proximité de matières inflammables ou explosives. I Do not place the Camcorder into the carrying case immediately after turning it remains extremely hot for some time. I The range of the LIGHT is limited. (up to use near... en cours d'enregistrement. Placez l'interrupteur [Power] sur [CAMERA]. 3. ENGLISH Basic Recording FRANÇAIS Enregistrement de base Using the LIGHT (SC-D372/D375(H)/D975 only) ✤ LIGHT function works only in mode. ➥page 19 ✤ The LIGHT enables you are recording.

User Manual (ENGLISH)
Page 59
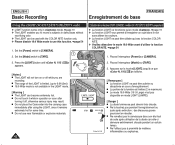
... Move OK Select MENU Exit 4. Pressing the [PHOTO] button Photo searching... Placez l'interrupteur de [Mode] sur [TAPE]. (modèles SC-D375(H)/D975 uniquement) 3. I L'enregistrement des images figées (photos) n'est pas disponible pendant un enregistrement. I L'enregistrement d'images figé...has been recorded, the Camcorder returns to select , then press the [OK] button. Set the [Mode] switch to [CAMERA]. 2. Photo Search SP 0:41:56:10 25min I will flicker on the remote control records the still image with automatic focusing. (SC-D375(H)/D975 only) I L'...
... Move OK Select MENU Exit 4. Pressing the [PHOTO] button Photo searching... Placez l'interrupteur de [Mode] sur [TAPE]. (modèles SC-D375(H)/D975 uniquement) 3. I L'enregistrement des images figées (photos) n'est pas disponible pendant un enregistrement. I L'enregistrement d'images figé...has been recorded, the Camcorder returns to select , then press the [OK] button. Set the [Mode] switch to [CAMERA]. 2. Photo Search SP 0:41:56:10 25min I will flicker on the remote control records the still image with automatic focusing. (SC-D375(H)/D975 only) I L'...
User Manual (ENGLISH)
Page 61
...function works only in mode. ➥page 19 ✤ The [PLAY], [STILL], [STOP], [FF] and [REW] buttons are located on the Camcorder and the remote control. (SC-D375(H)/D975 only) ✤ The [F.ADV] (Frame advance), [X2] and [SLOW] buttons are located on the remote control during playback. - mode Playback...I Reverse Slow Playback touche PLAY/STILL)]. - Press the [SLOW] button on the remote control only. (SC-D375(H)/D975 only) ✤ To prevent tape and head-drum wear, your Camcorder will automatically stop if it is left in still or slow modes for more than 3 minutes. To resume...
...function works only in mode. ➥page 19 ✤ The [PLAY], [STILL], [STOP], [FF] and [REW] buttons are located on the Camcorder and the remote control. (SC-D375(H)/D975 only) ✤ The [F.ADV] (Frame advance), [X2] and [SLOW] buttons are located on the remote control during playback. - mode Playback...I Reverse Slow Playback touche PLAY/STILL)]. - Press the [SLOW] button on the remote control only. (SC-D375(H)/D975 only) ✤ To prevent tape and head-drum wear, your Camcorder will automatically stop if it is left in still or slow modes for more than 3 minutes. To resume...

User Manual (ENGLISH)
Page 63
...sonorisation. I The Camcorder is displayed. sonorisation) lors de la lecture d'une cassette vidéo protégée en écriture. Press the [A.DUB] button on the remote control. Appuyez sur la touche [A.DUB] de la télécommande. Post-sonorisation (modèles SC-D375(H)/D975 uniquement) &#...externe, servez-vous du câble AV pour la raccorder aux entrées audio. ENGLISH Playback Lecture FRANÇAIS Audio Dubbing (SC-D375(H)/D975 only) ✤ The Audio Dubbing function works only in mode. ➥page 19 ✤ You can not dub sound on ...
...sonorisation. I The Camcorder is displayed. sonorisation) lors de la lecture d'une cassette vidéo protégée en écriture. Press the [A.DUB] button on the remote control. Appuyez sur la touche [A.DUB] de la télécommande. Post-sonorisation (modèles SC-D375(H)/D975 uniquement) &#...externe, servez-vous du câble AV pour la raccorder aux entrées audio. ENGLISH Playback Lecture FRANÇAIS Audio Dubbing (SC-D375(H)/D975 only) ✤ The Audio Dubbing function works only in mode. ➥page 19 ✤ You can not dub sound on ...

User Manual (ENGLISH)
Page 69
... vous permet d'enregistrer un signal à partir d'une source externe et de l'afficher sur l'écran ACL. I The menu list will appear on the Camcorder. Appuyez sur la touche [MENU]. I La liste des menus apparaîtra. 4. I : Select this when copying or playing back the contents of this...[PLAYER]. 2. Placez l'interrupteur de [Mode] sur [TAPE]. 3. ENGLISH Playback Lecture FRANÇAIS Setting the AV In/Out (SC-D975 only) Réglage Ent/Sor AV (modèles SC-D975 uniquement) ✤ AV In/Out function works only in mode. ➥page 19 ✤ AV In/Out setting enables...
... vous permet d'enregistrer un signal à partir d'une source externe et de l'afficher sur l'écran ACL. I The menu list will appear on the Camcorder. Appuyez sur la touche [MENU]. I La liste des menus apparaîtra. 4. I : Select this when copying or playing back the contents of this...[PLAYER]. 2. Placez l'interrupteur de [Mode] sur [TAPE]. 3. ENGLISH Playback Lecture FRANÇAIS Setting the AV In/Out (SC-D975 only) Réglage Ent/Sor AV (modèles SC-D975 uniquement) ✤ AV In/Out function works only in mode. ➥page 19 ✤ AV In/Out setting enables...
User Manual (ENGLISH)
Page 87
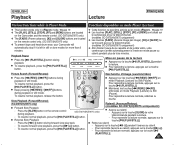
...MENU] button. 5 I Toutes les photos enregistrées sur la cassette seront copiées sur la carte mémoire. 6. The Camcorder automatically performs the still image search to select , then press the [OK] button. Le caméscope effectue automatiquement la recherche des photos,... recorded on the cassette tape will appear. 4. ENGLISH Appareil photo numérique FRANÇAIS Digital Still Camera Mode (SC-D375(H)/D975 only) (modèles SC-D375(H)/D975 uniquement) Copying Still Images from a Cassette to a Memory Card (Photo Copy) Copie de photos d'une cassette vers...
...MENU] button. 5 I Toutes les photos enregistrées sur la cassette seront copiées sur la carte mémoire. 6. The Camcorder automatically performs the still image search to select , then press the [OK] button. Le caméscope effectue automatiquement la recherche des photos,... recorded on the cassette tape will appear. 4. ENGLISH Appareil photo numérique FRANÇAIS Digital Still Camera Mode (SC-D375(H)/D975 only) (modèles SC-D375(H)/D975 uniquement) Copying Still Images from a Cassette to a Memory Card (Photo Copy) Copie de photos d'une cassette vers...

User Manual (ENGLISH)
Page 91
This Camcorder has a 4pin jack. Transfert de données DV standard conformes à la norme IEEE 1394 (i.LINK) Raccordement à un appareil DV (enregistreur DVD, cam&#... Data Transfer FRANÇAIS Transfert de données IEEE 1394 Transferring IEEE1394 (i.LINK)-DV Standard Data Connections Connecting to a DV Device (DVD Recorder, Camcorder, etc.) I Avec une connexion numérique, les signaux vidéo et audio sont transmis au format numérique, ce qui permet de transf...
This Camcorder has a 4pin jack. Transfert de données DV standard conformes à la norme IEEE 1394 (i.LINK) Raccordement à un appareil DV (enregistreur DVD, cam&#... Data Transfer FRANÇAIS Transfert de données IEEE 1394 Transferring IEEE1394 (i.LINK)-DV Standard Data Connections Connecting to a DV Device (DVD Recorder, Camcorder, etc.) I Avec une connexion numérique, les signaux vidéo et audio sont transmis au format numérique, ce qui permet de transf...
User Manual (ENGLISH)
Page 94
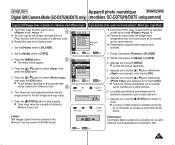
... 94 Placez l'interrupteur [Power] sur [PLAYER]. 2. Press the button to select , then press the [OK] button. 6. I You can connect your Camcorder to a computer to copy your moving images and photo images from the Memory Card, or to a printer to print your images. Press the [MENU] button... FRANÇAIS USB Interface (SC-D375(H)/D975 only) (modèles SC-D375(H)/D975 uniquement) Selecting the USB Device (USB Connect) ✤ USB Connect function works only in mode. ➥page 19 ✤ Using the USB cable, you can select to use the Camcorder as a PC Camera, USB ...
... 94 Placez l'interrupteur [Power] sur [PLAYER]. 2. Press the button to select , then press the [OK] button. 6. I You can connect your Camcorder to a computer to copy your moving images and photo images from the Memory Card, or to a printer to print your images. Press the [MENU] button... FRANÇAIS USB Interface (SC-D375(H)/D975 only) (modèles SC-D375(H)/D975 uniquement) Selecting the USB Device (USB Connect) ✤ USB Connect function works only in mode. ➥page 19 ✤ Using the USB cable, you can select to use the Camcorder as a PC Camera, USB ...
User Manual (ENGLISH)
Page 95
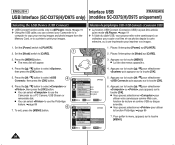
... du pilote prise d'image SAMSUNG A/V démarre sur votre ordinateur. ENGLISH Interface USB FRANÇAIS USB Interface (SC-D375(H)/D975 only) (modèles SC-D375(H)/D975 uniquement) Installing DV Media PRO Program ✤ To play the moving images recorded by the Camcorder or streaming data transferred through...on the PC. If the installation selection screen does not appear after inserting the CD, click "Run" in Camera mode. 2) Connect the camcorder to "D:drive", type "D:/autorun.exe" and press Enter. 3. Pilote LECTURE EN CONTINU & WEB CAM USB (PILOTE PRISE D'IMAGE) - Click...
... du pilote prise d'image SAMSUNG A/V démarre sur votre ordinateur. ENGLISH Interface USB FRANÇAIS USB Interface (SC-D375(H)/D975 only) (modèles SC-D375(H)/D975 uniquement) Installing DV Media PRO Program ✤ To play the moving images recorded by the Camcorder or streaming data transferred through...on the PC. If the installation selection screen does not appear after inserting the CD, click "Run" in Camera mode. 2) Connect the camcorder to "D:drive", type "D:/autorun.exe" and press Enter. 3. Pilote LECTURE EN CONTINU & WEB CAM USB (PILOTE PRISE D'IMAGE) - Click...
User Manual (ENGLISH)
Page 96
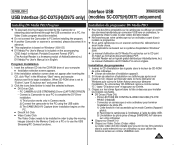
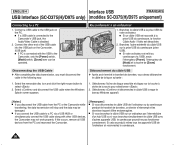
Disconnecting the USB Cable ✤ After completing the data transmission, you disconnect the USB cable from the PC and reconnect the Camcorder. [ Remarques ] I Si vous déconnectez le câble USB de l'ordinateur ou du caméscope pendant le transfert de...199;AIS USB Interface (SC-D375(H)/D975 only) (modèles SC-D375(H)/D975 uniquement) Connecting to select . 2. Sélectionnez l'icône de disque amovible et cliquez sur la touche à droite de la souris pour sélectionner ; 2. Connect the other USB devices, the Camcorder may be operated. Connect...
Disconnecting the USB Cable ✤ After completing the data transmission, you disconnect the USB cable from the PC and reconnect the Camcorder. [ Remarques ] I Si vous déconnectez le câble USB de l'ordinateur ou du caméscope pendant le transfert de...199;AIS USB Interface (SC-D375(H)/D975 only) (modèles SC-D375(H)/D975 uniquement) Connecting to select . 2. Sélectionnez l'icône de disque amovible et cliquez sur la touche à droite de la souris pour sélectionner ; 2. Connect the other USB devices, the Camcorder may be operated. Connect...

User Manual (ENGLISH)
Page 23
...respectivos valores. 9. I Se resaltará el mes. 7. Pantallas de este manual - En este manual se utilizan las ilustraciones de la OSD del modelo SC-D375. - Press the [L / M] button to select , 5 then press the [OK] button. 5. You can set the . ➥page 30 ... 8 I The month will be highlighted. 7. I The year will be highlighted first. 6. OSD illustrations of your camcorder. Coloque el interruptor [Mode] en [TAPE] o [CARD]. (sólo SC-D375(H)/D975) 3. Fije el mes, día, hora y minutos siguiendo el mismo procedimiento tras ajustar el año. 8....
...respectivos valores. 9. I Se resaltará el mes. 7. Pantallas de este manual - En este manual se utilizan las ilustraciones de la OSD del modelo SC-D375. - Press the [L / M] button to select , 5 then press the [OK] button. 5. You can set the . ➥page 30 ... 8 I The month will be highlighted. 7. I The year will be highlighted first. 6. OSD illustrations of your camcorder. Coloque el interruptor [Mode] en [TAPE] o [CARD]. (sólo SC-D375(H)/D975) 3. Fije el mes, día, hora y minutos siguiendo el mismo procedimiento tras ajustar el año. 8....


