
User Manual (ENGLISH)
Page 9
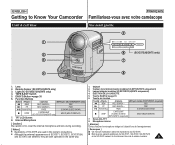
...microphone intégré et l'objectif lors de l'enregistrement. [ Remarques ] I Bien que les aspects extérieurs du SC-D371, SC-D372, SC-D375(H) et du SC-D975 varient, ils fonctionnent tous de la même manière. 9 Capteur de la télécommande (modè... 35 6. I Although the external appearances of SC-D375 are both operated in this owner's instructions. Function Buttons Button (SC-D375(H)/D975 only) œœ REW REC SEARCH - Internal Microphone [ Caution ] Be careful not to Know Your Camcorder Front & Left View FRANÇAIS Familiarisez-...
...microphone intégré et l'objectif lors de l'enregistrement. [ Remarques ] I Bien que les aspects extérieurs du SC-D371, SC-D372, SC-D375(H) et du SC-D975 varient, ils fonctionnent tous de la même manière. 9 Capteur de la télécommande (modè... 35 6. I Although the external appearances of SC-D375 are both operated in this owner's instructions. Function Buttons Button (SC-D375(H)/D975 only) œœ REW REC SEARCH - Internal Microphone [ Caution ] Be careful not to Know Your Camcorder Front & Left View FRANÇAIS Familiarisez-...
User Manual (ENGLISH)
Page 11
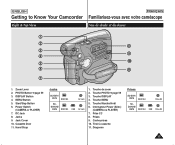
... 5. DC Jack 8. Touche PHOTO ➥page 59 3. Interrupteur Power (Alim.) (CAMERA ou PLAYER) 7. Start/Stop Button 6. Hand Strap Jacks SC-D371/ D372 IEEE1394 AV Jack SCD375(H)/ D975 IEEE1394 USB AV Jack 1. Prises 9. Zoom Lever 2. Cassette Door 11. Touche MENU 5. Tiroir à cassette 11.... PHOTO Button ➥page 59 3. Touche Marche/Arrêt 6. Dragonne Prises SC-D371/ D372 IEEE1394 Prise AV SCD375(H)/ D975 IEEE1394 USB Prise AV 11 ENGLISH Getting to Know Your Camcorder Right & Top View FRANÇAIS Familiarisez-vous avec votre caméscope Vue...
... 5. DC Jack 8. Touche PHOTO ➥page 59 3. Interrupteur Power (Alim.) (CAMERA ou PLAYER) 7. Start/Stop Button 6. Hand Strap Jacks SC-D371/ D372 IEEE1394 AV Jack SCD375(H)/ D975 IEEE1394 USB AV Jack 1. Prises 9. Zoom Lever 2. Cassette Door 11. Touche MENU 5. Tiroir à cassette 11.... PHOTO Button ➥page 59 3. Touche Marche/Arrêt 6. Dragonne Prises SC-D371/ D372 IEEE1394 Prise AV SCD375(H)/ D975 IEEE1394 USB Prise AV 11 ENGLISH Getting to Know Your Camcorder Right & Top View FRANÇAIS Familiarisez-vous avec votre caméscope Vue...
User Manual (ENGLISH)
Page 13
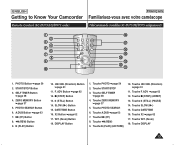
... 37 5. Touche SELF TIMER ➥page 38 4. Touche √√ (FF) 8. X2 Button ➥page 62 17. ENGLISH Getting to Know Your Camcorder Remote Control (SC-D375(H)/D975 only) FRANÇAIS Familiarisez-vous avec votre caméscope Télécommande (modèles... SC-D375(H)/D975 uniquement) ! @ # %$ ^ & * ( ) 8 7 6 5 4 3 2 1 1. A.DUB Button ➥page 63 7. √√ (FF) Button 8. œœ (REW) Button 9. √ (PLAY) Button 10 Direction) Button ...
... 37 5. Touche SELF TIMER ➥page 38 4. Touche √√ (FF) 8. X2 Button ➥page 62 17. ENGLISH Getting to Know Your Camcorder Remote Control (SC-D375(H)/D975 only) FRANÇAIS Familiarisez-vous avec votre caméscope Télécommande (modèles... SC-D375(H)/D975 uniquement) ! @ # %$ ^ & * ( ) 8 7 6 5 4 3 2 1 1. A.DUB Button ➥page 63 7. √√ (FF) Button 8. œœ (REW) Button 9. √ (PLAY) Button 10 Direction) Button ...

User Manual (ENGLISH)
Page 20
votre caméscope à l'aide de la touche [Q.MENU]. ✤ QUICK MENU provides easier access to frequently used to access camcorder functions by ✤ La fonction QUICK MENU permet d'accéder aux fonctions de using the QUICK MENU are as below: Camera Mode I ...Compensation) (Compensation du contre-jour) ➥page 57 I Sélection de la taille d'enregistrement en format photo (Photo Size) ➥page 75 (modèles SC-D975 uniquement) I Réglage de la balance des blancs (White Balance) ➥page 50 I Réglage de la qualité photo (Photo Quality) &#...
votre caméscope à l'aide de la touche [Q.MENU]. ✤ QUICK MENU provides easier access to frequently used to access camcorder functions by ✤ La fonction QUICK MENU permet d'accéder aux fonctions de using the QUICK MENU are as below: Camera Mode I ...Compensation) (Compensation du contre-jour) ➥page 57 I Sélection de la taille d'enregistrement en format photo (Photo Size) ➥page 75 (modèles SC-D975 uniquement) I Réglage de la balance des blancs (White Balance) ➥page 50 I Réglage de la qualité photo (Photo Quality) &#...

User Manual (ENGLISH)
Page 29
... Adjusting the LCD Screen (LCD Bright/LCD Color) ✤ Adjusting the LCD Screen works in /// modes. ➥page 19 ✤ Your Camcorder is equipped with a 2.5 inch (SC-D371 only) / 2.7 inch wide (SC-D372/D375(H)/D975 only) color Liquid Crystal Display (LCD) Screen, which enables you to view what you are recording or playing back...
... Adjusting the LCD Screen (LCD Bright/LCD Color) ✤ Adjusting the LCD Screen works in /// modes. ➥page 19 ✤ Your Camcorder is equipped with a 2.5 inch (SC-D371 only) / 2.7 inch wide (SC-D372/D375(H)/D975 only) color Liquid Crystal Display (LCD) Screen, which enables you to view what you are recording or playing back...

User Manual (ENGLISH)
Page 34
...is Assurez-vous que le displayed. I Placez l'interrupteur [Mode] sur [TAPE]. [TAPE]. (modèles SC-D375(H)/ (SC-D375(H)/D975 only) D975 uniquement) Make sure that there is displayed on the LCD Screen. Retirez le cache-...moin d'enregistrement s'affiche sur l'écran ACL. [ Note ] Detach the Battery Pack when you want to 3. I Assurez-vous que la scène que vous souhaitez enregistrer apparaît 4. REC G SP 16:9 Wide √ 0:00:10 60min I Set the [Mode] switch... You can select a Record Mode of the cassette is open (set to the Camcorder. 1.
...is Assurez-vous que le displayed. I Placez l'interrupteur [Mode] sur [TAPE]. [TAPE]. (modèles SC-D375(H)/ (SC-D375(H)/D975 only) D975 uniquement) Make sure that there is displayed on the LCD Screen. Retirez le cache-...moin d'enregistrement s'affiche sur l'écran ACL. [ Note ] Detach the Battery Pack when you want to 3. I Assurez-vous que la scène que vous souhaitez enregistrer apparaît 4. REC G SP 16:9 Wide √ 0:00:10 60min I Set the [Mode] switch... You can select a Record Mode of the cassette is open (set to the Camcorder. 1.
User Manual (ENGLISH)
Page 42
...will not turn on or off , otherwise serious injury may result. ENGLISH Basic Recording FRANÇAIS Enregistrement de base Using the LIGHT (SC-D372/D375(H)/D975 only) ✤ LIGHT function works only in dark places without sacrificing color. ✤ The LIGHT can become extremely hot...near flammable or explosive materials. 42 2. Utilisation de la fonction LIGHT (LUMIERE) (modèles SC- Press the [LIGHT] button until appears. [ Notes ] I Do not place the Camcorder into the carrying case immediately after turning it remains extremely hot for some time. I The LIGHT ...
...will not turn on or off , otherwise serious injury may result. ENGLISH Basic Recording FRANÇAIS Enregistrement de base Using the LIGHT (SC-D372/D375(H)/D975 only) ✤ LIGHT function works only in dark places without sacrificing color. ✤ The LIGHT can become extremely hot...near flammable or explosive materials. 42 2. Utilisation de la fonction LIGHT (LUMIERE) (modèles SC- Press the [LIGHT] button until appears. [ Notes ] I Do not place the Camcorder into the carrying case immediately after turning it remains extremely hot for some time. I The LIGHT ...

User Manual (ENGLISH)
Page 59
... enregistrez l'image fixe instantanément, la mise au point se faisant de façon the LCD screen. 6. I After completing the search, the Camcorder displays the still image. Searching for about 6~7 seconds. 4 4. Press the button to select , then press the [OK] button. I When there are...16:9 Wide is not available while recording. After the still image has been recorded, the Camcorder returns to search the still image. on the remote control records the still image with automatic focusing. (SC-D375(H)/D975 only) I DIS, Digital Zoom and COLOR NITE are recorded on a tape...
... enregistrez l'image fixe instantanément, la mise au point se faisant de façon the LCD screen. 6. I After completing the search, the Camcorder displays the still image. Searching for about 6~7 seconds. 4 4. Press the button to select , then press the [OK] button. I When there are...16:9 Wide is not available while recording. After the still image has been recorded, the Camcorder returns to search the still image. on the remote control records the still image with automatic focusing. (SC-D375(H)/D975 only) I DIS, Digital Zoom and COLOR NITE are recorded on a tape...
User Manual (ENGLISH)
Page 61
...Mise en pause de la lecture I Forward Slow Playback - Press the [SLOW] button on the remote control only. (SC-D375(H)/D975 only) ✤ To prevent tape and head-drum wear, your Camcorder will automatically stop if it is left in mode. ➥page 19 ✤ The [PLAY], [STILL], [STOP], ...[FF] and [REW] buttons are located on the Camcorder and the remote control. (SC-D375(H)/D975 only) ✤ The [F.ADV] (Frame advance), [X2] and [SLOW] buttons are located on the remote control during playback. - I...
...Mise en pause de la lecture I Forward Slow Playback - Press the [SLOW] button on the remote control only. (SC-D375(H)/D975 only) ✤ To prevent tape and head-drum wear, your Camcorder will automatically stop if it is left in mode. ➥page 19 ✤ The [PLAY], [STILL], [STOP], ...[FF] and [REW] buttons are located on the Camcorder and the remote control. (SC-D375(H)/D975 only) ✤ The [F.ADV] (Frame advance), [X2] and [SLOW] buttons are located on the remote control during playback. - I...

User Manual (ENGLISH)
Page 63
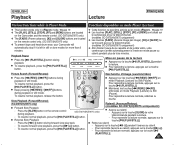
...est prêt pour la post-sonorisation. 6. I (STOP)] button to stop the dubbing. 34 5 √ 1. Set the [Power] switch to start dubbing. I The Camcorder is displayed. I Audio Dubbing icon ( ) is ready for dubbing. 6. Set the [Mode] switch to pause the scene. 5. I To utilize an external sound source, ... audio externe, servez-vous du câble AV pour la raccorder aux entrées audio. ENGLISH Playback Lecture FRANÇAIS Audio Dubbing (SC-D375(H)/D975 only) ✤ The Audio Dubbing function works only in mode. ➥page 19 ✤ You can not dub sound on a...
...est prêt pour la post-sonorisation. 6. I (STOP)] button to stop the dubbing. 34 5 √ 1. Set the [Power] switch to start dubbing. I The Camcorder is displayed. I Audio Dubbing icon ( ) is ready for dubbing. 6. Set the [Mode] switch to pause the scene. 5. I To utilize an external sound source, ... audio externe, servez-vous du câble AV pour la raccorder aux entrées audio. ENGLISH Playback Lecture FRANÇAIS Audio Dubbing (SC-D375(H)/D975 only) ✤ The Audio Dubbing function works only in mode. ➥page 19 ✤ You can not dub sound on a...

User Manual (ENGLISH)
Page 69
... la touche [OK]. 6. Appuyez sur la touche pour sélectionner ou , puis appuyez sur la touche [OK]. De la même façon the Camcorder. Press the [MENU] button. Press the button to select , then press the [OK] button. 5. Placez l'interrupteur [Power] sur [PLAYER]. 2. I Lorsque est régl&#... device. I La liste des menus apparaîtra. 4. ENGLISH Playback Lecture FRANÇAIS Setting the AV In/Out (SC-D975 only) Réglage Ent/Sor AV (modèles SC-D975 uniquement) ✤ AV In/Out function works only in mode. ➥page 19 ✤ AV In/Out setting...
... la touche [OK]. 6. Appuyez sur la touche pour sélectionner ou , puis appuyez sur la touche [OK]. De la même façon the Camcorder. Press the [MENU] button. Press the button to select , then press the [OK] button. 5. Placez l'interrupteur [Power] sur [PLAYER]. 2. I Lorsque est régl&#... device. I La liste des menus apparaîtra. 4. ENGLISH Playback Lecture FRANÇAIS Setting the AV In/Out (SC-D975 only) Réglage Ent/Sor AV (modèles SC-D975 uniquement) ✤ AV In/Out function works only in mode. ➥page 19 ✤ AV In/Out setting...
User Manual (ENGLISH)
Page 87
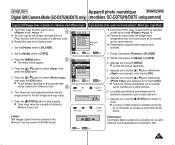
...Copie de photos d'une cassette vers la carte mémoire (Copie Photo) ✤ The Photo Copy function works only in 640x480 format. The Camcorder automatically performs the still image search to select , then press the [OK] button. Photo Copy SP 2/46 25min 1. ENGLISH Appareil photo num...érique FRANÇAIS Digital Still Camera Mode (SC-D375(H)/D975 only) (modèles SC-D375(H)/D975 uniquement) Copying Still Images from the cassette to a Memory Card. ✤ Rewind the tape to the desired ...
...Copie de photos d'une cassette vers la carte mémoire (Copie Photo) ✤ The Photo Copy function works only in 640x480 format. The Camcorder automatically performs the still image search to select , then press the [OK] button. Photo Copy SP 2/46 25min 1. ENGLISH Appareil photo num...érique FRANÇAIS Digital Still Camera Mode (SC-D375(H)/D975 only) (modèles SC-D375(H)/D975 uniquement) Copying Still Images from the cassette to a Memory Card. ✤ Rewind the tape to the desired ...

User Manual (ENGLISH)
Page 91
...CPU : faster Intel® Pentium III™ 450MHz compatible. I DV device that does not complies with the DV standard specification may not supported. This Camcorder has a 4pin jack. I Operating system : Windows® 98SE, ME, 2000, XP, VISTA(32bit), Mac OS (9.1~10.4) I Main memory : more...FRANÇAIS Transfert de données IEEE 1394 Transferring IEEE1394 (i.LINK)-DV Standard Data Connections Connecting to a DV Device (DVD Recorder, Camcorder, etc.) I Connecting to the DV jack using the correct cable. (not supplied) !!! Please be careful since there are transmitted in IEEE1394 ...
...CPU : faster Intel® Pentium III™ 450MHz compatible. I DV device that does not complies with the DV standard specification may not supported. This Camcorder has a 4pin jack. I Operating system : Windows® 98SE, ME, 2000, XP, VISTA(32bit), Mac OS (9.1~10.4) I Main memory : more...FRANÇAIS Transfert de données IEEE 1394 Transferring IEEE1394 (i.LINK)-DV Standard Data Connections Connecting to a DV Device (DVD Recorder, Camcorder, etc.) I Connecting to the DV jack using the correct cable. (not supplied) !!! Please be careful since there are transmitted in IEEE1394 ...
User Manual (ENGLISH)
Page 94
...(H)/D975 only) (modèles SC-D375(H)/D975 uniquement) Selecting the USB Device (USB Connect) ✤ USB Connect function works only in mode. ➥page 19 ✤ Using the USB cable, you can connect your Camcorder to a computer to copy your images. Sélection du périphé...images from the Memory Card, or to a printer to use the Pictbridge feature. ➥page 89 6 7. Set the [Power] switch to use the Camcorder as a PC Camera, USB Stream or removable disk. Placez l'interrupteur de [Mode] sur [CARD]. 3. Appuyez sur la touche pour sélectionner puis appuyez...
...(H)/D975 only) (modèles SC-D375(H)/D975 uniquement) Selecting the USB Device (USB Connect) ✤ USB Connect function works only in mode. ➥page 19 ✤ Using the USB cable, you can connect your Camcorder to a computer to copy your images. Sélection du périphé...images from the Memory Card, or to a printer to use the Pictbridge feature. ➥page 89 6 7. Set the [Power] switch to use the Camcorder as a PC Camera, USB Stream or removable disk. Placez l'interrupteur de [Mode] sur [CARD]. 3. Appuyez sur la touche pour sélectionner puis appuyez...
User Manual (ENGLISH)
Page 95
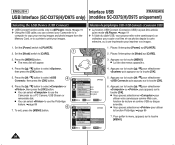
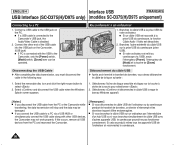
...joint (D:/help /) in Adobe's Portable Document Format (PDF). (The Acrobat Reader is in Camera mode. 2) Connect the camcorder to the PC using the USB cable. 3) The SAMSUNG A/V Capture driver installation begins on a PC or to your computer. Cliquez sur les icônes figurant dans la ... (CAPTURE DRIVER) - ENGLISH Interface USB FRANÇAIS USB Interface (SC-D375(H)/D975 only) (modèles SC-D375(H)/D975 uniquement) Installing DV Media PRO Program ✤ To play the moving images recorded by the Camcorder or streaming data transferred through the USB connection on a PC, the ...
...joint (D:/help /) in Adobe's Portable Document Format (PDF). (The Acrobat Reader is in Camera mode. 2) Connect the camcorder to the PC using the USB cable. 3) The SAMSUNG A/V Capture driver installation begins on a PC or to your computer. Cliquez sur les icônes figurant dans la ... (CAPTURE DRIVER) - ENGLISH Interface USB FRANÇAIS USB Interface (SC-D375(H)/D975 only) (modèles SC-D375(H)/D975 uniquement) Installing DV Media PRO Program ✤ To play the moving images recorded by the Camcorder or streaming data transferred through the USB connection on a PC, the ...
User Manual (ENGLISH)
Page 96
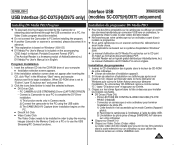
...232;les SC-D375(H)/D975 uniquement) Connecting to select . 2. Branchez l'autre extrémité du câble USB sur la prise USB du caméscope (prise USB). Branchez le câble USB à la prise USB de votre ordinateur. Connect the other USB devices, the Camcorder may be... 1. I Si votre ordinateur est relié au caméscope via a USB HUB or simultaneously connect the USB cable along with the USB to the Camcorder, only the [Power] switch, [Mode] switch, [Zoom] lever can be damaged. I If you must disconnect the cable in the following way: Raccordement ...
...232;les SC-D375(H)/D975 uniquement) Connecting to select . 2. Branchez l'autre extrémité du câble USB sur la prise USB du caméscope (prise USB). Branchez le câble USB à la prise USB de votre ordinateur. Connect the other USB devices, the Camcorder may be... 1. I Si votre ordinateur est relié au caméscope via a USB HUB or simultaneously connect the USB cable along with the USB to the Camcorder, only the [Power] switch, [Mode] switch, [Zoom] lever can be damaged. I If you must disconnect the cable in the following way: Raccordement ...

User Manual (ENGLISH)
Page 23
... The year will not be backed up to select , 5 then press the [OK] button. 5. Coloque el interruptor [Mode] en [TAPE] o [CARD]. (sólo SC-D375(H)/D975) 3. Presione el botón [MENU]. Presione el botón [L / M] para seleccionar y, a continuación, presione el botón [OK]. 5. I ... [OK] y presione el botón [L / M] para fijar los respectivos valores. 9. You can set the year up . OSD illustrations of your camcorder. I Si no se instala la batería de litio, no se memorizará ningún dato introducido. Pantallas de este manual - Set the ...
... The year will not be backed up to select , 5 then press the [OK] button. 5. Coloque el interruptor [Mode] en [TAPE] o [CARD]. (sólo SC-D375(H)/D975) 3. Presione el botón [MENU]. Presione el botón [L / M] para seleccionar y, a continuación, presione el botón [OK]. 5. I ... [OK] y presione el botón [L / M] para fijar los respectivos valores. 9. You can set the year up . OSD illustrations of your camcorder. I Si no se instala la batería de litio, no se memorizará ningún dato introducido. Pantallas de este manual - Set the ...


