
User Manual (ENGLISH)
Page 15
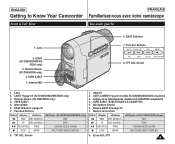
... Screen MF/AF MULTI DISP. 1. Lens 2. Internal MIC 6. Capteur de la télécommande (modèles SC-D364/D366 uniquement) 4. Bouton de fonction Button (modèles SC-D363/D364/D365/D366 uniquement) œœ REW REC SEARCH - TAPE EJECT 5. EASY.Q Button 7. TAPE EJECT 5. REV ...) œœ REW REC SEARCH - Function Buttons 8. LIGHT (LUMIÈRE) ➥page 43 (modèles SC-D362/D364/D365/D366 uniquement) 3. Remote Sensor (SC-D364/D366 only) 4. Bouton EASY.Q ➥page 35 7. EASY.Q Button ➥page 35 7. ENGLISH Getting to Know Your ...
... Screen MF/AF MULTI DISP. 1. Lens 2. Internal MIC 6. Capteur de la télécommande (modèles SC-D364/D366 uniquement) 4. Bouton de fonction Button (modèles SC-D363/D364/D365/D366 uniquement) œœ REW REC SEARCH - TAPE EJECT 5. EASY.Q Button 7. TAPE EJECT 5. REV ...) œœ REW REC SEARCH - Function Buttons 8. LIGHT (LUMIÈRE) ➥page 43 (modèles SC-D362/D364/D365/D366 uniquement) 3. Remote Sensor (SC-D364/D366 only) 4. Bouton EASY.Q ➥page 35 7. EASY.Q Button ➥page 35 7. ENGLISH Getting to Know Your ...

User Manual (ENGLISH)
Page 17
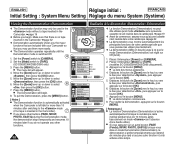
...Button ➥page 57 3. Jack Cover 9. Bouton QUICK MENU 4. Boucle pour dragonne Prises SC-D263 Micro IEEE1394 externe Câble AV SC-D363 Micro IEEE1394 USB Câble externe AV SC-D362/ D364/ D365/ D366 Micro externe IEEE1394 USB Câble multiple 11 Start/Stop Button 6. Power...Bouton PHOTO ➥page 57 3. QUICK MENU Button 4. Bouton de zoom (VOL/molette de menu) 2. MENU Button 5. Hand Strap Hook 1. Power Switch (CAMERA or PLAYER) 7. Jacks 10. Bouton Marche/Arrêt 6. PHOTO Button 3. QUICK MENU Button 4. DC Jack QMUEINCUK ERA R AV/ S USB DV MIC...
...Button ➥page 57 3. Jack Cover 9. Bouton QUICK MENU 4. Boucle pour dragonne Prises SC-D263 Micro IEEE1394 externe Câble AV SC-D363 Micro IEEE1394 USB Câble externe AV SC-D362/ D364/ D365/ D366 Micro externe IEEE1394 USB Câble multiple 11 Start/Stop Button 6. Power...Bouton PHOTO ➥page 57 3. QUICK MENU Button 4. Bouton de zoom (VOL/molette de menu) 2. MENU Button 5. Hand Strap Hook 1. Power Switch (CAMERA or PLAYER) 7. Jacks 10. Bouton Marche/Arrêt 6. PHOTO Button 3. QUICK MENU Button 4. DC Jack QMUEINCUK ERA R AV/ S USB DV MIC...

User Manual (ENGLISH)
Page 28
... the OSD off , access the menu and change the mode. ➥page 30 22 Affichage à l'écran en modes M.Cam/M.Player (modèles SC-D363/D364/D365/D366 uniquement) OSD in M.Player Mode 1. Image Counter Slide 2/46 (Compteur d'images) 800X600 8 (nombre total de photos pouvant être No Memory Card... M.Cam Mode 2. Numéro de dossier / Numéro de fichier ➥page 72 8. Photo Quality ➥page 71 OSD in M.Cam/M.Player Modes (SC-D363/D364/D365/D366 only) 1.
... the OSD off , access the menu and change the mode. ➥page 30 22 Affichage à l'écran en modes M.Cam/M.Player (modèles SC-D363/D364/D365/D366 uniquement) OSD in M.Player Mode 1. Image Counter Slide 2/46 (Compteur d'images) 800X600 8 (nombre total de photos pouvant être No Memory Card... M.Cam Mode 2. Numéro de dossier / Numéro de fichier ➥page 72 8. Photo Quality ➥page 71 OSD in M.Cam/M.Player Modes (SC-D363/D364/D365/D366 only) 1.

User Manual (ENGLISH)
Page 29
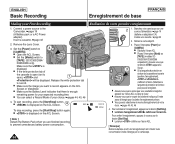
...Clock setup works in /// modes. ➥page 19 ✤ The Date/Time is displayed. Set the [Power] switch to [TAPE] or [MEMORY]. (SC-D363/D364/D365/D366 only) 3. I The menu list will not be I Si la pile au lithium n'est pas installée, aucune des données entr&#...bouton [OK]. , then press the [OK] button. Placez l'interrupteur [Mode] sur [TAPE] ou [MEMORY]. (modèles SC-D363/D364/D365/D366 uniquement). 3. I The year will be highlight first. 5 Camera Mode I Pour régler l'horloge, sélectionnez l'année, le mois, le jour, l'heure ou les minutes en appuyant...
...Clock setup works in /// modes. ➥page 19 ✤ The Date/Time is displayed. Set the [Power] switch to [TAPE] or [MEMORY]. (SC-D363/D364/D365/D366 only) 3. I The menu list will not be I Si la pile au lithium n'est pas installée, aucune des données entr&#...bouton [OK]. , then press the [OK] button. Placez l'interrupteur [Mode] sur [TAPE] ou [MEMORY]. (modèles SC-D363/D364/D365/D366 uniquement). 3. I The year will be highlight first. 5 Camera Mode I Pour régler l'horloge, sélectionnez l'année, le mois, le jour, l'heure ou les minutes en appuyant...

User Manual (ENGLISH)
Page 31
...8730;On √English √On ZOOM Move OK Select MENU Exit Camera Mode Back Clock Set Remote Beep Sound Off Language On Demonstration 4. Placez l'interrupteur [Mode] sur [TAPE] ou [MEMORY]. (modèles SC-D363/D364/D365/D366 uniquement). Appuyez sur le bouton [MENU]. Set the [...Power] switch to [TAPE] or [MEMORY]. (SC-D363/D364/D365/D366 only) 3. Déplacez le bouton de [Zoom] vers le haut ou...
...8730;On √English √On ZOOM Move OK Select MENU Exit Camera Mode Back Clock Set Remote Beep Sound Off Language On Demonstration 4. Placez l'interrupteur [Mode] sur [TAPE] ou [MEMORY]. (modèles SC-D363/D364/D365/D366 uniquement). Appuyez sur le bouton [MENU]. Set the [...Power] switch to [TAPE] or [MEMORY]. (SC-D363/D364/D365/D366 only) 3. Déplacez le bouton de [Zoom] vers le haut ou...

User Manual (ENGLISH)
Page 32
...Réglage du menu System (Système) Setting the Shutter Sound (Shutter Sound) (SC-D363/D364/D365 /D366 only) Réglage du son de l'obturateur (Son Obturateur) (modèles SC-D363/D364/D365/D366 uniquement) ✤ The Shutter Sound function works in both and ✤ La ... un son chaque fois que vous appuyez sur le bouton [PHOTO]. Si l'interrupteur [Power] est réglé sur [CAMERA], placez l'interrupteur [Mode] sur [MEMORY]. [Mode] switch to [CAMERA] or [PLAYER]. 1 PLAYE 1. Press the [MENU] button. Pour quitter le menu, appuyez sur le bouton [MENU]. Player...
...Réglage du menu System (Système) Setting the Shutter Sound (Shutter Sound) (SC-D363/D364/D365 /D366 only) Réglage du son de l'obturateur (Son Obturateur) (modèles SC-D363/D364/D365/D366 uniquement) ✤ The Shutter Sound function works in both and ✤ La ... un son chaque fois que vous appuyez sur le bouton [PHOTO]. Si l'interrupteur [Power] est réglé sur [CAMERA], placez l'interrupteur [Mode] sur [MEMORY]. [Mode] switch to [CAMERA] or [PLAYER]. 1 PLAYE 1. Press the [MENU] button. Pour quitter le menu, appuyez sur le bouton [MENU]. Player...
User Manual (ENGLISH)
Page 34
...;On √On √English √On ZOOM Move OK Select MENU Exit Camera Mode Back Clock Set Remote Beep Sound Language Demonstration Off On ZOOM Move OK Select MENU Exit SAMSUNG Camcorder is inserted in the Camcorder. ➥page 19 ✤ Before you do...) Visualisation de la démonstration (Démonstration) ✤ The Demonstration function may use them more than 10 minutes after switching to [TAPE]. (SC-D363/D364/D365/D366 only) 3. To quit the Demonstration, press the [MENU] button. [ Notes ] I The Demonstration function is automatically activated when the ...
...;On √On √English √On ZOOM Move OK Select MENU Exit Camera Mode Back Clock Set Remote Beep Sound Language Demonstration Off On ZOOM Move OK Select MENU Exit SAMSUNG Camcorder is inserted in the Camcorder. ➥page 19 ✤ Before you do...) Visualisation de la démonstration (Démonstration) ✤ The Demonstration function may use them more than 10 minutes after switching to [TAPE]. (SC-D363/D364/D365/D366 only) 3. To quit the Demonstration, press the [MENU] button. [ Notes ] I The Demonstration function is automatically activated when the ...

User Manual (ENGLISH)
Page 35
... [OK] button. 6. Move the [Zoom] lever up or down to adjust the value of the image to be recorded. Placez l'interrupteur [Power] sur [CAMERA] ou [PLAYER]. 2. I The menu list will appear. 4 4. Déplacez le bouton de [Zoom] vers le haut ou vers le bas pour sé...ACL) ✤ Adjusting the ACL Screen works in /// modes. ➥page 19 ✤ Your Camcorder is equipped with a 2.5 inch (SC-D263/D362/D363/ D364) / 2.7 inch wide (SC-D365/D366) color Liquid Crystal Display (ACL) Screen, which enables you to view what you are recording or playing back directly. ✤ ...
... [OK] button. 6. Move the [Zoom] lever up or down to adjust the value of the image to be recorded. Placez l'interrupteur [Power] sur [CAMERA] ou [PLAYER]. 2. I The menu list will appear. 4 4. Déplacez le bouton de [Zoom] vers le haut ou vers le bas pour sé...ACL) ✤ Adjusting the ACL Screen works in /// modes. ➥page 19 ✤ Your Camcorder is equipped with a 2.5 inch (SC-D263/D362/D363/ D364) / 2.7 inch wide (SC-D365/D366) color Liquid Crystal Display (ACL) Screen, which enables you to view what you are recording or playing back directly. ✤ ...

User Manual (ENGLISH)
Page 37
...down to select or , then press the [OK] button. 6 7. ERA MERA R ER PLAYE 1 CA PLAY 1. I The menu list will appear. 4 4. Camera Mode Back ACL Bright ACL Color Date/Time TV Display Off On 6. Utilisez le bouton [DISPLAY] pour activer ou désactiver l'affichage à l'écran...La liste des menus apparaîtra. 4. Move the [Zoom] lever up or down to a TV ➥page 64, 65) - CAM (modèles SC-D363/D364/D365/D366 uniquement). Set the [Mode] switch to select , then press the [OK] button. 5. To exit, press the [MENU] button. Placez l'interrupteur [...
...down to select or , then press the [OK] button. 6 7. ERA MERA R ER PLAYE 1 CA PLAY 1. I The menu list will appear. 4 4. Camera Mode Back ACL Bright ACL Color Date/Time TV Display Off On 6. Utilisez le bouton [DISPLAY] pour activer ou désactiver l'affichage à l'écran...La liste des menus apparaîtra. 4. Move the [Zoom] lever up or down to a TV ➥page 64, 65) - CAM (modèles SC-D363/D364/D365/D366 uniquement). Set the [Mode] switch to select , then press the [OK] button. 5. To exit, press the [MENU] button. Placez l'interrupteur [...
User Manual (ENGLISH)
Page 40
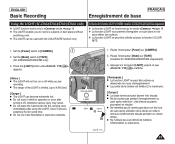
... Make sure the image you are finished recording to 4QMUEINCUK [CAMERA]. I Set the [Mode] switch to record appears on the ACL Screen. 4 REC G SP To stop recording, press the [Start/Stop] button again. I Assurez-vous que la scène que vous souhaitez enregistrer apparaît sur l'é...is open (set to record. I is displayed on the ACL Screen. [ Note ] Detach the Battery Pack when you want to [TAPE]. (SC-D363/D364/ CA D365/D366 only) Make sure that there is displayed on the ACL Screen or Viewfinder. To start recording, press the [Start/Stop] button...
... Make sure the image you are finished recording to 4QMUEINCUK [CAMERA]. I Set the [Mode] switch to record appears on the ACL Screen. 4 REC G SP To stop recording, press the [Start/Stop] button again. I Assurez-vous que la scène que vous souhaitez enregistrer apparaît sur l'é...is open (set to record. I is displayed on the ACL Screen. [ Note ] Detach the Battery Pack when you want to [TAPE]. (SC-D363/D364/ CA D365/D366 only) Make sure that there is displayed on the ACL Screen or Viewfinder. To start recording, press the [Start/Stop] button...

User Manual (ENGLISH)
Page 41
... settings are displayed at the same time. 4. I Les termes et s'affichent en même temps. 4. Press the [Start/Stop] button to [TAPE]. (SC-D363/D364/D365/D366 only) 3. Press the [EASY.Q] button again in mode. ➥page 19 ✤ The EASY.Q function allows a beginner to off . I L'... remettez la EASY.Q is removed from the Camcorder and I n'est pas disponible en mode EASY.Q. (modèles SC-D263/D362/D363/D364 uniquement) 35 If you want to [CAMERA]. 1 2. Appuyez sur le bouton [Start/Stop] pour démarrer PLA l'enregistrement. Pour utiliser ces fonctions, vous...
... settings are displayed at the same time. 4. I Les termes et s'affichent en même temps. 4. Press the [Start/Stop] button to [TAPE]. (SC-D363/D364/D365/D366 only) 3. Press the [EASY.Q] button again in mode. ➥page 19 ✤ The EASY.Q function allows a beginner to off . I L'... remettez la EASY.Q is removed from the Camcorder and I n'est pas disponible en mode EASY.Q. (modèles SC-D263/D362/D363/D364 uniquement) 35 If you want to [CAMERA]. 1 2. Appuyez sur le bouton [Start/Stop] pour démarrer PLA l'enregistrement. Pour utiliser ces fonctions, vous...

User Manual (ENGLISH)
Page 46
... l'image a Gradual disappearance totalement disparu, appuyez sur le bouton [Start/Stop] pour arrêter l'enregistrement. Set the [Mode] switch to [CAMERA]. 2. I The picture and sound gradually 5 disappear (fade out). 4. When the picture has disappeared, press the Press and hold the [FADE]...(ouverture en fondu). I L'image et le son disparaissent progressivement (fermeture en fondu). 6. Set the [Power] switch to [TAPE]. (SC-D363/D364/D365/D366 only) 3. When you wish to stop recording, press QMUEINCUK √ PLAYE and hold the [FADE] button. ENGLISH Basic ...
... l'image a Gradual disappearance totalement disparu, appuyez sur le bouton [Start/Stop] pour arrêter l'enregistrement. Set the [Mode] switch to [CAMERA]. 2. I The picture and sound gradually 5 disappear (fade out). 4. When the picture has disappeared, press the Press and hold the [FADE]...(ouverture en fondu). I L'image et le son disparaissent progressivement (fermeture en fondu). 6. Set the [Power] switch to [TAPE]. (SC-D363/D364/D365/D366 only) 3. When you wish to stop recording, press QMUEINCUK √ PLAYE and hold the [FADE] button. ENGLISH Basic ...
User Manual (ENGLISH)
Page 49
... places without sacrificing color. ✤ The LIGHT can become extremely hot. Placez l'interrupteur [Power] sur [CAMERA]. 2. I La diode lumineuse peut devenir très chaude. Set the [Power] switch to [TAPE]. (SC-D363/D364/D365/D366 only) 3. I La portée de la lumière est limitée (2 m...;e ou désactivée en cours d'enregistrement. Placez l'interrupteur [Mode] sur [TAPE] (modèles SC-D363/D364/D365/D366 uniquement). 3. Set the [Mode] switch to [CAMERA]. 1 2. I Ne remettez pas le caméscope dans son étui tout de suite après ...
... places without sacrificing color. ✤ The LIGHT can become extremely hot. Placez l'interrupteur [Power] sur [CAMERA]. 2. I La diode lumineuse peut devenir très chaude. Set the [Power] switch to [TAPE]. (SC-D363/D364/D365/D366 only) 3. I La portée de la lumière est limitée (2 m...;e ou désactivée en cours d'enregistrement. Placez l'interrupteur [Mode] sur [TAPE] (modèles SC-D363/D364/D365/D366 uniquement). 3. Set the [Mode] switch to [CAMERA]. 1 2. I Ne remettez pas le caméscope dans son étui tout de suite après ...

User Manual (ENGLISH)
Page 52
...233;o, utilisez des haut-parleurs stéréo. œ 46 Set the [Power] switch to [TAPE]. (SC-D363/D364/D365/D366 only) 3. To exit, press the [MENU] button. Placez l'interrupteur [Power] sur [CAMERA]. CAM 2. ZOOM Move OK Select MENU Exit 5. Placez l'interrupteur de [Mode] sur [TAPE]. (modè...;les SC-D363/D364/D365/D366 uniquement). Camera Mode Back Rec Mode Audio Mode WindCut Plus Real Stereo Off On ZOOM Move OK Select MENU Exit 6. STBY SP 0:00:10 60min S ...
...233;o, utilisez des haut-parleurs stéréo. œ 46 Set the [Power] switch to [TAPE]. (SC-D363/D364/D365/D366 only) 3. To exit, press the [MENU] button. Placez l'interrupteur [Power] sur [CAMERA]. CAM 2. ZOOM Move OK Select MENU Exit 5. Placez l'interrupteur de [Mode] sur [TAPE]. (modè...;les SC-D363/D364/D365/D366 uniquement). Camera Mode Back Rec Mode Audio Mode WindCut Plus Real Stereo Off On ZOOM Move OK Select MENU Exit 6. STBY SP 0:00:10 60min S ...

User Manual (ENGLISH)
Page 59
... available while EASY.Q is set , Emboss2, Pastel2, Mirror or Mosaic mode will appear. 4. Set the [Power] switch to [TAPE]. (SC-D363/D364/D365/D366 only) 3. Press the [MENU] button. Placez l'interrupteur [Power] sur [CAMERA]. 2. DIS √Off Digital Zoom √Off 4. Déplacez le bouton de [Zoom] vers le haut ou vers le...
... available while EASY.Q is set , Emboss2, Pastel2, Mirror or Mosaic mode will appear. 4. Set the [Power] switch to [TAPE]. (SC-D363/D364/D365/D366 only) 3. Press the [MENU] button. Placez l'interrupteur [Power] sur [CAMERA]. 2. DIS √Off Digital Zoom √Off 4. Déplacez le bouton de [Zoom] vers le haut ou vers le...

User Manual (ENGLISH)
Page 60
... while Visual Effect, DIS or EASY. L'icône sélectionnée s'affiche. Placez l'interrupteur de [Mode] sur [TAPE]. (modèles SC-D363/D364/D365/D366 uniquement). 3. lever up or down to select , then press the [OK] button. 7 I Le mode n'est pas disponible lorsque , ou EASY...16:9 Wide, réglez le menu sur . 7. Placez l'interrupteur [Power] sur [CAMERA]. 2. Q is set the menu to select , then press the [OK] button. 5. Q est en fonction. (modèles SC-D263/D362/D363/D364 uniquement) I Once COLOR NITE is in use the 16:9 Wide function, 16:9 Wide ...
... while Visual Effect, DIS or EASY. L'icône sélectionnée s'affiche. Placez l'interrupteur de [Mode] sur [TAPE]. (modèles SC-D363/D364/D365/D366 uniquement). 3. lever up or down to select , then press the [OK] button. 7 I Le mode n'est pas disponible lorsque , ou EASY...16:9 Wide, réglez le menu sur . 7. Placez l'interrupteur [Power] sur [CAMERA]. 2. Q is set the menu to select , then press the [OK] button. 5. Q est en fonction. (modèles SC-D263/D362/D363/D364 uniquement) I Once COLOR NITE is in use the 16:9 Wide function, 16:9 Wide ...

User Manual (ENGLISH)
Page 62
...Balance Visual Effect 16:9 Wide DIS Digital Zoom √Auto √Auto √Off √Off √Off √Off (modèles SC-D363/D364/D365/D366 uniquement). 3. Appuyez sur le bouton [MENU]. Déplacez le bouton de [Zoom] vers le haut ou vers le bas pour ... Emboss2, Pastel2, Mirror or Mosaic is in on how much you digitally zoom in use the Digital Zoom. Placez l'interrupteur [Power] sur [CAMERA]. √Camera 2. Set the [Mode] switch to [CAMERA]. 2. Set the [Power] switch to [TAPE]. (SC-D363/D364/D365/D366 only) 3. Placez l'interrupteur de [Mode] sur [TAPE].
...Balance Visual Effect 16:9 Wide DIS Digital Zoom √Auto √Auto √Off √Off √Off √Off (modèles SC-D363/D364/D365/D366 uniquement). 3. Appuyez sur le bouton [MENU]. Déplacez le bouton de [Zoom] vers le haut ou vers le bas pour ... Emboss2, Pastel2, Mirror or Mosaic is in on how much you digitally zoom in use the Digital Zoom. Placez l'interrupteur [Power] sur [CAMERA]. √Camera 2. Set the [Mode] switch to [CAMERA]. 2. Set the [Power] switch to [TAPE]. (SC-D363/D364/D365/D366 only) 3. Placez l'interrupteur de [Mode] sur [TAPE].

User Manual (ENGLISH)
Page 63
...photo dure 6 à 7 secondes. 4. Set the [Power] switch to [TAPE]. (modèles SC-D363/D364/D365/D366 uniquement). (SC-D363/D364/D365/D366 only) 3. Placez l'interrupteur [Power] sur [CAMERA]. 1. En appuyant sur la touche [PHOTO] de votre télécommande, vous enregistrez l'image fixe ...faisant de façon the ACL. 6. Set the [Mode] switch to [CAMERA]. 2. tape. 1. Appuyez sur le bouton [MENU]. 3. still image. 7. I The menu list will flash on automatique (SC-D364/D366 seulement) I Les fonctions DIS, , COLOR NITE et ne sont pas disponibles ...
...photo dure 6 à 7 secondes. 4. Set the [Power] switch to [TAPE]. (modèles SC-D363/D364/D365/D366 uniquement). (SC-D363/D364/D365/D366 only) 3. Placez l'interrupteur [Power] sur [CAMERA]. 1. En appuyant sur la touche [PHOTO] de votre télécommande, vous enregistrez l'image fixe ...faisant de façon the ACL. 6. Set the [Mode] switch to [CAMERA]. 2. tape. 1. Appuyez sur le bouton [MENU]. 3. still image. 7. I The menu list will flash on automatique (SC-D364/D366 seulement) I Les fonctions DIS, , COLOR NITE et ne sont pas disponibles ...
User Manual (ENGLISH)
Page 76
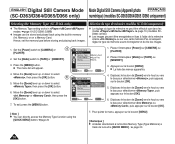
... pour sélectionner , puis appuyez sur le bouton [OK]. 5. ENGLISH Digital Still Camera Mode Mode Digital Still Camera (Appareil photo FRANÇAIS (SC-D363/D364/D365/D366 only) numérique) (modèles SC-D363/D364/D365 /D366 uniquement) Selecting the Memory Type (SC-D366 only) ✤ The Memory Type setting works in // modes. ➥...
... pour sélectionner , puis appuyez sur le bouton [OK]. 5. ENGLISH Digital Still Camera Mode Mode Digital Still Camera (Appareil photo FRANÇAIS (SC-D363/D364/D365/D366 only) numérique) (modèles SC-D363/D364/D365 /D366 uniquement) Selecting the Memory Type (SC-D366 only) ✤ The Memory Type setting works in // modes. ➥...

User Manual (ENGLISH)
Page 78
...;lectionner , puis appuyez sur le bouton [OK]. 5. ENGLISH Digital Still Camera Mode Mode Digital Still Camera (Appareil photo FRANÇAIS (SC-D363/D364/D365/D366 only) numérique) (modèles SC-D363/D364/D365 /D366 uniquement) Setting the File Number ✤ File Number setting works...may be set as follows: - : When there are existing files, the new image will appear. 4 M.Cam Mode 1. Placez l'interrupteur [Power] sur [CAMERA]. √Memory Memory Type √Memory Card 2. Placez l'interrupteur de [Mode] sur [MEMORY]. Move the [Zoom] lever up or down to select , ...
...;lectionner , puis appuyez sur le bouton [OK]. 5. ENGLISH Digital Still Camera Mode Mode Digital Still Camera (Appareil photo FRANÇAIS (SC-D363/D364/D365/D366 only) numérique) (modèles SC-D363/D364/D365 /D366 uniquement) Setting the File Number ✤ File Number setting works...may be set as follows: - : When there are existing files, the new image will appear. 4 M.Cam Mode 1. Placez l'interrupteur [Power] sur [CAMERA]. √Memory Memory Type √Memory Card 2. Placez l'interrupteur de [Mode] sur [MEMORY]. Move the [Zoom] lever up or down to select , ...


