
User Manual
Page 2
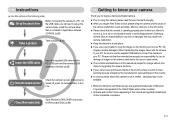
... software CD-ROM. (p.85) Take a picture Take a picture. (p.15) Insert the USB cable Insert the supplied USB cable into the PC's USB port and the camera's USB connection terminal. (p.88) Check the camera's power Check the camera's power. Install the camera driver that may not be available. Microsoft, Windows and Windows logo are registered trademarks of images on the memory card due to set up the camera driver. Instructions ■ Use this manual in a safe place. ● If you use a card reader to copy...
... software CD-ROM. (p.85) Take a picture Take a picture. (p.15) Insert the USB cable Insert the supplied USB cable into the PC's USB port and the camera's USB connection terminal. (p.88) Check the camera's power Check the camera's power. Install the camera driver that may not be available. Microsoft, Windows and Windows logo are registered trademarks of images on the memory card due to set up the camera driver. Instructions ■ Use this manual in a safe place. ● If you use a card reader to copy...
User Manual
Page 4
.... ■ Remove the battery when not planning to use the camera for When Taking Pictures 20 ●Using the camera buttons to set the camera 21 ■POWER button 21 ■Shutter button 21 ■ZOOM W / T button 21 ■Voice recording / Voice memo / UP button 23 ■Macro / Down button 23 ■Focus lock 24 ■Flash / Left button 25 ■Self-timer / Right button 27 ■MENU / OK button 27 SETUP ●Using the LCD monitor to set on how to use the memory card 11...
.... ■ Remove the battery when not planning to use the camera for When Taking Pictures 20 ●Using the camera buttons to set the camera 21 ■POWER button 21 ■Shutter button 21 ■ZOOM W / T button 21 ■Voice recording / Voice memo / UP button 23 ■Macro / Down button 23 ■Focus lock 24 ■Flash / Left button 25 ■Self-timer / Right button 27 ■MENU / OK button 27 SETUP ●Using the LCD monitor to set on how to use the memory card 11...
User Manual
Page 5
... play back function using the LCD monitor 67 ●Starting the slide show 69 ●Playback 70 ■Protecting images 70 ■Deleting images 71 ■DPOF 71 ■Copy To Card 73 ■On Screen Display information ...74 ●PictBridge 75 ■PictBridge : Picture Selection ......76 ■PictBridge : Print Setting 76 ■PictBridge : Reset 77 ●Important notes 77 ●Warning indicator 79 ●Before contacting a service centre...79 ●Specifications...
... play back function using the LCD monitor 67 ●Starting the slide show 69 ●Playback 70 ■Protecting images 70 ■Deleting images 71 ■DPOF 71 ■Copy To Card 73 ■On Screen Display information ...74 ●PictBridge 75 ■PictBridge : Picture Selection ......76 ■PictBridge : Print Setting 76 ■PictBridge : Reset 77 ●Important notes 77 ●Warning indicator 79 ●Before contacting a service centre...79 ●Specifications...
User Manual
Page 15
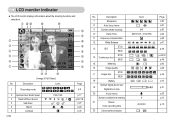
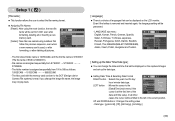
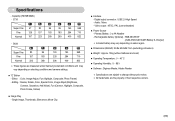
Description 7 Sharpness 8 Auto focus frame 9 Camera shake warning 10 Date/ Time 11 Exposure compensation 12 White Balance 13 ISO S730 S630 S730 14 Continuous shot S630 15 Metering 16 Image quality 17 Image size S730 S630 18 Battery Optical/ Digital Zoom bar/ 19 Digital Zoom rate 20 Voice memo Number of available shots remaining 21 Movie / Voice recording time 22 Card inserted indicator Icons 2007/01/01 01:00 PM 6 00:00:00 Page p.30 p.31 p.20 p.33...
Description 7 Sharpness 8 Auto focus frame 9 Camera shake warning 10 Date/ Time 11 Exposure compensation 12 White Balance 13 ISO S730 S630 S730 14 Continuous shot S630 15 Metering 16 Image quality 17 Image size S730 S630 18 Battery Optical/ Digital Zoom bar/ 19 Digital Zoom rate 20 Voice memo Number of available shots remaining 21 Movie / Voice recording time 22 Card inserted indicator Icons 2007/01/01 01:00 PM 6 00:00:00 Page p.30 p.31 p.20 p.33...
User Manual
Page 16
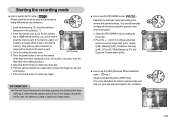
... Image Size (p.44), Quality (p.45), Metering (p.45), Continuous shooting (p.46), ISO (p.46), White Balance (p.47), and Exposure Compensation (p.48). [ PROGRAM mode ] ■ How to capture an image. Insert the batteries taking note of camera shake and help you get a well-exposed image in the internal memory. Insert the batteries (p.10). INFORMATION ● If the auto focus frame turns to red when you do not need to insert the memory card. Starting the recording mode ■ How to use the AUTO mode...
... Image Size (p.44), Quality (p.45), Metering (p.45), Continuous shooting (p.46), ISO (p.46), White Balance (p.47), and Exposure Compensation (p.48). [ PROGRAM mode ] ■ How to capture an image. Insert the batteries taking note of camera shake and help you get a well-exposed image in the internal memory. Insert the batteries (p.10). INFORMATION ● If the auto focus frame turns to red when you do not need to insert the memory card. Starting the recording mode ■ How to use the AUTO mode...
User Manual
Page 21
...), or exposure compensation (see page 17), fill-in a low lighting condition, the camera shake warning indicator ( ) may appear on a solid surface or change to flash shot mode. ■ Shooting against the light : Please do not take pictures to the sunlight direction. Taking a picture against the sun, please use a tripod, support the camera on the LCD monitor. Press the shutter button all way down half way. Lightly press the shutter button to confirm focus and flash battery charge. Things...
...), or exposure compensation (see page 17), fill-in a low lighting condition, the camera shake warning indicator ( ) may appear on a solid surface or change to flash shot mode. ■ Shooting against the light : Please do not take pictures to the sunlight direction. Taking a picture against the sun, please use a tripod, support the camera on the LCD monitor. Press the shutter button all way down half way. Lightly press the shutter button to confirm focus and flash battery charge. Things...
User Manual
Page 34
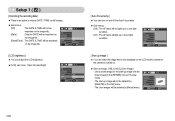
... the cursor to the [Date&Time] main menu if the cursor is removed and inserted again, the language setting will be preserved. - File names are named using the reset function, the next file name will be set up the Date/ Time/ Date type ] ■ You can change the image file name, the image may not play back. [ Language ] ■ There is used with the memory card conform to the DCF (Design rule for Camera File systems) format.
... the cursor to the [Date&Time] main menu if the cursor is removed and inserted again, the language setting will be preserved. - File names are named using the reset function, the next file name will be set up the Date/ Time/ Date type ] ■ You can change the image file name, the image may not play back. [ Language ] ■ There is used with the memory card conform to the DCF (Design rule for Camera File systems) format.
User Manual
Page 35
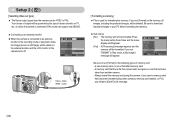
... OK Set [ Start up image ] ■ You can turn on and off the Auto Focus lamp. ● Sub menus [Off] : The AF lamp will not light up in a low light condition. [On] : The AF lamp will light up in the play mode. - Setup 1 ( ) [ Imprinting the recording date ] ■ There is turned on the image file. Use a saved image for the start -up image with the [User Image] in the [RESIZE] menu in a low light condition. The User images...
... OK Set [ Start up image ] ■ You can turn on and off the Auto Focus lamp. ● Sub menus [Off] : The AF lamp will not light up in a low light condition. [On] : The AF lamp will light up in the play mode. - Setup 1 ( ) [ Imprinting the recording date ] ■ There is turned on the image file. Use a saved image for the start -up image with the [User Image] in the [RESIZE] menu in a low light condition. The User images...
User Manual
Page 36
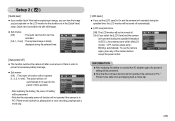
... not used for the duration set amount of time in the [Quick View] setup. SETUP2 Quick View Power Off LCD Save Video Out Format Reset Back Off 0.5 sec 1 sec 3 sec OK Set [ Auto power off ] ■ This function switches the camera off after a set in order to On and the camera isn't operated during the specified time, the LCD monitor will be turned off automatically. ● [LCD save function will be preserved. Quick view is in PC / Printer mode, slide show and playing back a movie...
... not used for the duration set amount of time in the [Quick View] setup. SETUP2 Quick View Power Off LCD Save Video Out Format Reset Back Off 0.5 sec 1 sec 3 sec OK Set [ Auto power off ] ■ This function switches the camera off after a set in order to On and the camera isn't operated during the specified time, the LCD monitor will be turned off automatically. ● [LCD save function will be preserved. Quick view is in PC / Printer mode, slide show and playing back a movie...
User Manual
Page 37
... output will get a [Card Error!] message. 《36》 Press the menu button three times and the menu display will disappear. [Yes] : A [Processing!] message appears and the memory will appear. Video White - sound [ Formatting a memory ] ■ This is connected. SETUP2 Quick View Power Off LCD Save Video Out Format Reset Back No Yes OK Set Be sure to an external monitor in Play mode, a [No Image!] message will be formatted. A new memory card, or an unformatted memory card - Always format the memory card using this camera can't recognise or...
... output will get a [Card Error!] message. 《36》 Press the menu button three times and the menu display will disappear. [Yes] : A [Processing!] message appears and the memory will appear. Video White - sound [ Formatting a memory ] ■ This is connected. SETUP2 Quick View Power Off LCD Save Video Out Format Reset Back No Yes OK Set Be sure to an external monitor in Play mode, a [No Image!] message will be formatted. A new memory card, or an unformatted memory card - Always format the memory card using this camera can't recognise or...
User Manual
Page 72
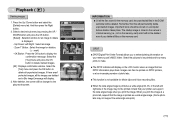
... many prints to make. ■The DPOF indicator will display on the memory card. No Yes OK Confirm INFORMATION ● Of all the images are deleted and a [No Image!] message will be printed. Select the pictures to be deleted even if you print the image. Check that the image is stored in the DCIM subfolder will display. 3. OK Button : Press the OK button to delete marked images. [All] : Displays confirmation window. PLAYBACK Protect Delete DPOF Copy To Card...
... many prints to make. ■The DPOF indicator will display on the memory card. No Yes OK Confirm INFORMATION ● Of all the images are deleted and a [No Image!] message will be printed. Select the pictures to be deleted even if you print the image. Check that the image is stored in the DCIM subfolder will display. 3. OK Button : Press the OK button to delete marked images. [All] : Displays confirmation window. PLAYBACK Protect Delete DPOF Copy To Card...
User Manual
Page 73
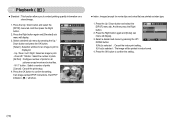
... Index Size menu will display. 3. Zoom W / T Button : Select the number of prints. [All Pics] : Configure number of prints [Cancel] : Cancel the print setup. 4. Press the OK button to embed printing quantity information on a stored image. 1. Select a desired sub menu by pressing the Up / Down button and press the OK button. If [No] is displayed. - PLAYBACK Standard Index 끄Se기lect All Pics 2. Playback ( ) ■ Standard : This function allows you to confirm the setting...
... Index Size menu will display. 3. Zoom W / T Button : Select the number of prints. [All Pics] : Configure number of prints [Cancel] : Cancel the print setup. 4. Press the OK button to embed printing quantity information on a stored image. 1. Select a desired sub menu by pressing the Up / Down button and press the OK button. If [No] is displayed. - PLAYBACK Standard Index 끄Se기lect All Pics 2. Playback ( ) ■ Standard : This function allows you to confirm the setting...

User Manual
Page 78
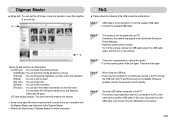
... unit. 《77》 Avoid obstructing the lens or the flash when you use the camera for a long period of sand. - To avoid dangerous electrical shocks, never hold or operate the camera with your printer's default setting, refer to observe the following locations. - PICTBRIDGE Layout Type Quality Date File Reset Move No Yes Print ※ Default print setting varies depending on beaches, coastal dunes, or other...
... unit. 《77》 Avoid obstructing the lens or the flash when you use the camera for a long period of sand. - To avoid dangerous electrical shocks, never hold or operate the camera with your printer's default setting, refer to observe the following locations. - PICTBRIDGE Layout Type Quality Date File Reset Move No Yes Print ※ Default print setting varies depending on beaches, coastal dunes, or other...
User Manual
Page 81
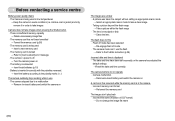
... camera has adopted the default settings →Reset the date and time correctly The camera buttons do not operate ㆍCamera malfunction → Remove/re-insert battery and switch the camera on A card error has occurred while the memory card is being used in low temperatures → Keep the camera in the camera. ㆍIncorrect memory card format → Re-format the memory card The images don't play back ㆍIncorrect file name (Violation of DCF format) → Do not change the image file...
... camera has adopted the default settings →Reset the date and time correctly The camera buttons do not operate ㆍCamera malfunction → Remove/re-insert battery and switch the camera on A card error has occurred while the memory card is being used in low temperatures → Keep the camera in the camera. ㆍIncorrect memory card format → Re-format the memory card The images don't play back ㆍIncorrect file name (Violation of DCF format) → Do not change the image file...
User Manual
Page 83
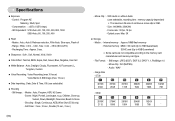
... ■ Flash - Modes : Auto, Auto & Red-eye reduction, Fill-in Still Image (max. 10 sec.) ■ Date Imprinting : Date, Date & Time, Off (user selectable) ■ Shooting - Recharging Time : Approx. 5 sec. ■ Sharpness : Soft+, Soft, Normal, Vivid, Vivid+ ■ Color Effect : Normal, B&W, Sepia, Red, Green, Blue, Negative, User Set ■ White Balance : Auto, Daylight, Cloudy, Fluorescent_H, Fluorescent_L, Tungsten, Custom ■ Voice Recording : Voice Recording (max.10 hours) Voice Memo in flash, Slow sync, Flash off - Image Size ·S730...
... ■ Flash - Modes : Auto, Auto & Red-eye reduction, Fill-in Still Image (max. 10 sec.) ■ Date Imprinting : Date, Date & Time, Off (user selectable) ■ Shooting - Recharging Time : Approx. 5 sec. ■ Sharpness : Soft+, Soft, Normal, Vivid, Vivid+ ■ Color Effect : Normal, B&W, Sepia, Red, Green, Blue, Negative, User Set ■ White Balance : Auto, Daylight, Cloudy, Fluorescent_H, Fluorescent_L, Tungsten, Custom ■ Voice Recording : Voice Recording (max.10 hours) Voice Memo in flash, Slow sync, Flash off - Image Size ·S730...
User Manual
Page 84
...; Operating Humidity : 5 ~ 85% ■ Software : Digimax Master, Adobe Reader ※ Specifications are subject to change without prior notice. ※ All trademarks are measured under Samsung's standard conditions and may vary depending on shooting conditions and camera settings. ■ "E" Button - Specifications - Editing : Resize, Rotate, Color, Special Color, Image Adjust (Brightness, Contrast, Saturation, Add Noise), Fun (Cartoon, Highlight, Composite, Photo Frame, Sticker) ■ Image Play - Single image, Thumbnails, Slide show, Movie...
...; Operating Humidity : 5 ~ 85% ■ Software : Digimax Master, Adobe Reader ※ Specifications are subject to change without prior notice. ※ All trademarks are measured under Samsung's standard conditions and may vary depending on shooting conditions and camera settings. ■ "E" Button - Specifications - Editing : Resize, Rotate, Color, Special Color, Image Adjust (Brightness, Contrast, Saturation, Add Noise), Fun (Cartoon, Highlight, Composite, Photo Frame, Sticker) ■ Image Play - Single image, Thumbnails, Slide show, Movie...
User Manual
Page 85
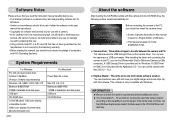
... the system requirements before use. •The attached software is based on model SAMSUNG S730. ■ Camera driver : This enables images to transfer between the camera and PC. This camera uses the USB Storage Driver as a USB card reader. You can download, view, edit and save your computer. This software is only compatible with this manual is based on English Edition of Windows. ※This manual is a camera driver and image editing software tool for Windows. •Under no...
... the system requirements before use. •The attached software is based on model SAMSUNG S730. ■ Camera driver : This enables images to transfer between the camera and PC. This camera uses the USB Storage Driver as a USB card reader. You can download, view, edit and save your computer. This software is only compatible with this manual is based on English Edition of Windows. ※This manual is a camera driver and image editing software tool for Windows. •Under no...
User Manual
Page 86
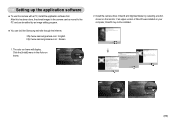
... Samsung web-site through the internet. If an upper version of DirectX was installed on the monitor. Click the [Install] menu in the camera can be installed. 《85》 http://www.samsungcamera.com : English http://www.samsungcamera.co.kr : Korean 1. The auto run frame. 2. Setting up the application software ■ To use this has been done, the stored images in the Auto...
... Samsung web-site through the internet. If an upper version of DirectX was installed on the monitor. Click the [Install] menu in the camera can be installed. 《85》 http://www.samsungcamera.com : English http://www.samsungcamera.co.kr : Korean 1. The auto run frame. 2. Setting up the application software ■ To use this has been done, the stored images in the Auto...
User Manual
Page 87
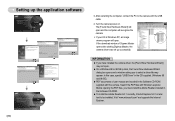
... Master opens after starting Digimax Master, the camera driver was set up the application software 3. Before opening the PDF files, you must install the Adobe Reader included in the Software CD-ROM supplied with Window's explorer. If the download window of user manual are included in the Software CD-ROM. ● To install the Adobe Reader 6.0.1 correctly, Internet Explorer 5.01 or later had to the camera with the USB cable. 4. Visit...
... Master opens after starting Digimax Master, the camera driver was set up the application software 3. Before opening the PDF files, you must install the Adobe Reader included in the Software CD-ROM supplied with Window's explorer. If the download window of user manual are included in the Software CD-ROM. ● To install the Adobe Reader 6.0.1 correctly, Internet Explorer 5.01 or later had to the camera with the USB cable. 4. Visit...
User Manual
Page 94
... error during file transfer. → Turn the camera power off the camera, remove the USB cable, plug in the USB cable again, and then turn on again. Wherever possible, connect the camera to a movie. [Edit Clip] : You can change the brightness, contrast, colour and saturation. [Effects] : You can insert an effect. [Set Text] : You can insert texts. [Narrate] : You can insert a narration. [Produce] : You can get the still image, movie...
... error during file transfer. → Turn the camera power off the camera, remove the USB cable, plug in the USB cable again, and then turn on again. Wherever possible, connect the camera to a movie. [Edit Clip] : You can change the brightness, contrast, colour and saturation. [Effects] : You can insert an effect. [Set Text] : You can insert texts. [Narrate] : You can insert a narration. [Produce] : You can get the still image, movie...


