
User Manual
Page 2
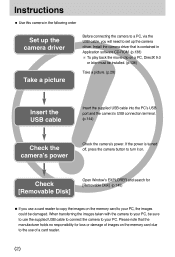
... the camera button to your PC, be sure to use a card reader to copy the images on the memory card to your PC, the images could be damaged. When transferring the images taken with the camera to your PC. Instructions ƈ Use this camera in Application software CD-ROM. (p.138) ſ To play back the movie clip on a PC, DirectX 9.0 or later must be installed. (p.138) Take a picture. (p.29...
... the camera button to your PC, be sure to use a card reader to copy the images on the memory card to your PC, the images could be damaged. When transferring the images taken with the camera to your PC. Instructions ƈ Use this camera in Application software CD-ROM. (p.138) ſ To play back the movie clip on a PC, DirectX 9.0 or later must be installed. (p.138) Take a picture. (p.29...
User Manual
Page 3
...;Using the camera buttons to adjust the camera 35 ƈPOWER button 35 ƈSHUTTER button 35 ƈJog dial (Front, Rear) 35 ƃDrive button 36 ƃSelf-timer/ Remote button 40 ƃISO button 42 ƃMetering button 43 ƃZoom operation 44 ƃFocusing 46 ƃHigh speed shutter mode 49 ƃExposure control 50 ƃ5-function button 52 ƃWhite balance 53 ƃMacro 55 ƃFlash 57 ƃExternal flash (optional) 61 ƃCustom settings 62 ƃLCD button 63 ƃDisplay/ Information button...
...;Using the camera buttons to adjust the camera 35 ƈPOWER button 35 ƈSHUTTER button 35 ƈJog dial (Front, Rear) 35 ƃDrive button 36 ƃSelf-timer/ Remote button 40 ƃISO button 42 ƃMetering button 43 ƃZoom operation 44 ƃFocusing 46 ƃHigh speed shutter mode 49 ƃExposure control 50 ƃ5-function button 52 ƃWhite balance 53 ƃMacro 55 ƃFlash 57 ƃExternal flash (optional) 61 ƃCustom settings 62 ƃLCD button 63 ƃDisplay/ Information button...
User Manual
Page 4
... recording date 119 ƃSound 120 ƃLCD brightness 120 ƃSelecting Video out type 121 ƃQuick view 122 ƃAuto rotating sensor 123 ƃConnecting an External Device (USB) 124 ƃInitialisation 124 ƃSetting up the MYCAM menu 125 ƃStart up image 126 ƃStart up sound 126 ƃShutter sound 127 ƃSound type 127 ƃImportant notes 128 ƃWarning indicator 130 ƃBefore contacting a service centre 131 ƃSpecifications 134 SOFTWARE...
... recording date 119 ƃSound 120 ƃLCD brightness 120 ƃSelecting Video out type 121 ƃQuick view 122 ƃAuto rotating sensor 123 ƃConnecting an External Device (USB) 124 ƃInitialisation 124 ƃSetting up the MYCAM menu 125 ƃStart up image 126 ƃStart up sound 126 ƃShutter sound 127 ƃSound type 127 ƃImportant notes 128 ƃWarning indicator 130 ƃBefore contacting a service centre 131 ƃSpecifications 134 SOFTWARE...

User Manual
Page 15
... AC adapter or remove the battery, turn off the camera power first. Changing the zoom position between the Wide and the Tele ends every 1 shot. CAUTION ƃ Please ensure that you can be damaged. ƈ Number of images and battery life Still image Battery life Number of user's usage. ŝ15Ş The data can use the exclusive battery with power. Using the flash every two times. Before using the camera Connecting to a Power Source ƈ...
... AC adapter or remove the battery, turn off the camera power first. Changing the zoom position between the Wide and the Tele ends every 1 shot. CAUTION ƃ Please ensure that you can be damaged. ƈ Number of images and battery life Still image Battery life Number of user's usage. ŝ15Ş The data can use the exclusive battery with power. Using the flash every two times. Before using the camera Connecting to a Power Source ƈ...
User Manual
Page 20
... memory card is not covered by another digital camera. To optimise the amount of extended use, you use a low writing speed memory card, the movie clip may become corrupted: - Should this be the case, you are extremes in temperature. ƃ Please keep the memory card in its case when not in this camera, first format the memory card by using the camera. ƃ Do not use a memory card formatted by the Samsung warranty. ƃ The memory card is used...
... memory card is not covered by another digital camera. To optimise the amount of extended use, you use a low writing speed memory card, the movie clip may become corrupted: - Should this be the case, you are extremes in temperature. ƃ Please keep the memory card in its case when not in this camera, first format the memory card by using the camera. ƃ Do not use a memory card formatted by the Samsung warranty. ƃ The memory card is used...

User Manual
Page 31
.... - Recording mode ƈ How to use the MANUAL mode ( ) The user can manually set the shutter speed for automatic exposure depends on the brightness of the object by using the LCD. 6. Over F2.2 : 15.0 ~ 1/1600 Sec. - Select the desired shutter speed or aperture value by using the LCD. 6. Point the camera towards the subject and compose the image by automatic aperture value setting in a still image as those for AUTO mode. 3. Rear jog dial (JOG2) : Selecting the aperture...
.... - Recording mode ƈ How to use the MANUAL mode ( ) The user can manually set the shutter speed for automatic exposure depends on the brightness of the object by using the LCD. 6. Over F2.2 : 15.0 ~ 1/1600 Sec. - Select the desired shutter speed or aperture value by using the LCD. 6. Point the camera towards the subject and compose the image by automatic aperture value setting in a still image as those for AUTO mode. 3. Rear jog dial (JOG2) : Selecting the aperture...

User Manual
Page 32
... used shooting settings for AUTO mode. 3. Press the OK button and a confirmation window will display on the LCD. 5. Point the camera towards the subject and compose the image by pressing the Up/ Down button. 7. If you wish to load the camera configuration saved in the MySET number and close the menu screen. 8. Please see page 78 for details of the MySET shooting mode and menus. ƈ How to use . The MOVIE CLIP mode icon...
... used shooting settings for AUTO mode. 3. Press the OK button and a confirmation window will display on the LCD. 5. Point the camera towards the subject and compose the image by pressing the Up/ Down button. 7. If you wish to load the camera configuration saved in the MySET number and close the menu screen. 8. Please see page 78 for details of the MySET shooting mode and menus. ƈ How to use . The MOVIE CLIP mode icon...

User Manual
Page 43
... will be biased towards the centre of the available light in the centre is suitable for general use. - Metering button ƈ If you cannot obtain suitable exposure conditions, you can change the metering method to take better pictures. ƈ Metering methods - Multi metering ( ) : Exposure will display on the LCD. 2. Press the metering button and a metering icon will be displayed when spot metering has been selected. ƈ How to set the metering mode 1.
... will be biased towards the centre of the available light in the centre is suitable for general use. - Metering button ƈ If you cannot obtain suitable exposure conditions, you can change the metering method to take better pictures. ƈ Metering methods - Multi metering ( ) : Exposure will display on the LCD. 2. Press the metering button and a metering icon will be displayed when spot metering has been selected. ƈ How to set the metering mode 1.

User Manual
Page 48
... set the change the focus by rotating the focus ring. Save Myset Flash Synchro. Please be careful when using the manual focus as the picture can be blurred easily. ƃ How to the left. This function is not available, for example, in the Program mode You can change the focus even though the camera is focused on the Rear LCD. 5. Press the Right button and select a desired sub menu...
... set the change the focus by rotating the focus ring. Save Myset Flash Synchro. Please be careful when using the manual focus as the picture can be blurred easily. ƃ How to the left. This function is not available, for example, in the Program mode You can change the focus even though the camera is focused on the Rear LCD. 5. Press the Right button and select a desired sub menu...

User Manual
Page 54
...button to set the colour temperature Colour temperature is overwritten. ŝ54Ş White paper [ Colour temperature icon ] [ Selecting a colour temperature ] White balance ƃ How to set will be applied, starting with the next picture you set the custom white balance White balance settings may fire according to the shooting condition. 3. The custom white balance value will display. - Low colour temperature implies warmer light (more red) while high colour temperature implies a colder light (more blue). 1. Approx. 10000 K : Blue sky 3. The user configured white...
...button to set the colour temperature Colour temperature is overwritten. ŝ54Ş White paper [ Colour temperature icon ] [ Selecting a colour temperature ] White balance ƃ How to set will be applied, starting with the next picture you set the custom white balance White balance settings may fire according to the shooting condition. 3. The custom white balance value will display. - Low colour temperature implies warmer light (more red) while high colour temperature implies a colder light (more blue). 1. Approx. 10000 K : Blue sky 3. The user configured white...

User Manual
Page 71
... used for compressing photos and graphics because it . ƃ The RAW and TIFF file format are for advanced users and provides the best quality. Direct MF Spot AE point Size Quality Effect Contrast Saturation TIFF Super Fine Fine Normal RAW [ Program mode ] Mode Icon Sub menu File format RAW RAW dng Still image mode TIFF TIFF S. The higher the compression ratio, the lower the picture quality. Fine Fine tif jpeg jpeg Movie...
... used for compressing photos and graphics because it . ƃ The RAW and TIFF file format are for advanced users and provides the best quality. Direct MF Spot AE point Size Quality Effect Contrast Saturation TIFF Super Fine Fine Normal RAW [ Program mode ] Mode Icon Sub menu File format RAW RAW dng Still image mode TIFF TIFF S. The higher the compression ratio, the lower the picture quality. Fine Fine tif jpeg jpeg Movie...

User Manual
Page 101
... 5M Set:OK ƃ Image Resize Types Size 3264X2448 3264X2176 3264X1840 2400X1800 1632X1224 1024X768 640X480 7M 6M 5M 4M 3M 2M 1M 640 User X480 Image OO O OOOO OO X X X X X X X X X X X X X X X X X X X X X O O OO O O X X X X X OO O O X X X X X X X O O X X X X X X X X O INFORMATION ƃ A large sized image can change the resolution of pictures taken. Select the [User Image] to save an image to save the resized image. Press the OK button and a confirmation window will display. 5. In play mode, press the Menu button...
... 5M Set:OK ƃ Image Resize Types Size 3264X2448 3264X2176 3264X1840 2400X1800 1632X1224 1024X768 640X480 7M 6M 5M 4M 3M 2M 1M 640 User X480 Image OO O OOOO OO X X X X X X X X X X X X X X X X X X X X X O O OO O O X X X X X OO O O X X X X X X X O O X X X X X X X X O INFORMATION ƃ A large sized image can change the resolution of pictures taken. Select the [User Image] to save an image to save the resized image. Press the OK button and a confirmation window will display. 5. In play mode, press the Menu button...
User Manual
Page 109
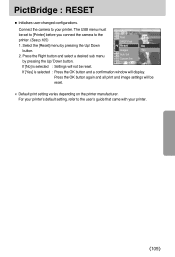
... printer manufacturer. Images Yes Auto Set Custom Set If [No] is selected : Press the OK button and a confirmation window will be set to [Printer] before you connect the camera to the printer. (See p.105) 1. Select the [Reset] menu by pressing the Up/ Down button. For your printer's default setting, refer to your printer. ŝ109Ş PictBridge : RESET ƈ Initialises user-changed configurations. Connect the camera to the user's guide that came...
... printer manufacturer. Images Yes Auto Set Custom Set If [No] is selected : Press the OK button and a confirmation window will be set to [Printer] before you connect the camera to the printer. (See p.105) 1. Select the [Reset] menu by pressing the Up/ Down button. For your printer's default setting, refer to your printer. ŝ109Ş PictBridge : RESET ƈ Initialises user-changed configurations. Connect the camera to the user's guide that came...

User Manual
Page 134
..., Auto & Red-eye reduction, Fill-in, Slow sync, Slow sync & Red-eye reduction, Flash off Flash compensation : ±2EV (1/3EV steps) Wide : 0.7 ~ 6.0m (ISO 100), Tele : 1.5 ~ 3.0m (ISO 100) Approx. 5 sec. Bracketing : Exposure, Focusing, White Balance (3 frames or 5 frames selectable) Digital Zoom Electronic Viewfinder Viewfinder LCD Monitor Focusing Type Modes Range Shutter Type Speed Control Exposure Compensation ISO Equivalent High Speed Mode Modes Flash Sharpness Range Recharging Time External Flash (optional) Effect Color Space White Balance Voice Recording Date...
..., Auto & Red-eye reduction, Fill-in, Slow sync, Slow sync & Red-eye reduction, Flash off Flash compensation : ±2EV (1/3EV steps) Wide : 0.7 ~ 6.0m (ISO 100), Tele : 1.5 ~ 3.0m (ISO 100) Approx. 5 sec. Bracketing : Exposure, Focusing, White Balance (3 frames or 5 frames selectable) Digital Zoom Electronic Viewfinder Viewfinder LCD Monitor Focusing Type Modes Range Shutter Type Speed Control Exposure Compensation ISO Equivalent High Speed Mode Modes Flash Sharpness Range Recharging Time External Flash (optional) Effect Color Space White Balance Voice Recording Date...

User Manual
Page 137
... camera uses the USB Storage Driver as a USB card reader. This software is only compatible with Windows. A USB Storage Driver is provided only for running the automatic setup program according to the capability of your digital images and movie clips with this software. About the software After inserting the software CD provided with this camera into the CD-ROM drive, the following window should first install the camera driver. ƈ Camera driver : This enables images to transfer between the camera...
... camera uses the USB Storage Driver as a USB card reader. This software is only compatible with Windows. A USB Storage Driver is provided only for running the automatic setup program according to the capability of your digital images and movie clips with this software. About the software After inserting the software CD provided with this camera into the CD-ROM drive, the following window should first install the camera driver. ƈ Camera driver : This enables images to transfer between the camera...
User Manual
Page 138
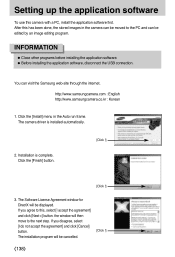
... before installing the application software. ƃ Before installing the application software, disconnect the USB connection. http://www.samsungcamera.com : English http://www.samsungcamera.co.kr : Korean 1. After this camera with a PC, install the application software first. Installation is installed automatically. 2. The Software License Agreement window for DirectX will be edited by an image editing program. The installation program will then move to the next step. Setting...
... before installing the application software. ƃ Before installing the application software, disconnect the USB connection. http://www.samsungcamera.com : English http://www.samsungcamera.co.kr : Korean 1. After this camera with a PC, install the application software first. Installation is installed automatically. 2. The Software License Agreement window for DirectX will be edited by an image editing program. The installation program will then move to the next step. Setting...

User Manual
Page 143
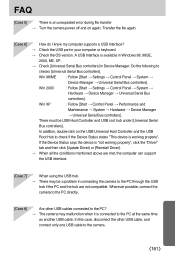
... software 21. If you to restart your PC's central processing unit is VIA chip (This is shown in the USB Host Controller), download the patch file from the camera to the PC before installing the camera driver, the [Found New Hardware Wizard] will open. Now you connect the camera to PC via the USB cable. If your PC. ƃ If you can see [Removable Disk...
... software 21. If you to restart your PC's central processing unit is VIA chip (This is shown in the USB Host Controller), download the patch file from the camera to the PC before installing the camera driver, the [Found New Hardware Wizard] will open. Now you connect the camera to PC via the USB cable. If your PC. ƃ If you can see [Removable Disk...
User Manual
Page 161
... "not working properly". There must be a problem in connecting the camera to checks [Universal Serial Bus controllers]. Win 98/ME : Follow [Start ƍ Settings ƍ Control Panel ƍ System ƍ Device Manager ƍ Universal Serial Bus controllers]. In addition, double-click on again. FAQ [Case 5] There is an unexpected error during file transfer ƍ Turn the camera power off and on the USB Universal Host Controller and the USB Root...
... "not working properly". There must be a problem in connecting the camera to checks [Universal Serial Bus controllers]. Win 98/ME : Follow [Start ƍ Settings ƍ Control Panel ƍ System ƍ Device Manager ƍ Universal Serial Bus controllers]. In addition, double-click on again. FAQ [Case 5] There is an unexpected error during file transfer ƍ Turn the camera power off and on the USB Universal Host Controller and the USB Root...
User Manual
Page 162
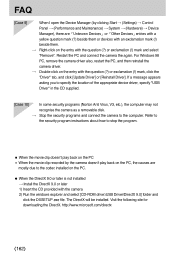
... not recognise the camera as a removable disk. ƍ Stop the security programs and connect the camera to the codec installed on the PC. ƃ When the DirectX 9.0 or later is not installed ƍ Install the DirectX 9.0 or later 1) Insert the CD provided with the camera 2) Run the windows explorer and select [CD-ROM drive:\USB Driver\DirectX 9.0] folder and click the DXSETUP.exe file. The DirectX...
... not recognise the camera as a removable disk. ƍ Stop the security programs and connect the camera to the codec installed on the PC. ƃ When the DirectX 9.0 or later is not installed ƍ Install the DirectX 9.0 or later 1) Insert the CD provided with the camera 2) Run the windows explorer and select [CD-ROM drive:\USB Driver\DirectX 9.0] folder and click the DXSETUP.exe file. The DirectX...
User Manual
Page 163
... problem happens continuously, set the Legacy USB Support to the PC manufacturer or BIOS manufacturer. ƈ If the movie clip can't be deleted, removable disk can't be extracted or an error message displays during the file transfer. ƍ If you install only the Digimax Master, the problems mentioned above occasionally happen. - If you can't change the menu by clicking the Digimax Master icon on for a long time and the camera is connected...
... problem happens continuously, set the Legacy USB Support to the PC manufacturer or BIOS manufacturer. ƈ If the movie clip can't be deleted, removable disk can't be extracted or an error message displays during the file transfer. ƍ If you install only the Digimax Master, the problems mentioned above occasionally happen. - If you can't change the menu by clicking the Digimax Master icon on for a long time and the camera is connected...


