User Manual
Page 4
... System (Video or S-Video Mode 16 ■ Changing the Picture Mode 16 ■ Adjusting the Picture Settings 17 ■ Adjusting the Picture Settings (PC or DVI Mode 18 ■ Selecting the Picture Size 19 ■ Activating/Deactivating the Digital Noise Reduction Feature 19 ■ Freezing the Current Picture 20 ■ Changing...
... System (Video or S-Video Mode 16 ■ Changing the Picture Mode 16 ■ Adjusting the Picture Settings 17 ■ Adjusting the Picture Settings (PC or DVI Mode 18 ■ Selecting the Picture Size 19 ■ Activating/Deactivating the Digital Noise Reduction Feature 19 ■ Freezing the Current Picture 20 ■ Changing...

User Manual
Page 5
.../Video Input 35 ■ Connecting to the S-Video Input 36 ■ Connecting to the DVD/DTV RECEIVER Input 36 ■ Connecting to the DVI Input 37 ■ Connecting to the RGB(PC) Input 37 ■ Setting up Your PC Software (Windows only 38 ■ Pin Configurations 39... ■ Input Mode (PC/DVI 40 ■ Power Saver (PC1 mode only 41 ◆ RECOMMENDATIONS FOR USE ■ Troubleshooting: Before Contacting Service Personnel 42 ■ Care and Maintenance ...
.../Video Input 35 ■ Connecting to the S-Video Input 36 ■ Connecting to the DVD/DTV RECEIVER Input 36 ■ Connecting to the DVI Input 37 ■ Connecting to the RGB(PC) Input 37 ■ Setting up Your PC Software (Windows only 38 ■ Pin Configurations 39... ■ Input Mode (PC/DVI 40 ■ Power Saver (PC1 mode only 41 ◆ RECOMMENDATIONS FOR USE ■ Troubleshooting: Before Contacting Service Personnel 42 ■ Care and Maintenance ...

User Manual
Page 7
... of another PDP. - h) VIDEO OUT (VIDEO / L-AUDIO-R) Used to pages 35~37. a b cd e f g h i j a) RS232C - IN : Used for device with DVI output. i) EXT SPEAKER (8Ω) Connect external speakers. c) AUDIO Connect to the video output jack on your PC. S-VIDEO). f) VIDEO IN Video and audio inputs for...7 Your New Plasma Display Panel ➢ The actual configuration on your PDP may be different, depending on your PC or any device with DVI output. (It is audio input for external devices with RS232C input of another PDP. j) POWER IN Connect the supplied power cord. 7 ENG...
... of another PDP. - h) VIDEO OUT (VIDEO / L-AUDIO-R) Used to pages 35~37. a b cd e f g h i j a) RS232C - IN : Used for device with DVI output. i) EXT SPEAKER (8Ω) Connect external speakers. c) AUDIO Connect to the video output jack on your PC. S-VIDEO). f) VIDEO IN Video and audio inputs for...7 Your New Plasma Display Panel ➢ The actual configuration on your PDP may be different, depending on your PC or any device with DVI output. (It is audio input for external devices with RS232C input of another PDP. j) POWER IN Connect the supplied power cord. 7 ENG...
User Manual
Page 16
... √ Move Sel. Custom ◆ Custom - NTSC3.58 PAL M - Return You can also set these options simply by using the SOURCE button. Low (PC or DVI Mode) ➣ You can select the type of picture which best corresponds to your viewing requirements. 1 Press the MENU button. Result: The options available in...
... √ Move Sel. Custom ◆ Custom - NTSC3.58 PAL M - Return You can also set these options simply by using the SOURCE button. Low (PC or DVI Mode) ➣ You can select the type of picture which best corresponds to your viewing requirements. 1 Press the MENU button. Result: The options available in...

User Manual
Page 18
... to select Color Tone. Move the horizontal bar's cursor left or right by pressing the œ or √ button. 10 When you are displayed in DVI mode. 9 Press the ▲ or ▼ button to select the option (Red, Green, Blue) to be adjusted. Move the horizontal bar's cursor ...-01Eng 4/19/04 4:13 PM Page 18 ENG √ √ urn √ √ eturn Adjusting the Picture Settings (PC or DVI Mode) ➢ Preset to the PC or DVI mode by pressing the œ or √ button. Return Picture Mode Adjust Color Tone Color Adjust Size œ Custom √ √...
... to select Color Tone. Move the horizontal bar's cursor left or right by pressing the œ or √ button. 10 When you are displayed in DVI mode. 9 Press the ▲ or ▼ button to select the option (Red, Green, Blue) to be adjusted. Move the horizontal bar's cursor ...-01Eng 4/19/04 4:13 PM Page 18 ENG √ √ urn √ √ eturn Adjusting the Picture Settings (PC or DVI Mode) ➢ Preset to the PC or DVI mode by pressing the œ or √ button. Return Picture Mode Adjust Color Tone Color Adjust Size œ Custom √ √...

User Manual
Page 19
... ... Size Wide Store ENG Activating/Deactivating the Digital Noise Reduction Feature If the signal received by pressing the œ or √ button. Normal (PC or DVI Mode) ➣ You can activate this feature to change the setting (On or Off). BN68-00654A-01Eng 4/19/04 4:13 PM Page 19 Selecting the...
... ... Size Wide Store ENG Activating/Deactivating the Digital Noise Reduction Feature If the signal received by pressing the œ or √ button. Normal (PC or DVI Mode) ➣ You can activate this feature to change the setting (On or Off). BN68-00654A-01Eng 4/19/04 4:13 PM Page 19 Selecting the...

User Manual
Page 32
...; On √ œ Video √ √ œ Large √ œ √ œ Main √ Video - Double2 8 Press the ▲ or ▼ button to select Swap. DVI ➣ For further details about selecting a source, refer to "Selecting the source of sub picture depending on the source of the sub picture by pressing...
...; On √ œ Video √ √ œ Large √ œ √ œ Main √ Video - Double2 8 Press the ▲ or ▼ button to select Swap. DVI ➣ For further details about selecting a source, refer to "Selecting the source of sub picture depending on the source of the sub picture by pressing...
User Manual
Page 33
...Page 33 Viewing the Picture In Picture (PIP) (continued) ENG Easy functions of main picture Main picture Video S-Video Component1 Component2 PC1 PC2 DVI Sub picture Video ✔ ✔ ✔ ✔ ✔ ✔ S-Video ✔ ✔ ✔ ✔ ✔...; ✔ Component1 ✔ ✔ Component2 ✔ ✔ PC1 ✔ ✔ PC2 ✔ ✔ DVI ✔ ✔ 33 Buttons PIP ON SIZE LOCATE SOURCE SWAP S.SEL Feature Used to interchange the main picture and the sub picture. Selecting the...
...Page 33 Viewing the Picture In Picture (PIP) (continued) ENG Easy functions of main picture Main picture Video S-Video Component1 Component2 PC1 PC2 DVI Sub picture Video ✔ ✔ ✔ ✔ ✔ ✔ S-Video ✔ ✔ ✔ ✔ ✔...; ✔ Component1 ✔ ✔ Component2 ✔ ✔ PC1 ✔ ✔ PC2 ✔ ✔ DVI ✔ ✔ 33 Buttons PIP ON SIZE LOCATE SOURCE SWAP S.SEL Feature Used to interchange the main picture and the sub picture. Selecting the...

User Manual
Page 34
... indicated for Component2 and PC2, which use the same input connector. 34 Viewing Pictures From External Sources AV Input Video S-Video Component1 Component2 PC1 PC2 DVI Connected Not Connected Connected Not Connected Not Connected Sel. Result: The input sources available are displayed. 3 Press the √ button. 4 Press the ▲ or ▼...
... indicated for Component2 and PC2, which use the same input connector. 34 Viewing Pictures From External Sources AV Input Video S-Video Component1 Component2 PC1 PC2 DVI Connected Not Connected Connected Not Connected Not Connected Sel. Result: The input sources available are displayed. 3 Press the √ button. 4 Press the ▲ or ▼...
User Manual
Page 37
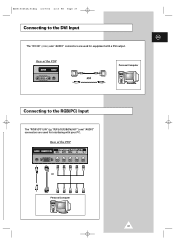
Rear of the PDP Personal Computer and Connecting to the DVI Input ENG The "DVI IN" (video) and "AUDIO" connectors are used for interfacing with a DVI output. Rear of the PDP or Personal Computer 37 BN68-00654A-01Eng 4/19/04 4:13 PM Page 37 Connecting to the RGB(PC) Input The "RGB1(PC1) IN" (or "R(Pr)/G(Y)/B(Pb)/H/V") and "AUDIO" connectors are used for equipment with your PC.
Rear of the PDP Personal Computer and Connecting to the DVI Input ENG The "DVI IN" (video) and "AUDIO" connectors are used for interfacing with a DVI output. Rear of the PDP or Personal Computer 37 BN68-00654A-01Eng 4/19/04 4:13 PM Page 37 Connecting to the RGB(PC) Input The "RGB1(PC1) IN" (or "R(Pr)/G(Y)/B(Pb)/H/V") and "AUDIO" connectors are used for equipment with your PC.
User Manual
Page 39
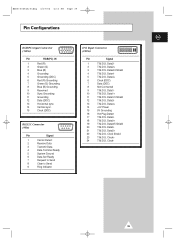
... (9Pin) Pin Signal 1 Carrier Detect 2 Receive Data 3 Transmit Data 4 Data Terminal Ready 5 System Ground 6 Data Set Ready 7 Request to Send 8 Clear to Send 9 Ring Indicator DVI Input Connector (24Pin) Pin Signal 1 T.M.D.S. Data2+ 3 T.M.D.S. Data0/5 Shield 20 T.M.D.S. Clock Shield 23 T.M.D.S. Data3- 13 T.M.D.S. Data0+ 19 T.M.D.S. Data1/3 Shield 12 T.M.D.S. Data0- 18 T.M.D.S. Data2/4 Shield 4 T.M.D.S. Data5+ 22...
... (9Pin) Pin Signal 1 Carrier Detect 2 Receive Data 3 Transmit Data 4 Data Terminal Ready 5 System Ground 6 Data Set Ready 7 Request to Send 8 Clear to Send 9 Ring Indicator DVI Input Connector (24Pin) Pin Signal 1 T.M.D.S. Data2+ 3 T.M.D.S. Data0/5 Shield 20 T.M.D.S. Clock Shield 23 T.M.D.S. Data3- 13 T.M.D.S. Data0+ 19 T.M.D.S. Data1/3 Shield 12 T.M.D.S. Data0- 18 T.M.D.S. Data2/4 Shield 4 T.M.D.S. Data5+ 22...

User Manual
Page 40
... below shows all of PC monitor and its resolution. BN68-00654A-02Eng 5/3/04 9:19 AM Page 40 Input Mode (PC/DVI) ENG Both screen position and size will vary depending on the type of the display modes that are supported: Resolution VGA...;/ ✔/ ✔ ✔ ✔ ✔ ✔ ✔/ ✔/ ✔/ ✔/ ✔/ ✔/ ✔ ✔ ◆ "❉" mode does not work with DVI mode. ◆ The interlace mode is not supported. ◆ The PDP might operate abnormally if a non-standard video format is selected. ◆ The 1366 x 768...
... below shows all of PC monitor and its resolution. BN68-00654A-02Eng 5/3/04 9:19 AM Page 40 Input Mode (PC/DVI) ENG Both screen position and size will vary depending on the type of the display modes that are supported: Resolution VGA...;/ ✔/ ✔ ✔ ✔ ✔ ✔ ✔/ ✔/ ✔/ ✔/ ✔/ ✔/ ✔ ✔ ◆ "❉" mode does not work with DVI mode. ◆ The interlace mode is not supported. ◆ The PDP might operate abnormally if a non-standard video format is selected. ◆ The 1366 x 768...

User Manual
Page 43
.../Pr (RCA, 3P, 480i~1080i) COMPONENT2/RGB2(PC2) IN (BNC, 480i~1080i (Pr/Y/Pb), VGA~XGA (R/G/B/H/V)) RGB1(PC1) IN - D-SUB, 15P DVI IN - IN (Stereo jack), OUT (D-SUB, 9P) 43 AC120V~, 60Hz Other countries - AC100-250V~, 50/60Hz PPM42S3Q - 330 Watts PPM50H3Q - 490 Watts... - R-/+, L-/+ RS232C - VIDEO/S-VIDEO COMPONENT1 IN - L/R COMPONENT1 IN - L/R (RCA, 2P) AUDIO (Stereo jack for COMPONENT2,RGB1/2(PC1/2), and DVI input) EXT SPEAKER (8Ω) - DVI-D type VIDEO OUT - VIDEO/L/R (RCA, 3P) VIDEO IN - This PDP has been registered for residential use . BN68-00654A-02Eng 5/3/04 9:20...
.../Pr (RCA, 3P, 480i~1080i) COMPONENT2/RGB2(PC2) IN (BNC, 480i~1080i (Pr/Y/Pb), VGA~XGA (R/G/B/H/V)) RGB1(PC1) IN - D-SUB, 15P DVI IN - IN (Stereo jack), OUT (D-SUB, 9P) 43 AC120V~, 60Hz Other countries - AC100-250V~, 50/60Hz PPM42S3Q - 330 Watts PPM50H3Q - 490 Watts... - R-/+, L-/+ RS232C - VIDEO/S-VIDEO COMPONENT1 IN - L/R COMPONENT1 IN - L/R (RCA, 2P) AUDIO (Stereo jack for COMPONENT2,RGB1/2(PC1/2), and DVI input) EXT SPEAKER (8Ω) - DVI-D type VIDEO OUT - VIDEO/L/R (RCA, 3P) VIDEO IN - This PDP has been registered for residential use . BN68-00654A-02Eng 5/3/04 9:20...

Owners Instructions
Page 4
... System (Video or S-Video Mode 16 ■ Changing the Picture Mode 16 ■ Adjusting the Picture Settings 17 ■ Adjusting the Picture Settings (PC or DVI Mode 18 ■ Selecting the Picture Size 19 ■ Activating/Deactivating the Digital Noise Reduction Feature 19 ■ Freezing the Current Picture 20 ■ Changing...
... System (Video or S-Video Mode 16 ■ Changing the Picture Mode 16 ■ Adjusting the Picture Settings 17 ■ Adjusting the Picture Settings (PC or DVI Mode 18 ■ Selecting the Picture Size 19 ■ Activating/Deactivating the Digital Noise Reduction Feature 19 ■ Freezing the Current Picture 20 ■ Changing...
Owners Instructions
Page 5
.../Video Input 35 ■ Connecting to the S-Video Input 36 ■ Connecting to the DVD/DTV RECEIVER Input 36 ■ Connecting to the DVI Input 37 ■ Connecting to the RGB(PC) Input 37 ■ Setting up Your PC Software (Windows only 38 ■ Pin Configurations 39... ■ Input Mode (PC/DVI 40 ■ Power Saver (PC1 mode only 41 ◆ RECOMMENDATIONS FOR USE ■ Troubleshooting: Before Contacting Service Personnel 42 ■ Care and Maintenance ...
.../Video Input 35 ■ Connecting to the S-Video Input 36 ■ Connecting to the DVD/DTV RECEIVER Input 36 ■ Connecting to the DVI Input 37 ■ Connecting to the RGB(PC) Input 37 ■ Setting up Your PC Software (Windows only 38 ■ Pin Configurations 39... ■ Input Mode (PC/DVI 40 ■ Power Saver (PC1 mode only 41 ◆ RECOMMENDATIONS FOR USE ■ Troubleshooting: Before Contacting Service Personnel 42 ■ Care and Maintenance ...

Owners Instructions
Page 7
IN : Used for the MDC function when connecting with DVI output. OUT : Used for the MDC function when connecting PC or RS232C output of another PDP. - f) VIDEO IN Video and audio inputs for external devices, ... video disc players (or for device with RS232C input of another PDP. S-VIDEO). j) POWER IN Connect the supplied power cord. 7 b) DVI IN Connect to the video output jack for external devices with DVI output. (It is audio input for b, d, and e.) d) RGB1(PC1) IN Connect to output screen of Video or S-Video in...
IN : Used for the MDC function when connecting with DVI output. OUT : Used for the MDC function when connecting PC or RS232C output of another PDP. - f) VIDEO IN Video and audio inputs for external devices, ... video disc players (or for device with RS232C input of another PDP. S-VIDEO). j) POWER IN Connect the supplied power cord. 7 b) DVI IN Connect to the video output jack for external devices with DVI output. (It is audio input for b, d, and e.) d) RGB1(PC1) IN Connect to output screen of Video or S-Video in...

Owners Instructions
Page 16
...; œ Normal √ Wide œ Off √ Move Sel. Select the option by pressing the P.MODE (Picture Mode) button. 16 Standard - Movie - Low (PC or DVI Mode) ➣ You can select the type of picture which best corresponds to your viewing requirements. 1 Press the MENU button. ENG Picture If necessary, select...
...; œ Normal √ Wide œ Off √ Move Sel. Select the option by pressing the P.MODE (Picture Mode) button. 16 Standard - Movie - Low (PC or DVI Mode) ➣ You can select the type of picture which best corresponds to your viewing requirements. 1 Press the MENU button. ENG Picture If necessary, select...

Owners Instructions
Page 18
...œ or √ button. button to 18 Press the œ or √ button. Adjusting the Picture Settings (PC or DVI Mode) ➢ Preset to the PC or DVI mode by pressing the œ or √ button. 10 When you are satisfied with the settings, press the store them . Return...9650; or ▼ button to be adjusted. Color2 - button to 6 Press the MENU button. Result: The horizontal bar is displayed. Result: The options available in DVI mode. 9 Press the ▲ or ▼ button to select the option (Red, Green, Blue) to select color Adjust. Color3 8 Press the ▲ or ...
...œ or √ button. button to 18 Press the œ or √ button. Adjusting the Picture Settings (PC or DVI Mode) ➢ Preset to the PC or DVI mode by pressing the œ or √ button. 10 When you are satisfied with the settings, press the store them . Return...9650; or ▼ button to be adjusted. Color2 - button to 6 Press the MENU button. Result: The horizontal bar is displayed. Result: The options available in DVI mode. 9 Press the ▲ or ▼ button to select the option (Red, Green, Blue) to select color Adjust. Color3 8 Press the ▲ or ...

Owners Instructions
Page 19
Zoom1 - Normal (PC or DVI Mode) ➣ You can also set these options simply by pressing the œ or √ button. Return œ √ Sel. Mode Adjust Color Tone Size ...
Zoom1 - Normal (PC or DVI Mode) ➣ You can also set these options simply by pressing the œ or √ button. Return œ √ Sel. Mode Adjust Color Tone Size ...

Owners Instructions
Page 32
... select Sel.. Result: The sizes are displayed in the PIP group are interchanged. 7 Press the ▲ or ▼ button to select Swap. Small - Move Sel. DVI ➣ For further details about selecting a source, refer to "Selecting the source of sub picture depending on page 33. 6 Press the ▲ or ▼ button...
... select Sel.. Result: The sizes are displayed in the PIP group are interchanged. 7 Press the ▲ or ▼ button to select Swap. Small - Move Sel. DVI ➣ For further details about selecting a source, refer to "Selecting the source of sub picture depending on page 33. 6 Press the ▲ or ▼ button...
