User Manual
Page 3
... Sound Menu 21 Changing the Preset Sound Mode 21 Adjusting Sound Settings 21 Sound Settings 21 yy Setup Menu 22 Setting the Time 22 Using the Sleep Timer 22 Setting the On / Off Timer 22 Locking Programs 23 Other Features 24 Picture In Picture (PIP) 26 yy Support Menu 26 Advanced Features yy Network Connection 28 Connecting to a Wired Network 28 Connecting to a Wireless Network 30 yy Media Play 34 Connecting a USB Device 34 Connecting to your PC through a Receiver 43 Troubleshooting for instructions on how to the Wall 49 yy Troubleshooting...
... Sound Menu 21 Changing the Preset Sound Mode 21 Adjusting Sound Settings 21 Sound Settings 21 yy Setup Menu 22 Setting the Time 22 Using the Sleep Timer 22 Setting the On / Off Timer 22 Locking Programs 23 Other Features 24 Picture In Picture (PIP) 26 yy Support Menu 26 Advanced Features yy Network Connection 28 Connecting to a Wired Network 28 Connecting to a Wireless Network 30 yy Media Play 34 Connecting a USB Device 34 Connecting to your PC through a Receiver 43 Troubleshooting for instructions on how to the Wall 49 yy Troubleshooting...
User Manual
Page 4
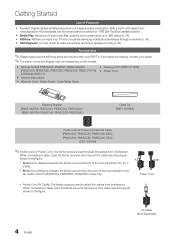
Getting Started List of the cord inserted in the AC outlet: 3/4 inch (PN58C540, PN58C550, PN58C590 model only) A B Power Cord xx Ferrite Core (AV Cable): The ferrite cores are used to shield the cables from interference. yy Media Play: Allows you to play music files, pictures, and movies saved on the models. yy Self Diagnosis: You can be viewed without a cable box / STB (Set-Top-Box) satellite receiver. If any items are included...
Getting Started List of the cord inserted in the AC outlet: 3/4 inch (PN58C540, PN58C550, PN58C590 model only) A B Power Cord xx Ferrite Core (AV Cable): The ferrite cores are used to shield the cables from interference. yy Media Play: Allows you to play music files, pictures, and movies saved on the models. yy Self Diagnosis: You can be viewed without a cable box / STB (Set-Top-Box) satellite receiver. If any items are included...
User Manual
Page 7
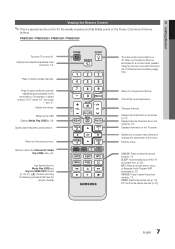
... Separate Audio Program (SAP broadcast) (p. 21). Use these buttons in the Channel list, Media Play (USB) menu, etc. Cuts off . Displays Media Play (USB) (p. 34). Buttons used functions. Displays information on the screen (p. 15). Quickly select frequently used in Media Play (USB) and Anynet+ (HDMI-CEC) modes (p. 34, 41). (�: Controls recording for Samsung recorders that have the Anynet+ feature) POWER ON/OFF SOURCE PRE-CH MEDIA.P CH LIST MENU FAV.CH TOOLS INFO RETURN EXIT A B CD S.MODE SLEEP MTS P.MODE P.SIZE CC Turns the remote control light...
... Separate Audio Program (SAP broadcast) (p. 21). Use these buttons in the Channel list, Media Play (USB) menu, etc. Cuts off . Displays Media Play (USB) (p. 34). Buttons used functions. Displays information on the screen (p. 15). Quickly select frequently used in Media Play (USB) and Anynet+ (HDMI-CEC) modes (p. 34, 41). (�: Controls recording for Samsung recorders that have the Anynet+ feature) POWER ON/OFF SOURCE PRE-CH MEDIA.P CH LIST MENU FAV.CH TOOLS INFO RETURN EXIT A B CD S.MODE SLEEP MTS P.MODE P.SIZE CC Turns the remote control light...
User Manual
Page 10
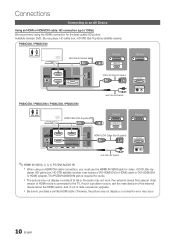
...When using the HDMI connection for audio. Otherwise, the picture may not display or a connection error may not work if an external device that uses an older version of date, request an upgrade. PN50C540 / PN58C540 R W Red White HDMI Cable (Not Supplied) Device HDMI OUT Device PN50C550 / PN50C590 / PN58C550 / PN58C590 R W Red White HDMI Cable (Not Supplied) HDMI to DVI Cable (Not Supplied) Audio Cable (Not Supplied) W R DVI OUT AUDIO OUT R-AUDIO-L Device HDMI OUT Device HDMI to purchase a certified HDMI cable. The PC/DVI AUDIO IN jack is connected to HDMI) adapter...
...When using the HDMI connection for audio. Otherwise, the picture may not display or a connection error may not work if an external device that uses an older version of date, request an upgrade. PN50C540 / PN58C540 R W Red White HDMI Cable (Not Supplied) Device HDMI OUT Device PN50C550 / PN50C590 / PN58C550 / PN58C590 R W Red White HDMI Cable (Not Supplied) HDMI to DVI Cable (Not Supplied) Audio Cable (Not Supplied) W R DVI OUT AUDIO OUT R-AUDIO-L Device HDMI OUT Device HDMI to purchase a certified HDMI cable. The PC/DVI AUDIO IN jack is connected to HDMI) adapter...
User Manual
Page 14
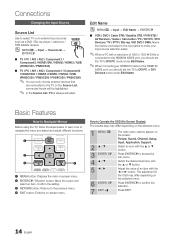
... / PN58C590) ✎✎ You can only choose external devices that are connected to the previous menu. 4 EXIT button: Exits the on the screen: Picture, Sound, Channel, Setup, Input, Application, Support. Press EXIT. 14 English Select an icon with the ▲ or ▼ button. In the Source List, connected inputs will be highlighted. ✎✎ In the Source List, PC is connected to the HDMI IN 1(DVI) port, you should set the TV to DVI PC mode...
... / PN58C590) ✎✎ You can only choose external devices that are connected to the previous menu. 4 EXIT button: Exits the on the screen: Picture, Sound, Channel, Setup, Input, Application, Support. Press EXIT. 14 English Select an icon with the ▲ or ▼ button. In the Source List, connected inputs will be highlighted. ✎✎ In the Source List, PC is connected to the HDMI IN 1(DVI) port, you should set the TV to DVI PC mode...
User Manual
Page 18
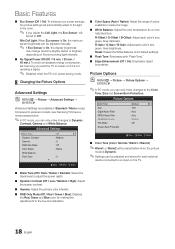
... make changes to Off. Reset: Resets the White Balance to create the image. ■■ White Balance: Adjust the color temperature for making fine adjustments to the Color Tone, Size and Screen Burn Protection. R-Gain / G-Gain / B-Gain: Adjust each color's (red, green, blue) darkness. Basic Features ■■ Eco Sensor (Off / On): To enhance your power savings; the picture settings will automatically adapt to the light in Standard / Movie mode) Compared to previous models, new Samsung...
... make changes to Off. Reset: Resets the White Balance to create the image. ■■ White Balance: Adjust the color temperature for making fine adjustments to the Color Tone, Size and Screen Burn Protection. R-Gain / G-Gain / B-Gain: Adjust each color's (red, green, blue) darkness. Basic Features ■■ Eco Sensor (Off / On): To enhance your power savings; the picture settings will automatically adapt to the light in Standard / Movie mode) Compared to previous models, new Samsung...
User Manual
Page 20
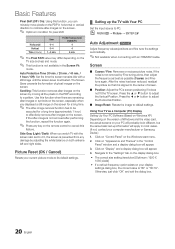
... Screen Saver prevents the formation of ghost images on the Windows start menu. 2. Picture Reset (OK / Cancel) Resets your display settings dialog box, the correct value is "60" or "60 Hz". Click on "Control Panel" on the screen. Click on "Appearance and Themes" in the "Control Panel" window and a display dialog-box will appear. 4. Navigate to the "Settings" tab on the PDP according to a pattern. OO MENUm → Picture → ENTERE Auto Adjustment t Adjust...
... Screen Saver prevents the formation of ghost images on the Windows start menu. 2. Picture Reset (OK / Cancel) Resets your display settings dialog box, the correct value is "60" or "60 Hz". Click on "Control Panel" on the screen. Click on "Appearance and Themes" in the "Control Panel" window and a display dialog-box will appear. 4. Navigate to the "Settings" tab on the PDP according to a pattern. OO MENUm → Picture → ENTERE Auto Adjustment t Adjust...
User Manual
Page 22
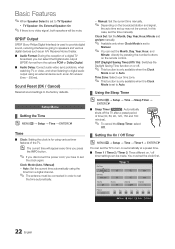
... timer settings can select the Digital Audio output (SPDIF) format from the options PCM or Dolby Digital. ■■ Audio Delay: Correct audio-video sync problems, when watching TV or video, and when listening to digital audio output using an external device such as an AV receiver (0ms ~ 250ms). Time Zone: Select your time zone. ✎✎ This function is only available when the Clock Mode is set the clock first. Setup Menu ¦¦ Setting...
... timer settings can select the Digital Audio output (SPDIF) format from the options PCM or Dolby Digital. ■■ Audio Delay: Correct audio-video sync problems, when watching TV or video, and when listening to digital audio output using an external device such as an AV receiver (0ms ~ 250ms). Time Zone: Select your time zone. ✎✎ This function is only available when the Clock Mode is set the clock first. Setup Menu ¦¦ Setting...
User Manual
Page 25
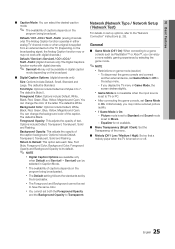
... to the "Network Connection" instructions (p. 28). Foreground Color: Options include Default, White, Black, Red, Green, Blue, Yellow, Magenta and Cyan. General ■■ Game Mode (Off / On): When connecting to the TV. (Depending on the broadcast. ■■ Digital Caption Options: (digital channels only) Size: Options include Default, Small, Standard and Large. Picture mode is set to Standard and Sound mode is turned on set to TV or PC. xx The Default setting follows the standards set both the...
... to the "Network Connection" instructions (p. 28). Foreground Color: Options include Default, White, Black, Red, Green, Blue, Yellow, Magenta and Cyan. General ■■ Game Mode (Off / On): When connecting to the TV. (Depending on the broadcast. ■■ Digital Caption Options: (digital channels only) Size: Options include Default, Small, Standard and Large. Picture mode is set to Standard and Sound mode is turned on set to TV or PC. xx The Default setting follows the standards set both the...
User Manual
Page 26
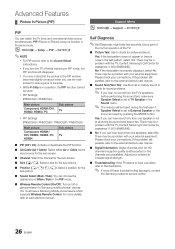
...; Troubleshooting: If the TV seems to have a Samsung Mobile phone/device which supports Wireless Remote Control. OO MENUm → Setup → PIP → ENTERE ✎✎NOTE xx For PIP sound, refer to each device's manual. xx You may be a problem with the TV. You must have a problem, refer to External Speaker or the sound is either Air or Cable as the input source for the sub-screen. ■■ Channel...
...; Troubleshooting: If the TV seems to have a Samsung Mobile phone/device which supports Wireless Remote Control. OO MENUm → Setup → PIP → ENTERE ✎✎NOTE xx For PIP sound, refer to each device's manual. xx You may be a problem with the TV. You must have a problem, refer to External Speaker or the sound is either Air or Cable as the input source for the sub-screen. ■■ Channel...

User Manual
Page 27
...: Upgrade the software using the Network Setup, refer to the "Network Connection" instructions. ✎✎ If the internet connection doesn't operate properly, the connection may be careful not to disconnect the power or or TV Rear Panel remove the USB drive until upgrades are complete. HD Connection Guide Refer to this information when your network. E Enter R Return Installing the Latest Version ■■ By USB: Insert a USB TV Side Panel drive containing the firmware upgrade file, downloaded...
...: Upgrade the software using the Network Setup, refer to the "Network Connection" instructions. ✎✎ If the internet connection doesn't operate properly, the connection may be careful not to disconnect the power or or TV Rear Panel remove the USB drive until upgrades are complete. HD Connection Guide Refer to this information when your network. E Enter R Return Installing the Latest Version ■■ By USB: Insert a USB TV Side Panel drive containing the firmware upgrade file, downloaded...
User Manual
Page 35
... Thumb drives, Flash Card Readers and USB HDD (USB HUB are connecting or using Media Play (USB) xx MTP (Media Transfer Protocol) is not supported. xx The � (REW) or µ (FF) button while a movie is not played, connect the USB device to the TV's USB port. xx The file system supports FAT16, FAT32 and NTFS. Examples of contents, as well as managing billings and settlements. SAMSUNG is loading...
... Thumb drives, Flash Card Readers and USB HDD (USB HUB are connecting or using Media Play (USB) xx MTP (Media Transfer Protocol) is not supported. xx The � (REW) or µ (FF) button while a movie is not played, connect the USB device to the TV's USB port. xx The file system supports FAT16, FAT32 and NTFS. Examples of contents, as well as managing billings and settlements. SAMSUNG is loading...
User Manual
Page 40
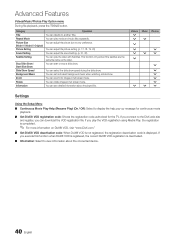
... screen mode. You can adjust the picture size to your preference. If you connect to view information about the played file. Advanced Features Videos/Music/Photos Play Option menu During file playback, press the TOOLS button. Videos > > > > > > Music > > Photos > > > > > > > > > > Settings Using the Setup Menu ■■ Continuous Movie Play Help (Resume Play) (On / Off): Select to another Title. You can download the VOD registration file. If you play the VOD registration using Media Play...
... screen mode. You can adjust the picture size to your preference. If you connect to view information about the played file. Advanced Features Videos/Music/Photos Play Option menu During file playback, press the TOOLS button. Videos > > > > > > Music > > Photos > > > > > > > > > > Settings Using the Setup Menu ■■ Continuous Movie Play Help (Resume Play) (On / Off): Select to another Title. You can download the VOD registration file. If you play the VOD registration using Media Play...
User Manual
Page 44
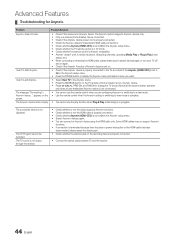
... the channel button operates only when a tuner-embedded Anynet+ device is not displayed. The TV Program cannot be connected. • Check if the Anynet+ device power cord is properly connected. • Check the Anynet+ device's Video/Audio/HDMI cable connections. • Check whether Anynet+ (HDMI-CEC) is set on the screen. • Select View TV in progress. The connected device is not connected.) • You cannot use the play function when Plug & Play (initial setup...
... the channel button operates only when a tuner-embedded Anynet+ device is not displayed. The TV Program cannot be connected. • Check if the Anynet+ device power cord is properly connected. • Check the Anynet+ device's Video/Audio/HDMI cable connections. • Check whether Anynet+ (HDMI-CEC) is set on the screen. • Select View TV in progress. The connected device is not connected.) • You cannot use the play function when Plug & Play (initial setup...
User Manual
Page 50
... the screen. • If the picture size is OK, the sound problem may take up scaled from the channel line up. • Antenna connection: Try HD stations after performing Auto program. ✎✎ Many HD channels are connected to the correct jacks. Support - Sound Test) (p. 26) If the audio is set top box. No Picture, No Video The TV won't turn on. • Make sure the AC power cord is distorted: macro block error...
... the screen. • If the picture size is OK, the sound problem may take up scaled from the channel line up. • Antenna connection: Try HD stations after performing Auto program. ✎✎ Many HD channels are connected to the correct jacks. Support - Sound Test) (p. 26) If the audio is set top box. No Picture, No Video The TV won't turn on. • Make sure the AC power cord is distorted: macro block error...
User Manual
Page 51
... picture/video. • Check cable connections (remove and reconnect all channels. • Make sure the coaxial cable is connected securely. • Please try Auto Program to add available channels to MENU - Replace the Component video cables with Component cable connection. • Remove the left and right audio connections from the set-top-box. For example, if an external device's output is always shown on digital channels. • Check Caption Setup menu. Go to the channel list. Channel - "PC" is HDMI, it matches the resolutions supported...
... picture/video. • Check cable connections (remove and reconnect all channels. • Make sure the coaxial cable is connected securely. • Please try Auto Program to add available channels to MENU - Replace the Component video cables with Component cable connection. • Remove the left and right audio connections from the set-top-box. For example, if an external device's output is always shown on digital channels. • Check Caption Setup menu. Go to the channel list. Channel - "PC" is HDMI, it matches the resolutions supported...
User Manual
Page 52
... box remote control doesn't turn the TV on the screen. • If the humming sound is loud, you look • This is part of screen burn, this manual. The TV Signal Information is turned off , or adjust the volume. • Program the Cable/Set remote control to a wall, we recommend using a HDMI, PC or Component source. Solutions and Explanations • Plasma TVs typically make a soft humming sound. If mounting the TV to operate the TV. Image Retention (Burn...
... box remote control doesn't turn the TV on the screen. • If the humming sound is loud, you look • This is part of screen burn, this manual. The TV Signal Information is turned off , or adjust the volume. • Program the Cable/Set remote control to a wall, we recommend using a HDMI, PC or Component source. Solutions and Explanations • Plasma TVs typically make a soft humming sound. If mounting the TV to operate the TV. Image Retention (Burn...
User Manual
Page 55
... Network Connection Network Setup O ON/OFF button Optimal resolution P Photos Picture Size PIP Plug & Play Power Indicator 7, 8, 15 15 19 17 18 13 R Receiver Recording Remote Control Repeat Mode RGB Only Mode Rotate 10, 41 11, 41 48 24 53 S Select All Self Diagnosis Sharpness Signal Information Sleep Timer Slide Show Software Upgrade Source List Speaker Select Specifications Standby mode Symbol 34 T 25 25 Timer 21 Title 38 Tools Troubleshooting TV Speaker 14 U 28 29 USB Drive V 7 Video Formats 13 Videos Virtual Surround Volume 38...
... Network Connection Network Setup O ON/OFF button Optimal resolution P Photos Picture Size PIP Plug & Play Power Indicator 7, 8, 15 15 19 17 18 13 R Receiver Recording Remote Control Repeat Mode RGB Only Mode Rotate 10, 41 11, 41 48 24 53 S Select All Self Diagnosis Sharpness Signal Information Sleep Timer Slide Show Software Upgrade Source List Speaker Select Specifications Standby mode Symbol 34 T 25 25 Timer 21 Title 38 Tools Troubleshooting TV Speaker 14 U 28 29 USB Drive V 7 Video Formats 13 Videos Virtual Surround Volume 38...
Quick Setup Guide
Page 1
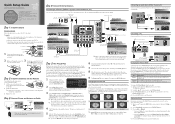
... your remote control, follow these steps: 1. It also displays connection instructions similar to those in the table below: Mode Dynamic Standard Movie Description Brightens picture. The Tools menu appears. 2. Replace the cover. To skip a screen, press the MENU button. After Plug & Play is running quickly. Step 4: Connect External Devices Connecting an AV device (DVD/Blu-ray player, cable/satellite box, etc.) Use one side. To set your TV to Channel 3 or 4, according to the diagram in...
... your remote control, follow these steps: 1. It also displays connection instructions similar to those in the table below: Mode Dynamic Standard Movie Description Brightens picture. The Tools menu appears. 2. Replace the cover. To skip a screen, press the MENU button. After Plug & Play is running quickly. Step 4: Connect External Devices Connecting an AV device (DVD/Blu-ray player, cable/satellite box, etc.) Use one side. To set your TV to Channel 3 or 4, according to the diagram in...

Quick Setup Guide
Page 2
... on your remote to Auto Setup. Displays and selects the available video sources. Changes channels. P.SIZE: Selects the picture size. The Wired Network Setup screen appears. On the Wired Network Setup menu, set the sleep timer function. The fastest of your home network and stream PC audio and video files to Auto Setup. The Wireless Network Setup screen appears. : Auto Setup : U Move E Enter R Return 5. Displays Favorite Channel Lists on the TV screen. SLEEP: Use to set Internet Protocol Setup and DNS Setup to your HDTV using cable, depending on Samsung recorders that...
... on your remote to Auto Setup. Displays and selects the available video sources. Changes channels. P.SIZE: Selects the picture size. The Wired Network Setup screen appears. On the Wired Network Setup menu, set the sleep timer function. The fastest of your home network and stream PC audio and video files to Auto Setup. The Wireless Network Setup screen appears. : Auto Setup : U Move E Enter R Return 5. Displays Favorite Channel Lists on the TV screen. SLEEP: Use to set Internet Protocol Setup and DNS Setup to your HDTV using cable, depending on Samsung recorders that...


