
Quick Guide (easy Manual) (ver.1.0) (English, French, Spanish)
Page 3
.... ✎✎Check that is inserted A into the TV. ✎✎Ferrite Core: The ferrite cores are used to a cable, open the box. yy QWERTY Remote (BN59-01134A / BN59-01134B) & Batteries (AAA x 4) yy Owner's Instructions yy Cleaning Cloth (BN63-01798B) yy Warranty Card / Safety Guide Ferrite Core (2EA) (3301-002049) AV...
.... ✎✎Check that is inserted A into the TV. ✎✎Ferrite Core: The ferrite cores are used to a cable, open the box. yy QWERTY Remote (BN59-01134A / BN59-01134B) & Batteries (AAA x 4) yy Owner's Instructions yy Cleaning Cloth (BN63-01798B) yy Warranty Card / Safety Guide Ferrite Core (2EA) (3301-002049) AV...

Quick Guide (easy Manual) (ver.1.0) (English, French, Spanish)
Page 4
...in standby mode. C x8 (M4 X L8) Screws (8EA) English - 4 Changes the channels. In the OSD, use the z buttons as you are away on the remote control. It is on screen display), which contains controls for more detailed instructions. In the on-screen menu, use this spot on the...9650; buttons on the TV. Blinks and turns off . To be safe and to unplug the power cord. Control Panel Remote control sensor Power Indicator SOURCEE MENUm y z P (Power) Aim the remote control towards this button as you would use the ◄ and ► buttons on the model. Toggles between all the ...
...in standby mode. C x8 (M4 X L8) Screws (8EA) English - 4 Changes the channels. In the OSD, use the z buttons as you are away on the remote control. It is on screen display), which contains controls for more detailed instructions. In the on-screen menu, use this spot on the...9650; buttons on the TV. Blinks and turns off . To be safe and to unplug the power cord. Control Panel Remote control sensor Power Indicator SOURCEE MENUm y z P (Power) Aim the remote control towards this button as you would use the ◄ and ► buttons on the model. Toggles between all the ...

Quick Guide (easy Manual) (ver.1.0) (English, French, Spanish)
Page 7
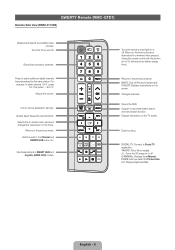
... '3'. MUTE: Cuts off . YAHOO!: Runs Yahoo widget. X: Turns the 3D image on or off . CC: Displays digital subtitles. QWERTY Remote (RMC-QTD1) Remote Side View (BN59-01134A) Displays and selects the available video sources. Gives direct access to various application services. Link to channels. Returns to ...0 PRE-CH VOL < MUTE M CH CH LIST SMART HUB MENU m SEARCH l < E BCD SOCIAL TV X E-MANUAL P.SIZE CC Turns the remote control light on or off the sound temporarily. CH LIST: Displays channel lists on and off . Changes channels. Exits the menu. E-MANUAL: Displays the...
... '3'. MUTE: Cuts off . YAHOO!: Runs Yahoo widget. X: Turns the 3D image on or off . CC: Displays digital subtitles. QWERTY Remote (RMC-QTD1) Remote Side View (BN59-01134A) Displays and selects the available video sources. Gives direct access to various application services. Link to channels. Returns to ...0 PRE-CH VOL < MUTE M CH CH LIST SMART HUB MENU m SEARCH l < E BCD SOCIAL TV X E-MANUAL P.SIZE CC Turns the remote control light on or off the sound temporarily. CH LIST: Displays channel lists on and off . Changes channels. Exits the menu. E-MANUAL: Displays the...
Quick Guide (easy Manual) (ver.1.0) (English, French, Spanish)
Page 8
...the Picture Size. English - 8 Displays information on the screen. E-MANUAL: Displays the e-Manual. Press to the previous channel. QWERTY Remote (RMC-QTD1) Remote Side View (BN59-01134B) Displays and selects the available video sources. Gives direct access to Social TV application. Selects the on-screen menu... items and changes the values seen on , the buttons become illuminated for a moment when pressed. (Using the remote control with this button set to On will reduce the battery usage time.) Returns to select additional digital channels being broadcast by ...
...the Picture Size. English - 8 Displays information on the screen. E-MANUAL: Displays the e-Manual. Press to the previous channel. QWERTY Remote (RMC-QTD1) Remote Side View (BN59-01134B) Displays and selects the available video sources. Gives direct access to Social TV application. Selects the on-screen menu... items and changes the values seen on , the buttons become illuminated for a moment when pressed. (Using the remote control with this button set to On will reduce the battery usage time.) Returns to select additional digital channels being broadcast by ...

Quick Guide (easy Manual) (ver.1.0) (English, French, Spanish)
Page 9
.... OFN(Optical Finger Navigation) Sensor In full browser function, it can be used as the pointer. When the user presses ENTERE, all characters on the remote side of each button. QWERTY Side View Displays the characters the user typed in SMART HUB and SOCIAL TV menu, etc. E + R = T[ 4... ( TAP Z X C V < > / ESC 0 ) CAPS SHIFT SYM @ Y] H ; SYM: Enables the symbol printed on the lower right side of new QWERTY Remote facing the TV. 2. If the user doesn't press any button on the TV, start the pairing process about 30 seconds later. Initial Pairing 1. Press SYM...
.... OFN(Optical Finger Navigation) Sensor In full browser function, it can be used as the pointer. When the user presses ENTERE, all characters on the remote side of each button. QWERTY Side View Displays the characters the user typed in SMART HUB and SOCIAL TV menu, etc. E + R = T[ 4... ( TAP Z X C V < > / ESC 0 ) CAPS SHIFT SYM @ Y] H ; SYM: Enables the symbol printed on the lower right side of new QWERTY Remote facing the TV. 2. If the user doesn't press any button on the TV, start the pairing process about 30 seconds later. Initial Pairing 1. Press SYM...

Quick Guide (easy Manual) (ver.1.0) (English, French, Spanish)
Page 16
... input source as a DVD player / Blu-ray player / cable box / STB satellite receiver. Refresh In Source, If the external devices are connected to make your remote. 2. Edit Favorites In Source, press the TOOLS button to select Refresh, then search for the connected devices. Changing the Input Source Source Use to an...
... input source as a DVD player / Blu-ray player / cable box / STB satellite receiver. Refresh In Source, If the external devices are connected to make your remote. 2. Edit Favorites In Source, press the TOOLS button to select Refresh, then search for the connected devices. Changing the Input Source Source Use to an...

Quick Guide (easy Manual) (ver.1.0) (English, French, Spanish)
Page 17
... play smoothly. If you play video over a IEEE 802.11b/g connection, the video may need to enter security key depending on your remote to your network as shown in the e-Manual. Configuring the Network Connection - Connect your TV to select numbers and characters. 7. Network ...DHCP, follow these steps: 1. Network Connection You can set to WEP, TKIP or TKIP AES (WPS2Mixed) on your AP or wireless router, Samsung TVs will not support a connection in compliance with the following security protocols: yy Authentication Mode: OPEN, SHARED, WPAPSK, WPA2PSK yy Encryption Type:...
... play smoothly. If you play video over a IEEE 802.11b/g connection, the video may need to enter security key depending on your remote to your network as shown in the e-Manual. Configuring the Network Connection - Connect your TV to select numbers and characters. 7. Network ...DHCP, follow these steps: 1. Network Connection You can set to WEP, TKIP or TKIP AES (WPS2Mixed) on your AP or wireless router, Samsung TVs will not support a connection in compliance with the following security protocols: yy Authentication Mode: OPEN, SHARED, WPAPSK, WPA2PSK yy Encryption Type:...

Quick Guide (easy Manual) (ver.1.0) (English, French, Spanish)
Page 18
... network connections. Connect your TV to the network using cable, depending on your network setup. Turn on your TV, press the MENU button on your remote, and then select Network → Network Settings. Network Connection - The Network Settings screen will appear. 3. When the connection has been verified, the "Internet connection successful...
... network connections. Connect your TV to the network using cable, depending on your network setup. Turn on your TV, press the MENU button on your remote, and then select Network → Network Settings. Network Connection - The Network Settings screen will appear. 3. When the connection has been verified, the "Internet connection successful...

Quick Guide (easy Manual) (ver.1.0) (English, French, Spanish)
Page 19
...corresponding OSD menu(s). Help Basic Features > Changing the Preset Picture Mode (1/1) ‰ Changing the Preset Picture Mode ■ Picture Mode t Select your remote. N In PC mode, you can fi nd instructions for your TV's features in the e-Manual in your TV. English - 19 Basic Features ...Index O MENUm → Support → e-Manual → ENTERE ✎ If you want to return to the e-Manual, press the E-MANUAL button on your remote. ✎ You can also access it through the menu: O MENUm → Support → e-Manual → ENTERE ✎ If you want to return...
...corresponding OSD menu(s). Help Basic Features > Changing the Preset Picture Mode (1/1) ‰ Changing the Preset Picture Mode ■ Picture Mode t Select your remote. N In PC mode, you can fi nd instructions for your TV's features in the e-Manual in your TV. English - 19 Basic Features ...Index O MENUm → Support → e-Manual → ENTERE ✎ If you want to return to the e-Manual, press the E-MANUAL button on your remote. ✎ You can also access it through the menu: O MENUm → Support → e-Manual → ENTERE ✎ If you want to return...

Quick Guide (easy Manual) (ver.1.0) (English, French, Spanish)
Page 21
... site by grouping and sorting Apps to your taste. The cable/set top box remote control doesn't turn on the remote. Lets you customize your TV by USB (samsung.com → Support → Downloads). Gives you watch non-subscription HD broadcasts without a cable box or STB (Set-Top-Box) ... DVD, Blu-ray etc) to match the TV input connections. If none of your TV and compatible Samsung mobile phones/devices through a network. yy Try pointing the remote directly at 1-800-SAMSUNG. License List of the product. ✎✎To keep your TV in optimum condition, upgrade to the...
... site by grouping and sorting Apps to your taste. The cable/set top box remote control doesn't turn on the remote. Lets you customize your TV by USB (samsung.com → Support → Downloads). Gives you watch non-subscription HD broadcasts without a cable box or STB (Set-Top-Box) ... DVD, Blu-ray etc) to match the TV input connections. If none of your TV and compatible Samsung mobile phones/devices through a network. yy Try pointing the remote directly at 1-800-SAMSUNG. License List of the product. ✎✎To keep your TV in optimum condition, upgrade to the...

Quick Guide (easy Manual) (ver.1.0) (English, French, Spanish)
Page 24
To find the nearest recycling location, go to the product. Model Name Battery Dimension(WxDxH) Weight Specifications - Dispose unwanted electronics through an approved recycler. Qwerty Remote RMC-QTD1 AAA x 4 To extend the battery life, use of alkaline battery is recommended. 2.4 X 1.0 X 6.0 inches (60.9 x 24.36 x 152.2 mm) 0.295 lbs (134 g) Specifications...Class B digital apparatus. ✎✎For information about the power supply, and more about power consumption, refer to the label attached to our website: www.samsung.com/recyclingdirect Or call, (877) 278 - 0799 English - 24
To find the nearest recycling location, go to the product. Model Name Battery Dimension(WxDxH) Weight Specifications - Dispose unwanted electronics through an approved recycler. Qwerty Remote RMC-QTD1 AAA x 4 To extend the battery life, use of alkaline battery is recommended. 2.4 X 1.0 X 6.0 inches (60.9 x 24.36 x 152.2 mm) 0.295 lbs (134 g) Specifications...Class B digital apparatus. ✎✎For information about the power supply, and more about power consumption, refer to the label attached to our website: www.samsung.com/recyclingdirect Or call, (877) 278 - 0799 English - 24

User Manual
Page 3
...Channel Menu To access the Channel menu, press the SMART HUB button on your choice. After Smart Hub appears, use the arrow buttons on your remote to access the Timer Viewing function. Source a Login b Sort by { Edit Mode } Settings ●● The displayed image may differ ...depending on the model. ▶ OO SMART HUB → Schedule Manager → ENTERE Press the SMART HUB button on your remote, and then select Schedule Manager to select Channel, and then press the ENTERE button. ■■ Schedule Manager Search Recommended Favorites Channel Web ...
...Channel Menu To access the Channel menu, press the SMART HUB button on your choice. After Smart Hub appears, use the arrow buttons on your remote to access the Timer Viewing function. Source a Login b Sort by { Edit Mode } Settings ●● The displayed image may differ ...depending on the model. ▶ OO SMART HUB → Schedule Manager → ENTERE Press the SMART HUB button on your remote, and then select Schedule Manager to select Channel, and then press the ENTERE button. ■■ Schedule Manager Search Recommended Favorites Channel Web ...

User Manual
Page 7
... (Added Channels) when you can view Added Channels, channel information, Favorites, and manage channels. ■■ Channel List The Channel List contains the channels your remote. Channel List Added Channels 6 Air 6-1 TV #6 7 Air 8 Air 9 Air No Information 9-2 TV #10 9-3 TV #11 9 Air 10-1 TV #12 10-2 TV #13 10 Air 11...;● The displayed image may differ depending on the model. ▶ ▶ English On the Channel List, you press the CH LIST button on the remote control, Channel List screen is displayed immediately.
... (Added Channels) when you can view Added Channels, channel information, Favorites, and manage channels. ■■ Channel List The Channel List contains the channels your remote. Channel List Added Channels 6 Air 6-1 TV #6 7 Air 8 Air 9 Air No Information 9-2 TV #10 9-3 TV #11 9 Air 10-1 TV #12 10-2 TV #13 10 Air 11...;● The displayed image may differ depending on the model. ▶ ▶ English On the Channel List, you press the CH LIST button on the remote control, Channel List screen is displayed immediately.
User Manual
Page 15
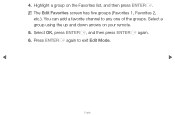
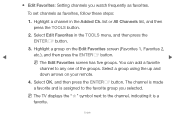
NN The Edit Favorites screen has five groups (Favorites 1, Favorites 2, etc.). You can add a favorite channel to exit Edit Mode. ▶ English Press ENTERE again to any one of the groups. Select a group using the up and down arrows on the Favorites list, and then press ENTERE. Select OK, press ENTERE, and then press ENTERE again. 6. ▶ 4. Highlight a group on your remote. 5.
NN The Edit Favorites screen has five groups (Favorites 1, Favorites 2, etc.). You can add a favorite channel to exit Edit Mode. ▶ English Press ENTERE again to any one of the groups. Select a group using the up and down arrows on the Favorites list, and then press ENTERE. Select OK, press ENTERE, and then press ENTERE again. 6. ▶ 4. Highlight a group on your remote. 5.
User Manual
Page 18
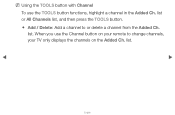
list. ▶ English list. ▶ NN Using the TOOLS button with Channel To use the Channel button on the Added Ch. list or All Channels list, and then press the TOOLS button. ●● Add / Delete: Add a channel to change channels, your TV only displays the channels on your remote to or delete a channel from the Added Ch. When you use the TOOLS button functions, highlight a channel in the Added Ch.
list. ▶ English list. ▶ NN Using the TOOLS button with Channel To use the Channel button on the Added Ch. list or All Channels list, and then press the TOOLS button. ●● Add / Delete: Add a channel to change channels, your TV only displays the channels on your remote to or delete a channel from the Added Ch. When you use the TOOLS button functions, highlight a channel in the Added Ch.
User Manual
Page 22
... steps: 1. NN The TV displays the "F" symbol next to the channel, indicating it is assigned to any one of the groups. Highlight a group on your remote. 4. Select a group using the up and down arrows on the Edit Favorites screen (Favorites 1, Favorites 2, etc.), and then press the ENTERE button. ▶ NN The...
... steps: 1. NN The TV displays the "F" symbol next to the channel, indicating it is assigned to any one of the groups. Highlight a group on your remote. 4. Select a group using the up and down arrows on the Edit Favorites screen (Favorites 1, Favorites 2, etc.), and then press the ENTERE button. ▶ NN The...
User Manual
Page 30
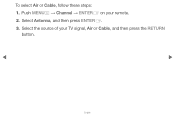
▶ To select Air or Cable, follow these steps: 1. Select the source of your remote. 2. Push MENUm → Channel → ENTERE on your TV signal, Air or Cable, and then press the RETURN button. ▶ English Select Antenna, and then press ENTERE. 3.
▶ To select Air or Cable, follow these steps: 1. Select the source of your remote. 2. Push MENUm → Channel → ENTERE on your TV signal, Air or Cable, and then press the RETURN button. ▶ English Select Antenna, and then press ENTERE. 3.
User Manual
Page 31
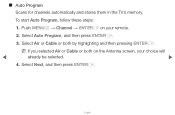
NN If you selected Air or Cable or both by highlighting and then pressing ENTERE. Select Air or Cable or both on your choice will already be selected. ▶ 4. Select Next, and then press ENTERE. ▶ English Select Auto Program, and then press ENTERE. 3. ■■ Auto Program Scans for channels automatically and stores them in the TV's memory. Push MENUm → Channel → ENTERE on the Antenna screen, your remote. 2. To start Auto Program, follow these steps: 1.
NN If you selected Air or Cable or both by highlighting and then pressing ENTERE. Select Air or Cable or both on your choice will already be selected. ▶ 4. Select Next, and then press ENTERE. ▶ English Select Auto Program, and then press ENTERE. 3. ■■ Auto Program Scans for channels automatically and stores them in the TV's memory. Push MENUm → Channel → ENTERE on the Antenna screen, your remote. 2. To start Auto Program, follow these steps: 1.
User Manual
Page 82
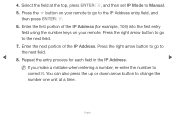
Repeat the entry process for example, 105) into the first entry field using the number keys on your remote. Press the right arrow button to go to the IP Address entry field, and then press ENTERE. 6. 4. Press the right arrow button to go to ... make a mistake when entering a number, re-enter the number to the next field. 8. Select the field at a time. ▶ English Press the d button on your remote to go to the next field. 7. Enter the first portion of the IP Address. You can also press the up or down arrow button to...
Repeat the entry process for example, 105) into the first entry field using the number keys on your remote. Press the right arrow button to go to the IP Address entry field, and then press ENTERE. 6. 4. Press the right arrow button to go to ... make a mistake when entering a number, re-enter the number to the next field. 8. Select the field at a time. ▶ English Press the d button on your remote to go to the next field. 7. Enter the first portion of the IP Address. You can also press the up or down arrow button to...
User Manual
Page 90
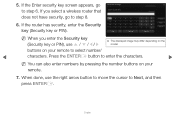
... to enter the characters. ▶ NN You can also enter numbers by pressing the number buttons on your remote to Next, and then press ENTERE. ▶ English When done, use u / d / l / r ●● ...The displayed image may differ depending on your remote. 7. Network Settings Enter security key. 4/6 0 entered a b c d e f 1 2 3 g h i j k l 4 5 6 m n o p q r 7 8 9 s t u v w x y z 0 a/A Delete Space Previous Next Cancel NN When ...
... to enter the characters. ▶ NN You can also enter numbers by pressing the number buttons on your remote to Next, and then press ENTERE. ▶ English When done, use u / d / l / r ●● ...The displayed image may differ depending on your remote. 7. Network Settings Enter security key. 4/6 0 entered a b c d e f 1 2 3 g h i j k l 4 5 6 m n o p q r 7 8 9 s t u v w x y z 0 a/A Delete Space Previous Next Cancel NN When ...


