
User Guide
Page 6
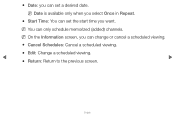
NN On the Information screen, you can set the start time you want. English NN You can set a desired date. ▶ ●● Date: you can change or cancel a scheduled viewing. ●● Cancel Schedules: Cancel a scheduled viewing. ●● Edit: Change a scheduled viewing. ▶ ●● Return: Return to the previous screen. NN Date is available only when you select Once in Repeat. ●● Start Time: You can only schedule memorized (added) channels.
NN On the Information screen, you can set the start time you want. English NN You can set a desired date. ▶ ●● Date: you can change or cancel a scheduled viewing. ●● Cancel Schedules: Cancel a scheduled viewing. ●● Edit: Change a scheduled viewing. ▶ ●● Return: Return to the previous screen. NN Date is available only when you select Once in Repeat. ●● Start Time: You can only schedule memorized (added) channels.

User Guide
Page 7
... Air a Antenna { Program View L CH Mode E Watch k Page ●● The displayed image may differ depending on the Channel List remote control, the Channel List screen is Added Channels 6-1 TV#6 displayed at once. 7 a3 TV#7 Air 23 TV#6 ●● Added Channels: Shows all favorite channels, arranged in up to Favorites.... On the Channel List, you press the Channel button on your remote. OO When you have added favorites using Add to five groups. has a separate screen. NN The TV displays Favorites only if you press the CH LIST button on the model.
... Air a Antenna { Program View L CH Mode E Watch k Page ●● The displayed image may differ depending on the Channel List remote control, the Channel List screen is Added Channels 6-1 TV#6 displayed at once. 7 a3 TV#7 Air 23 TV#6 ●● Added Channels: Shows all favorite channels, arranged in up to Favorites.... On the Channel List, you press the Channel button on your remote. OO When you have added favorites using Add to five groups. has a separate screen. NN The TV displays Favorites only if you press the CH LIST button on the model.
User Guide
Page 11
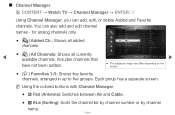
... (Antenna): Switches between Air and Cable. ● } Blue (Sorting): Sorts the channel list by channel number or by channel name. English Each group has a separate screen. ■ Channel Manager O CONTENT → Watch TV → Channel Manager → ENTERE Using Channel Manager, you can also add and edit channel names -
... (Antenna): Switches between Air and Cable. ● } Blue (Sorting): Sorts the channel list by channel number or by channel name. English Each group has a separate screen. ■ Channel Manager O CONTENT → Watch TV → Channel Manager → ENTERE Using Channel Manager, you can also add and edit channel names -
User Guide
Page 12
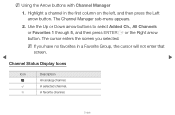
c A selected channel. Highlight a channel in a Favorite Group, the cursor will not enter that screen. ▶ Channel Status Display Icons Icon Description a An analog channel. The Channel Manager sub-menu appears. 2. Use the Up or Down arrow buttons to select ...Added Ch., All Channels or Favorites 1 through 5, and then press ENTERE or the Right arrow button. The cursor enters the screen you have no favorites in the first column on the left, and then press the Left arrow button. F A favorite channel. ▶ English NN If you...
c A selected channel. Highlight a channel in a Favorite Group, the cursor will not enter that screen. ▶ Channel Status Display Icons Icon Description a An analog channel. The Channel Manager sub-menu appears. 2. Use the Up or Down arrow buttons to select ...Added Ch., All Channels or Favorites 1 through 5, and then press ENTERE or the Right arrow button. The cursor enters the screen you have no favorites in the first column on the left, and then press the Left arrow button. F A favorite channel. ▶ English NN If you...
User Guide
Page 14
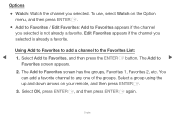
... The Add to any one of the groups. Select OK, press ENTERE, and then press ENTERE again. You can add a favorite channel to Favorites screen has five groups, Favorites 1, Favorites 2, etc. English The Add to Favorites, and then press the ENTERE button. Select a group using the up ...Option menu, and then press ENTERE. ●● Add to Favorites / Edit Favorites: Add to the Favorites List: 1. Select Add to ▶ Favorites screen appears. 2. To use, select Watch on your remote, and then press ENTERE. 3. Using Add to Favorites to add a channel to Favorites appears if the...
... The Add to any one of the groups. Select OK, press ENTERE, and then press ENTERE again. You can add a favorite channel to Favorites screen has five groups, Favorites 1, Favorites 2, etc. English The Add to Favorites, and then press the ENTERE button. Select a group using the up ...Option menu, and then press ENTERE. ●● Add to Favorites / Edit Favorites: Add to the Favorites List: 1. Select Add to ▶ Favorites screen appears. 2. To use, select Watch on your remote, and then press ENTERE. 3. Using Add to Favorites to add a channel to Favorites appears if the...
User Guide
Page 15
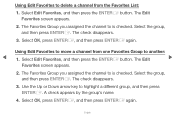
.... ▶ English The check disappears. 3. The Favorites Group you assigned the channel to is checked. Select the group, and then press ENTERE. The Edit Favorites screen appears. 2. Select OK, press ENTERE, and then press ENTERE again. Using Edit Favorites to delete a channel from one Favorites Group to another: 1. The Edit ▶...
.... ▶ English The check disappears. 3. The Favorites Group you assigned the channel to is checked. Select the group, and then press ENTERE. The Edit Favorites screen appears. 2. Select OK, press ENTERE, and then press ENTERE again. Using Edit Favorites to delete a channel from one Favorites Group to another: 1. The Edit ▶...
User Guide
Page 21
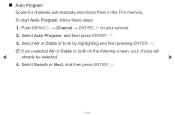
Select Auto Program, and then press ENTERE. 3. Select Air or Cable or both on your choice will already be selected. ▶ 4. Select Search or Next, and then press ENTERE. ▶ English ■■ Auto Program Scans for channels automatically and stores them in the TV's memory. To start Auto Program, follow these steps: 1. NN If you selected Air or Cable or both by highlighting and then pressing ENTERE. Push MENUm → Channel → ENTERE on the Antenna screen, your remote. 2.
Select Auto Program, and then press ENTERE. 3. Select Air or Cable or both on your choice will already be selected. ▶ 4. Select Search or Next, and then press ENTERE. ▶ English ■■ Auto Program Scans for channels automatically and stores them in the TV's memory. To start Auto Program, follow these steps: 1. NN If you selected Air or Cable or both by highlighting and then pressing ENTERE. Push MENUm → Channel → ENTERE on the Antenna screen, your remote. 2.

User Guide
Page 22
Select STD, HRC, or IRC, and then press ENTERE. 7. This process ▶ can take up to 30 minutes. Select Search or Next, and then press ENTERE. ▶ 5. NN If you selected Cable, the Cable System screen appears. When done, the Auto Program menu then reappears. Select Digital, and then press ENTERE. Auto Program starts. English NN After all the available channels are stored, Auto Program removes scrambled channels. If you selected Air only, Auto Program starts. 6. Repeat for Analog. 8.
Select STD, HRC, or IRC, and then press ENTERE. 7. This process ▶ can take up to 30 minutes. Select Search or Next, and then press ENTERE. ▶ 5. NN If you selected Cable, the Cable System screen appears. When done, the Auto Program menu then reappears. Select Digital, and then press ENTERE. Auto Program starts. English NN After all the available channels are stored, Auto Program removes scrambled channels. If you selected Air only, Auto Program starts. 6. Repeat for Analog. 8.
User Guide
Page 28
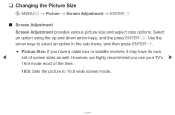
.... ●● Picture Size: If you use your TV's ▶ 16:9 mode most of screen sizes as well. English ▶ ❑❑ Changing the Picture Size OO MENUm → Picture → Screen Adjustment → ENTERE ■■ Screen Adjustment Screen Adjustment provides various picture size and aspect ratio options. Select an option using the...
.... ●● Picture Size: If you use your TV's ▶ 16:9 mode most of screen sizes as well. English ▶ ❑❑ Changing the Picture Size OO MENUm → Picture → Screen Adjustment → ENTERE ■■ Screen Adjustment Screen Adjustment provides various picture size and aspect ratio options. Select an option using the...
User Guide
Page 29
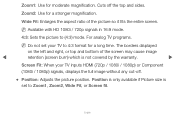
.... NN Do not set to Zoom1, Zoom2, Wide Fit, or Screen fit. ▶ English Zoom2: Use for moderate magnification. The borders displayed on the left and right, or top and bottom of the picture so it fits the entire screen. Zoom1: Use for a stronger magnification. Wide Fit: Enlarges the ...aspect ratio of the screen may cause image retention (screen burn) which is set your TV inputs HDMI (720p / 1080i / 1080p) or Component (1080i /...
.... NN Do not set to Zoom1, Zoom2, Wide Fit, or Screen fit. ▶ English Zoom2: Use for moderate magnification. The borders displayed on the left and right, or top and bottom of the picture so it fits the entire screen. Zoom1: Use for a stronger magnification. Wide Fit: Enlarges the ...aspect ratio of the screen may cause image retention (screen burn) which is set your TV inputs HDMI (720p / 1080i / 1080p) or Component (1080i /...

User Guide
Page 30
Press the ENTERE button. 5. Select Close by pressing the d and r buttons sequentially. To reset the picture position, press Reset. ▶ NN If you want to reset the pictures to its original position, select Reset in the Position screen, and then press ENTERE. NN To use the Position function after selecting Zoom1, Zoom2 or Wide Fit, follow these steps: 1. The picture will be reset to its default position. ▶ English Press the u or d button to select Position. 2. Press the ENTERE button. 3. Press the d button to move the picture up or down. 4.
Press the ENTERE button. 5. Select Close by pressing the d and r buttons sequentially. To reset the picture position, press Reset. ▶ NN If you want to reset the pictures to its original position, select Reset in the Position screen, and then press ENTERE. NN To use the Position function after selecting Zoom1, Zoom2 or Wide Fit, follow these steps: 1. The picture will be reset to its default position. ▶ English Press the u or d button to select Position. 2. Press the ENTERE button. 3. Press the d button to move the picture up or down. 4.

User Guide
Page 31
Press the ENTERE button. 5. Press the d button to move the picture. 4. Press the ENTERE button. 3. NN If you want to reset the pictures to its default position. ▶ English The picture will be set to an HDMI (1080i/1080p) or Component (1080i/1080p) source, follow these steps: 1. Press the u, d, l or r button to select Position. 2. Select Close by pressing the d and r buttons sequentially. NN To use the Position function after selecting Screen Fit when connected to its original position, select Reset in the ▶ Position screen.
Press the ENTERE button. 5. Press the d button to move the picture. 4. Press the ENTERE button. 3. NN If you want to reset the pictures to its default position. ▶ English The picture will be set to an HDMI (1080i/1080p) or Component (1080i/1080p) source, follow these steps: 1. Press the u, d, l or r button to select Position. 2. Select Close by pressing the d and r buttons sequentially. NN To use the Position function after selecting Screen Fit when connected to its original position, select Reset in the ▶ Position screen.
User Guide
Page 32
●● HD (High Definition): 16:9 - 1080i / 1080p (1920x1080), 720p (1280x720) ●● You can adjust and store settings for each external device you have connected to an input on the TV. ●● Picture Sizes available by Input Source: Input Source ATV, AV, Component (480i, 480p) DTV(1080i), Component (1080i, 1080p), HDMI (720p, 1080i, 1080p) PC Picture Size 16:9, Zoom1, Zoom2, 4:3 16:9, 4:3, Wide Fit, Screen Fit 16:9, 4:3 ▶ ▶ English
●● HD (High Definition): 16:9 - 1080i / 1080p (1920x1080), 720p (1280x720) ●● You can adjust and store settings for each external device you have connected to an input on the TV. ●● Picture Sizes available by Input Source: Input Source ATV, AV, Component (480i, 480p) DTV(1080i), Component (1080i, 1080p), HDMI (720p, 1080i, 1080p) PC Picture Size 16:9, Zoom1, Zoom2, 4:3 16:9, 4:3, Wide Fit, Screen Fit 16:9, 4:3 ▶ ▶ English

User Guide
Page 34
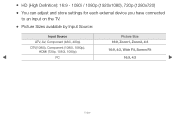
▶ ●● Black Tone (Off / Dark / Darker / Darkest): Select the black level to adjust the screen depth. ●● Dynamic Contrast (Off / Low / Medium / High): Adjusts the screen contrast. ●● Gamma: Adjusts the primary color intensity. ●● RGB Only Mode (Off / Red / Green / Blue): Displays the Red, Green and Blue color for making fine adjustments to hue and saturation. ▶ English
▶ ●● Black Tone (Off / Dark / Darker / Darkest): Select the black level to adjust the screen depth. ●● Dynamic Contrast (Off / Low / Medium / High): Adjusts the screen contrast. ●● Gamma: Adjusts the primary color intensity. ●● RGB Only Mode (Off / Red / Green / Blue): Displays the Red, Green and Blue color for making fine adjustments to hue and saturation. ▶ English
User Guide
Page 35
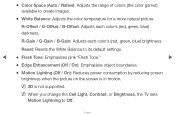
... Tone." ▶ ●● Edge Enhancement (Off / On): Emphasizes object boundaries. ●● Motion Lighting (Off / On): Reduces power consumption by reducing screen brightness when the picture on the screen is not supported. ●● Color Space (Auto / Native): Adjusts the range of colors (the color gamut) available to Off. ▶ English...
... Tone." ▶ ●● Edge Enhancement (Off / On): Emphasizes object boundaries. ●● Motion Lighting (Off / On): Reduces power consumption by reducing screen brightness when the picture on the screen is not supported. ●● Color Space (Auto / Native): Adjusts the range of colors (the color gamut) available to Off. ▶ English...
User Guide
Page 37
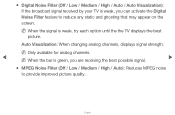
.... ▶ ●● MPEG Noise Filter (Off / Low / Medium / High / Auto): Reduces MPEG noise to reduce any static and ghosting that may appear on the screen. NN When the bar is green, you can activate the Digital Noise Filter feature to provide improved picture quality. ▶ English
.... ▶ ●● MPEG Noise Filter (Off / Low / Medium / High / Auto): Reduces MPEG noise to reduce any static and ghosting that may appear on the screen. NN When the bar is green, you can activate the Digital Noise Filter feature to provide improved picture quality. ▶ English
User Guide
Page 38
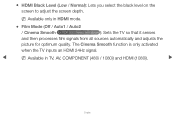
The Cinema Smooth function is only activated when the TV inputs an HDMI 24Hz signal. NN Available in HDMI mode. ●● Film Mode (Off / Auto1 / Auto2 / Cinema Smooth for PDP 550 Series and above ): Sets the TV so that it senses and then processes film signals from all sources automatically and adjusts the picture for optimum quality. NN Available only in TV, AV, COMPONENT (480i / 1080i) and HDMI (1080i). ▶ ▶ English ●● HDMI Black Level (Low / Normal): Lets you select the black level on the screen to adjust the screen depth.
The Cinema Smooth function is only activated when the TV inputs an HDMI 24Hz signal. NN Available in HDMI mode. ●● Film Mode (Off / Auto1 / Auto2 / Cinema Smooth for PDP 550 Series and above ): Sets the TV so that it senses and then processes film signals from all sources automatically and adjusts the picture for optimum quality. NN Available only in TV, AV, COMPONENT (480i / 1080i) and HDMI (1080i). ▶ ▶ English ●● HDMI Black Level (Low / Normal): Lets you select the black level on the screen to adjust the screen depth.

User Guide
Page 41
... been reduced, re-adjust the picture so that it is aligned to adjust the vertical position. English ▶ ■■ PC Screen Adjustment OO MENUm → Picture → Screen Adjustment → PC Screen Adjustment → ENTERE NN Available in PC mode only. ●● Coarse / Fine: Removes or reduces picture noise. Press the...
... been reduced, re-adjust the picture so that it is aligned to adjust the vertical position. English ▶ ■■ PC Screen Adjustment OO MENUm → Picture → Screen Adjustment → PC Screen Adjustment → ENTERE NN Available in PC mode only. ●● Coarse / Fine: Removes or reduces picture noise. Press the...

User Guide
Page 56
... DHCP also let you use ADSL modems that support DHCP automatically provide the IP address, subnet mask, gateway, and DNS values your TV's Cable Setup Screen when you set up the network connection.
... DHCP also let you use ADSL modems that support DHCP automatically provide the IP address, subnet mask, gateway, and DNS values your TV's Cable Setup Screen when you set up the network connection.
User Guide
Page 58
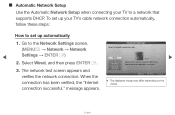
Select Wired, and then press ENTERE. 3. To set up your TV to a network that the LAN cable is connected. The network test screen appears and verifies the network connection. U Move E Enter R Return ▶ ●● The displayed image may differ depending on the model. ▶ English ...make sure that supports DHCP. Network Settings Select a network connection type. Wired Wireless(General) WPS(PBC) One Foot Connection Connect to the Network Settings screen. (MENUm → Network → Network Settings → ENTERE) 2. Go to the network using LAN cable.
Select Wired, and then press ENTERE. 3. To set up your TV to a network that the LAN cable is connected. The network test screen appears and verifies the network connection. U Move E Enter R Return ▶ ●● The displayed image may differ depending on the model. ▶ English ...make sure that supports DHCP. Network Settings Select a network connection type. Wired Wireless(General) WPS(PBC) One Foot Connection Connect to the Network Settings screen. (MENUm → Network → Network Settings → ENTERE) 2. Go to the network using LAN cable.


