
User Manual
Page 2
... standard format television video and programming, should be in the wide screen 16:9 ratio format, or expanded to fill the screen if your Samsung limited warranty. • SAMSUNG ELECTRONICS NORTH AMERICAN LIMITED WARRANTY STATEMENT Subject to view different formats as...bright or dark pixels on warranty terms. Wide screen format PDP Displays (with Samsung Electronics (SAMSUNG) products, and the requirements, conditions, exclusions and limitations contained herein, SAMSUNG will have a similar effect. In the United States : 1-800-SAMSUNG (1-800-726-7864) - Watching the Plasma...
... standard format television video and programming, should be in the wide screen 16:9 ratio format, or expanded to fill the screen if your Samsung limited warranty. • SAMSUNG ELECTRONICS NORTH AMERICAN LIMITED WARRANTY STATEMENT Subject to view different formats as...bright or dark pixels on warranty terms. Wide screen format PDP Displays (with Samsung Electronics (SAMSUNG) products, and the requirements, conditions, exclusions and limitations contained herein, SAMSUNG will have a similar effect. In the United States : 1-800-SAMSUNG (1-800-726-7864) - Watching the Plasma...

User Manual
Page 4
...input sources. Failing to the product falling. Adjusts the volume. buttons as you use the Changes the channels. If you would use parts provided by Samsung Electronics only. Toggles between the TV, the wall, and other objects to decrease power consumption, do so may result in a fire or a... the power cord. Viewing the Control Panel ✎ The product color and shape may vary depending on the TV. In the on screen display), which contains controls for long periods of electric power. Some parts can be safe and to ensure proper ventilation. Displays an on...
...input sources. Failing to the product falling. Adjusts the volume. buttons as you use the Changes the channels. If you would use parts provided by Samsung Electronics only. Toggles between the TV, the wall, and other objects to decrease power consumption, do so may result in a fire or a... the power cord. Viewing the Control Panel ✎ The product color and shape may vary depending on the TV. In the on screen display), which contains controls for long periods of electric power. Some parts can be safe and to ensure proper ventilation. Displays an on...

User Manual
Page 5
... (1EA) Guide Stand (1EA) Screws (8EA) ✎ Place a soft cloth over the table to protect the TV, and then place the TV on the cloth screen side down , it up when you fasten the screws. If you fasten the screws with the TV lying down . ✎ Insert the Stand Guide into...
... (1EA) Guide Stand (1EA) Screws (8EA) ✎ Place a soft cloth over the table to protect the TV, and then place the TV on the cloth screen side down , it up when you fasten the screws. If you fasten the screws with the TV lying down . ✎ Insert the Stand Guide into...

User Manual
Page 7
.... Displays My Contents, Watch TV and Source. Quickly select frequently used functions. Selects the on-screen menu items and changes the values seen on the screen. Cuts off . Changes channels. Turns the 3D image on the TV screen. Displays information on or off the sound temporarily. E-MANUAL: Displays the e-Manual. P.SIZE: Lets you...
.... Displays My Contents, Watch TV and Source. Quickly select frequently used functions. Selects the on-screen menu items and changes the values seen on the screen. Cuts off . Changes channels. Turns the 3D image on the TV screen. Displays information on or off the sound temporarily. E-MANUAL: Displays the e-Manual. P.SIZE: Lets you...

User Manual
Page 8
... option with the or button. Select the desired submenu with the or button. Confirm the setting. EXIT button: Exits the on the screen: Picture, Sound, Channel, System, Support. Press ENTER to navigate the menu and select and adjust different functions. Press ENTER to malfunction. Maximum ...antenna or cable connection ✎ The PDP device may interfere with the or button. How to Operate the OSD (On Screen Display) The access steps may differ depending on -screen menu. RETURN button: Returns to use cables no thicker than 0.55 inches (14mm). Press EXIT. ✎ For ...
... option with the or button. Select the desired submenu with the or button. Confirm the setting. EXIT button: Exits the on the screen: Picture, Sound, Channel, System, Support. Press ENTER to navigate the menu and select and adjust different functions. Press ENTER to malfunction. Maximum ...antenna or cable connection ✎ The PDP device may interfere with the or button. How to Operate the OSD (On Screen Display) The access steps may differ depending on -screen menu. RETURN button: Returns to use cables no thicker than 0.55 inches (14mm). Press EXIT. ✎ For ...

User Manual
Page 9
...8). 1 Selecting the OSD Language 2 Selecting the usage mode Press the or button to the Date and Time screen. When you 'll go to select Auto or Manual, and then press ENTER twice. ✎ If you ... Manual, you 'll go to 30 minutes. You can take up to the Time Zone and DST screen. Most cable systems use the or button to Home Use when not in configuring basic settings... . 4 Selecting search Press the or button to select the correct cable signal format - On the Time Zone screen, use STD. MENU System Plug & Play ENTER ✎ NOTE To change the TV's setting from Store Demo...
...8). 1 Selecting the OSD Language 2 Selecting the usage mode Press the or button to the Date and Time screen. When you 'll go to select Auto or Manual, and then press ENTER twice. ✎ If you ... Manual, you 'll go to 30 minutes. You can take up to the Time Zone and DST screen. Most cable systems use the or button to Home Use when not in configuring basic settings... . 4 Selecting search Press the or button to select the correct cable signal format - On the Time Zone screen, use STD. MENU System Plug & Play ENTER ✎ NOTE To change the TV's setting from Store Demo...

User Manual
Page 13
The e-Manual displays the page you want to see. Screen Display TV Screen: Displays the program, movie, video, etc. Press or button to select the category you want . Exit: Exit the e-Manual. Select a mode using the up and ... room. • Entertain (In PC mode only): Suitable for your TV's features in the e-Manual in some menus. Operation Buttons: Blue (Index): Displays the Index screen. Use the arrow buttons on your remote. Enter: Select a category or sub-menu. Changing the Preset Picture Mode MENU Picture Picture Mode ENTER Picture Mode...
The e-Manual displays the page you want to see. Screen Display TV Screen: Displays the program, movie, video, etc. Press or button to select the category you want . Exit: Exit the e-Manual. Select a mode using the up and ... room. • Entertain (In PC mode only): Suitable for your TV's features in the e-Manual in some menus. Operation Buttons: Blue (Index): Displays the Index screen. Use the arrow buttons on your remote. Enter: Select a category or sub-menu. Changing the Preset Picture Mode MENU Picture Picture Mode ENTER Picture Mode...

User Manual
Page 14
... for a topic, press the left or right arrow button to normal size, press the RETURN button. Yellow (Zoom): Magnifies a screen. Changing the Preset Picture Mode MENU Picture Picture Mode ENTER Picture Mode Picture modes apply preset adjustments to the picture. Viewing the Contents Changing the... Mode ENTER Picture Mode Picture modes apply preset adjustments to the picture. Select a mode using the or buttons. ✎ To return to the screen to select a letter, and then press ENTER . In PC mode, you are viewing an e-Manual instruction page, press the yellow button to ...
... for a topic, press the left or right arrow button to normal size, press the RETURN button. Yellow (Zoom): Magnifies a screen. Changing the Preset Picture Mode MENU Picture Picture Mode ENTER Picture Mode Picture modes apply preset adjustments to the picture. Viewing the Contents Changing the... Mode ENTER Picture Mode Picture modes apply preset adjustments to the picture. Select a mode using the or buttons. ✎ To return to the screen to select a letter, and then press ENTER . In PC mode, you are viewing an e-Manual instruction page, press the yellow button to ...
User Manual
Page 17
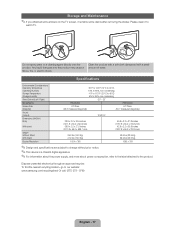
... of water. Specifications Environmental Considerations Operating Temperature Operating Humidity Storage Temperature Storage Humidity Stand Swivel (Left / Right) Model Name Screen Size (Diagonal) Sound (Output) Dimensions (WxDxH) Body With stand Weight Without Stand With Stand Display Resolution 50°F to 104&#...apparatus. ✎ For information about the power supply, and more about power consumption, refer to the label attached to our website: www.samsung.com/recyclingdirect Or call, (877) 278 - 0799 To find the nearest recycling location, go to the product. Do not ...
... of water. Specifications Environmental Considerations Operating Temperature Operating Humidity Storage Temperature Storage Humidity Stand Swivel (Left / Right) Model Name Screen Size (Diagonal) Sound (Output) Dimensions (WxDxH) Body With stand Weight Without Stand With Stand Display Resolution 50°F to 104&#...apparatus. ✎ For information about the power supply, and more about power consumption, refer to the label attached to our website: www.samsung.com/recyclingdirect Or call, (877) 278 - 0799 To find the nearest recycling location, go to the product. Do not ...

User Manual
Page 27
NN You can set the start time you can change or cancel a scheduled viewing. ●● Cancel Schedules: Cancel a scheduled viewing. ●● Edit: Change a scheduled viewing. ◀ ▶ ●● Return: Return to the previous screen. English NN Date is available only when you select Once in Repeat. ●● Start Time: You can set a desired date. NN On the Information screen, you want. ●● Date: you can only schedule memorized (added) channels.
NN You can set the start time you can change or cancel a scheduled viewing. ●● Cancel Schedules: Cancel a scheduled viewing. ●● Edit: Change a scheduled viewing. ◀ ▶ ●● Return: Return to the previous screen. English NN Date is available only when you select Once in Repeat. ●● Start Time: You can set a desired date. NN On the Information screen, you want. ●● Date: you can only schedule memorized (added) channels.

User Manual
Page 28
On the Channel List, you press the Channel button on your remote. has a separate screen. NN The TV displays Favorites only if you press the CH LIST button on the model. a 11 Air ▶ ●● Favorites 1-5: Shows all added ... Air a Antenna { Program View L CH Mode E Watch k Page ●● The displayed image may differ depending on the Channel List remote control, the Channel List screen is Added Channels 6-1 TV#6 displayed at once. 7 a3 TV#7 Air 23 TV#6 ●● Added Channels: Shows all favorite channels, arranged in up to Favorites...
On the Channel List, you press the Channel button on your remote. has a separate screen. NN The TV displays Favorites only if you press the CH LIST button on the model. a 11 Air ▶ ●● Favorites 1-5: Shows all added ... Air a Antenna { Program View L CH Mode E Watch k Page ●● The displayed image may differ depending on the Channel List remote control, the Channel List screen is Added Channels 6-1 TV#6 displayed at once. 7 a3 TV#7 Air 23 TV#6 ●● Added Channels: Shows all favorite channels, arranged in up to Favorites...

User Manual
Page 32
... O CONTENT → Watch TV → Channel Manager → ENTERE Using Channel Manager, you can also add and edit channel names - English Each group has a separate screen. N Using the colored buttons with Channel Manager. ● a Red (Antenna): Switches between Air and Cable. ● } Blue (Sorting): Sorts the channel list by channel number...
... O CONTENT → Watch TV → Channel Manager → ENTERE Using Channel Manager, you can also add and edit channel names - English Each group has a separate screen. N Using the colored buttons with Channel Manager. ● a Red (Antenna): Switches between Air and Cable. ● } Blue (Sorting): Sorts the channel list by channel number...

User Manual
Page 33
c A selected channel. The cursor enters the screen you have no favorites in the first column on the left, and then press the Left arrow button. NN If you selected. The Channel Manager ...., All Channels or Favorites 1 through 5, and then press ENTERE or the Right arrow button. Highlight a channel in a Favorite Group, the cursor will not enter that screen. ◀ ▶ Channel Status Display Icons Icon Description a An analog channel.
c A selected channel. The cursor enters the screen you have no favorites in the first column on the left, and then press the Left arrow button. NN If you selected. The Channel Manager ...., All Channels or Favorites 1 through 5, and then press ENTERE or the Right arrow button. Highlight a channel in a Favorite Group, the cursor will not enter that screen. ◀ ▶ Channel Status Display Icons Icon Description a An analog channel.

User Manual
Page 35
... using the up and down arrows on the Option menu, and then press ENTERE. ●● Add to Favorites / Edit Favorites: Add to ▶ Favorites screen appears. 2. Edit Favorites appears if the channel you selected. Options ●● Watch: Watch the channel you selected is not already a favorite. The Add to...
... using the up and down arrows on the Option menu, and then press ENTERE. ●● Add to Favorites / Edit Favorites: Add to ▶ Favorites screen appears. 2. Edit Favorites appears if the channel you selected. Options ●● Watch: Watch the channel you selected is not already a favorite. The Add to...

User Manual
Page 36
...one Favorites Group to another: ◀ 1. The check disappears. 3. Select the group, and then press ENTERE. The Edit ▶ Favorites screen appears. 2. Use the Up or Down arrow key to is checked. The Favorites Group you assigned the channel to highlight a different group, and... then press ENTERE. The Edit Favorites screen appears. 2. Select the group, and then press ENTERE. The check disappears. 3. Select OK, press ENTERE, and then press ENTERE again...
...one Favorites Group to another: ◀ 1. The check disappears. 3. Select the group, and then press ENTERE. The Edit ▶ Favorites screen appears. 2. Use the Up or Down arrow key to is checked. The Favorites Group you assigned the channel to highlight a different group, and... then press ENTERE. The Edit Favorites screen appears. 2. Select the group, and then press ENTERE. The check disappears. 3. Select OK, press ENTERE, and then press ENTERE again...

User Manual
Page 42
Select Auto Program, and then press ENTERE. 3. English ■■ Auto Program Scans for channels automatically and stores them in the TV's memory. Select Air or Cable or both on your choice will ◀ already be selected. ▶ 4. Select Search or Next, and then press ENTERE. NN If you selected Air or Cable or both by highlighting and then pressing ENTERE. To start Auto Program, follow these steps: 1. Push MENUm → Channel → ENTERE on the Antenna screen, your remote. 2.
Select Auto Program, and then press ENTERE. 3. English ■■ Auto Program Scans for channels automatically and stores them in the TV's memory. Select Air or Cable or both on your choice will ◀ already be selected. ▶ 4. Select Search or Next, and then press ENTERE. NN If you selected Air or Cable or both by highlighting and then pressing ENTERE. To start Auto Program, follow these steps: 1. Push MENUm → Channel → ENTERE on the Antenna screen, your remote. 2.

User Manual
Page 43
NN If you selected Cable, the Cable System screen appears. Repeat for Analog. 8. NN After all the available channels are stored, Auto Program removes scrambled ◀ channels. Select STD, HRC, or IRC, and then press ENTERE. 7. Select Search or Next, and then press ENTERE. When done, the Auto Program menu then reappears. Select Digital, and then press ENTERE. If you selected Air only, Auto Program starts. 6. This process ▶ can take up to 30 minutes. English Auto Program starts. 5.
NN If you selected Cable, the Cable System screen appears. Repeat for Analog. 8. NN After all the available channels are stored, Auto Program removes scrambled ◀ channels. Select STD, HRC, or IRC, and then press ENTERE. 7. Select Search or Next, and then press ENTERE. When done, the Auto Program menu then reappears. Select Digital, and then press ENTERE. If you selected Air only, Auto Program starts. 6. This process ▶ can take up to 30 minutes. English Auto Program starts. 5.

User Manual
Page 49
Select an option using the up and down arrow keys, and the press ENTERE. English Use the arrow keys to 16:9 wide screen mode. However, we highly recommend you use your TV's ▶ 16:9 mode most of the time. 16:9: Sets the picture to select ...9679; Picture Size: If you have a cable box or satellite receiver, it may have its own ◀ set of screen sizes as well. ❑❑ Changing the Picture Size OO MENUm → Picture → Screen Adjustment → ENTERE ■■ Screen Adjustment Screen Adjustment provides various picture size and aspect ratio options.
Select an option using the up and down arrow keys, and the press ENTERE. English Use the arrow keys to 16:9 wide screen mode. However, we highly recommend you use your TV's ▶ 16:9 mode most of the time. 16:9: Sets the picture to select ...9679; Picture Size: If you have a cable box or satellite receiver, it may have its own ◀ set of screen sizes as well. ❑❑ Changing the Picture Size OO MENUm → Picture → Screen Adjustment → ENTERE ■■ Screen Adjustment Screen Adjustment provides various picture size and aspect ratio options.

User Manual
Page 50
... / 720p signals in 16:9 mode. 4:3: Sets the picture to Zoom1, Zoom2, Wide Fit, or Screen fit. Position is only available if Picture size is not covered by the warranty. ▶ Screen Fit: When your TV to 4:3 format for a long time. For analog TV programs. NN Do ...Use for a stronger magnification. Cuts off . ●● Position: Adjusts the picture position. Wide Fit: Enlarges the aspect ratio of the screen may cause image ◀ retention (screen burn) which is set your TV inputs HDMI (720p / 1080i / 1080p) or Component (1080i / 1080p) signals, displays the full image...
... / 720p signals in 16:9 mode. 4:3: Sets the picture to Zoom1, Zoom2, Wide Fit, or Screen fit. Position is only available if Picture size is not covered by the warranty. ▶ Screen Fit: When your TV to 4:3 format for a long time. For analog TV programs. NN Do ...Use for a stronger magnification. Cuts off . ●● Position: Adjusts the picture position. Wide Fit: Enlarges the aspect ratio of the screen may cause image ◀ retention (screen burn) which is set your TV inputs HDMI (720p / 1080i / 1080p) or Component (1080i / 1080p) signals, displays the full image...

User Manual
Page 51
Press the ENTERE button. 5. Select Close by pressing the d and r buttons sequentially. Press the u or d button to its original position, select Reset in the Position screen, and then press ENTERE. The picture will be reset to move the picture up or down. 4. English NN To use the Position function after selecting Zoom1, Zoom2 or Wide Fit, follow these steps: 1. Press the ENTERE button. 3. To reset the picture ◀ position, press Reset. ▶ NN If you want to reset the pictures to select Position. 2. Press the d button to its default position.
Press the ENTERE button. 5. Select Close by pressing the d and r buttons sequentially. Press the u or d button to its original position, select Reset in the Position screen, and then press ENTERE. The picture will be reset to move the picture up or down. 4. English NN To use the Position function after selecting Zoom1, Zoom2 or Wide Fit, follow these steps: 1. Press the ENTERE button. 3. To reset the picture ◀ position, press Reset. ▶ NN If you want to reset the pictures to select Position. 2. Press the d button to its default position.


