Quick Setup Guide
Page 1
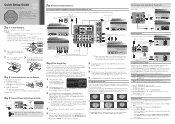
... you press the P.SIZE button, you have , contact your cable company. ✎✎ If your area. Plug & Play Select Language of the Stand and Guide Stand when assembling them. then press the ENTERE button on your remote. ✎✎ Most cable systems are Standard(STD) systems, If you are not... your TV, press the POWER button on the remote or on the TV. Read this guide. STOP Please do not return this product, visit: www.samsung.com/ register. xx Make sure that at position 2. 2 Rear 1 Step 2: Install the Batteries into the Remote To install batteries into your cable or...
... you press the P.SIZE button, you have , contact your cable company. ✎✎ If your area. Plug & Play Select Language of the Stand and Guide Stand when assembling them. then press the ENTERE button on your remote. ✎✎ Most cable systems are Standard(STD) systems, If you are not... your TV, press the POWER button on the remote or on the TV. Read this guide. STOP Please do not return this product, visit: www.samsung.com/ register. xx Make sure that at position 2. 2 Rear 1 Step 2: Install the Batteries into the Remote To install batteries into your cable or...

User Manual
Page 3
... yy Dimensions 54 yy Index 55 Check the Symbol! Note Indicates additional information. Contents Getting Started yy List of Features 4 yy Accessories 4 yy Install the Stand 5 yy Viewing the Control Panel 6 yy Viewing the Remote Control 7 yy Connecting to an Antenna 9 yy Plug & Play (Initial Setup 9 Connections yy Connecting to an...
... yy Dimensions 54 yy Index 55 Check the Symbol! Note Indicates additional information. Contents Getting Started yy List of Features 4 yy Accessories 4 yy Install the Stand 5 yy Viewing the Control Panel 6 yy Viewing the Remote Control 7 yy Connecting to an Antenna 9 yy Plug & Play (Initial Setup 9 Connections yy Connecting to an...
User Manual
Page 5
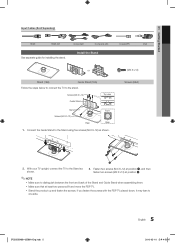
...; 4:50:47 xx Make sure that at position 2. ✎✎NOTE xx Make sure to distinguish between the front and back of the Stand and Guide Stand when assembling them. 01 Getting Started Input Cables (Sold Separately) HDMI HDMI-DVI Component Composite (AV) Coaxial (RF) VGA See separate guide... you fasten the screws with the PDP TV placed down, it may lean to the Stand as shown. (M4 X L12) Screws (9EA) 2 1 2. Screws (M4 X L12) Guide Stand Top view Stand Screws (M4 X L12) Rear Front Rear 1. Fasten two screws (M4 X L12) at position 1, and then fasten two screws (M4 X L12...
...; 4:50:47 xx Make sure that at position 2. ✎✎NOTE xx Make sure to distinguish between the front and back of the Stand and Guide Stand when assembling them. 01 Getting Started Input Cables (Sold Separately) HDMI HDMI-DVI Component Composite (AV) Coaxial (RF) VGA See separate guide... you fasten the screws with the PDP TV placed down, it may lean to the Stand as shown. (M4 X L12) Screws (9EA) 2 1 2. Screws (M4 X L12) Guide Stand Top view Stand Screws (M4 X L12) Rear Front Rear 1. Fasten two screws (M4 X L12) at position 1, and then fasten two screws (M4 X L12...
User Manual
Page 47
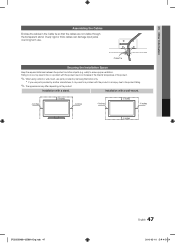
... Cable Tie Securing the Installation Space Keep the required distances between the product and other objects (e.g. xx If you use parts provided by Samsung Electronics only. walls) to the product falling. ✎✎ The appearance may differ depending on the product. Failing to do so ... in fire or a problem with the product due to an increase in the Cable tie so that the cables are not visible through the transparent stand. Installation with a wall-mount. 4 inches 4 inches 4 inches 4 inches 4 inches 4 inches 4 inches [PC550]BN68-02580A-Eng.indb 47 47 English 2010...
... Cable Tie Securing the Installation Space Keep the required distances between the product and other objects (e.g. xx If you use parts provided by Samsung Electronics only. walls) to the product falling. ✎✎ The appearance may differ depending on the product. Failing to do so ... in fire or a problem with the product due to an increase in the Cable tie so that the cables are not visible through the transparent stand. Installation with a wall-mount. 4 inches 4 inches 4 inches 4 inches 4 inches 4 inches 4 inches [PC550]BN68-02580A-Eng.indb 47 47 English 2010...
User Manual
Page 51
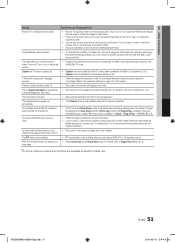
... adjust the external device's output resolution accordingly. 05 Other Information Issues Solutions and Explanations Plasma TV is tilted to the side. • Remove the base stand from the TV and reassemble it will dissipate over time. You see small particles when you to set the brightness on or off . • If...). There is a plastic smell from Store Demo mode to the Cable/Set user manual for long term use. Your settings are flexible enough for the SAMSUNG TV code.
... adjust the external device's output resolution accordingly. 05 Other Information Issues Solutions and Explanations Plasma TV is tilted to the side. • Remove the base stand from the TV and reassemble it will dissipate over time. You see small particles when you to set the brightness on or off . • If...). There is a plastic smell from Store Demo mode to the Cable/Set user manual for long term use. Your settings are flexible enough for the SAMSUNG TV code.
User Manual
Page 52
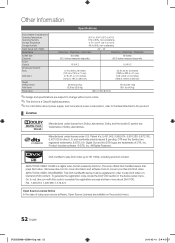
... Specifications Environmental Considerations Operating Temperature Operating Humidity Storage Temperature Storage Humidity Stand Swivel (Left / Right) Model Name Screen Size (Diagonal) Sound (Output) Dimensions (WxDxH) Body With stand Weight Without Stand With Stand Panel native 50°F to 104°F (10°C ...to 40°C) 10% to 80%, non-condensing -4°F to 113°F (-20°C to 45°C) 5% to 95%, non-condensing -20˚ ~ 20˚ PN50C540 / PN50C550 / PN50C590 PN58C540...
... Specifications Environmental Considerations Operating Temperature Operating Humidity Storage Temperature Storage Humidity Stand Swivel (Left / Right) Model Name Screen Size (Diagonal) Sound (Output) Dimensions (WxDxH) Body With stand Weight Without Stand With Stand Panel native 50°F to 104°F (10°C ...to 40°C) 10% to 80%, non-condensing -4°F to 113°F (-20°C to 45°C) 5% to 95%, non-condensing -20˚ ~ 20˚ PN50C540 / PN50C550 / PN50C590 PN58C540...

