
User Manual Ver.1.0 (English)
Page 7
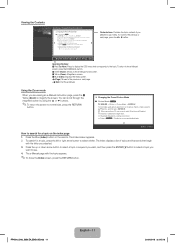
English On the Channel List screen, you press the channel button on your TV displays (Added channels) when you can also view channel information, Added Ch., and Favorites 1-5. ❑❑ Using the Channel menu ■■ Channel List OO MENU → Broadcasting → Channel List → ENTERE The Channel List contains the channels your remote. Press the ►(Mode) button to change the channel mode. ◀ NN When you press the CH LIST button, the Channel List screen is displayed at ▶ once.
English On the Channel List screen, you press the channel button on your TV displays (Added channels) when you can also view channel information, Added Ch., and Favorites 1-5. ❑❑ Using the Channel menu ■■ Channel List OO MENU → Broadcasting → Channel List → ENTERE The Channel List contains the channels your remote. Press the ►(Mode) button to change the channel mode. ◀ NN When you press the CH LIST button, the Channel List screen is displayed at ▶ once.
User Manual Ver.1.0 (English)
Page 80
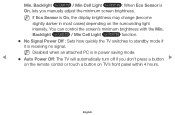
...; No Signal Power Off : Sets how quickly the TV switches to standby mode if it is On, lets you don't press a button ▶ on the remote control or touch a button on the surrounding light intensity. English Min. Backlight for LED TV / Min Cell Light for PDP TV : When Eco Sensor is...
...; No Signal Power Off : Sets how quickly the TV switches to standby mode if it is On, lets you don't press a button ▶ on the remote control or touch a button on the surrounding light intensity. English Min. Backlight for LED TV / Min Cell Light for PDP TV : When Eco Sensor is...

User Manual Ver.1.0 (English)
Page 85
English NN Press any key on the remote control to remove after-images on the screen effectively. If the after-image is not removed after you apply this feature. ◀ ●● Side ...
English NN Press any key on the remote control to remove after-images on the screen effectively. If the after-image is not removed after you apply this feature. ◀ ●● Side ...

User Manual Ver.1.0 (English)
Page 86
... "0-0-0-0" : MUTE → 8 → 2 → 4 → POWER (on) English Re-enter the same 4 digits in Standby mode. NN Whenever you forget the PIN code, press the remote control buttons in the following sequence in Confirm New PIN. Enter the current or default PIN. ▶ NN The default PIN number for your new...
... "0-0-0-0" : MUTE → 8 → 2 → 4 → POWER (on) English Re-enter the same 4 digits in Standby mode. NN Whenever you forget the PIN code, press the remote control buttons in the following sequence in Confirm New PIN. Enter the current or default PIN. ▶ NN The default PIN number for your new...
User Manual Ver.1.0 (English)
Page 98
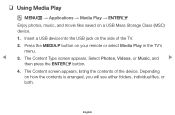
... (MSC) device. 1. ❑❑ Using Media Play OO MENUm → Applications → Media Play → ENTERE Enjoy photos, music, and movie files saved on your remote or select Media Play in the TV's menu. ◀ 3.
... (MSC) device. 1. ❑❑ Using Media Play OO MENUm → Applications → Media Play → ENTERE Enjoy photos, music, and movie files saved on your remote or select Media Play in the TV's menu. ◀ 3.

User Manual Ver.1.0 (English)
Page 99
Select a file to select a folder, and then press the ENTERE button. 5. Press the RETURN button to exit a current screen and go to the previous screen. If necessary, use the buttons to view or play, and then press the ENTERE or ∂ button on your remote. 6. To disconnect the USB device, go to "Disconnecting a USB Device" in the e-Manual. 7. Press the EXIT button to exit to "Playing selected files" and "Controlling Photo / Video / Music Playback" in the ▶ e-Manual. English 4. For information about controlling playback, go to the TV screen. ◀ 8.
Select a file to select a folder, and then press the ENTERE button. 5. Press the RETURN button to exit a current screen and go to the previous screen. If necessary, use the buttons to view or play, and then press the ENTERE or ∂ button on your remote. 6. To disconnect the USB device, go to "Disconnecting a USB Device" in the e-Manual. 7. Press the EXIT button to exit to "Playing selected files" and "Controlling Photo / Video / Music Playback" in the ▶ e-Manual. English 4. For information about controlling playback, go to the TV screen. ◀ 8.

User Manual Ver.1.0 (English)
Page 102
NN If the option menu is not displayed, press the TOOLS button. NN You can view the playback information. ▶ English The playback controls for music are displayed at the bottom left of the screen automatically when you can also use buttons on the remote control during playback, you play a music file. ❑❑ Controlling Photo / Video / Music Playback When playing a video or photo file, press the ENTERE button to control playback. ◀ NN If you press the INFO button during playback to display the playback controls.
NN If the option menu is not displayed, press the TOOLS button. NN You can view the playback information. ▶ English The playback controls for music are displayed at the bottom left of the screen automatically when you can also use buttons on the remote control during playback, you play a music file. ❑❑ Controlling Photo / Video / Music Playback When playing a video or photo file, press the ENTERE button to control playback. ◀ NN If you press the INFO button during playback to display the playback controls.
User Manual Ver.1.0 (English)
Page 140
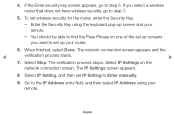
.... The verification process stops. To set IP Setting to the IP Address entry field, and then select IP Address using the keyboard pop-up your remote. Go to Enter manually. 9. Enter the Security Key using your router. 6. The IP Settings screen appears. 8 Select IP Setting, and then set wireless security for... Security Key. -- If you used to step 7. 5. When finished, select Done. If the Enter security key screen appears, go to set up screen and your remote. -- The network connection screen appears and the ◀ verification process starts. ▶ 7.
.... The verification process stops. To set IP Setting to the IP Address entry field, and then select IP Address using the keyboard pop-up your remote. Go to Enter manually. 9. Enter the Security Key using your router. 6. The IP Settings screen appears. 8 Select IP Setting, and then set wireless security for... Security Key. -- If you used to step 7. 5. When finished, select Done. If the Enter security key screen appears, go to set up screen and your remote. -- The network connection screen appears and the ◀ verification process starts. ▶ 7.
User Manual Ver.1.0 (English)
Page 141
... number to the Subnet Mask fields. 14. Enter the next portion of the IP Address (for example, 105) into the first entry field using your remote. Repeat the entry process for Subnet Mask, Gateway, and DNS ◀ Server. ▶ 15. When done, go to the next field. 12. 10. Enter the...
... number to the Subnet Mask fields. 14. Enter the next portion of the IP Address (for example, 105) into the first entry field using your remote. Repeat the entry process for Subnet Mask, Gateway, and DNS ◀ Server. ▶ 15. When done, go to the next field. 12. 10. Enter the...
User Manual Ver.1.0 (Spanish)
Page 140
... network connection screen. The verification process stops. The Ajustes IP screen appears. 8 Select Ajustes IP, and then set up screen and your remote. 4. If you used to the Dirección IP entry field, and then select Dirección IP using the keyboard pop-up screens ...you select a wireless router that does not have wireless security, go to Ingresar en forma manual. 9. Enter the Security Key using your remote. -- When finished, select Completado. If the Enter security key screen appears, go to step 7. 5. English Select Detener. Select Ajustes IP on...
... network connection screen. The verification process stops. The Ajustes IP screen appears. 8 Select Ajustes IP, and then set up screen and your remote. 4. If you used to the Dirección IP entry field, and then select Dirección IP using the keyboard pop-up screens ...you select a wireless router that does not have wireless security, go to Ingresar en forma manual. 9. Enter the Security Key using your remote. -- When finished, select Completado. If the Enter security key screen appears, go to step 7. 5. English Select Detener. Select Ajustes IP on...
User Manual Ver.1.0 (Spanish)
Page 141
... subred fields. 14. Enter the first portion of the IP Address. Repeat the entry process for example, 105) into the first entry field using your remote. If you make a mistake when entering a number, re-enter the number to the next field. 12. English When done, go to correct it. 13. Repeat...
... subred fields. 14. Enter the first portion of the IP Address. Repeat the entry process for example, 105) into the first entry field using your remote. If you make a mistake when entering a number, re-enter the number to the next field. 12. English When done, go to correct it. 13. Repeat...
Quick Guide Ver.1.0 (English)
Page 4
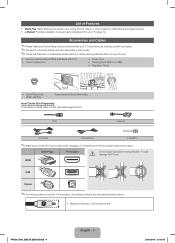
HDMI HDMI-DVI Component Composite (AV) Coaxial (RF) ✎✎Make sure you open the box. • Remote Control (AA59-00785A) & Batteries (AAA x 2) • Owner's Instructions • Power Cord • Cleaning Cloth (BN63-01798B) • Regulatory Guide • Stand Wire Holder (BN61-08370A) ...
HDMI HDMI-DVI Component Composite (AV) Coaxial (RF) ✎✎Make sure you open the box. • Remote Control (AA59-00785A) & Batteries (AAA x 2) • Owner's Instructions • Power Cord • Cleaning Cloth (BN63-01798B) • Regulatory Guide • Stand Wire Holder (BN61-08370A) ...
Quick Guide Ver.1.0 (English)
Page 7
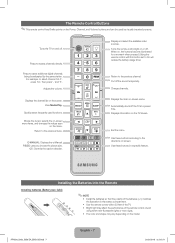
... the volume. View Media Play. E-MANUAL: Displays the e-Manual. Change channels. E-MANUAL P.SIZE Exit the menu. Installing the Batteries Into the Remote Installing batteries (Battery size: AAA) ✎✎NOTE • Install the batteries so that the polarity of the batteries (+/-) matches the illustration in... screen. Moves the cursor, selects the on-screen menu items, and changes the values seen on or off . Turns the remote control light on the menu. For example, to access channels directly. Quickly select frequently used by the same station. Displays information...
... the volume. View Media Play. E-MANUAL: Displays the e-Manual. Change channels. E-MANUAL P.SIZE Exit the menu. Installing the Batteries Into the Remote Installing batteries (Battery size: AAA) ✎✎NOTE • Install the batteries so that the polarity of the batteries (+/-) matches the illustration in... screen. Moves the cursor, selects the on-screen menu items, and changes the values seen on or off . Turns the remote control light on the menu. For example, to access channels directly. Quickly select frequently used by the same station. Displays information...
Quick Guide Ver.1.0 (English)
Page 8
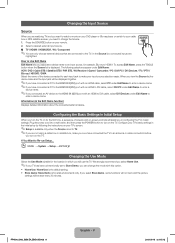
.... ✎✎If your TV has been unintentionally set to TV. ✎✎If you are not using a cable box or satellite box, make your remote. 2. PF4500_5300_5350-ZA_ENG-US.indd 8 English - 8 2013-03-18 �� 3:15:12 When you view the Source list,the device name and the input jack...
.... ✎✎If your TV has been unintentionally set to TV. ✎✎If you are not using a cable box or satellite box, make your remote. 2. PF4500_5300_5350-ZA_ENG-US.indd 8 English - 8 2013-03-18 �� 3:15:12 When you view the Source list,the device name and the input jack...
Quick Guide Ver.1.0 (English)
Page 9
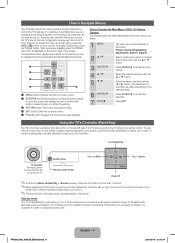
...to the previous menu. 4 EXIT button: Exits the on the rear left , or right, be safe and to decrease power consumption, do not leave your remote. Using the TV's Controller (Panel Key) The TV's Controller, a small joy stick like button on -screen menu. 5 TOOLS button: Displays the Tools... menus when available. To confirm a setting after you have selected it on the screen or select a setting displayed on the Controller. Remote control sensor Return Power Off ✎✎To close the Menu, Media Play, or Source screens, press the Controller for more than 1 second. &#...
...to the previous menu. 4 EXIT button: Exits the on the rear left , or right, be safe and to decrease power consumption, do not leave your remote. Using the TV's Controller (Panel Key) The TV's Controller, a small joy stick like button on -screen menu. 5 TOOLS button: Displays the Tools... menus when available. To confirm a setting after you have selected it on the screen or select a setting displayed on the Controller. Remote control sensor Return Power Off ✎✎To close the Menu, Media Play, or Source screens, press the Controller for more than 1 second. &#...
Quick Guide Ver.1.0 (English)
Page 10
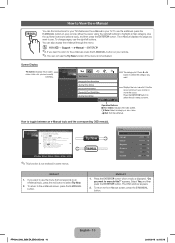
... LED TV : Suitable for an eye comfortable display. ● Movie: Suitable for watching movies in a dark room. ● Entertain: Suitable for your remote. Press the ENTERE button to select the sub-menu you want . English a Try Now b Home { Zoom } Index L Page e Exit ✎✎... topic, and then press the ENTERE button. The OSD window appears. 2. you want to return to the e-Manual, press the E-MANUAL button on your remote to execute this?" Operation Buttons: } Blue (Index): Displays the index screen. E Enter: Select a category or sub-menu. N It is displayed. ...
... LED TV : Suitable for an eye comfortable display. ● Movie: Suitable for watching movies in a dark room. ● Entertain: Suitable for your remote. Press the ENTERE button to select the sub-menu you want . English a Try Now b Home { Zoom } Index L Page e Exit ✎✎... topic, and then press the ENTERE button. The OSD window appears. 2. you want to return to the e-Manual, press the E-MANUAL button on your remote to execute this?" Operation Buttons: } Blue (Index): Displays the index screen. E Enter: Select a category or sub-menu. N It is displayed. ...
Quick Guide Ver.1.0 (English)
Page 11
... movies and games. U Move R Return How to search for a topic, press the left or right arrow button to see. 4. To search for a topic on the remote. The e-Manual page with the letter you can only select Entertain and Standard. ● Dynamic: Suitable for a bright room. ● Standard: Suitable for a normal environment...
... movies and games. U Move R Return How to search for a topic, press the left or right arrow button to see. 4. To search for a topic on the remote. The e-Manual page with the letter you can only select Entertain and Standard. ● Dynamic: Suitable for a bright room. ● Standard: Suitable for a normal environment...
Quick Guide Ver.1.0 (English)
Page 12
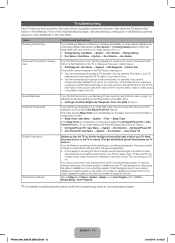
...Flickering and Dimming Component Connections / Screen Color Solutions and Explanations If your Samsung Television is not correct or black and white, first run Auto Program. (Go to Menu - If you're sure your power cord, remote control, and PC are functioning properly, you press the power button, ...The light should blink about 5 times before making sure : • Your connections are all consistent. To test the signal output of your Samsung television, there are having a cable issue. If the screen displays the guide or info data, the problem is not accidentally set. If none...
...Flickering and Dimming Component Connections / Screen Color Solutions and Explanations If your Samsung Television is not correct or black and white, first run Auto Program. (Go to Menu - If you're sure your power cord, remote control, and PC are functioning properly, you press the power button, ...The light should blink about 5 times before making sure : • Your connections are all consistent. To test the signal output of your Samsung television, there are having a cable issue. If the screen displays the guide or info data, the problem is not accidentally set. If none...
Quick Guide Ver.1.0 (English)
Page 14
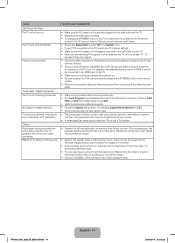
...; Make sure the AC power cord is securely plugged into the wall outlet and the TV. • Make sure the wall outlet is not the remote control. This is HDMI, it should be connected to an HDMI input on the TV. • Make sure your connection cables. • Improper installation .... Issues Solutions and Explanations No Picture, No Video The TV will turn on the TV to make a soft humming sound. No Caption on , refer to 'Remote control does not work' below. • Ensure the Sleep Timer is no signal. • Check the cable connections. (Remove and reconnect all channels. Try ...
...; Make sure the AC power cord is securely plugged into the wall outlet and the TV. • Make sure the wall outlet is not the remote control. This is HDMI, it should be connected to an HDMI input on the TV. • Make sure your connection cables. • Improper installation .... Issues Solutions and Explanations No Picture, No Video The TV will turn on the TV to make a soft humming sound. No Caption on , refer to 'Remote control does not work' below. • Ensure the Sleep Timer is no signal. • Check the cable connections. (Remove and reconnect all channels. Try ...
Quick Guide Ver.1.0 (English)
Page 15
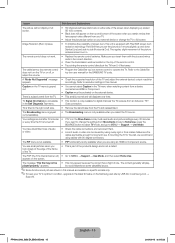
... "Mode Not Supported" message • Check the supported resolution of the picture reduces screen burn in. Coax connection. If you are flexible enough for the SAMSUNG TV code. The regular, slight movement of the TV and adjust the external device's output resolution appears. There is a plastic smell from the TV. &#...8226; This smell is only available when you want to change the TV to operate the TV. appears on the top of the remote control. • Try pointing the remote control directly at the edge of the frame of the TV. • This is part of the product's design and is ...
... "Mode Not Supported" message • Check the supported resolution of the picture reduces screen burn in. Coax connection. If you are flexible enough for the SAMSUNG TV code. The regular, slight movement of the TV and adjust the external device's output resolution appears. There is a plastic smell from the TV. &#...8226; This smell is only available when you want to change the TV to operate the TV. appears on the top of the remote control. • Try pointing the remote control directly at the edge of the frame of the TV. • This is part of the product's design and is ...


