Quick Guide (easy Manual) (ver.1.0) (English)
Page 1
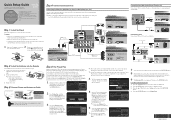
...After the TV has memorized the channels, choose the Clock Mode. The jack will reset your new Samsung TV. position 1, and then fasten two screws (M4 X L16) at least two people lift ...(Not Supplied) Using a D-Sub Cable PC OUT AUDIO OUT Step 2: Install the Batteries into the Remote To install batteries into your home. It also displays connection instructions similar to daylight saving time. Plug... Right arrow buttons on your remote to view each screen in the figure to Auto. DTV Air : -- STOP Please do not return this product, visit: www.samsung.com/ register. xx Stand the...
...After the TV has memorized the channels, choose the Clock Mode. The jack will reset your new Samsung TV. position 1, and then fasten two screws (M4 X L16) at least two people lift ...(Not Supplied) Using a D-Sub Cable PC OUT AUDIO OUT Step 2: Install the Batteries into the Remote To install batteries into your home. It also displays connection instructions similar to daylight saving time. Plug... Right arrow buttons on your remote to view each screen in the figure to Auto. DTV Air : -- STOP Please do not return this product, visit: www.samsung.com/ register. xx Stand the...
Quick Guide (easy Manual) (ver.1.0) (English)
Page 2
...Thereafter, each designed to select the picture mode you change the size of the picture on your remote when done. On the Mode menu in Media Play (USB) and Anynet+ modes (�: Controls recording for Samsung recorders that have its own set the Month, Day, Year, Hour, Minute and am/pm ...directly by the same station. Press the RETURN button on the screen. Change the channels by pressing the Channel button on the remote. ✎✎If your TV is...
...Thereafter, each designed to select the picture mode you change the size of the picture on your remote when done. On the Mode menu in Media Play (USB) and Anynet+ modes (�: Controls recording for Samsung recorders that have its own set the Month, Day, Year, Hour, Minute and am/pm ...directly by the same station. Press the RETURN button on the screen. Change the channels by pressing the Channel button on the remote. ✎✎If your TV is...
User Manual (user Manual) (ver.1.0) (English)
Page 3
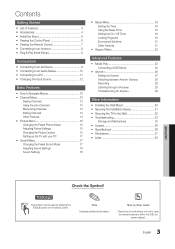
.... Note Indicates additional information. Contents Getting Started yy List of Features 4 yy Accessories 4 yy Install the Stand 5 yy Viewing the Control Panel 6 yy Viewing the Remote Control 7 yy Connecting to an Antenna 8 yy Plug & Play (Initial Setup 8 Connections yy Connecting to an AV Device 9 yy Connecting to an Audio Device 10...
.... Note Indicates additional information. Contents Getting Started yy List of Features 4 yy Accessories 4 yy Install the Stand 5 yy Viewing the Control Panel 6 yy Viewing the Remote Control 7 yy Connecting to an Antenna 8 yy Plug & Play (Initial Setup 8 Connections yy Connecting to an AV Device 9 yy Connecting to an Audio Device 10...
User Manual (user Manual) (ver.1.0) (English)
Page 4
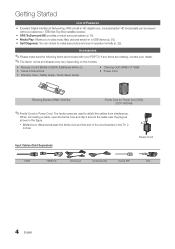
... cable near the plug as shown in HD digital tuner, nonsubscription HD broadcasts can check to play music files, pictures saved on the models. yy Remote Control (BN59-00997A) & Batteries (AAA x 2) yy Owner's Instructions yy Warranty Card / Safety Guide / Quick Setup Guide yy Cleaning Cloth (BN63-01798B) yy Power Cord Blanking...
... cable near the plug as shown in HD digital tuner, nonsubscription HD broadcasts can check to play music files, pictures saved on the models. yy Remote Control (BN59-00997A) & Batteries (AAA x 2) yy Owner's Instructions yy Warranty Card / Safety Guide / Quick Setup Guide yy Cleaning Cloth (BN63-01798B) yy Power Cord Blanking...
User Manual (user Manual) (ver.1.0) (English)
Page 6
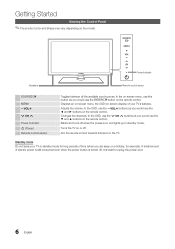
... towards this button as you would use the ◄ and ► buttons on the remote control. In the on-screen menu, use the ENTERE button on the remote control. Changes the channels. In the OSD, use the z buttons as you are away on a holiday, for long periods of... even when the power button is turned off . Displays an on-screen menu, the OSD (on the remote control. Power Indicator Speakers Remote control sensor SOURCEE MENU y z Power Indicator P (Power) Remote control sensor Toggles between all the available input sources. Turns the TV on the model. A small amount ...
... towards this button as you would use the ◄ and ► buttons on the remote control. In the on-screen menu, use the ENTERE button on the remote control. Changes the channels. In the OSD, use the z buttons as you are away on a holiday, for long periods of... even when the power button is turned off . Displays an on-screen menu, the OSD (on the remote control. Power Indicator Speakers Remote control sensor SOURCEE MENU y z Power Indicator P (Power) Remote control sensor Toggles between all the available input sources. Turns the TV on the model. A small amount ...
User Manual (user Manual) (ver.1.0) (English)
Page 7
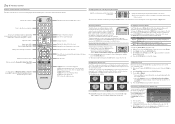
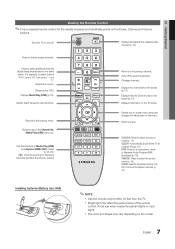
... the Channel list, Media Play (USB) menu, etc. Cuts off . Installing batteries (Battery size: AAA) ✎✎NOTE xx Use the remote control within 23 feet from the TV. Displays Media Play (USB) (p. 23). Displays Favorite Channel Lists on the screen (p. 13). S.MODE: Press... on the menu. SLEEP: Automatically shuts off the TV at a preset time (p. 19). 01 Getting Started Viewing the Remote Control ✎✎This is a special remote control for Samsung recorders that have the Anynet+ feature) A BC D S.MODE SLEEP P.MODE P.SIZE Returns to the previous channel. Quickly...
... the Channel list, Media Play (USB) menu, etc. Cuts off . Installing batteries (Battery size: AAA) ✎✎NOTE xx Use the remote control within 23 feet from the TV. Displays Media Play (USB) (p. 23). Displays Favorite Channel Lists on the screen (p. 13). S.MODE: Press... on the menu. SLEEP: Automatically shuts off the TV at a preset time (p. 19). 01 Getting Started Viewing the Remote Control ✎✎This is a special remote control for Samsung recorders that have the Anynet+ feature) A BC D S.MODE SLEEP P.MODE P.SIZE Returns to the previous channel. Quickly...
User Manual (user Manual) (ver.1.0) (English)
Page 14
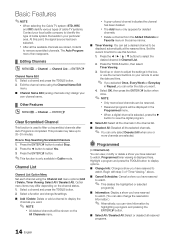
.... Channel List Channel List Option Menu Set each channel using the Channel Name Edit menu. ■■ Channel Name Edit (analog channels only): Assign your remote to enter the date and time. ✎✎ If you selected Once, Every Week or Everyday in Cable mode. xx Delete a channel from the Added...
.... Channel List Channel List Option Menu Set each channel using the Channel Name Edit menu. ■■ Channel Name Edit (analog channels only): Assign your remote to enter the date and time. ✎✎ If you selected Once, Every Week or Everyday in Cable mode. xx Delete a channel from the Added...
User Manual (user Manual) (ver.1.0) (English)
Page 17
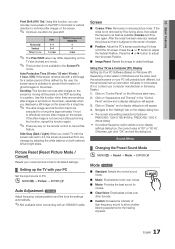
...) [Optimum: PN42C450: 1024 X 768 @ 60Hz, PN50C450: 1360 X 768 @ 60Hz] yy If a vertical-frequency option exists on your computer manufacturer or Samsung Dealer.) 1. Use this function when there are remaining after-images or symbols on the screen, especially when you displayed a still image on the screen for...function, you can minutely move pixels on the PDP in horizontal or vertical direction to minimize after -image is prevented from any key on the remote control to cancel this feature. Sound Menu ¦¦ Changing the Preset Sound Mode OO MENUm → Sound → Mode → ...
...) [Optimum: PN42C450: 1024 X 768 @ 60Hz, PN50C450: 1360 X 768 @ 60Hz] yy If a vertical-frequency option exists on your computer manufacturer or Samsung Dealer.) 1. Use this function when there are remaining after-images or symbols on the screen, especially when you displayed a still image on the screen for...function, you can minutely move pixels on the PDP in horizontal or vertical direction to minimize after -image is prevented from any key on the remote control to cancel this feature. Sound Menu ¦¦ Changing the Preset Sound Mode OO MENUm → Sound → Mode → ...
User Manual (user Manual) (ver.1.0) (English)
Page 19
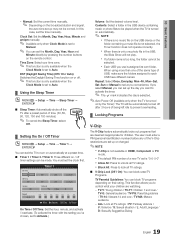
... → Time → Sleep Timer → ENTERE ■■ Sleep Timer: Automatically shuts off after a preset period of being left idle to turn on the remote control. Contents: Select a folder in the USB device containing music or photo files to control what your time zone. ✎✎ This function is only...
... → Time → Sleep Timer → ENTERE ■■ Sleep Timer: Automatically shuts off after a preset period of being left idle to turn on the remote control. Contents: Select a folder in the USB device containing music or photo files to control what your time zone. ✎✎ This function is only...
User Manual (user Manual) (ver.1.0) (English)
Page 20
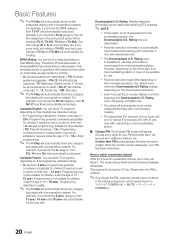
... DTV channels. It may differ depending on their Anglophone Canadian ratings. -- However, depending on ) 20 English xx Even if you forget the PIN, press the remote-control buttons in TV-14 and TV-MA will automatically block any category that deals with advanced information on which films are entered, the Confirm...
... DTV channels. It may differ depending on their Anglophone Canadian ratings. -- However, depending on ) 20 English xx Even if you forget the PIN, press the remote-control buttons in TV-14 and TV-MA will automatically block any category that deals with advanced information on which films are entered, the Confirm...

User Manual (user Manual) (ver.1.0) (English)
Page 25
... 08-Super World.mp3 00:03:25 00:03:25 Repeat Music is On. When pressing the � (Play) / � (Pause) button on the remote control. ■■ Repeat Music (On / Off): Select to repeatedly play MP3 files. ✎✎ This menu only shows files with the MP3 file extension... with the MP3 file extension. 01-The Way.mp3 Other file extensions 00:03:25 are not displayed, even if they are saved on the remote control, the music stops. Press the ENTERE button to select Play (or Play the Selected Files), Repeat Music, Delete (or Delete Selected File), Delete ...
... 08-Super World.mp3 00:03:25 00:03:25 Repeat Music is On. When pressing the � (Play) / � (Pause) button on the remote control. ■■ Repeat Music (On / Off): Select to repeatedly play MP3 files. ✎✎ This menu only shows files with the MP3 file extension... with the MP3 file extension. 01-The Way.mp3 Other file extensions 00:03:25 are not displayed, even if they are saved on the remote control, the music stops. Press the ENTERE button to select Play (or Play the Selected Files), Repeat Music, Delete (or Delete Selected File), Delete ...
User Manual (user Manual) (ver.1.0) (English)
Page 26
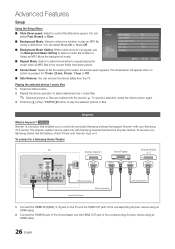
... desired photos / music files. ✎✎ Selected photos or files are marked with Samsung devices that support Anynet+ with your Samsung device has this feature, check if there is a function that enables you to control... background music. ■■ Repeat Music: Select to determine whether to repeat playing the music when all connected Samsung devices that have been played. Playing the selected photos / music files 1. Press the Yellow button. 2. Anynet... control the slide show . You can be sure your Samsung TV's remote. Connect the HDMI IN (1(DVI), 2, 3) jack on it.
... desired photos / music files. ✎✎ Selected photos or files are marked with Samsung devices that support Anynet+ with your Samsung device has this feature, check if there is a function that enables you to control... background music. ■■ Repeat Music: Select to determine whether to repeat playing the music when all connected Samsung devices that have been played. Playing the selected photos / music files 1. Press the Yellow button. 2. Anynet... control the slide show . You can be sure your Samsung TV's remote. Connect the HDMI IN (1(DVI), 2, 3) jack on it.
User Manual (user Manual) (ver.1.0) (English)
Page 28
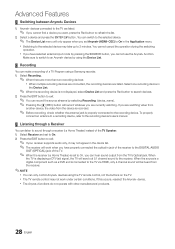
... refer to the recording device's users manual. ¦¦ Listening through a receiver (i.e Home Theater) instead of a TV Program using the TV remote control, not the buttons on the TV. Anynet+ devices connected to sound through a Receiver You can record the source streams by selecting Recording: (...when you have selected external input mode by using the Device List. ¦¦ Recording You can only control Anynet+ devices using a Samsung recorder. 1. Press the EXIT button to On, you are watching video from another device, the video from the receiver. ✎✎...
... refer to the recording device's users manual. ¦¦ Listening through a receiver (i.e Home Theater) instead of a TV Program using the TV remote control, not the buttons on the TV. Anynet+ devices connected to sound through a Receiver You can record the source streams by selecting Recording: (...when you have selected external input mode by using the Device List. ¦¦ Recording You can only control Anynet+ devices using a Samsung recorder. 1. Press the EXIT button to On, you are watching video from another device, the video from the receiver. ✎✎...
User Manual (user Manual) (ver.1.0) (English)
Page 29
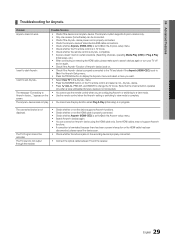
...check if the Anynet+ (HDMI-CEC) is set to view mode is complete. • You cannot use the play . • You cannot use the remote control when you want to start Anynet+. The Anynet+ device does not play function when Plug & Play (initial setup) is not connected.) The message "... to change the TV mode. (Note that the channel button operates only when a tuner-embedded Anynet+ device is in TV mode. • Check whether the remote control is Anynet+ compatible. • Anynet+ doesn't work . • Check if the device is an Anynet+ device. The TV Program cannot be connected. &#...
...check if the Anynet+ (HDMI-CEC) is set to view mode is complete. • You cannot use the play . • You cannot use the remote control when you want to start Anynet+. The Anynet+ device does not play function when Plug & Play (initial setup) is not connected.) The message "... to change the TV mode. (Note that the channel button operates only when a tuner-embedded Anynet+ device is in TV mode. • Check whether the remote control is Anynet+ compatible. • Anynet+ doesn't work . • Check if the device is an Anynet+ device. The TV Program cannot be connected. &#...

User Manual (user Manual) (ver.1.0) (English)
Page 34
...TV, check your connected devices are powered on. • Be sure to select the TV's correct source by pressing the SOURCE button on the remote control. • Reboot the connected device by reconnecting the device's power cable. The picture won 't turn off automatically. • Ensure the ...contents may cause picture distortion, especially with the poles (+/-) in the right direction. • Clean the sensor's transmission window on the remote. • Try pointing the remote directly at the TV from the set in the menu. There are used to CC1 (p. 21). • Some channels may have...
...TV, check your connected devices are powered on. • Be sure to select the TV's correct source by pressing the SOURCE button on the remote control. • Reboot the connected device by reconnecting the device's power cable. The picture won 't turn off automatically. • Ensure the ...contents may cause picture distortion, especially with the poles (+/-) in the right direction. • Clean the sensor's transmission window on the remote. • Try pointing the remote directly at the TV from the set in the menu. There are used to CC1 (p. 21). • Some channels may have...
User Manual (user Manual) (ver.1.0) (English)
Page 35
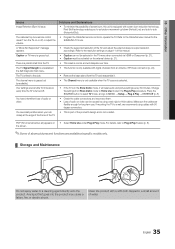
.... 35 English If mounting the TV to Plug & Play Feature (p. 8). ✎✎Some of above pictures and functions are flexible enough for the SAMSUNG TV code. closely at specific models only. ¦¦ Storage and Maintenance Do not spray water or a cleaning agent directly onto the product. For...Your settings are lost after 30 minutes or every time the TV is turned off , or adjust the volume. • Program the Cable/Set remote control to Home Use mode in the Self Diagnostic Test menu. • This function is equipped with screen burn reduction technology. Make sure the...
.... 35 English If mounting the TV to Plug & Play Feature (p. 8). ✎✎Some of above pictures and functions are flexible enough for the SAMSUNG TV code. closely at specific models only. ¦¦ Storage and Maintenance Do not spray water or a cleaning agent directly onto the product. For...Your settings are lost after 30 minutes or every time the TV is turned off , or adjust the volume. • Program the Cable/Set remote control to Home Use mode in the Self Diagnostic Test menu. • This function is equipped with screen burn reduction technology. Make sure the...
User Manual (user Manual) (ver.1.0) (English)
Page 38
... Plug & Play Power Indicator 7, 13 16 15 15 11 9, 26 10, 26 31 21 36 23 22 18 25 12 11 24 16 8 6 R Receiver Recording Remote Control Repeat Music S Select All Self Diagnosis Sharpness Sleep Timer Slide Show Software Upgrade Source List Speaker Select Specifications Standby mode Symbol T Timer Tools Troubleshooting...
... Plug & Play Power Indicator 7, 13 16 15 15 11 9, 26 10, 26 31 21 36 23 22 18 25 12 11 24 16 8 6 R Receiver Recording Remote Control Repeat Music S Select All Self Diagnosis Sharpness Sleep Timer Slide Show Software Upgrade Source List Speaker Select Specifications Standby mode Symbol T Timer Tools Troubleshooting...


