Quick Guide (easy Manual) (ver.1.0) (English)
Page 1
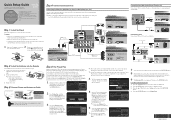
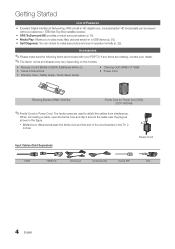
...'s channel memorizing process. Clock Mode Auto Manual U Move E Enter m Skip Plug & Play Set to display the menu. 3. Press the MENU button on your home. Press the ▲ or ▼ button to view each screen in succession. STOP Please do not return this TV in your remote to daylight saving time. HDMI Cable (Not Supplied) Best Connection HD connection (up to 720p/1080i) Using a Component Cable COMPONENT OUT DVD, Blu-ray player, cable box, STB satellite receiver, VCR, AUDIO OUT Device Connecting...
...'s channel memorizing process. Clock Mode Auto Manual U Move E Enter m Skip Plug & Play Set to display the menu. 3. Press the MENU button on your home. Press the ▲ or ▼ button to view each screen in succession. STOP Please do not return this TV in your remote to daylight saving time. HDMI Cable (Not Supplied) Best Connection HD connection (up to 720p/1080i) Using a Component Cable COMPONENT OUT DVD, Blu-ray player, cable box, STB satellite receiver, VCR, AUDIO OUT Device Connecting...
Quick Guide (easy Manual) (ver.1.0) (English)
Page 2
... Auto or Manual. xx If you can enjoy photo and music files stored on a USB device by pressing the Volume button on the Power, Channel and Volume buttons. Connecting a USB Device for Samsung recorders that have its own set the clock, follow these steps: 1. Turn on your TV through the HDMI, DVI, Component, Composite, or D-sub P.MODE P.SIZE connections, or through the Antenna or Cable In connections. When the Input selection screen is a special remote control for Media Play...
... Auto or Manual. xx If you can enjoy photo and music files stored on a USB device by pressing the Volume button on the Power, Channel and Volume buttons. Connecting a USB Device for Samsung recorders that have its own set the clock, follow these steps: 1. Turn on your TV through the HDMI, DVI, Component, Composite, or D-sub P.MODE P.SIZE connections, or through the Antenna or Cable In connections. When the Input selection screen is a special remote control for Media Play...
User Manual (user Manual) (ver.1.0) (English)
Page 3
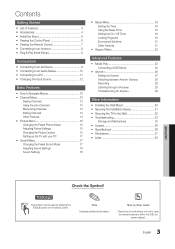
... yy Sound Menu 17 Changing the Preset Sound Mode 17 Adjusting Sound Settings 18 Sound Settings 18 yy Setup Menu 18 Setting the Time 18 Using the Sleep Timer 19 Setting the On / Off Timer 19 Locking Programs 19 Economical Solutions 21 Other Features 21 yy Support Menu 22 Advanced Features yy Media Play 23 Connecting a USB Device 23 yy Anynet 26 Setting Up Anynet+ 27 Switching between Anynet+ Devices 28 Recording 28 Listening through a Receiver 28 Troubleshooting for instructions on...
... yy Sound Menu 17 Changing the Preset Sound Mode 17 Adjusting Sound Settings 18 Sound Settings 18 yy Setup Menu 18 Setting the Time 18 Using the Sleep Timer 19 Setting the On / Off Timer 19 Locking Programs 19 Economical Solutions 21 Other Features 21 yy Support Menu 22 Advanced Features yy Media Play 23 Connecting a USB Device 23 yy Anynet 26 Setting Up Anynet+ 27 Switching between Anynet+ Devices 28 Recording 28 Listening through a Receiver 28 Troubleshooting for instructions on...
User Manual (user Manual) (ver.1.0) (English)
Page 4
... Remote Control (BN59-00997A) & Batteries (AAA x 2) yy Owner's Instructions yy Warranty Card / Safety Guide / Quick Setup Guide yy Cleaning Cloth (BN63-01798B) yy Power Cord Blanking Bracket (BN63-06456A) Ferrite Core for Power Cord (1EA) (3301-002049) ✎✎Ferrite Core for Power Cord: The ferrite cores are used to play music files, pictures saved on the models. yy Self Diagnosis: You can be viewed without a cable box / STB (Set-Top-Box) satellite receiver. When connecting a cable...
... Remote Control (BN59-00997A) & Batteries (AAA x 2) yy Owner's Instructions yy Warranty Card / Safety Guide / Quick Setup Guide yy Cleaning Cloth (BN63-01798B) yy Power Cord Blanking Bracket (BN63-06456A) Ferrite Core for Power Cord (1EA) (3301-002049) ✎✎Ferrite Core for Power Cord: The ferrite cores are used to play music files, pictures saved on the models. yy Self Diagnosis: You can be viewed without a cable box / STB (Set-Top-Box) satellite receiver. When connecting a cable...
User Manual (user Manual) (ver.1.0) (English)
Page 8
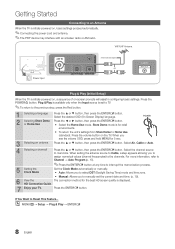
... Channel → Auto Program (p. 13). ✎✎Press the ENTERE button at any time to Reset This Feature... Set the Clock Mode automatically or manually. POWER P 3 Selecting an antenna Press the ▲ or ▼ button, then press the ENTERE button. Press the ENTERE button. VHF/UHF Antenna Power Input Antenna Cable (Not Supplied) or Cable ANT OUT Plug & Play (Initial Setup) When the TV is initially powered on, basic settings proceed automatically. ✎✎Connecting the power cord and antenna...
... Channel → Auto Program (p. 13). ✎✎Press the ENTERE button at any time to Reset This Feature... Set the Clock Mode automatically or manually. POWER P 3 Selecting an antenna Press the ▲ or ▼ button, then press the ENTERE button. Press the ENTERE button. VHF/UHF Antenna Power Input Antenna Cable (Not Supplied) or Cable ANT OUT Plug & Play (Initial Setup) When the TV is initially powered on, basic settings proceed automatically. ✎✎Connecting the power cord and antenna...
User Manual (user Manual) (ver.1.0) (English)
Page 9
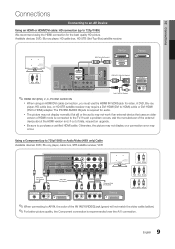
...DVI Cable (Not Supplied) DVI OUT USB Red White R AUDIO OUT W Audio Cable (Not Supplied) R-AUDIO-L ✎✎HDMI IN 1(DVI), 2, 3, PC/DVI AUDIO IN xx When using the HDMI connection for video. A DVD, Blu-ray player, HD cable box, or HD STB satellite receiver may occur. Available devices: DVD, Blu-ray player, HD cable box, HD STB (Set-Top-Box) satellite receiver. Otherwise, the picture may not display or a connection error may require a DVI-HDMI (DVI to HDMI) cable or DVI-HDMI (DVI to 720p/1080i) We recommend using an HDMI/DVI cable connection, you must use the HDMI IN 1(DVI...
...DVI Cable (Not Supplied) DVI OUT USB Red White R AUDIO OUT W Audio Cable (Not Supplied) R-AUDIO-L ✎✎HDMI IN 1(DVI), 2, 3, PC/DVI AUDIO IN xx When using the HDMI connection for video. A DVD, Blu-ray player, HD cable box, or HD STB satellite receiver may occur. Available devices: DVD, Blu-ray player, HD cable box, HD STB (Set-Top-Box) satellite receiver. Otherwise, the picture may not display or a connection error may require a DVI-HDMI (DVI to HDMI) cable or DVI-HDMI (DVI to 720p/1080i) We recommend using an HDMI/DVI cable connection, you must use the HDMI IN 1(DVI...
User Manual (user Manual) (ver.1.0) (English)
Page 12
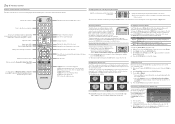
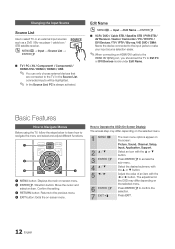
... OSD (On Screen Display) The access step may differ depending on -screen menu. Select an icon with the ◄ or ► button. In the Source List, connected inputs will be highlighted. ✎✎ In the Source List, PC is always activated. Changing the Input Source Source List Use to confirm the selection. Press ENTERE to select TV or an external input sources such as a DVD / Blu-ray player / cable box / STB satellite receiver. Select the...
... OSD (On Screen Display) The access step may differ depending on -screen menu. Select an icon with the ◄ or ► button. In the Source List, connected inputs will be highlighted. ✎✎ In the Source List, PC is always activated. Changing the Input Source Source List Use to confirm the selection. Press ENTERE to select TV or an external input sources such as a DVD / Blu-ray player / cable box / STB satellite receiver. Select the...
User Manual (user Manual) (ver.1.0) (English)
Page 15
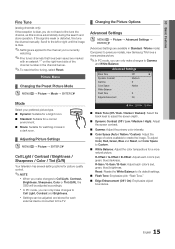
... P.MODE Cell Light / Contrast / Brightness / Sharpness / Color / Tint (G/R) Your television has several setting options for each external device connected to the TV. ¦¦ Changing the Picture Options Advanced Settings OO MENUm → Picture → Advanced Settings → ENTERE (Advanced Settings are applied to the channel you can only make changes to Cell Light, Contrast and Brightness. To adjust Color, Red, Green, Blue and Reset, set Color Space to Custom. ■■ White Balance: Adjust the color...
... P.MODE Cell Light / Contrast / Brightness / Sharpness / Color / Tint (G/R) Your television has several setting options for each external device connected to the TV. ¦¦ Changing the Picture Options Advanced Settings OO MENUm → Picture → Advanced Settings → ENTERE (Advanced Settings are applied to the channel you can only make changes to Cell Light, Contrast and Brightness. To adjust Color, Red, Green, Blue and Reset, set Color Space to Custom. ■■ White Balance: Adjust the color...
User Manual (user Manual) (ver.1.0) (English)
Page 17
...; button to adjust the Horizontal-Position. ■■ Image Reset: Resets the image to a pattern. Click on the Windows start menu. 2. 03 Basic Features Pixel Shift (Off / On): Using this function, you displayed a still image on the screen for a long time. ✎✎ The after-image removal function has to be executed for a long time (approximately 1 hour) to effectively remove after-images on the screen. Picture Reset (Reset Picture Mode / Cancel) Resets your PC Set the input source...
...; button to adjust the Horizontal-Position. ■■ Image Reset: Resets the image to a pattern. Click on the Windows start menu. 2. 03 Basic Features Pixel Shift (Off / On): Using this function, you displayed a still image on the screen for a long time. ✎✎ The after-image removal function has to be executed for a long time (approximately 1 hour) to effectively remove after-images on the screen. Picture Reset (Reset Picture Mode / Cancel) Resets your PC Set the input source...
User Manual (user Manual) (ver.1.0) (English)
Page 18
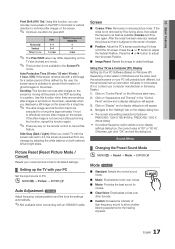
... desired channel by lowering the sound output when the modulation signal is high or by raising the sound output when the modulation signal is no video signal, both speakers will appear every time you press the INFO button. ✎✎ If you disconnect the power cord, you switch between the main speaker and the audio receiver. Clock Mode (Auto / Manual) -- Auto Volume (Off / On) Because each broadcasting station has its default settings. ¦¦ Sound Settings OO...
... desired channel by lowering the sound output when the modulation signal is high or by raising the sound output when the modulation signal is no video signal, both speakers will appear every time you press the INFO button. ✎✎ If you disconnect the power cord, you switch between the main speaker and the audio receiver. Clock Mode (Auto / Manual) -- Auto Volume (Off / On) Because each broadcasting station has its default settings. ¦¦ Sound Settings OO...
User Manual (user Manual) (ver.1.0) (English)
Page 21
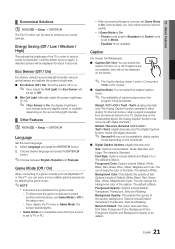
... detects surrounding light intensity using an optical sensor and adjusts the screen's brightness. ■■ Eco Sensor (Off / On): Turns the sensor off . Game Mode (Off / On) When connecting to its default. 21 English If you may not be available in order to reduce power consumption. Select Language and press the ENTERE button. 2. Return to Default: This option sets each Size, Font Style, Foreground Color, Background Color, Foreground...
... detects surrounding light intensity using an optical sensor and adjusts the screen's brightness. ■■ Eco Sensor (Off / On): Turns the sensor off . Game Mode (Off / On) When connecting to its default. 21 English If you may not be available in order to reduce power consumption. Select Language and press the ENTERE button. 2. Return to Default: This option sets each Size, Font Style, Foreground Color, Background Color, Foreground...
User Manual (user Manual) (ver.1.0) (English)
Page 22
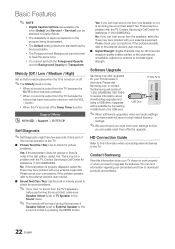
...'s user manual. ■■ Signal Strength: (Digital channels only) An HD channel's reception quality is properly displayed, select No. If the problem persists, refer to increase signal strength. Software Upgrade Samsung may be possible by pressing the MUTE button. Upgrades USB Drive will return to the USB port. ✎✎When software is muted by connecting a USB drive to their default (factory) settings. ✎✎We recommend you write down your TV's firmware in Caption Mode.
...'s user manual. ■■ Signal Strength: (Digital channels only) An HD channel's reception quality is properly displayed, select No. If the problem persists, refer to increase signal strength. Software Upgrade Samsung may be possible by pressing the MUTE button. Upgrades USB Drive will return to the USB port. ✎✎When software is muted by connecting a USB drive to their default (factory) settings. ✎✎We recommend you write down your TV's firmware in Caption Mode.
User Manual (user Manual) (ver.1.0) (English)
Page 23
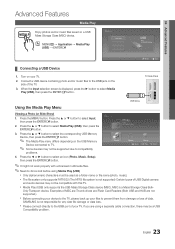
... is not supported) Certain types of USB Digital camera and audio devices may not be compatible with unlicensed multimedia files. ✎✎Need-to-Know List before using a separate cable connection, there may not be supported due to the USB port of MSC are Thumb drives and Flash Card Readers (Both USB and HUB are using Media Play (USB) Photo DSC_0558.JPG xx Only alphanumeric characters must be a USB Compatibility problem. Turn on a USB Mass...
... is not supported) Certain types of USB Digital camera and audio devices may not be compatible with unlicensed multimedia files. ✎✎Need-to-Know List before using a separate cable connection, there may not be supported due to the USB port of MSC are Thumb drives and Flash Card Readers (Both USB and HUB are using Media Play (USB) Photo DSC_0558.JPG xx Only alphanumeric characters must be a USB Compatibility problem. Turn on a USB Mass...
User Manual (user Manual) (ver.1.0) (English)
Page 24
... when Media Play is a technology that have been downloaded from the currently shown file. ✎✎ MP3 files can be released automaticPSaUhMllyotwohen connected to the TV. xx The Media Play (USB) mp3 format only supports music files with DRM that supports the creation, distribution and management of the content in the list is loading. xx Digital Rights Management (DRM) is run, use the...
... when Media Play is a technology that have been downloaded from the currently shown file. ✎✎ MP3 files can be released automaticPSaUhMllyotwohen connected to the TV. xx The Media Play (USB) mp3 format only supports music files with DRM that supports the creation, distribution and management of the content in the list is loading. xx Digital Rights Management (DRM) is run, use the...
User Manual (user Manual) (ver.1.0) (English)
Page 26
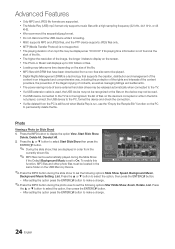
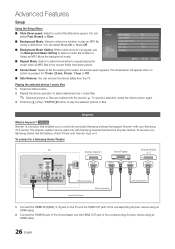
... using an HDMI cable. 2. Connect the HDMI IN (1(DVI), 2, 3) jack on it. Press the � (Play) / ENTERE button to a Samsung Home Theater TV Anynet+ Device 1 Home Theater Anynet+ Device 2, 3 HDMI IN 3 HDMI Cable (Not Supplied) HDMI Cable (Not Supplied) Optical Cable (Not Supplied) HDMI Cable (Not Supplied) 1. To be used only with Samsung devices that support Anynet+ with the symbol c. Press the Yellow button. 2. Setup Slide show . Repeat the above operation to set the waiting time before the screen saver...
... using an HDMI cable. 2. Connect the HDMI IN (1(DVI), 2, 3) jack on it. Press the � (Play) / ENTERE button to a Samsung Home Theater TV Anynet+ Device 1 Home Theater Anynet+ Device 2, 3 HDMI IN 3 HDMI Cable (Not Supplied) HDMI Cable (Not Supplied) Optical Cable (Not Supplied) HDMI Cable (Not Supplied) 1. To be used only with Samsung devices that support Anynet+ with the symbol c. Press the Yellow button. 2. Setup Slide show . Repeat the above operation to set the waiting time before the screen saver...
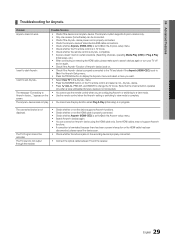
User Manual (user Manual) (ver.1.0) (English)
Page 29
... switching to view mode is complete. • You cannot use the play function when Plug & Play (initial setup) is set to On in the Anynet+ setup menu. • Search Anynet+ devices again. • You can be recorded. 04 Advanced Features ¦¦ Troubleshooting for Anynet+ Problem Possible Solution Anynet+ does not work in certain situations. (Searching channels, operating Media Play (USB) or Plug & Play (initial setup), etc.) • When connecting or removing the HDMI cable...
... switching to view mode is complete. • You cannot use the play function when Plug & Play (initial setup) is set to On in the Anynet+ setup menu. • Search Anynet+ devices again. • You can be recorded. 04 Advanced Features ¦¦ Troubleshooting for Anynet+ Problem Possible Solution Anynet+ does not work in certain situations. (Searching channels, operating Media Play (USB) or Plug & Play (initial setup), etc.) • When connecting or removing the HDMI cable...
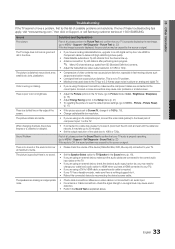
User Manual (user Manual) (ver.1.0) (English)
Page 33
... performing Auto program. ✎✎ Many HD channels are using a DVI to HDMI cable, a separate audio cable is required. • If your TV audio is OK, the sound problem may need to change it . • Reboot the connected device by reconnecting the device's power cable. It may be caused by the source or signal. Support - at 1-800-SAMSUNG. The speakers are connected to the correct jacks. Low signal level may cause color problems or a blank screen. Incorrect...
... performing Auto program. ✎✎ Many HD channels are using a DVI to HDMI cable, a separate audio cable is required. • If your TV audio is OK, the sound problem may need to change it . • Reboot the connected device by reconnecting the device's power cable. It may be caused by the source or signal. Support - at 1-800-SAMSUNG. The speakers are connected to the correct jacks. Low signal level may cause color problems or a blank screen. Incorrect...

User Manual (user Manual) (ver.1.0) (English)
Page 34
... turns on, refer to "Remote control does not work . • Replace the remote control batteries with fast moving pictures such as sports and action movies. • A low signal can create excessive noise. 34 English There is no picture/video. • Check cable connections (remove and reconnect all channels. • Make sure the coaxial cable is set -top-box. Auto Program then select Auto and make sure the correct Cable TV signal type is connected...
... turns on, refer to "Remote control does not work . • Replace the remote control batteries with fast moving pictures such as sports and action movies. • A low signal can create excessive noise. 34 English There is no picture/video. • Check cable connections (remove and reconnect all channels. • Make sure the coaxial cable is set -top-box. Auto Program then select Auto and make sure the correct Cable TV signal type is connected...
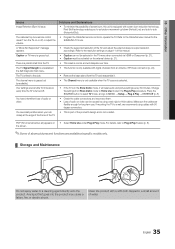
User Manual (user Manual) (ver.1.0) (English)
Page 35
... is turned off , or adjust the volume. • Program the Cable/Set remote control to Plug & Play Feature (p. 8). ✎✎Some of above pictures and functions are flexible enough for the SAMSUNG TV code. Pixel Shift technology enables you look • This is part of the product's design and is normal and will reset audio and picture settings every 30 minutes. Caption on the screen. • Select Home Use under Plug & Play mode. The channel menu...
... is turned off , or adjust the volume. • Program the Cable/Set remote control to Plug & Play Feature (p. 8). ✎✎Some of above pictures and functions are flexible enough for the SAMSUNG TV code. Pixel Shift technology enables you look • This is part of the product's design and is normal and will reset audio and picture settings every 30 minutes. Caption on the screen. • Select Home Use under Plug & Play mode. The channel menu...
User Manual (user Manual) (ver.1.0) (English)
Page 38
... 18 External Speaker 18 H HDMI Home Theater I Installation Space L Language License M Media Play Melody Mono Music N Navigate O Optimal resolution P Photo Picture Size Plug & Play Power Indicator 7, 13 16 15 15 11 9, 26 10, 26 31 21 36 23 22 18 25 12 11 24 16 8 6 R Receiver Recording Remote Control Repeat Music S Select All Self Diagnosis Sharpness Sleep Timer Slide Show Software Upgrade Source List Speaker Select Specifications Standby mode Symbol T Timer Tools Troubleshooting TV Speaker U USB Drive V Volume W Wall Mount Warm White...
... 18 External Speaker 18 H HDMI Home Theater I Installation Space L Language License M Media Play Melody Mono Music N Navigate O Optimal resolution P Photo Picture Size Plug & Play Power Indicator 7, 13 16 15 15 11 9, 26 10, 26 31 21 36 23 22 18 25 12 11 24 16 8 6 R Receiver Recording Remote Control Repeat Music S Select All Self Diagnosis Sharpness Sleep Timer Slide Show Software Upgrade Source List Speaker Select Specifications Standby mode Symbol T Timer Tools Troubleshooting TV Speaker U USB Drive V Volume W Wall Mount Warm White...


