

Open Source Guide (ENGLISH)
Page 1
... implemented by the two goals of preserving the free status of all the notices that you can get the source code. Each time you may copy and distribute the Program (or a work based on the Program), you ". If the Program does not specify a version number of this License and to certain responsibilities for software interchange; If you also do one of...
... implemented by the two goals of preserving the free status of all the notices that you can get the source code. Each time you may copy and distribute the Program (or a work based on the Program), you ". If the Program does not specify a version number of this License and to certain responsibilities for software interchange; If you also do one of...

Open Source Guide (ENGLISH)
Page 2
... a new library, and you want it free software that everyone can do so by permitting redistribution under the terms of each file should have at least the "copyright" line and a pointer to most effectively convey the exclusion of the greatest possible use to the library. To apply these terms ...(or, alternatively, under these terms, attach the following notices to the public, we recommend making it to be of warranty; You can redistribute and change. and each source file to where the full notice...
... a new library, and you want it free software that everyone can do so by permitting redistribution under the terms of each file should have at least the "copyright" line and a pointer to most effectively convey the exclusion of the greatest possible use to the library. To apply these terms ...(or, alternatively, under these terms, attach the following notices to the public, we recommend making it to be of warranty; You can redistribute and change. and each source file to where the full notice...
Quick Guide (easy Manual) (ver.1.0) (English)
Page 1
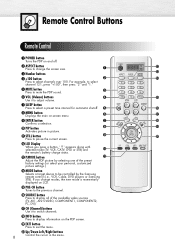
... current screen. LCD Display When you change the screen size. ˇ Number buttons ¨ +100 button Press to select a preset time interval for automatic shutoff. Remote Control Buttons Remote Control Œ POWER button Turns the PDP on and off. ´ ASPECT button Press to change modes, the new mode is momentarily displayed on LCD. Æ PRE-CH button Tunes to the previous channel. ı SOURCE button Press to display all of the preset factory settings (or select your personal, customized picture settings.) Ú MODE button...
... current screen. LCD Display When you change the screen size. ˇ Number buttons ¨ +100 button Press to select a preset time interval for automatic shutoff. Remote Control Buttons Remote Control Œ POWER button Turns the PDP on and off. ´ ASPECT button Press to change modes, the new mode is momentarily displayed on LCD. Æ PRE-CH button Tunes to the previous channel. ı SOURCE button Press to display all of the preset factory settings (or select your personal, customized picture settings.) Ú MODE button...

Quick Guide (easy Manual) (ver.1.0) (English)
Page 2
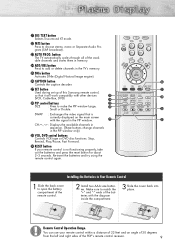
... other devices (VCR, Cable Box, DVD) ÷ PIP control buttons SIZE : Press to add or delete channels in Your Remote Control 1 Slide the back cover to choose stereo, mono or Separate Audio Program (SAP broadcast). ◊ AUTO PROG. Installing the Batteries in the TV's memory. ≠ DNIe button Activates DNIe (Digital Natural Image engine). - Remote Control Operation Range. ¸ SRS TSXT button Selects Trusurround XT mode. ˛ MTS button Press to open...
... other devices (VCR, Cable Box, DVD) ÷ PIP control buttons SIZE : Press to add or delete channels in Your Remote Control 1 Slide the back cover to choose stereo, mono or Separate Audio Program (SAP broadcast). ◊ AUTO PROG. Installing the Batteries in the TV's memory. ≠ DNIe button Activates DNIe (Digital Natural Image engine). - Remote Control Operation Range. ¸ SRS TSXT button Selects Trusurround XT mode. ˛ MTS button Press to open...

Quick Guide (easy Manual) (ver.1.0) (English)
Page 4
... S-VIDEO / AUDIO output jacks on your camcorder and set it to Video Mode. (For details, refer to your camcorder Owner's instructions.) 4. Turn on the camcorder. Press the SOURCE button to match he color coded input terminals and cable jacks. AUDIO - Insert the tape into the camcorder and press the Play button. Turn on your PDP. 2. Note • Please be sure to select "Video(AV1 or AV2)" or "S-Video". 3. Connecting a Camcorder Viewing camcorder tapes PDP Power Plug Camcorder S-VIDEO S-Video Cable Video Cable Audio Cable...
... S-VIDEO / AUDIO output jacks on your camcorder and set it to Video Mode. (For details, refer to your camcorder Owner's instructions.) 4. Turn on the camcorder. Press the SOURCE button to match he color coded input terminals and cable jacks. AUDIO - Insert the tape into the camcorder and press the Play button. Turn on your PDP. 2. Note • Please be sure to select "Video(AV1 or AV2)" or "S-Video". 3. Connecting a Camcorder Viewing camcorder tapes PDP Power Plug Camcorder S-VIDEO S-Video Cable Video Cable Audio Cable...

Quick Guide (easy Manual) (ver.1.0) (English)
Page 5
..., 2) input jacks on the PDP and Y/PB/PR output jacks on the DVD player. 2 Connect a Audio Cable between the AUDIO L/R(COMPONENT1, 2) input jacks on the PDP and the AUDIO output jacks on your DVD player, insert a DVD disc and press the Play button. • For an explanation of Component video, see your PDP. 2. To Play DVD: 1. Playing DVD PDP Power Plug DVD Player Video Cable Audio Cable How to match he color coded input terminals and cable jacks. Connecting a DVD Player (480i, 480p) This PDP displays the optimum picture in 720p mode. Press the SOURCE button...
..., 2) input jacks on the PDP and Y/PB/PR output jacks on the DVD player. 2 Connect a Audio Cable between the AUDIO L/R(COMPONENT1, 2) input jacks on the PDP and the AUDIO output jacks on your DVD player, insert a DVD disc and press the Play button. • For an explanation of Component video, see your PDP. 2. To Play DVD: 1. Playing DVD PDP Power Plug DVD Player Video Cable Audio Cable How to match he color coded input terminals and cable jacks. Connecting a DVD Player (480i, 480p) This PDP displays the optimum picture in 720p mode. Press the SOURCE button...

Quick Guide (easy Manual) (ver.1.0) (English)
Page 6
Turn on your DTV receiver owner's instructions. Watching DTV PDP Power Plug DTV Receiver or Video Cable Audio Cable DVI Cable Use a DVI-D connection cable. (sold separately) How to Connect 1 Connect the cable or antenna to select "COMPONENT1", "COMPONENT2" or "DVI". 3. Press the SOURCE button to the antenna input jack on the DTV. 2 Connect a Video cable between the Y, Pb, Pr (COMPONENT 1, 2) or DVI jack on the PDP and the Y, PB, PR (COMPONENT) or DVI output jacks on the DTV receiver. 3 Connect an Audio cable between the COMPONENT 1, 2 (L/R AUDIO) or DVI (L/R AUDIO) jacks...
Turn on your DTV receiver owner's instructions. Watching DTV PDP Power Plug DTV Receiver or Video Cable Audio Cable DVI Cable Use a DVI-D connection cable. (sold separately) How to Connect 1 Connect the cable or antenna to select "COMPONENT1", "COMPONENT2" or "DVI". 3. Press the SOURCE button to the antenna input jack on the DTV. 2 Connect a Video cable between the Y, Pb, Pr (COMPONENT 1, 2) or DVI jack on the PDP and the Y, PB, PR (COMPONENT) or DVI output jacks on the DTV receiver. 3 Connect an Audio cable between the COMPONENT 1, 2 (L/R AUDIO) or DVI (L/R AUDIO) jacks...
User Manual (user Manual) (ver.1.0) (English)
Page 4
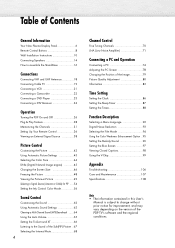
... New Plasma Display Panel 6 Remote Control Buttons 8 Wall Installation Instructions 10 Connecting Speakers 14 How to assemble the Stand-Base 16 Connections Connecting VHF and UHF Antennas 18 Connecting Cable TV 19 Connecting a VCR 21 Connecting a Camcorder 22 Connecting a DVD Player 23 Connecting a DTV Receiver 24 Operation Turning the PDP On and Off 26 Plug & Play Feature 28 Memorizing the Channels 31 Setting Up Your Remote Control 36 Viewing an External Signal Source 38 Picture Control Customizing the Picture 42 Using Automatic Picture Settings 43 Selecting the Color Tone...
... New Plasma Display Panel 6 Remote Control Buttons 8 Wall Installation Instructions 10 Connecting Speakers 14 How to assemble the Stand-Base 16 Connections Connecting VHF and UHF Antennas 18 Connecting Cable TV 19 Connecting a VCR 21 Connecting a Camcorder 22 Connecting a DVD Player 23 Connecting a DTV Receiver 24 Operation Turning the PDP On and Off 26 Plug & Play Feature 28 Memorizing the Channels 31 Setting Up Your Remote Control 36 Viewing an External Signal Source 38 Picture Control Customizing the Picture 42 Using Automatic Picture Settings 43 Selecting the Color Tone...

User Manual (user Manual) (ver.1.0) (English)
Page 5
PLASMA DISPLAY PANEL General Information Your New Plasma Display Panel 6 Remote Control Buttons 8 Wall Installation Instructions 10 Connecting Speakers 14 How to assemble the Stand-Base 16
PLASMA DISPLAY PANEL General Information Your New Plasma Display Panel 6 Remote Control Buttons 8 Wall Installation Instructions 10 Connecting Speakers 14 How to assemble the Stand-Base 16

User Manual (user Manual) (ver.1.0) (English)
Page 6
.... Sold Separately Owner's Instructions Remote Control (BN59-00377G)/ Ferrite Core 2EA AAA Batteries (4301-000103) (3301-001110) S-VIDEO Cable DVI Cable Component Cables (RCA) (AA39-40001E) (BN39-00072A) (AA39-00033A) Power Cord Antenna Cable Speaker Cables 6 (3903-000144) (BN39--00333A) (BN39-00530A) PC Cable (AA39-00288A) PC Audio Cable (BH39-00120A) CH( , ) button Press CH or CH to display all the parts shown here. Your New Plasma Display Panel Front Panel SOURCE/ENTER button Press to change Channels. Power On...
.... Sold Separately Owner's Instructions Remote Control (BN59-00377G)/ Ferrite Core 2EA AAA Batteries (4301-000103) (3301-001110) S-VIDEO Cable DVI Cable Component Cables (RCA) (AA39-40001E) (BN39-00072A) (AA39-00033A) Power Cord Antenna Cable Speaker Cables 6 (3903-000144) (BN39--00333A) (BN39-00530A) PC Cable (AA39-00288A) PC Audio Cable (BH39-00120A) CH( , ) button Press CH or CH to display all the parts shown here. Your New Plasma Display Panel Front Panel SOURCE/ENTER button Press to change Channels. Power On...

User Manual (user Manual) (ver.1.0) (English)
Page 7
... Antenna/Cable Network. ' EXT SPEAKER (8Ω) Connectors for Component. Rear Panel Œ DVI INPUT (DVI-D / L-AUDIO-R) Connect to the digital video and audio output jack of a device with DVI output. ´ MONITOR OUT (VIDEO / L-AUDIO-R) Outputs for external devices. ˇ PC INPUT (RGB IN / AUDIO) Connect to the video and audio output jack on your PC. ¨ FOR SERVICE ONLY Connector for service only. ˆ S-VIDEO (S-VIDEO / L-AUDIO-R) Video and audio inputs for external devices with an S-Video output, such as a camcorder or VCR. Ø AV1, AV2 (VIDEO / L-AUDIO-R) Video and audio...
... Antenna/Cable Network. ' EXT SPEAKER (8Ω) Connectors for Component. Rear Panel Œ DVI INPUT (DVI-D / L-AUDIO-R) Connect to the digital video and audio output jack of a device with DVI output. ´ MONITOR OUT (VIDEO / L-AUDIO-R) Outputs for external devices. ˇ PC INPUT (RGB IN / AUDIO) Connect to the video and audio output jack on your PC. ¨ FOR SERVICE ONLY Connector for service only. ˆ S-VIDEO (S-VIDEO / L-AUDIO-R) Video and audio inputs for external devices with an S-Video output, such as a camcorder or VCR. Ø AV1, AV2 (VIDEO / L-AUDIO-R) Video and audio...

User Manual (user Manual) (ver.1.0) (English)
Page 8
... (Channel) buttons Use it to adjust volume. ∏ SLEEP button Press to select a preset time interval for automatic shutoff. " MENU button Displays the main on the PDP screen. ˘ EXIT button Press to exit the menu. ¿ Up/Down Left/Right buttons 8 Control the cursor in picture. Ô STILL button Press to pause the current screen. LCD Display When you change the screen size. ˇ Number buttons ¨ +100 button Press to be controlled by the Samsung remote control (i.e., VCR, Cable, DVD players...
... (Channel) buttons Use it to adjust volume. ∏ SLEEP button Press to select a preset time interval for automatic shutoff. " MENU button Displays the main on the PDP screen. ˘ EXIT button Press to exit the menu. ¿ Up/Down Left/Right buttons 8 Control the cursor in picture. Ô STILL button Press to pause the current screen. LCD Display When you change the screen size. ˇ Number buttons ¨ +100 button Press to be controlled by the Samsung remote control (i.e., VCR, Cable, DVD players...
User Manual (user Manual) (ver.1.0) (English)
Page 9
... Audio Program (SAP broadcast). ◊ AUTO PROG. Installing the Batteries in memory. ± ADD/DEL button Press to make the PIP window Large, Small or Double. You can use your remote control is currently displayed on the main screen with the signal in the TV's memory. ≠ DNIe button Activates DNIe (Digital Natural Image engine). - Remote Control Operation Range. button The TV automatically cycles through all of the PDP's remote control receiver...
... Audio Program (SAP broadcast). ◊ AUTO PROG. Installing the Batteries in memory. ± ADD/DEL button Press to make the PIP window Large, Small or Double. You can use your remote control is currently displayed on the main screen with the signal in the TV's memory. ≠ DNIe button Activates DNIe (Digital Natural Image engine). - Remote Control Operation Range. button The TV automatically cycles through all of the PDP's remote control receiver...

User Manual (user Manual) (ver.1.0) (English)
Page 13
... used, the PDP may fall down. • Please secure the mounting bracket on the wall surface after setting its angle at 0°. Factory default How to Adjust Mounting Angle Please tighten the captive screw in the direction of the PDP and pull forward fully as directed by the arrow(as illustrated in the direction of the PDP). Connecting External Devices to the PDP 1 Be sure to remove...
... used, the PDP may fall down. • Please secure the mounting bracket on the wall surface after setting its angle at 0°. Factory default How to Adjust Mounting Angle Please tighten the captive screw in the direction of the PDP and pull forward fully as directed by the arrow(as illustrated in the direction of the PDP). Connecting External Devices to the PDP 1 Be sure to remove...

User Manual (user Manual) (ver.1.0) (English)
Page 22
... the camcorder and press the Play button. 22 Press the SOURCE button to your camcorder and set it to Video Mode. (For details, refer to select "Video(AV1 or AV2)" or "S-Video". 3. Note • Please be sure to Connect Connect a Video/Audio cable between the VIDEO or S-VIDEO / L - Connecting a Camcorder Viewing camcorder tapes PDP Power Plug Camcorder S-VIDEO S-Video Cable Video Cable Audio Cable How to match he color coded input terminals and cable jacks. Viewing Tapes 1. Set the IN/OUT switch on your camcorder Owner's instructions.) 4. AUDIO -
... the camcorder and press the Play button. 22 Press the SOURCE button to your camcorder and set it to Video Mode. (For details, refer to select "Video(AV1 or AV2)" or "S-Video". 3. Note • Please be sure to Connect Connect a Video/Audio cable between the VIDEO or S-VIDEO / L - Connecting a Camcorder Viewing camcorder tapes PDP Power Plug Camcorder S-VIDEO S-Video Cable Video Cable Audio Cable How to match he color coded input terminals and cable jacks. Viewing Tapes 1. Set the IN/OUT switch on your camcorder Owner's instructions.) 4. AUDIO -
User Manual (user Manual) (ver.1.0) (English)
Page 36
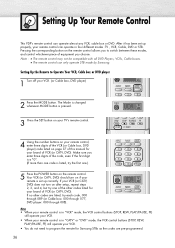
...'s remote control. 4 Using the number buttons on your brand of the VCR (or Cable box, DVD player) code listed on the remote control. Setting Up Your Remote Control This PDP's remote control can only operate STB made by Samsung. Setting Up the Remote to switch between these modes, and control whichever piece of equipment you enter three digits of the code, even if the first digit is a "0". (If more than one of VCR (or CATV, DVD). The Mode is changed whenever MODE button...
...'s remote control. 4 Using the number buttons on your brand of the VCR (or Cable box, DVD player) code listed on the remote control. Setting Up Your Remote Control This PDP's remote control can only operate STB made by Samsung. Setting Up the Remote to switch between these modes, and control whichever piece of equipment you enter three digits of the code, even if the first digit is a "0". (If more than one of VCR (or CATV, DVD). The Mode is changed whenever MODE button...

User Manual (user Manual) (ver.1.0) (English)
Page 77
... SOURCE button on the remote control or SOURCE button on your particular version of PC monitor and its resolution. The table below shows all of the display modes that the PC is connected. • Connect only a PC monitor to the monitor output port while viewing the PC screen. (Otherwise, random signals might appear on the type of Windows.) Check your PC instruction book for information about connecting your PC to enter the VIDEO mode...
... SOURCE button on the remote control or SOURCE button on your particular version of PC monitor and its resolution. The table below shows all of the display modes that the PC is connected. • Connect only a PC monitor to the monitor output port while viewing the PC screen. (Otherwise, random signals might appear on the type of Windows.) Check your PC instruction book for information about connecting your PC to enter the VIDEO mode...

User Manual (user Manual) (ver.1.0) (English)
Page 78
...; or √ button to change the value of the item, using the on-screen gauge as your guide. Adjusting the PC Screen Adjusting the R.G.B Preset: • Press the SOURCE button to Custom and a PC is connected. Press the ▲ or ▼ button to select "Picture", then press the ENTER button. 2 Press the ▲ or ▼ button to exit. 78 TV Picture Mode Custom Color Tone Color Control Film Mode Size PIP † More...
...; or √ button to change the value of the item, using the on-screen gauge as your guide. Adjusting the PC Screen Adjusting the R.G.B Preset: • Press the SOURCE button to Custom and a PC is connected. Press the ▲ or ▼ button to select "Picture", then press the ENTER button. 2 Press the ▲ or ▼ button to exit. 78 TV Picture Mode Custom Color Tone Color Control Film Mode Size PIP † More...
User Manual (user Manual) (ver.1.0) (English)
Page 88
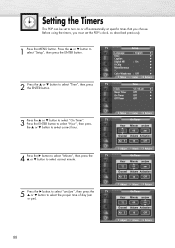
... Channel Volume Activation Air 3 10 Off Adjust Move Return TV On Timer Hour Minute am/pm 12 00 am √ Off √ Off √ Off √ 3 Press the ▲ or ▼ button to select "On Timer". Setting the Timers This PDP can be set to turn on or off automatically at specific times that you must set the PDP's clock, as described previously. 1 Press the MENU button...
... Channel Volume Activation Air 3 10 Off Adjust Move Return TV On Timer Hour Minute am/pm 12 00 am √ Off √ Off √ Off √ 3 Press the ▲ or ▼ button to select "On Timer". Setting the Timers This PDP can be set to turn on or off automatically at specific times that you must set the PDP's clock, as described previously. 1 Press the MENU button...
User Manual (user Manual) (ver.1.0) (English)
Page 106
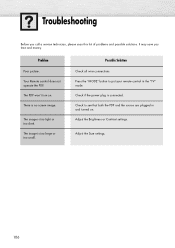
.... Problem Poor picture. There is connected. Check if the power plug is no screen image. The PDP won't turn on . Press the "MODE" button to see that both the PDP and the source are plugged in the "TV" mode. Adjust the Brightness or Contrast settings. Your Remote control does not operate the PDP. Possible Solution Check all wire connections. The image is too large or too small. Adjust the Size settings. 106 The image is too light...
.... Problem Poor picture. There is connected. Check if the power plug is no screen image. The PDP won't turn on . Press the "MODE" button to see that both the PDP and the source are plugged in the "TV" mode. Adjust the Brightness or Contrast settings. Your Remote control does not operate the PDP. Possible Solution Check all wire connections. The image is too large or too small. Adjust the Size settings. 106 The image is too light...


