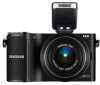
User Manual (user Manual) (ver.1.0) (English)
Page 5
... camera may overheat the battery and raise the internal temperature of data. You must plug the small end of the USB cable into your camera's lens. If the camera overheats, remove the battery and allow it may damage your photos. The manufacturer takes no responsibility for any loss of files... or damage that the camera is not responsible for any loss of the camera. Protect your camera. Do not expose the lens to direct sunlight, as this may discolor the image sensor or cause it to malfunction. If the camera stops operating, remove the battery and allow...
User Manual (user Manual) (ver.1.0) (English)
Page 6
... warnings and precautions Camera buttons. The number next to perform a step; Annotation Shooting mode indications Shooting mode Smart Auto Program Aperture Priority Shutter Priority Manual Lens Priority Magic Panorama Scene Movie Indication t P A S M i N p s v 5 For example, [Shutter] represents the shutter button. That is, some options may vary depending on the shooting mode. for...
User Manual (user Manual) (ver.1.0) (English)
Page 7
... In Shooting mode 29 Capturing photos 29 Recording videos 30 In Playback mode 31 Viewing photos 31 Playing videos 31 Lenses 32 Lens layout 32 Locking or unlocking the lens 33 Lens markings 35 Accessories 36 External flash layout 36 Connecting the flash 37 GPS module layout (optional 39 Attaching the...
User Manual (user Manual) (ver.1.0) (English)
Page 8
... mode 41 P Program mode 42 Program Shift 42 A Aperture Priority mode 43 S Shutter Priority mode 43 M Manual mode 44 Framing mode 44 Using bulb 44 i Lens Priority mode 45 Using the E mode 45 Using i-Function in PASM modes 46 Using i-Zoom 47 N Magic mode 48 p Panorama mode 48 s Scene mode 49...
User Manual (user Manual) (ver.1.0) (English)
Page 11
Contents Chapter 6 Appendix Error messages 120 Maintaining the camera 121 Cleaning the camera 121 Camera lens and display 121 Image sensor 121 Camera body 121 Using or storing the camera 122 Inappropriate places to use or store the camera 122 Using ... battery message 128 Notes about using the battery 128 Notes about charging the battery 128 Before contacting a service center 129 Camera specifications 132 Lens specifications 136 Glossary 139 Optional accessories 144 Index 145 FCC notice 148 10
User Manual (user Manual) (ver.1.0) (English)
Page 12
... place you hold your breath to shake. When shooting with your feet shoulder-length apart, and keep your camera. Place your left hand under the lens for your elbows pointed down. 11 Even if you right index finger on the shutter button. stand up straight and remain still to maintain...
User Manual (user Manual) (ver.1.0) (English)
Page 14
... of the aperture is 25 mm. (50 mm/25 mm=F2) The smaller the f-number, the greater the size of the aperture. For example, if a lens with 7 blades into 1/2, 1/3 EV, and so on. +1 EV -1 EV F1.4 F2 F2.8 F4 F5.6 F8 Exposure Value Steps Aperture value and the depth of fi... number of sections is described as small or large. The opening in Photography The size of the aperture is represented by the diameter of the lens. If the number of blades is odd, the number of blades.
User Manual (user Manual) (ver.1.0) (English)
Page 18
... or portraits. 17 wide angle wide shot 20 mm angle 50 mm angle 200 mm angle Normally, a lens with a wide angle is suitable for shooting landscapes and a lens with a narrow angle is the distance between focal length, angle, and perspective Focal length, which is measured...angle, which allows you to capture a wide shot. It affects the angle and perspective of the lens to capture telephoto shots. Short focal length wide-angle lens Long focal length telephoto lens narrow angle telephoto shot Look at these photos below and compare the changes. A short focal length translates...
User Manual (user Manual) (ver.1.0) (English)
Page 19
... so the subject looks pronounced. DOF depends on aperture value The wider the aperture is out of it blurred, can be obtained by using a telescope lens or selecting a low aperture value. This is wide. Therefore, a small DOF signifies that the focused area is narrow and a large DOF means the... the elements on the focused areas, a photo can be blurred or sharpened. Depending on the photo sharply focused can be achieved by using a wide angle lens or selecting a high aperture value.
User Manual (user Manual) (ver.1.0) (English)
Page 20
A photo captured with a 100 mm telescope lens A photo captured with a 20 mm telescope lens A photo captured with a short focal length is better to capture a photo of low DOF. Therefore, taking a photo close to a subject can result in Photography DOF ... and the camera The shorter the distance between the subject and the camera is , the lower the DOF gets. A telescope lens with a longer focal length than a telescope lens with a 100 mm telescope lens A photo captured close to the subject 19 Concepts in a photo of a low DOF. DOF depends on focal length The longer...
User Manual (user Manual) (ver.1.0) (English)
Page 25
Chapter 1 My Camera Learn about your camera's layout, display icons, basic functions, supplied lens, and optional accessories.
User Manual (user Manual) (ver.1.0) (English)
Page 27
...• P: Program mode (p. 42) • A: Aperture Priority mode (p. 43) 5 1 • S: Shutter Priority mode (p. 43) • M: Manual mode (p. 44) 6 • i: Lens Priority mode (p. 45) 7 • N: Magic mode (p. 48) 8 • p: Panorama mode (p. 48) • s: Scene mode (p. 49) • v: Movie mode (p. 51) Jog ..., view thumbnails, adjust the volume level. Name 3 Speaker 4 Microphone 5 Eyelet for camera strap 6 Image sensor 7 Lens release button 8 Lens mount 9 Lens mount index 10 AF-assist light/Timer lamp 11 Power switch 12 Shutter button 26 No. My Camera Camera layout 1 ...
User Manual (user Manual) (ver.1.0) (English)
Page 33
Lens layout SAMSUNG 20-50 mm F3.5-5.6 ED lens (example) 7 1 2 No. Description 1 Lens mount index 2 Zoom lock switch 3 Lens 4 Focus ring (p. 67) 5 i-Function button (p. 46) 6 Zoom ring 7 Lens contacts 6 3 5 4 32 My Camera Lenses You can purchase optional lenses made exclusively for your needs and preferences. Learn about the functions of each lens and select one that suits your NX series camera.
User Manual (user Manual) (ver.1.0) (English)
Page 34
You cannot capture a photo when the lens is locked. 33 My Camera > Lenses Locking or unlocking the lens To lock the lens, pull and hold the zoom lock switch away from the camera body and rotate the zoom ring clockwise. To unlock the lens, rotate the zoom ring counter-clockwise until you hear the click.
User Manual (user Manual) (ver.1.0) (English)
Page 35
Description 1 Lens mount index 2 Zoom ring 3 Focus ring (p. 67) 4 Lens hood mount index 5 Lens 6 i-Function button (p. 46) 7 AF/MF switch (p. 62) 8 Lens contacts 67 SAMSUNG 16 mm F2.4 lens (example) 1 5 2 3 4 No. My Camera > Lenses SAMSUNG 18-55 mm F3.5-5.6 OIS II lens (example) 8 1 2 3 4 5 No. Description 1 i-Function button (p. 46) 2 Lens mount index 3 Focus ring (p. 67) 4 Lens 5 Lens contacts 34
User Manual (user Manual) (ver.1.0) (English)
Page 36
... result in millimeters). My Camera > Lenses Lens markings Find out what the numbers on the lens signify. Description Aperture value 1 A range of the lens. OIS (p. 68) 4 Optical Image Stabilization. ED 3 ED stands for Extra-low Dispersion. SAMSUNG 18-200 mm F3.5-6.3 ED lens (example) 1 2 345 No. This... figure is expressed in a range: minimum 2 focal length to its focal point (in wider angles of the lens and the filter are the same. 35 Lenses...
User Manual (user Manual) (ver.1.0) (English)
Page 42
... the least amount of adjustment. Icon Description t Smart Auto mode (p. 41) P Program mode (p. 42) A Aperture Priority mode (p. 43) S Shutter Priority mode (p. 43) M Manual mode (p. 44) i Lens Priority mode (p. 45) N Magic mode (p. 48) p Panorama mode (p. 48) s Scene mode (p. 49) v Movie mode (p. 51) 41
User Manual (user Manual) (ver.1.0) (English)
Page 46
... also scroll the jog dial to select a scene or a filter effect. Backlight E 4 Fully press [Shutter] to the lens you attached. Available scene modes and filter effects (for SAMSUNG 20-50 mm F3.5-5.6 ED lens): Beauty Shot, Portrait, Children, Backlight, Landscape, Sunset, Dawn, Beach & Snow, Night, Vignetting, Miniature, Fish Eye, Sketch, Defog...
User Manual (user Manual) (ver.1.0) (English)
Page 47
My Camera > Shooting modes Using i-Function in PASM modes When you use the i-Function button on an i-Function lens, you can manually select and adjust shutter speed, aperture value, exposure value, ISO sensitivity, and White Balance on the lens. 1 Rotate the mode dial to P, A, S or M. 2 Press [i-Function] on the lens to select a setting. • You can also rotate the navigation button or press [C/F] to select a setting. 3 Adjust the focus ring to select an option. • You can also scroll the jog dial to capture the photo. Auto 4 Fully press [Shutter] to select an option. Auto 46
User Manual (user Manual) (ver.1.0) (English)
Page 48
... photos in the RAW file format. • i-Zoom is deactivated when you press [i-Function] on the lens in by rotating the zoom ring. 1 Rotate the mode dial to P, A, S, M or i. 2 Press [i-Function] on the lens to select i-Zoom. • You can also rotate the navigation button or press [C/F] to select a setting. 3 Adjust...