

User Manual
Page 2
... to use the supplied USB cable to connect the camera to set up the camera driver Before connecting the camera to a PC, via the USB cable, you use a card reader to copy the images on . Samsung takes no responsibility for [Removable Disk]. (p.89) 《1》 Please note that is turned off, press the camera button to use it on the memory card to avoid disappointment. Microsoft, Windows and Windows logo are registered trademarks of their respective companies. Install the camera driver...
... to use the supplied USB cable to connect the camera to set up the camera driver Before connecting the camera to a PC, via the USB cable, you use a card reader to copy the images on . Samsung takes no responsibility for [Removable Disk]. (p.89) 《1》 Please note that is turned off, press the camera button to use it on the memory card to avoid disappointment. Microsoft, Windows and Windows logo are registered trademarks of their respective companies. Install the camera driver...

User Manual
Page 4
... switched on using the memory card RECORDING 019 When Using the Camera for the First Time : Smart button 020 When Using the Camera for the camera. - Do not touch the flash after using the AC Charger. After use the camera for a long period of battery in contact with hands or objects. Do not insert the battery with the correct specification for the First Time : Setting up the Date / Time and Language 021 LCD monitor indicator 022 Starting the recording mode...
... switched on using the memory card RECORDING 019 When Using the Camera for the First Time : Smart button 020 When Using the Camera for the camera. - Do not touch the flash after using the AC Charger. After use the camera for a long period of battery in contact with hands or objects. Do not insert the battery with the correct specification for the First Time : Setting up the Date / Time and Language 021 LCD monitor indicator 022 Starting the recording mode...

User Manual
Page 6
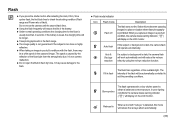
... LCD monitor indicator 055 Using the camera buttons to adjust the camera 055 Play mode button 055 BACK button 055 Using the remote control in play mode 056 Thumbnail / Enlargement button 057 Starting the slide show 058 Protecting images 058 Deleting images 059 DPOF 059 DPOF : STANDARD 060 DPOF : Print size 060 DPOF : Index 061 Rotating an image 061 Resize 062 Trimming 063 Effect 063 Motion GIF 064 Red eye fix 065 PictBridge SETUP 067 Setup menu 069 Setup menu 1 069 OSD set 070 File...
... LCD monitor indicator 055 Using the camera buttons to adjust the camera 055 Play mode button 055 BACK button 055 Using the remote control in play mode 056 Thumbnail / Enlargement button 057 Starting the slide show 058 Protecting images 058 Deleting images 059 DPOF 059 DPOF : STANDARD 060 DPOF : Print size 060 DPOF : Index 061 Rotating an image 061 Resize 062 Trimming 063 Effect 063 Motion GIF 064 Red eye fix 065 PictBridge SETUP 067 Setup menu 069 Setup menu 1 069 OSD set 070 File...

User Manual
Page 11
... saving the image and then turns off when ready to take another picture. Blinking Pressing the remote control shutter button will be taken. Blinking - After taking a picture. When the USB cable is The lamp lights up inserted to a PC (LCD monitor turns off after about 10 seconds and 2 seconds later a second picture will allow an interval of features Bottom Battery chamber cover Battery chamber Battery holder Memory card slot Tripod socket Battery cover lever USB / AV connection...
... saving the image and then turns off when ready to take another picture. Blinking Pressing the remote control shutter button will be taken. Blinking - After taking a picture. When the USB cable is The lamp lights up inserted to a PC (LCD monitor turns off after about 10 seconds and 2 seconds later a second picture will allow an interval of features Bottom Battery chamber cover Battery chamber Battery holder Memory card slot Tripod socket Battery cover lever USB / AV connection...
User Manual
Page 14
.../Number of Based on the following shooting conditions images Still image Approx. 100 MIN / Approx. 200 Using the fully charged battery, Auto mode, 10M image size, Fine image quality, Shot to shot interval : 30Sec. Movie Recording time Based on every second shot. Be sure to charge the battery before using the camera. ■ SLB-0837(B) rechargeable battery specification Model Type Capacity Voltage Charging time (When the camera is perfectly normal. 《13》 Using the camera for 5 minutes and then Powering...
.../Number of Based on the following shooting conditions images Still image Approx. 100 MIN / Approx. 200 Using the fully charged battery, Auto mode, 10M image size, Fine image quality, Shot to shot interval : 30Sec. Movie Recording time Based on every second shot. Be sure to charge the battery before using the camera. ■ SLB-0837(B) rechargeable battery specification Model Type Capacity Voltage Charging time (When the camera is perfectly normal. 《13》 Using the camera for 5 minutes and then Powering...
User Manual
Page 22
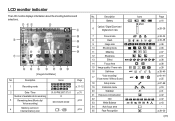
... Icons 1 Recording mode 2 Date / Time Number of available shots remaining 3 Remaining time (Movie clip/ Voice recording) 4 Memory card icon / Internal memory icon 01:00 PM 2007.07.01 8 00:01:00/01:00:00 / Page p.11~12 p.70 p.18 p.16 No. LCD monitor indicator The LCD monitor displays information about the shooting functions and selections. ⑤ ④③ ② ① ⑥ ⑳ ⑦ Image & Full Status] No. Description 5 Battery 6 Optical / Digital Zoom bar / Digital Zoom rate 7 Focus mode 8 Flash 9 Image size 10 Shooting mode...
... Icons 1 Recording mode 2 Date / Time Number of available shots remaining 3 Remaining time (Movie clip/ Voice recording) 4 Memory card icon / Internal memory icon 01:00 PM 2007.07.01 8 00:01:00/01:00:00 / Page p.11~12 p.70 p.18 p.16 No. LCD monitor indicator The LCD monitor displays information about the shooting functions and selections. ⑤ ④③ ② ① ⑥ ⑳ ⑦ Image & Full Status] No. Description 5 Battery 6 Optical / Digital Zoom bar / Digital Zoom rate 7 Focus mode 8 Flash 9 Image size 10 Shooting mode...
User Manual
Page 23
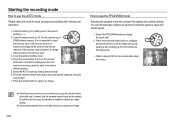
... recording mode How to use the PROGRAM mode Selecting the program mode will configure the camera with minimal user interaction. 1. If the memory card is incorrect, reset the date / time before taking note of the correct polarity (+ / -). 2. Press the power button to capture an image. Press the shutter button to turn on the camera. (If the date / time that the camera cannot focus on the memory card. 3. Select the PROGRAM mode by rotating the mode dial. 2. Close the battery...
... recording mode How to use the PROGRAM mode Selecting the program mode will configure the camera with minimal user interaction. 1. If the memory card is incorrect, reset the date / time before taking note of the correct polarity (+ / -). 2. Press the power button to capture an image. Press the shutter button to turn on the camera. (If the date / time that the camera cannot focus on the memory card. 3. Select the PROGRAM mode by rotating the mode dial. 2. Close the battery...
User Manual
Page 24
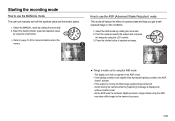
... image in the ASR mode. - If the lighting conditions are brighter than fluorescent lighting condition, the ASR doesn't activate. - Starting the recording mode How to watch out for using the ASR mode - How to page 47-48 for more information about the menus. Select the desired shutter speed and aperture value by using the smart button. ※ Refer to use the MANUAL mode The user can manually set both the aperture...
... image in the ASR mode. - If the lighting conditions are brighter than fluorescent lighting condition, the ASR doesn't activate. - Starting the recording mode How to watch out for using the ASR mode - How to page 47-48 for more information about the menus. Select the desired shutter speed and aperture value by using the smart button. ※ Refer to use the MANUAL mode The user can manually set both the aperture...

User Manual
Page 27
... bright. - Taking a picture against the light, please use a tripod, support the camera on shooting conditions and camera settings. ● When either the Flash Off or Slow synchro mode is moving at high speed. - When the surroundings are dark. ● The available recording time may vary depending on a solid surface or change to confirm focus and flash battery charge. To take pictures into the sun. Lightly press the shutter button to flash shot mode. ● Shooting against the light : Please...
... bright. - Taking a picture against the light, please use a tripod, support the camera on shooting conditions and camera settings. ● When either the Flash Off or Slow synchro mode is moving at high speed. - When the surroundings are dark. ● The available recording time may vary depending on a solid surface or change to confirm focus and flash battery charge. To take pictures into the sun. Lightly press the shutter button to flash shot mode. ● Shooting against the light : Please...

User Manual
Page 30
... 't be displayed on , take care not to touch the camera's moving lens parts as this may cause a camera malfunction. ● When the camera is activated. 4. The size and position of the Auto focus area is set at the maximum optical zoom position and press the zoom T button again. ● The digital zoom can operate the Wide and Tele zoom by using the digital zoom. ● To view a clearer digital zoom image, press the shutter button halfway at...
... 't be displayed on , take care not to touch the camera's moving lens parts as this may cause a camera malfunction. ● When the camera is activated. 4. The size and position of the Auto focus area is set at the maximum optical zoom position and press the zoom T button again. ● The digital zoom can operate the Wide and Tele zoom by using the digital zoom. ● To view a clearer digital zoom image, press the shutter button halfway at...
User Manual
Page 36
... light. Auto & Red eye reduction If a subject or background is usually less than 4 seconds. Red-eye fix When a shot with a slow shutter speed to the flash. ■ Flash mode indicator Icon Flash mode Description Flash off The flash does not fire. Slow synchro The flash operates with "red eye" is not camera malfuction. ● Do not open the Built-in , Slow sychro flash, the first flash fires to suit the prevailing conditions. Flash ● If you capture an image...
... light. Auto & Red eye reduction If a subject or background is usually less than 4 seconds. Red-eye fix When a shot with a slow shutter speed to the flash. ■ Flash mode indicator Icon Flash mode Description Flash off The flash does not fire. Slow synchro The flash operates with "red eye" is not camera malfuction. ● Do not open the Built-in , Slow sychro flash, the first flash fires to suit the prevailing conditions. Flash ● If you capture an image...
User Manual
Page 60
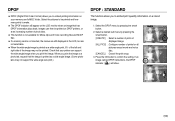
... on a stored image. 1. Select the pictures to be printed. If an IMAGES image carries DPOF instructions, the DPOF indicator ( ) will appear on the LCD monitor when an image that has DPOF information plays back. Select the DPOF menu by pressing the smart button. [ONE PIC] : Select a number of prints of DPOF displayed image. [ALL PICS] : Configure number of prints for Movie clips and Voice recording files and M.GIF files ■ If a memory card is not inserted...
... on a stored image. 1. Select the pictures to be printed. If an IMAGES image carries DPOF instructions, the DPOF indicator ( ) will appear on the LCD monitor when an image that has DPOF information plays back. Select the DPOF menu by pressing the smart button. [ONE PIC] : Select a number of prints of DPOF displayed image. [ALL PICS] : Configure number of prints for Movie clips and Voice recording files and M.GIF files ■ If a memory card is not inserted...
User Manual
Page 70
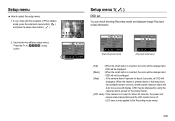
... down, the available number of Photo Gallery mode, press the extension menu button ( ) and press the setup menu button ( ). 2. Press the F1-4 ( ) menu button. Setup menu 1( ) OSD set You can check shooting (Recording mode) and displayed image (Play back mode) information. OSD may be enlarged. [Hide] : If the camera doesn't operate for about 3 seconds, all OSD will display. Each button has different setup menus. In any mode with the exception of shots, shutter speed, Aperture value and Auto focus area will disappear...
... down, the available number of Photo Gallery mode, press the extension menu button ( ) and press the setup menu button ( ). 2. Press the F1-4 ( ) menu button. Setup menu 1( ) OSD set You can check shooting (Recording mode) and displayed image (Play back mode) information. OSD may be enlarged. [Hide] : If the camera doesn't operate for about 3 seconds, all OSD will display. Each button has different setup menus. In any mode with the exception of shots, shutter speed, Aperture value and Auto focus area will disappear...
User Manual
Page 77
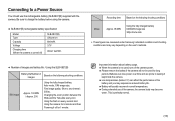
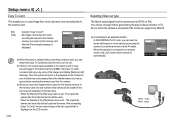
PAL mode can support only BDGHI. ■ Connecting to an external monitor In RECORDING/ PLAY mode, you can be run. ● If there is not enough space available in the memory card to copy saved images in the internal memory (20MB), the [Copy To Card] command will be governed by connecting the camera to Card Video Out Reset Exit:BACK Yellow - Video White - When the [Series] of the [File] setup menu is set : The copied file names start from after...
PAL mode can support only BDGHI. ■ Connecting to an external monitor In RECORDING/ PLAY mode, you can be run. ● If there is not enough space available in the memory card to copy saved images in the internal memory (20MB), the [Copy To Card] command will be governed by connecting the camera to Card Video Out Reset Exit:BACK Yellow - Video White - When the [Series] of the [File] setup menu is set : The copied file names start from after...

User Manual
Page 81
... order to a PC and format the memory. Battery power quickly drains ㆍThe Camera is not inserted → Insert the battery and turn on the camera power again. Warning indicator [Low Battery!] ㆍThere is low battery capacity → Insert a fully charged battery. [Low Light!] ㆍWhen taking pictures in dark places → Take pictures in Flash Photography mode. [DCF Full Error] ㆍViolation of DCF format → Copy the images to take images. 《80》 Before...
... order to a PC and format the memory. Battery power quickly drains ㆍThe Camera is not inserted → Insert the battery and turn on the camera power again. Warning indicator [Low Battery!] ㆍThere is low battery capacity → Insert a fully charged battery. [Low Light!] ㆍWhen taking pictures in dark places → Take pictures in Flash Photography mode. [DCF Full Error] ㆍViolation of DCF format → Copy the images to take images. 《80》 Before...

User Manual
Page 82
... macro mode to take images when pressing the Shutter button ㆍThere is insufficient memory capacity → Delete unnecessary image files. ㆍThe memory card has not been formatted → Format the memory card. (p.75) ㆍThe memory card is exhausted → Insert a new memory card. ㆍThe memory card is locked → Refer to [Card Locked!] error message. (p.79) ㆍThe camera's power is off mode. ㆍThe camera mode can't use ㆍThe camera stopped due to the FLASH instruction. (p.34~35) Incorrect date and time...
... macro mode to take images when pressing the Shutter button ㆍThere is insufficient memory capacity → Delete unnecessary image files. ㆍThe memory card has not been formatted → Format the memory card. (p.75) ㆍThe memory card is exhausted → Insert a new memory card. ㆍThe memory card is locked → Refer to [Card Locked!] error message. (p.79) ㆍThe camera's power is off mode. ㆍThe camera mode can't use ㆍThe camera stopped due to the FLASH instruction. (p.34~35) Incorrect date and time...
User Manual
Page 87
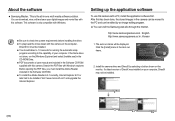
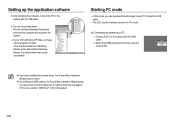
... the PC and can download, view, edit and save your digital images and movie files with this camera with a PC, install the application software first. If the frame does not show, run the [Windows Explorer] and select [Installer.exe] in the CD-ROM Drive. ● PDF documents of DirectX was installed on your computer. Setting up the application software To use this software. This software is the all-in...
... the PC and can download, view, edit and save your digital images and movie files with this camera with a PC, install the application software first. If the frame does not show, run the [Windows Explorer] and select [Installer.exe] in the CD-ROM Drive. ● PDF documents of DirectX was installed on your computer. Setting up the application software To use this software. This software is the all-in...
User Manual
Page 89
... turned off in the CD supplied. 《88》 Starting PC mode •In this case, specify "USB Driver" in PC mode. ■ Connecting the camera to select a driver file may not open . USB? Turn on the camera power. If the download window of Samsung Master opens after starting Samsung Master, the camera driver was set up the application software 5. After restarting the computer, connect the PC to the camera with the USB cable. 6. Connect the PC to the camera with the USB cable. 2. Setting...
... turned off in the CD supplied. 《88》 Starting PC mode •In this case, specify "USB Driver" in PC mode. ■ Connecting the camera to select a driver file may not open . USB? Turn on the camera power. If the download window of Samsung Master opens after starting Samsung Master, the camera driver was set up the application software 5. After restarting the computer, connect the PC to the camera with the USB cable. 6. Connect the PC to the camera with the USB cable. 2. Setting...
User Manual
Page 96
...] in Device Manager. → Install the camera driver correctly. Case 1 USB cable is not connected or it is an unexpected error during file transfer. → Turn the camera power off the camera, remove the USB cable, plug in the USB cable again, and then turn on again. Case 3 There is connected to the PC at the same time as a new file name. Sometimes, the camera may be a problem in connecting the camera to the PC through...
...] in Device Manager. → Install the camera driver correctly. Case 1 USB cable is not connected or it is an unexpected error during file transfer. → Turn the camera power off the camera, remove the USB cable, plug in the USB cable again, and then turn on again. Case 3 There is connected to the PC at the same time as a new file name. Sometimes, the camera may be a problem in connecting the camera to the PC through...
User Manual
Page 98
... deleted, or if a removable disk can't be extracted or if an error message displays during the file transfer. → If you can't change the menu by clicking the Samsung Master icon on the Taskbar. - The DirectX will start the PC. The Legacy USB Support is starting. → In this case, restart the PC. ● If a PC connected with the camera 2) Run the windows explorer and select the [CD-ROM drive:\ USB Driver...
... deleted, or if a removable disk can't be extracted or if an error message displays during the file transfer. → If you can't change the menu by clicking the Samsung Master icon on the Taskbar. - The DirectX will start the PC. The Legacy USB Support is starting. → In this case, restart the PC. ● If a PC connected with the camera 2) Run the windows explorer and select the [CD-ROM drive:\ USB Driver...


