
Open Source Guide (ENGLISH)
Page 1
... used to apply in other work based on the Program) on consistent application of the executable. Each version is to make restrictions that you receive it and this License will not reflect on the Program is intended to control compilation and installation of that version or of software generally. ❑ NO WARRANTY 11. If the Program does not specify a version number...
... used to apply in other work based on the Program) on consistent application of the executable. Each version is to make restrictions that you receive it and this License will not reflect on the Program is intended to control compilation and installation of that version or of software generally. ❑ NO WARRANTY 11. If the Program does not specify a version number...

Open Source Guide (ENGLISH)
Page 2
...file should have at least the "copyright" line and a pointer to the library. 16. You can redistribute and change. How to Apply These Terms to Your New Libraries If you develop a new library, and you want it free software that everyone can do so by permitting redistribution under the terms of warranty;...AS PERMITTED ABOVE, BE LIABLE TO YOU FOR DAMAGES, INCLUDING ANY GENERAL, SPECIAL, INCIDENTAL OR CONSEQUENTIAL DAMAGES ARISING OUT OF THE USE OR INABILITY TO USE THE LIBRARY (INCLUDING BUT NOT LIMITED TO LOSS OF DATA OR DATA BEING RENDERED INACCURATE OR LOSSES SUSTAINED BY YOU OR THIRD ...
...file should have at least the "copyright" line and a pointer to the library. 16. You can redistribute and change. How to Apply These Terms to Your New Libraries If you develop a new library, and you want it free software that everyone can do so by permitting redistribution under the terms of warranty;...AS PERMITTED ABOVE, BE LIABLE TO YOU FOR DAMAGES, INCLUDING ANY GENERAL, SPECIAL, INCIDENTAL OR CONSEQUENTIAL DAMAGES ARISING OUT OF THE USE OR INABILITY TO USE THE LIBRARY (INCLUDING BUT NOT LIMITED TO LOSS OF DATA OR DATA BEING RENDERED INACCURATE OR LOSSES SUSTAINED BY YOU OR THIRD ...
Quick Guide (ENGLISH)
Page 4
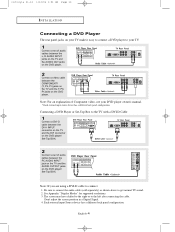
... of Component video, see your TV. 1 Connect a set of audio cables between the L, R AUDIO INPUT jacks on the TV and the AUDIO OUT jacks on the DVD player. 2 Connect a video cable between the COMPONENT1 (Y, Pb, Pr) jacks on the TV and the Y, Pb, Pr jacks on the DVD player/ Set-Top BOX. English-4 See Appendix "Display Modes" for supported resolutions. 3. Connecting a DVD Player or Set-Top Box to the TV with a DVI-D Cable 1 Connect a DVI-D cable between the DVI-I O N Connecting a DVD Player The rear panel jacks on your TV make it easy to connect a DVD player to your DVD player owner's manual...
... of Component video, see your TV. 1 Connect a set of audio cables between the L, R AUDIO INPUT jacks on the TV and the AUDIO OUT jacks on the DVD player. 2 Connect a video cable between the COMPONENT1 (Y, Pb, Pr) jacks on the TV and the Y, Pb, Pr jacks on the DVD player/ Set-Top BOX. English-4 See Appendix "Display Modes" for supported resolutions. 3. Connecting a DVD Player or Set-Top Box to the TV with a DVI-D Cable 1 Connect a DVI-D cable between the DVI-I O N Connecting a DVD Player The rear panel jacks on your TV make it easy to connect a DVD player to your DVD player owner's manual...
User Manual (ENGLISH)
Page 2
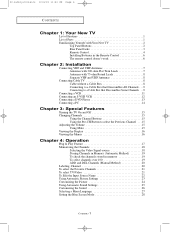
... and UHF Antennas 8 Connecting Cable TV 8 Cable without a Cable Box 8 Connecting to a Cable Box that Descrambles All Channels . . .9 Connecting to a Cable Box that Descrambles Some Channels . .9 Connecting a VCR 11 Connecting an S-VHS VCR 12 Connecting a DVD Player 13 Connecting a PC 14 Chapter 3: Special Features Turning the TV On and Off 15 Changing Channels 15 Using the Channel Buttons 15 Using the Pre-CH Button to select the Previous Channel . . .15 Adjusting the Volume 15 Using Mute 15 Viewing the Display 16 Viewing the Menus 16 Chapter 4: Operation Plug & Play Feature 17...
... and UHF Antennas 8 Connecting Cable TV 8 Cable without a Cable Box 8 Connecting to a Cable Box that Descrambles All Channels . . .9 Connecting to a Cable Box that Descrambles Some Channels . .9 Connecting a VCR 11 Connecting an S-VHS VCR 12 Connecting a DVD Player 13 Connecting a PC 14 Chapter 3: Special Features Turning the TV On and Off 15 Changing Channels 15 Using the Channel Buttons 15 Using the Pre-CH Button to select the Previous Channel . . .15 Adjusting the Volume 15 Using Mute 15 Viewing the Display 16 Viewing the Menus 16 Chapter 4: Operation Plug & Play Feature 17...
User Manual (ENGLISH)
Page 3
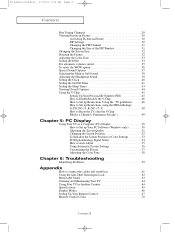
... Initialize the Screen Position or Color Settings 53 PC(Digital/Analog) Signal Select 54 How to Auto Adjust 55 Using Automatic Picture Settings 56 Customizing the Picture 57 Adjusting the Color Tone 58 Chapter 6: Troubleshooting Identifying Problems 59 Appendix How to connect the cables and stand base 61 Using the Anti-Theft Kensington Lock 62 Retractable Stand 63 Cleaning and Maintaining Your TV 64 Using Your TV in Another Country 64 Specifications 65 Display Modes 66 Setting Up Your Remote Control 67 Remote Control Codes 70...
... Initialize the Screen Position or Color Settings 53 PC(Digital/Analog) Signal Select 54 How to Auto Adjust 55 Using Automatic Picture Settings 56 Customizing the Picture 57 Adjusting the Color Tone 58 Chapter 6: Troubleshooting Identifying Problems 59 Appendix How to connect the cables and stand base 61 Using the Anti-Theft Kensington Lock 62 Retractable Stand 63 Cleaning and Maintaining Your TV 64 Using Your TV in Another Country 64 Specifications 65 Display Modes 66 Setting Up Your Remote Control 67 Remote Control Codes 70...
User Manual (ENGLISH)
Page 4
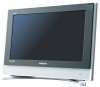
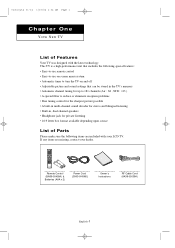
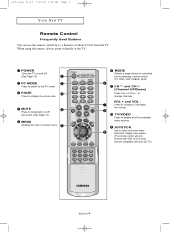
... latest technology. Remote Control (BN59-00409A) & Batteries (AAA x 2) Power Cord (3903-000085) Owner's Instructions RF Cable Cord (AA39-00039A) English-1 This TV is a high-performance unit that includes the following special features: • Easy-to-use remote control • Easy-to-use on-screen menu system • Automatic timer to turn the TV on and off • Adjustable picture and sound settings that can be stored in the TV's memory • Automatic channel tuning for...
... latest technology. Remote Control (BN59-00409A) & Batteries (AAA x 2) Power Cord (3903-000085) Owner's Instructions RF Cable Cord (AA39-00039A) English-1 This TV is a high-performance unit that includes the following special features: • Easy-to-use remote control • Easy-to-use on-screen menu system • Automatic timer to turn the TV on and off • Adjustable picture and sound settings that can be stored in the TV's memory • Automatic channel tuning for...
User Manual (ENGLISH)
Page 8
... before use the remote control up to a distance of this manual. (See Page 30) SIZE 7 Press to make the PIP window double, large or small. 8 CH Displays the available channels in sequence. (These buttons change the batteries and press the 9 RESET button for the TV to turn off automatically.(See Page 43) P.MODE Adjusts the TV picture by selecting one of the preset factory settings. 1 (See Page 23) S.MODE Adjust the TV sound by selecting...
... before use the remote control up to a distance of this manual. (See Page 30) SIZE 7 Press to make the PIP window double, large or small. 8 CH Displays the available channels in sequence. (These buttons change the batteries and press the 9 RESET button for the TV to turn off automatically.(See Page 43) P.MODE Adjusts the TV picture by selecting one of the preset factory settings. 1 (See Page 23) S.MODE Adjust the TV sound by selecting...
User Manual (ENGLISH)
Page 19
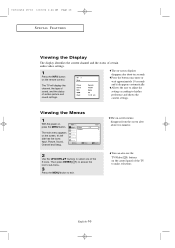
...: Input, Picture, Sound, Channel and Setup. 2 Use the UP/DOWN buttons to select one of the TV to make selections. You can also use the TV/Video( ) buttons on the remote control. English-16 Press the button once more or wait approximately 10 seconds and it disappears automatically. Then press ENTER( ) to access the icon's sub-menu. 3 Press the MENU button to his/her preference and shows the current settings. The on the screen...
...: Input, Picture, Sound, Channel and Setup. 2 Use the UP/DOWN buttons to select one of the TV to make selections. You can also use the TV/Video( ) buttons on the remote control. English-16 Press the button once more or wait approximately 10 seconds and it disappears automatically. Then press ENTER( ) to access the icon's sub-menu. 3 Press the MENU button to his/her preference and shows the current settings. The on the screen...
User Manual (ENGLISH)
Page 33
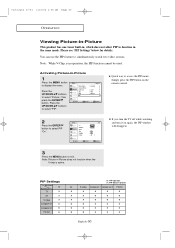
... and turn it on the remote control. 2 Press the ENTER button to select "Picture", then press the ENTER button. Press the UP/DOWN buttons to exit. PIP Settings Sub Picture TV Main Picture TV X AV X S-Video X Component 1 O Component 2 O PC/DVI O O : PIP operates X : PIP doesn't operate AV S-Video Component 1 Component 2 PC/DVI X X O O O X X O O O X X O O O O O X X X O O X X X O O X X X English-30 Quick way to access the PIP menu: Simply press the PIP button on again, the PIP window will disappear. 3 Press the MENU button to select "PIP...
... and turn it on the remote control. 2 Press the ENTER button to select "Picture", then press the ENTER button. Press the UP/DOWN buttons to exit. PIP Settings Sub Picture TV Main Picture TV X AV X S-Video X Component 1 O Component 2 O PC/DVI O O : PIP operates X : PIP doesn't operate AV S-Video Component 1 Component 2 PC/DVI X X O O O X X O O O X X O O O O O X X X O O X X X O O X X X English-30 Quick way to access the PIP menu: Simply press the PIP button on again, the PIP window will disappear. 3 Press the MENU button to select "PIP...

User Manual (ENGLISH)
Page 48
... the ENTER button. 3 The "Enter Pin" screen will appear. Press the MENU button to 0-0-0-0: POWER OFF ➔ MUTE ➔ 8 ➔ 2 ➔ 4 ➔ POWER ON. English-45 ➜ Note: If you forget the Pin, press the remote-control buttons in the following sequence,which resets the pin to exit. The user must first enter a Pin (personal ID number) before any 4-digits for your 4-digit Pin number. Choose...
... the ENTER button. 3 The "Enter Pin" screen will appear. Press the MENU button to 0-0-0-0: POWER OFF ➔ MUTE ➔ 8 ➔ 2 ➔ 4 ➔ POWER ON. English-45 ➜ Note: If you forget the Pin, press the remote-control buttons in the following sequence,which resets the pin to exit. The user must first enter a Pin (personal ID number) before any 4-digits for your 4-digit Pin number. Choose...

User Manual (ENGLISH)
Page 49
buttons How to display the menu. Parental restrictions can be set up using either of two methods: The TV guidelines or the MPAA rating. 1 Press the MENU button to Set up a personal identification number (PIN), and enable the V-Chip. (See previous section). English-46 Enter your 4-digit Pin number. 4 The "V-Chip" screen will appear, and "V-Chip Lock" will be selected. Press the UP/DOWN buttons to Yes. (Pressing the...
buttons How to display the menu. Parental restrictions can be set up using either of two methods: The TV guidelines or the MPAA rating. 1 Press the MENU button to Set up a personal identification number (PIN), and enable the V-Chip. (See previous section). English-46 Enter your 4-digit Pin number. 4 The "V-Chip" screen will appear, and "V-Chip Lock" will be selected. Press the UP/DOWN buttons to Yes. (Pressing the...

User Manual (ENGLISH)
Page 51
... objectionable ratings (either MPAA or TV-Ratings). 1 Press the MENU button to display the menu. How to Set up additional restrictions based on the MPAA codes). When the V-Chip lock is for each sub-rating. English-48 Press MENU once to yellow. To exit this screen, press the MENU button again. While the "U" or "B" is selected, repeatedly press the ENTER( )button. First, highlight one of America...
... objectionable ratings (either MPAA or TV-Ratings). 1 Press the MENU button to display the menu. How to Set up additional restrictions based on the MPAA codes). When the V-Chip lock is for each sub-rating. English-48 Press MENU once to yellow. To exit this screen, press the MENU button again. While the "U" or "B" is selected, repeatedly press the ENTER( )button. First, highlight one of America...
User Manual (ENGLISH)
Page 62
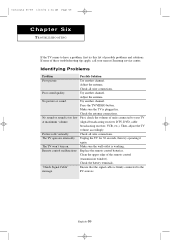
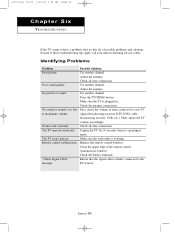
No picture or sound. Picture rolls vertically. Adjust the antenna. Make sure the wall outlet is plugged in. Possible Solution Try another channel. Try another channel. Make sure the TV is working. Check all wire connections. Adjust the antenna. Check the antenna connections. Replace the remote control batteries. No sound or sound is firmly connected to the PC sources. Remote control malfunctions "Check Signal Cable" message. English-59 The TV won't turn on. Then, adjust the TV volume accordingly. Ensure that the signal cable is...
No picture or sound. Picture rolls vertically. Adjust the antenna. Make sure the wall outlet is plugged in. Possible Solution Try another channel. Try another channel. Make sure the TV is working. Check all wire connections. Adjust the antenna. Check the antenna connections. Replace the remote control batteries. No sound or sound is firmly connected to the PC sources. Remote control malfunctions "Check Signal Cable" message. English-59 The TV won't turn on. Then, adjust the TV volume accordingly. Ensure that the signal cable is...
User Manual (ENGLISH)
Page 2
... and UHF Antennas 8 Connecting Cable TV 8 Cable without a Cable Box 8 Connecting to a Cable Box that Descrambles All Channels . . .9 Connecting to a Cable Box that Descrambles Some Channels . .9 Connecting a VCR 11 Connecting an S-VHS VCR 12 Connecting a DVD Player 13 Connecting a PC 14 Chapter 3: Special Features Turning the TV On and Off 15 Changing Channels 15 Using the Channel Buttons 15 Using the Pre-CH Button to select the Previous Channel . . .15 Adjusting the Volume 15 Using Mute 15 Viewing the Display 16 Viewing the Menus 16 Chapter 4: Operation Plug & Play Feature 17...
... and UHF Antennas 8 Connecting Cable TV 8 Cable without a Cable Box 8 Connecting to a Cable Box that Descrambles All Channels . . .9 Connecting to a Cable Box that Descrambles Some Channels . .9 Connecting a VCR 11 Connecting an S-VHS VCR 12 Connecting a DVD Player 13 Connecting a PC 14 Chapter 3: Special Features Turning the TV On and Off 15 Changing Channels 15 Using the Channel Buttons 15 Using the Pre-CH Button to select the Previous Channel . . .15 Adjusting the Volume 15 Using Mute 15 Viewing the Display 16 Viewing the Menus 16 Chapter 4: Operation Plug & Play Feature 17...
User Manual (ENGLISH)
Page 3
... Initialize the Screen Position or Color Settings 53 PC(Digital/Analog) Signal Select 54 How to Auto Adjust 55 Using Automatic Picture Settings 56 Customizing the Picture 57 Adjusting the Color Tone 58 Chapter 6: Troubleshooting Identifying Problems 59 Appendix How to connect the cables and stand base 61 Using the Anti-Theft Kensington Lock 62 Retractable Stand 63 Cleaning and Maintaining Your TV 64 Using Your TV in Another Country 64 Specifications 65 Display Modes 66 Setting Up Your Remote Control 67 Remote Control Codes 70...
... Initialize the Screen Position or Color Settings 53 PC(Digital/Analog) Signal Select 54 How to Auto Adjust 55 Using Automatic Picture Settings 56 Customizing the Picture 57 Adjusting the Color Tone 58 Chapter 6: Troubleshooting Identifying Problems 59 Appendix How to connect the cables and stand base 61 Using the Anti-Theft Kensington Lock 62 Retractable Stand 63 Cleaning and Maintaining Your TV 64 Using Your TV in Another Country 64 Specifications 65 Display Modes 66 Setting Up Your Remote Control 67 Remote Control Codes 70...
User Manual (ENGLISH)
Page 7
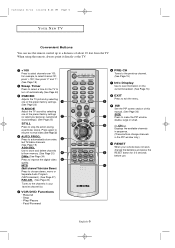
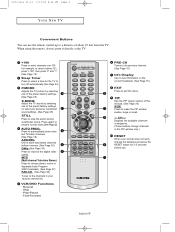
... change channels. When using the remote, always point it directly at the TV. P.SIZE 3 Press to select on-screen menu 9 items and change the screen size. victoryia 01-14 1/10/04 1:03 AM Page 4 YOUR NEW TV Remote Control Frequently Used Buttons You can use the remote control up to display all of about 23 feet from the TV. JOYSTICK Use to change menu values. (The remote control will only function with VCR or DVD units that are compatible with the LCD TV.) English...
... change channels. When using the remote, always point it directly at the TV. P.SIZE 3 Press to select on-screen menu 9 items and change the screen size. victoryia 01-14 1/10/04 1:03 AM Page 4 YOUR NEW TV Remote Control Frequently Used Buttons You can use the remote control up to display all of about 23 feet from the TV. JOYSTICK Use to change menu values. (The remote control will only function with VCR or DVD units that are compatible with the LCD TV.) English...
User Manual (ENGLISH)
Page 8
... 9 RESET button for the TV to improve the digital video 5 quality. VCR/DVD Functions - Play/Pause - victoryia 01-14 1/11/04 8:26 PM Page 5 YOUR NEW TV Convenient Buttons You can use . 10 English-5 When using the remote, always point it directly at the TV. +100 Press to resume normal video.(See Page 32) AUTO PROG. Press again to select channels over 100. Rewind - Press to automatically store selec 3 ted TV/cable channels...
... 9 RESET button for the TV to improve the digital video 5 quality. VCR/DVD Functions - Play/Pause - victoryia 01-14 1/11/04 8:26 PM Page 5 YOUR NEW TV Convenient Buttons You can use . 10 English-5 When using the remote, always point it directly at the TV. +100 Press to resume normal video.(See Page 32) AUTO PROG. Press again to select channels over 100. Rewind - Press to automatically store selec 3 ted TV/cable channels...

User Manual (ENGLISH)
Page 49
... 4-digit Pin number. 4 The "V-Chip" screen will appear, and "V-Chip Lock" will appear. Press the UP/DOWN buttons to select "Setup", then press the ENTER button. 2 Press the UP/DOWN buttons to display the menu. Parental restrictions can be selected. victoryia 32-49 1/10/04 1:04 AM Page 46 O P E R AT I O N How to Enable/Disable the V-Chip Note: V-Chip cannot be used during PIP operation. 1 Press...
... 4-digit Pin number. 4 The "V-Chip" screen will appear, and "V-Chip Lock" will appear. Press the UP/DOWN buttons to select "Setup", then press the ENTER button. 2 Press the UP/DOWN buttons to display the menu. Parental restrictions can be selected. victoryia 32-49 1/10/04 1:04 AM Page 46 O P E R AT I O N How to Enable/Disable the V-Chip Note: V-Chip cannot be used during PIP operation. 1 Press...

User Manual (ENGLISH)
Page 51
... be blocked. 7 Press the MENU button three times to clear all the screens. (Or proceed to the next section, and set the FV, D, L, S and V sub-ratings. Press MENU once to select "Setup", then press the ENTER button. Note: The V-chip will automatically be encoded with objectionable ratings (either MPAA or TV-Ratings). 1 Press the MENU button to display the menu. For example, if you...
... be blocked. 7 Press the MENU button three times to clear all the screens. (Or proceed to the next section, and set the FV, D, L, S and V sub-ratings. Press MENU once to select "Setup", then press the ENTER button. Note: The V-chip will automatically be encoded with objectionable ratings (either MPAA or TV-Ratings). 1 Press the MENU button to display the menu. For example, if you...
User Manual (ENGLISH)
Page 62
...call your TV (digital broadcasting receiver, DTV, DVD, cable broadcasting receiver, VCR, etc.). Check all wire connections. Check all wire connections. Ensure that the signal cable is plugged in. Identifying Problems Problem Poor picture Poor sound quality. Replace the remote control batteries. No sound or sound is working. Picture rolls vertically. The TV operates erratically. Adjust the antenna. Try another channel. Make sure the TV is firmly connected to your nearest Samsung service center. Check the antenna connections. Then, adjust the TV volume...
...call your TV (digital broadcasting receiver, DTV, DVD, cable broadcasting receiver, VCR, etc.). Check all wire connections. Check all wire connections. Ensure that the signal cable is plugged in. Identifying Problems Problem Poor picture Poor sound quality. Replace the remote control batteries. No sound or sound is working. Picture rolls vertically. The TV operates erratically. Adjust the antenna. Try another channel. Make sure the TV is firmly connected to your nearest Samsung service center. Check the antenna connections. Then, adjust the TV volume...


