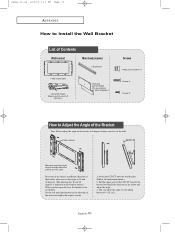
User Manual (user Manual) (ver.02) (English)
Page 2
When a cart is used, use attachments/accessories specified by the manufacturer. 12) Use only with cart, stand, tripod, bracket, or table specified by the manufacturer, or sold with the manufacturer's instructions. 8) Do not install near any way, such as power-supply cord or plug ...
User Manual (user Manual) (ver.02) (English)
Page 8
... Adjust 65 Chapter 6: Troubleshooting 66 Identifying Problems 66 Appendix 68 Installing Stand 68 Using the Anti-Theft Kensington Lock 69 How to Install the Wall Bracket 70 Pin Assignments 72 Specifications 73 Display Modes 74 2 CONTENTS
User Manual (user Manual) (ver.02) (English)
Page 78
...When you fix it to your liking between 0°~20°(±2°). Put the left /right pair.) 2 Brackets (Left and Right) (The two brackets are a left and right brackets in the direction of the arrow and adjust the angle. 3. English-70 venus-07-en 6/28/03 8:18 AM... Page 70 APPENDIX How to Install the Wall Bracket List of Contents Wall bracket Main body bracket 1 Bracket bar 1 Wall bracket plate 2 Assembly hinges (Make sure they are interchangeable.) Screws Plastic screw anchors: 4 Screws: 4 Screws: 8 How to ...
User Manual (user Manual) (ver.02) (English)
Page 79
... screw anchors in. 1) Attach the plastic screw anchors to each of the left/right brackets as in 1. 2) Assemble the bracket bars to the left/right brackets as in (3) so that the two will not separate. After you hang the LCD... to the wall. 4 Put the four holders on the back of the TV into the holes on the wall bracket, (1) lower the TV, and (2) hang the TV on the left. Warning 1. They are securely in place.... 3. venus-07-en 6/28/03 8:18 AM Page 71 How to Attach the LCD TV to the Bracket The LCD TV in the picture may fall from both sides to see if the plastic screw anchors are left...
User Manual (user Manual) (ver.1.0) (English)
Page 2
... has been exposed to avoid injury from the apparatus. 11) Only use attachments/accessories specified by the manufacturer. 12) Use only with cart, stand, tripod, bracket, or table specified by the manufacturer, or sold with the manufacturer's instructions. 8) Do not install near any way, such as radiators, heat registers, or other...
User Manual (user Manual) (ver.1.0) (English)
Page 8
... 66 Appendix 68 How to assemble the TV set and stand base 68 Using the Anti-Theft Kensington Lock 69 How to Install the Wall Bracket 70 Pin Assignments 72 Specifications 73 Display Modes 74 2 CONTENTS
User Manual (user Manual) (ver.1.0) (English)
Page 78
...00Eng_07 7/20/03 6:23 PM Page 70 APPENDIX How to Install the Wall Bracket List of Contents Wall bracket Main body bracket 1 Bracket bar 1 Wall bracket plate 2 Assembly hinges (Make sure they are a left and right brackets in the direction of the bracket and vice versa. You can adjust the angle to the right side of ...arrow and tighten the captive screws. 1. Pull the upper part of the LCD TV fixed to 0 degrees before you first open the box, the bracket is not assembled. Captive screws Make sure you put the right hinge to your liking between 0°~20°(±2°).
User Manual (user Manual) (ver.1.0) (English)
Page 79
... careful not to get your TV.) 1 Assemble the plastic screw anchors and the screws. (See the picture below.) 3 Assemble the main body bracket as in the pictures in 2. The LCD TV may not look exactly like yours. (You assemble the plastic screw anchors and the screws the same ...way regardless of the model of the left/right brackets as in 1. 2) Assemble the bracket bars to the left/right brackets as in (3) so that the two will not separate. Warning 1. Make sure the bracket is not attached securely to the wall. They are securely in place. 3. Fasten the...
User Manual (user Manual) (ver.1.0) (English)
Page 2
.... 2) Keep these instructions. 3) Heed all warnings. 4) Follow all instructions. 5) Do not use attachments/accessories specified by the manufacturer. 12) Use only with cart, stand, tripod, bracket, or table specified by the manufacturer, or sold with one wider than the other apparatus (including amplifiers) that produce heat. 9) Do not defeat the safety...
User Manual (user Manual) (ver.1.0) (English)
Page 7
... Adjust 65 Chapter 6: Troubleshooting 66 Identifying Problems 66 Appendix 68 Installing Stand 68 Using the Anti-Theft Kensington Lock 69 How to Install the Wall Bracket 70 Pin Assignments 72 Specifications 73 Display Modes 74 2 CONTENTS
User Manual (user Manual) (ver.1.0) (English)
Page 77
...You can adjust the angle to the right side of the bracket and vice versa. venus-07-en 6/3/03 3:11 PM Page 70 APPENDIX How to Install the Wall Bracket List of Contents Wall bracket Main body bracket 1 Bracket bar 1 Wall bracket plate 2 Assembly hinges (Make sure they are a left ...and right brackets in the direction of the arrow and tighten the captive screws. 1. Captive screws...
User Manual (user Manual) (ver.1.0) (English)
Page 78
...exactly like yours. (You assemble the plastic screw anchors and the screws the same way regardless of the model of the bracket. 4. Installing a wall bracket must be done by a qualified professional installer. 2. LCD TV Wall Wall bracket English-71 They are securely in place. 3. After you hang the LCD TV on the wall... and the screws. (See the picture below and put the plastic screw anchors in. 1) Attach the plastic screw anchors to each of the left/right brackets as in 1. 2) Assemble the bracket bars to the wall. 4 Put the four holders on the back of the TV into the holes on the wall...
User Manual (user Manual) (ver.1.0) (English)
Page 2
... captioning capabilities, making it from the wall outlet before operating your TV. • Keep the safety and operating instructions for choosing Samsung! Do not block these safety precautions in the cabinet for ventilation to overturn. • Provide ventilation for mounting. • Operate... Follow the manufacturer's instructions when mounting the unit, and use the TV receiver where contact with a cart, stand, tripod, bracket, or table recommended by the manufacturer. This plug will provide convenient, dependable service and enjoyment for years to insert the plug fully...
User Manual (user Manual) (ver.1.0) (English)
Page 8
... Adjust 65 Chapter 6: Troubleshooting 66 Identifying Problems 66 Appendix 68 Installing Stand 68 Using the Anti-Theft Kensington Lock 69 How to Install the Wall Bracket 70 Pin Assignments 72 Specifications 73 Display Modes 74 2 CONTENTS
User Manual (user Manual) (ver.1.0) (English)
Page 78
...the right hinge to the right side of the bracket and vice versa. venus-07-en 6/28/03 8:18 AM Page 70 APPENDIX How to Install the Wall Bracket List of Contents Wall bracket Main body bracket 1 Bracket bar 1 Wall bracket plate 2 Assembly hinges (Make sure they are ...interchangeable.) Screws Plastic screw anchors: 4 Screws: 4 Screws: 8 How to Adjust the Angle of the Bracket Note: Please adjust the angle of ...
User Manual (user Manual) (ver.1.0) (English)
Page 79
... the screws. (See the picture below and put the plastic screw anchors in. 1) Attach the plastic screw anchors to each of the bracket. 4. They are securely in place. 3. Installing a wall bracket must be done by a qualified professional installer. 2. Warning 1. venus-07-en 6/28/03 8:18 AM Page 71 How to Attach the... LCD TV to the Bracket The LCD TV in the picture may fall from both sides to see if the plastic screw anchors are left . and below. 2 Assemble the main ...