Owners Instructions
Page 3
... the Connection Panel ■ Remote Control ■ Installing Batteries in the Remote Control CONNECTIONS ■ Connecting VHF and UHF Antennas ■ Connecting Cable TV ■ Connecting a VCR ■ Connecting an S-VHS VCR ■ Connecting a Camcorder (LN-S3241DILN-S40410) • Connecting a DVD Player &#... 48 ■ Using the V-Chip 48 23 APPENDIX 24 24 ■ Identifying Problems 54 25 ■ Installing the Stand 55 26 ■ Disconnecting the Stand 55 26 ■ Installing the Wall Mount Kit (LN-S26410) 56 ■ Installing the Wall Mount Kit (LN-S3241D/LN-...
... the Connection Panel ■ Remote Control ■ Installing Batteries in the Remote Control CONNECTIONS ■ Connecting VHF and UHF Antennas ■ Connecting Cable TV ■ Connecting a VCR ■ Connecting an S-VHS VCR ■ Connecting a Camcorder (LN-S3241DILN-S40410) • Connecting a DVD Player &#... 48 ■ Using the V-Chip 48 23 APPENDIX 24 24 ■ Identifying Problems 54 25 ■ Installing the Stand 55 26 ■ Disconnecting the Stand 55 26 ■ Installing the Wall Mount Kit (LN-S26410) 56 ■ Installing the Wall Mount Kit (LN-S3241D/LN-...
Owners Instructions
Page 4
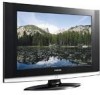
... Batteries (AM x 2) (BN59-00511A) Power Cord (3903-000144) Cover-Bottom LN-S2641D/LN-S3241D (BN63-02415A) LN-S4041D (BN63-02416A) Stand LN-S2641D (BN96-03192A) LN-S3241D (BN96-03191A) 44) M4 X L16 Screw (6002-001294) Owner's Instructions Warranty Card / Registration Card /Safety...• Excellent Digital Interface & Networking With a built-in all locations) English-2 Accessories Please make sure the following items are missing, contact your LCD TV. DNIe technology provides life-like clear images. • SRS TruSurround XT - If any items are included with no Set-Top Box needed. &#...
... Batteries (AM x 2) (BN59-00511A) Power Cord (3903-000144) Cover-Bottom LN-S2641D/LN-S3241D (BN63-02415A) LN-S4041D (BN63-02416A) Stand LN-S2641D (BN96-03192A) LN-S3241D (BN96-03191A) 44) M4 X L16 Screw (6002-001294) Owner's Instructions Warranty Card / Registration Card /Safety...• Excellent Digital Interface & Networking With a built-in all locations) English-2 Accessories Please make sure the following items are missing, contact your LCD TV. DNIe technology provides life-like clear images. • SRS TruSurround XT - If any items are included with no Set-Top Box needed. &#...
Owners Instructions
Page 5
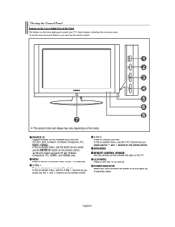
In the on-screen menu, use the ENTER 123' button on the remote control. 26 inch model supports TV, AV, S-Video, Component, PC, HDMI1, and HDMI2 only. 0 MENU Press to ...remote control. 0 < CH Press to see an on-screen menu of the Panel The buttons on the lower-right panel control your TV's features. 0+ VOL - To use the more advanced features, you would use the + VOL - In the on-screen menu, use... on the TV. 0 0) (POWER) Press to decrease or increase the volume. Press to tum the TV on and off. 0 POWER INDICATOR Blinks and turns off when the power is on and lights up in stand-by mode....
In the on-screen menu, use the ENTER 123' button on the remote control. 26 inch model supports TV, AV, S-Video, Component, PC, HDMI1, and HDMI2 only. 0 MENU Press to ...remote control. 0 < CH Press to see an on-screen menu of the Panel The buttons on the lower-right panel control your TV's features. 0+ VOL - To use the more advanced features, you would use the + VOL - In the on-screen menu, use... on the TV. 0 0) (POWER) Press to decrease or increase the volume. Press to tum the TV on and off. 0 POWER INDICATOR Blinks and turns off when the power is on and lights up in stand-by mode....

Owners Instructions
Page 57
Separate the stand from the back of the N. 3. Disconnecting the Stand 1. Remove four screws from the N. 4. Cover the bottom hole with a cap. English-55 Place the TV faced down on a soft cloth or cushion on a table. 2. Installing the Stand 1. Place the TV faced down on a soft cloth or cushion on a table. 2. Put the stand into the hole indicated and tighten. Insert screw into the hole at the bottom of the N. 3.
Separate the stand from the back of the N. 3. Disconnecting the Stand 1. Remove four screws from the N. 4. Cover the bottom hole with a cap. English-55 Place the TV faced down on a soft cloth or cushion on a table. 2. Installing the Stand 1. Place the TV faced down on a soft cloth or cushion on a table. 2. Put the stand into the hole indicated and tighten. Insert screw into the hole at the bottom of the N. 3.

Owners Instructions
Page 60
...The place of the Kensington Lock may differ from the Illustration depending on its model. 1. Insert the locking device into the Kensington slot on the LCD TV (Figure 1), and turn it in the locking direction (Figure 2). 2. C) 10% to 80%, non-condensing -4 7 to 1137 (-20 &#...Name Screen Size (Diagonal) Power Supply Power Consumption PC Resolution Sound Output Dimensions (WxDxH) Body With stand Weight With stand Environmental Considerations Operating Temperature Operating Humidity Storage Temperature Storage Humidity LNS2641D 26 Inch AC110V-120V 80Hz 133 W 1360 x 768 @ 60 Hz 6WX 2 29.69 X 3.11...
...The place of the Kensington Lock may differ from the Illustration depending on its model. 1. Insert the locking device into the Kensington slot on the LCD TV (Figure 1), and turn it in the locking direction (Figure 2). 2. C) 10% to 80%, non-condensing -4 7 to 1137 (-20 &#...Name Screen Size (Diagonal) Power Supply Power Consumption PC Resolution Sound Output Dimensions (WxDxH) Body With stand Weight With stand Environmental Considerations Operating Temperature Operating Humidity Storage Temperature Storage Humidity LNS2641D 26 Inch AC110V-120V 80Hz 133 W 1360 x 768 @ 60 Hz 6WX 2 29.69 X 3.11...


