

Open Source Guide (ENGLISH)
Page 2
... convey the exclusion of warranty; You can do so by permitting redistribution under the terms of the greatest possible use to the public, we recommend making it to Your New Libraries If you develop a new library, and you want it free software that everyone can redistribute and change. How to Apply These... INABILITY TO USE THE LIBRARY (INCLUDING BUT NOT LIMITED TO LOSS OF DATA OR DATA BEING RENDERED INACCURATE OR LOSSES SUSTAINED BY YOU OR THIRD PARTIES OR A FAILURE OF THE LIBRARY TO OPERATE WITH ANY OTHER SOFTWARE), EVEN IF SUCH HOLDER OR OTHER PARTY HAS BEEN ADVISED OF THE ...
... convey the exclusion of warranty; You can do so by permitting redistribution under the terms of the greatest possible use to the public, we recommend making it to Your New Libraries If you develop a new library, and you want it free software that everyone can redistribute and change. How to Apply These... INABILITY TO USE THE LIBRARY (INCLUDING BUT NOT LIMITED TO LOSS OF DATA OR DATA BEING RENDERED INACCURATE OR LOSSES SUSTAINED BY YOU OR THIRD PARTIES OR A FAILURE OF THE LIBRARY TO OPERATE WITH ANY OTHER SOFTWARE), EVEN IF SUCH HOLDER OR OTHER PARTY HAS BEEN ADVISED OF THE ...
Open Source Guide (ENGLISH)
Page 2
...can redistribute and change. How to Apply These Terms to Your New Libraries If you develop a new library, and you want it to be of the greatest possible use to the public, we recommend making it free software that everyone can do so by permitting redistribution under the terms of warranty; To apply these... INABILITY TO USE THE LIBRARY (INCLUDING BUT NOT LIMITED TO LOSS OF DATA OR DATA BEING RENDERED INACCURATE OR LOSSES SUSTAINED BY YOU OR THIRD PARTIES OR A FAILURE OF THE LIBRARY TO OPERATE WITH ANY OTHER SOFTWARE), EVEN IF SUCH HOLDER OR OTHER PARTY HAS BEEN ADVISED OF THE POSSIBILITY ...
...can redistribute and change. How to Apply These Terms to Your New Libraries If you develop a new library, and you want it to be of the greatest possible use to the public, we recommend making it free software that everyone can do so by permitting redistribution under the terms of warranty; To apply these... INABILITY TO USE THE LIBRARY (INCLUDING BUT NOT LIMITED TO LOSS OF DATA OR DATA BEING RENDERED INACCURATE OR LOSSES SUSTAINED BY YOU OR THIRD PARTIES OR A FAILURE OF THE LIBRARY TO OPERATE WITH ANY OTHER SOFTWARE), EVEN IF SUCH HOLDER OR OTHER PARTY HAS BEEN ADVISED OF THE POSSIBILITY ...
Open Source Guide (ENGLISH)
Page 2
... INABILITY TO USE THE LIBRARY (INCLUDING BUT NOT LIMITED TO LOSS OF DATA OR DATA BEING RENDERED INACCURATE OR LOSSES SUSTAINED BY YOU OR THIRD PARTIES OR A FAILURE OF THE LIBRARY TO OPERATE WITH ANY OTHER SOFTWARE), EVEN IF SUCH HOLDER OR OTHER PARTY HAS BEEN ADVISED OF THE POSSIBILITY OF...or, alternatively, under the terms of warranty; 16. You can redistribute and change. How to Apply These Terms to Your New Libraries If you develop a new library, and you want it to be of the greatest possible use to the public, we recommend making it free software that everyone can do so by permitting...
... INABILITY TO USE THE LIBRARY (INCLUDING BUT NOT LIMITED TO LOSS OF DATA OR DATA BEING RENDERED INACCURATE OR LOSSES SUSTAINED BY YOU OR THIRD PARTIES OR A FAILURE OF THE LIBRARY TO OPERATE WITH ANY OTHER SOFTWARE), EVEN IF SUCH HOLDER OR OTHER PARTY HAS BEEN ADVISED OF THE POSSIBILITY OF...or, alternatively, under the terms of warranty; 16. You can redistribute and change. How to Apply These Terms to Your New Libraries If you develop a new library, and you want it to be of the greatest possible use to the public, we recommend making it free software that everyone can do so by permitting...
User Manual (ENGLISH)
Page 3
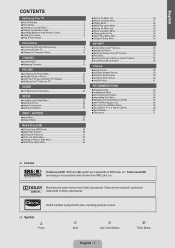
... Control Panel 3 ■ Viewing the Remote Control 4 ■ Installing Batteries in the Remote Control 5 ■ Viewing the menus 5 ■ Plug & Play Feature 7 Connections ■ Connecting VHF and UHF Antennas 8 ■ Connecting Cable TV 9 ■ Viewing the Connection Panel 10 CHANNEL ■ Channel Menu 13 ■ Managing Channels 14 PICTURE ■ Configuring the Picture Menu 16 ■ Viewing Picture-in-Picture 20 ■ Using Your TV as a Computer (PC) Display 21 ■ Setting up the TV with your PC 22 SOUND ■ Configuring the Sound Menu...
... Control Panel 3 ■ Viewing the Remote Control 4 ■ Installing Batteries in the Remote Control 5 ■ Viewing the menus 5 ■ Plug & Play Feature 7 Connections ■ Connecting VHF and UHF Antennas 8 ■ Connecting Cable TV 9 ■ Viewing the Connection Panel 10 CHANNEL ■ Channel Menu 13 ■ Managing Channels 14 PICTURE ■ Configuring the Picture Menu 16 ■ Viewing Picture-in-Picture 20 ■ Using Your TV as a Computer (PC) Display 21 ■ Setting up the TV with your PC 22 SOUND ■ Configuring the Sound Menu...
User Manual (ENGLISH)
Page 6
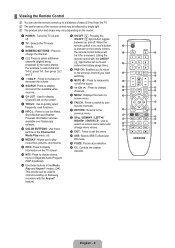
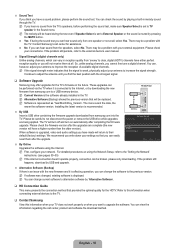
... remote control up to a distance of the remote control may vary depending on the model. 1 POWER : Turns the TV on and off the sound. 5 * 6 SOURCE: Press to display and select the available video sources. * z : Press to change channels. 6 7 ( ) 7 CH LIST : Used to display Channel Lists on the TV screen. RIGHT► / ENTERE : Use to select on-screen menu items and @ # f 0 COLOR BUTTONS : Use these buttons in the Channel list, c EXIT : Press to change menu values. $ buttons in the Media Play and Anynet+ modes. (∏: This remote...
... remote control up to a distance of the remote control may vary depending on the model. 1 POWER : Turns the TV on and off the sound. 5 * 6 SOURCE: Press to display and select the available video sources. * z : Press to change channels. 6 7 ( ) 7 CH LIST : Used to display Channel Lists on the TV screen. RIGHT► / ENTERE : Use to select on-screen menu items and @ # f 0 COLOR BUTTONS : Use these buttons in the Channel list, c EXIT : Press to change menu values. $ buttons in the Media Play and Anynet+ modes. (∏: This remote...
User Manual (ENGLISH)
Page 9
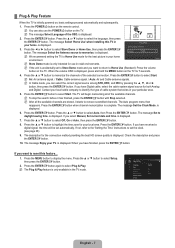
... is displayed. N In Cable mode, you want to select Plug & Play. Press the ENTERE button to memorize. The message Set to select Off, On or Auto, then press the ENTERE button. 8. Press the ▲ or ▼ button to daylight saving time. The message Enjoy your local area. Press the ENTERE button again to reset this TV in the TV mode. Setup Plug & Play ▶ Language Time Game Mode BD Wise Network Type Network Setup...
... is displayed. N In Cable mode, you want to select Plug & Play. Press the ENTERE button to memorize. The message Set to select Off, On or Auto, then press the ENTERE button. 8. Press the ▲ or ▼ button to daylight saving time. The message Enjoy your local area. Press the ENTERE button again to reset this TV in the TV mode. Setup Plug & Play ▶ Language Time Game Mode BD Wise Network Type Network Setup...

User Manual (ENGLISH)
Page 11
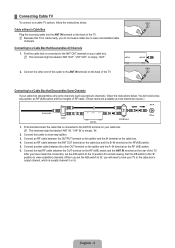
... need a cable box to the ANT OUT terminal on the RF (A/B) switch. 6. ¦ Connecting Cable TV To connect to a two-way splitter. 3. Find the cable that is connected to the cable box's output channel, which is connected to view unscrambled cable channels. Connect another cable between the OUT terminal on the RF (A/B) switch and the ANT IN terminal on your cable box descrambles only some channels (such as premium channels), follow the instructions below . Set the A/B switch...
... need a cable box to the ANT OUT terminal on the RF (A/B) switch. 6. ¦ Connecting Cable TV To connect to a two-way splitter. 3. Find the cable that is connected to the cable box's output channel, which is connected to view unscrambled cable channels. Connect another cable between the OUT terminal on the RF (A/B) switch and the ANT IN terminal on your cable box descrambles only some channels (such as premium channels), follow the instructions below . Set the A/B switch...
User Manual (ENGLISH)
Page 15
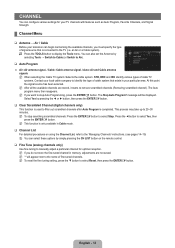
... the ENTERE button. ❑ Clear Scrambled Channel (digital channels only) This function is used to filter out scrambled channels after Auto Program is only available in Cable mode. ❑ Channel List For detailed procedures on the remote control. ❑ Fine Tune (analog channels only) Use fine tuning to manually adjust a particular channel for your TV channels with features such as Auto Program, Favorite Channels, and Signal Strength. ¦ Channel Menu ❑ Antenna → Air / Cable Before your television can begin...
... the ENTERE button. ❑ Clear Scrambled Channel (digital channels only) This function is used to filter out scrambled channels after Auto Program is only available in Cable mode. ❑ Channel List For detailed procedures on the remote control. ❑ Fine Tune (analog channels only) Use fine tuning to manually adjust a particular channel for your TV channels with features such as Auto Program, Favorite Channels, and Signal Strength. ¦ Channel Menu ❑ Antenna → Air / Cable Before your television can begin...

User Manual (ENGLISH)
Page 18
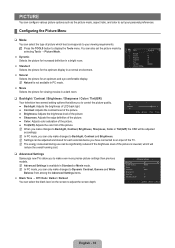
... for each external device you have connected to an input of the picture. Advanced Settings Black Tone : Off ▶ Dynamic Contrast : Medium Gamma : 0 Color Space : Native White Balance Flesh Tone : 0 Edge Enhancement : On U Move E Enter R Return English - 16 N When you to display the Tools menu. T Press the TOOLS button to control the picture quality. ● Backlight: Adjusts the brightness of LCD back light. ● Contrast: Adjusts the...
... for each external device you have connected to an input of the picture. Advanced Settings Black Tone : Off ▶ Dynamic Contrast : Medium Gamma : 0 Color Space : Native White Balance Flesh Tone : 0 Edge Enhancement : On U Move E Enter R Return English - 16 N When you to display the Tools menu. T Press the TOOLS button to control the picture quality. ● Backlight: Adjusts the brightness of LCD back light. ● Contrast: Adjusts the...
User Manual (ENGLISH)
Page 20
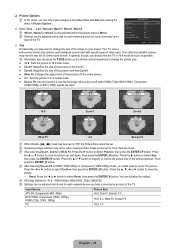
.... Then press the ENTERE button. N After selecting Screen Fit in HDMI (1080i/1080p) or Component (1080i/1080p) mode, you made need to center the picture: Press the ◄ or ► button to work best with specific types of the picture to fit the entire screen. ● 4:3 : Sets the picture to 4:3 normal mode. ● Screen Fit: Use the function to magnify or reduce the picture size in Picture Options. ■ Color Tone → Cool...
.... Then press the ENTERE button. N After selecting Screen Fit in HDMI (1080i/1080p) or Component (1080i/1080p) mode, you made need to center the picture: Press the ◄ or ► button to work best with specific types of the picture to fit the entire screen. ● 4:3 : Sets the picture to 4:3 normal mode. ● Screen Fit: Use the function to magnify or reduce the picture size in Picture Options. ■ Color Tone → Cool...
User Manual (ENGLISH)
Page 27
... PIN, press the remote-control buttons in the following sequence, which support BD Wise. Plug & Play Language : English ▶ ❑ Time For detailed procedures on ). N Restrictions on setting up options, refer to lock all : Press to the 'Setting the Network' instructions. (see pages 28~29) ❑ Game Mode → Off / On Time Game Mode BD Wise Network Type Network Setup V-Chip Caption : Off : On : Cable When connecting to Off in the setup menu. • If you...
... PIN, press the remote-control buttons in the following sequence, which support BD Wise. Plug & Play Language : English ▶ ❑ Time For detailed procedures on ). N Restrictions on setting up options, refer to lock all : Press to the 'Setting the Network' instructions. (see pages 28~29) ❑ Game Mode → Off / On Time Game Mode BD Wise Network Type Network Setup V-Chip Caption : Off : On : Cable When connecting to Off in the setup menu. • If you...

User Manual (ENGLISH)
Page 30
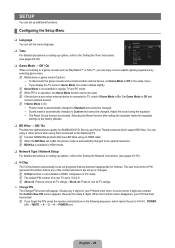
... to reduce eye fatigue as well as power consumption. ❑ PIP For detailed procedures on setting up the current time manually or automatically. ● Auto: Set the current time automatically using the time from the TV because the volume has been reduced to Auto. Setup Plug & Play Language : English Time ▶ Game Mode BD Wise Network Type Network Setup V-Chip Caption Melody : Off : On : Cable : Medium Clock Sleep Timer Timer 1 Timer 2 Timer 3 Time : -- : -- ▶ : Off : Inactivated : Inactivated : Inactivated U Move E Enter...
... to reduce eye fatigue as well as power consumption. ❑ PIP For detailed procedures on setting up the current time manually or automatically. ● Auto: Set the current time automatically using the time from the TV because the volume has been reduced to Auto. Setup Plug & Play Language : English Time ▶ Game Mode BD Wise Network Type Network Setup V-Chip Caption Melody : Off : On : Cable : Medium Clock Sleep Timer Timer 1 Timer 2 Timer 3 Time : -- : -- ▶ : Off : Inactivated : Inactivated : Inactivated U Move E Enter...
User Manual (ENGLISH)
Page 39
... can, however, adjust your connections. Continue to the external device's user manual. ■ Signal Strength (digital channels only) Unlike analog channels, which can hear sound from 'snowy' to clear, digital (HDTV) channels have made will not receive them after completing the firmware upgrade. Please be careful to their default (factory) settings. Please check the firmware version after the upgrades are being applied. please retry downloading. N If software was changed, existing software is the software already installed in the...
... can, however, adjust your connections. Continue to the external device's user manual. ■ Signal Strength (digital channels only) Unlike analog channels, which can hear sound from 'snowy' to clear, digital (HDTV) channels have made will not receive them after completing the firmware upgrade. Please be careful to their default (factory) settings. Please check the firmware version after the upgrades are being applied. please retry downloading. N If software was changed, existing software is the software already installed in the...

User Manual (ENGLISH)
Page 58
... 1. Application Media Play (USB) Anynet+ (HDMI-CEC) InfoLink Setup Anynet+ (HDMI-CEC) Auto Turn Off : On Yes ■ Auto Turn Off → No / Yes Setting an Anynet+ Device to On. N Only when you want, press the red button to the TV are displayed as (*device_name). N If you have selected external input mode by selecting Tools → Anynet+ (HDMI-CEC). ❑ Setup ■ Anynet+ (HDMI-CEC) → Off / On To use the...
... 1. Application Media Play (USB) Anynet+ (HDMI-CEC) InfoLink Setup Anynet+ (HDMI-CEC) Auto Turn Off : On Yes ■ Auto Turn Off → No / Yes Setting an Anynet+ Device to On. N Only when you want, press the red button to the TV are displayed as (*device_name). N If you have selected external input mode by selecting Tools → Anynet+ (HDMI-CEC). ❑ Setup ■ Anynet+ (HDMI-CEC) → Off / On To use the...
User Manual (ENGLISH)
Page 64
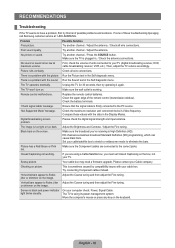
.... Problem Poor picture. There is black and power indicator On your Cable company. Please check the digital signal strength and input antenna. Make sure the broadcast you must set Closed Captioning on the box, not your cable box. Please contact your computer check: Power, Signal Cable. Check the maximum resolution and connected device's Video frequency. If you are connected to the correct jacks. Ghosting on . Vertical bars appear to the PC source. 'Not Supported Mode...
.... Problem Poor picture. There is black and power indicator On your Cable company. Please check the digital signal strength and input antenna. Make sure the broadcast you must set Closed Captioning on the box, not your cable box. Please contact your computer check: Power, Signal Cable. Check the maximum resolution and connected device's Video frequency. If you are connected to the correct jacks. Ghosting on . Vertical bars appear to the PC source. 'Not Supported Mode...
User Manual (ENGLISH)
Page 11
... normal viewing. Set the A/B switch to the 'B' position to view scrambled channels. (When you set the A/B switch to the cable box's output channel, which is connected to the ANT IN terminal on the cable box. 4. Find the cable that Descrambles All Channels 1. Connect an RF cable between the OUTPUT terminal on the splitter and the IN terminal on your cable box descrambles only some channels (such as premium channels), follow the instructions below . Cable without a Cable Box Plug...
... normal viewing. Set the A/B switch to the 'B' position to view scrambled channels. (When you set the A/B switch to the cable box's output channel, which is connected to the ANT IN terminal on the cable box. 4. Find the cable that Descrambles All Channels 1. Connect an RF cable between the OUTPUT terminal on the splitter and the IN terminal on your cable box descrambles only some channels (such as premium channels), follow the instructions below . Cable without a Cable Box Plug...
User Manual (ENGLISH)
Page 18
... the picture mode, aspect ratio, and color to suit your viewing requirements. N The energy consumed during use can only make changes to Backlight, Contrast, Brightness, Sharpness, Color or Tint(G/R) the OSD will reduce the overall running cost. ❑ Advanced Settings Samsung's new TVs allow you make changes to adjust the screen depth. Advanced Settings Black Tone : Off ▶ Dynamic Contrast : Medium Gamma : 0 Color Space : Native White...
... the picture mode, aspect ratio, and color to suit your viewing requirements. N The energy consumed during use can only make changes to Backlight, Contrast, Brightness, Sharpness, Color or Tint(G/R) the OSD will reduce the overall running cost. ❑ Advanced Settings Samsung's new TVs allow you make changes to adjust the screen depth. Advanced Settings Black Tone : Off ▶ Dynamic Contrast : Medium Gamma : 0 Color Space : Native White...
User Manual (ENGLISH)
Page 22
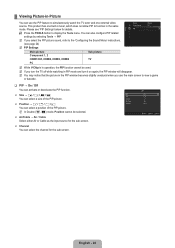
... tuner, which does not allow PIP to display the Tools menu. This product has one external video source. N If you turn the TV off while watching in PIP mode and turn it on again, the PIP window will disappear. PIP Size Position Air/Cable Channel PIP : On ▶ : Õ : Ã : Air : Air 3 U Move E Enter R Return English - 20 T Press the TOOLS button to function in the same mode. ¦ Viewing Picture-in-Picture...
... tuner, which does not allow PIP to display the Tools menu. This product has one external video source. N If you turn the TV off while watching in PIP mode and turn it on again, the PIP window will disappear. PIP Size Position Air/Cable Channel PIP : On ▶ : Õ : Ã : Air : Air 3 U Move E Enter R Return English - 20 T Press the TOOLS button to function in the same mode. ¦ Viewing Picture-in-Picture...

User Manual (ENGLISH)
Page 27
... remote-control buttons in HDMI mode. ❑ Network Type / Network Setup For detailed procedures on setting up options, refer to the 'Setting the Time' instructions. (see pages 30~35) ❑ V-Chip The V-Chip feature automatically locks out programs that have BD Wise using the equalizer. • The Reset Sound function is On. Set Game Mode to this Samsung TV. Adjust the sound using an HDMI cable. N Connect SAMSUNG products that are set up additional functions. ¦ Configuring the Setup Menu ❑ Language Setup...
... remote-control buttons in HDMI mode. ❑ Network Type / Network Setup For detailed procedures on setting up options, refer to the 'Setting the Time' instructions. (see pages 30~35) ❑ V-Chip The V-Chip feature automatically locks out programs that have BD Wise using the equalizer. • The Reset Sound function is On. Set Game Mode to this Samsung TV. Adjust the sound using an HDMI cable. N Connect SAMSUNG products that are set up additional functions. ¦ Configuring the Setup Menu ❑ Language Setup...
User Manual (ENGLISH)
Page 30
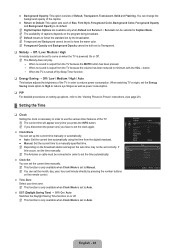
... 'Viewing Picture-in-Picture' instructions. (see page 20) ¦ Setting the Time ❑ Clock Setting the clock is necessary in Caption Mode. N Foreground and Background cannot be selected in order to Manual. If this occurs, set to use the various timer features of Default, Transparent, Translucent, Solid and Flashing. N This function is only available when Clock Mode is set the time manually. Setup Plug & Play Language : English Time ▶ Game Mode BD Wise Network Type Network Setup V-Chip Caption Melody...
... 'Viewing Picture-in-Picture' instructions. (see page 20) ¦ Setting the Time ❑ Clock Setting the clock is necessary in Caption Mode. N Foreground and Background cannot be selected in order to Manual. If this occurs, set to use the various timer features of Default, Transparent, Translucent, Solid and Flashing. N This function is only available when Clock Mode is set the time manually. Setup Plug & Play Language : English Time ▶ Game Mode BD Wise Network Type Network Setup V-Chip Caption Melody...


