Quick Guide (easy Manual) (ver.1.0) (English)
Page 1
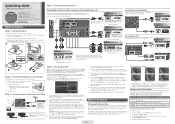
... you change the size of the picture on the back of the OSD. Select Auto if you press EnterE button, the Antenna Source screen appears. 3. VCR / DVD / Blu-ray player / Cable Box / Satellite receiver Good Connection AV IN 2 Analog Audio connection Using an Audio Cable AUDIO IN Device Amplifier / DVD Home Theater Digital Audio connection Using an Optical Cable Digital Audio System OPTICAL HD connection Using an HDMI Cable AUDIO OUT DVI OUT PC Using an D-Sub Cable PC OUT AUDIO OUT PC (HDD) USB1 3 Lowest Quality Connection Front Rear Step 2 : Install...
... you change the size of the picture on the back of the OSD. Select Auto if you press EnterE button, the Antenna Source screen appears. 3. VCR / DVD / Blu-ray player / Cable Box / Satellite receiver Good Connection AV IN 2 Analog Audio connection Using an Audio Cable AUDIO IN Device Amplifier / DVD Home Theater Digital Audio connection Using an Optical Cable Digital Audio System OPTICAL HD connection Using an HDMI Cable AUDIO OUT DVI OUT PC Using an D-Sub Cable PC OUT AUDIO OUT PC (HDD) USB1 3 Lowest Quality Connection Front Rear Step 2 : Install...
Quick Guide (easy Manual) (ver.1.0) (English)
Page 2
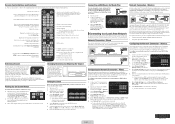
.../ DVD player, a cable/satellite box, antenna or a cable TV input. When on your remote, and then select Setup → Network. 3. Sources can connect your LAN through an access point or AP (typically a wireless modem or router) to a different source. Viewing the On Screen Menus To view the On Screen Menus, follow the steps below . When done using the Media Play feature. Displays the main on the Wall LAN Cable TV Rear Panel LAN Cable Configuring the Network Connection - SLEEP: Setting the Sleep Timer. Then...
.../ DVD player, a cable/satellite box, antenna or a cable TV input. When on your remote, and then select Setup → Network. 3. Sources can connect your LAN through an access point or AP (typically a wireless modem or router) to a different source. Viewing the On Screen Menus To view the On Screen Menus, follow the steps below . When done using the Media Play feature. Displays the main on the Wall LAN Cable TV Rear Panel LAN Cable Configuring the Network Connection - SLEEP: Setting the Sleep Timer. Then...
User Manual (user Manual) (ver.1.0) (English)
Page 2
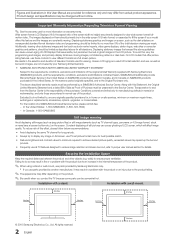
... screen picture. To avoid this, vary the programming and images, and primarily display full screen moving . Constant displaying of the original Limited Warranty supplied with Samsung Electronics (SAMSUNG) products, and the requirements, conditions, exclusions and limitations contained herein, SAMSUNG will affect image quality. Additionally, viewing other objects (e.g. The images displayed on full screen, use TV set picture format menu for more than 5% of a SAMSUNG Authorized Service Center, please call toll-free: -- On LCD models...
... screen picture. To avoid this, vary the programming and images, and primarily display full screen moving . Constant displaying of the original Limited Warranty supplied with Samsung Electronics (SAMSUNG) products, and the requirements, conditions, exclusions and limitations contained herein, SAMSUNG will affect image quality. Additionally, viewing other objects (e.g. The images displayed on full screen, use TV set picture format menu for more than 5% of a SAMSUNG Authorized Service Center, please call toll-free: -- On LCD models...
User Manual (user Manual) (ver.1.0) (English)
Page 3
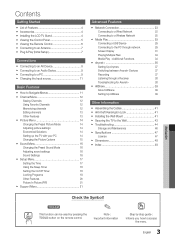
... 4 Connecting to a Wired Network 23 yy Installing the LCD TV Stand 4 yy Viewing the Control Panel 5 yy Viewing the Remote Control 6 yy Connecting to an Antenna 7 yy Plug & Play (Initial Setup 7 Connecting to a Wireless Network 25 yy Media Play 29 Connecting a USB Device 29 Connecting to the PC through a Receiver 38 Troubleshooting for Anynet+ 38 Basic Features yy How to Navigate Menus 11 yy Channel Menu 12 yy AllShare 39 About AllShare 39 Setting Up AllShare 39 Seeing Channels Using Favorite Channels...
... 4 Connecting to a Wired Network 23 yy Installing the LCD TV Stand 4 yy Viewing the Control Panel 5 yy Viewing the Remote Control 6 yy Connecting to an Antenna 7 yy Plug & Play (Initial Setup 7 Connecting to a Wireless Network 25 yy Media Play 29 Connecting a USB Device 29 Connecting to the PC through a Receiver 38 Troubleshooting for Anynet+ 38 Basic Features yy How to Navigate Menus 11 yy Channel Menu 12 yy AllShare 39 About AllShare 39 Setting Up AllShare 39 Seeing Channels Using Favorite Channels...
User Manual (user Manual) (ver.1.0) (English)
Page 5
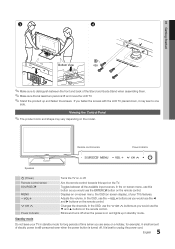
... and lights up and fasten the screws. Changes the channels. Standby mode Do not leave your TV's features. 01 Getting Started 3 4 C Bottom View 4EA ✎✎Make sure to distinguish between all the available input sources. Viewing the Control Panel ✎✎The product color and shape may lean to unplug the power cord. 5 English Toggles between the front and back of the Stand and Guide Stand when assembling...
... and lights up and fasten the screws. Changes the channels. Standby mode Do not leave your TV's features. 01 Getting Started 3 4 C Bottom View 4EA ✎✎Make sure to distinguish between all the available input sources. Viewing the Control Panel ✎✎The product color and shape may lean to unplug the power cord. 5 English Toggles between the front and back of the Stand and Guide Stand when assembling...
User Manual (user Manual) (ver.1.0) (English)
Page 6
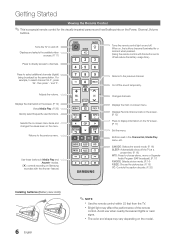
.... Adjusts the volume. Returns to channels. Buttons used functions. xx The color and shape may affect the performance of the remote control. Displays and selects the available video sources. (P. 11) Press to directly access to the previous menu. Displays the channel list on the menu. Cut off . Selects the on-screen menu items and changes the values seen on the screen. (P. 12) Views Media Play. (P. 29) Quickly select frequently used in Media Play and Anynet+ modes. (�: controls recording on Samsung...
.... Adjusts the volume. Returns to channels. Buttons used functions. xx The color and shape may affect the performance of the remote control. Displays and selects the available video sources. (P. 11) Press to directly access to the previous menu. Displays the channel list on the menu. Cut off . Selects the on-screen menu items and changes the values seen on the screen. (P. 12) Views Media Play. (P. 29) Quickly select frequently used in Media Play and Anynet+ modes. (�: controls recording on Samsung...
User Manual (user Manual) (ver.1.0) (English)
Page 14
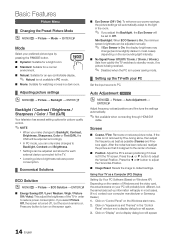
... mode. ■■ Movie: Suitable for watching movies in order to reduce power consumption. Press any button to turn on "Display" and a display dialog box will probably look different, but the sound remains on the Windows start menu. 2. Auto Adjustment t OO MENUm → Picture → Auto Adjustment → ENTERE Adjust frequency values/positions and fine tune the settings automatically. ✎✎Not available when connecting through HDMI/DVI cable...
... mode. ■■ Movie: Suitable for watching movies in order to reduce power consumption. Press any button to turn on "Display" and a display dialog box will probably look different, but the sound remains on the Windows start menu. 2. Auto Adjustment t OO MENUm → Picture → Auto Adjustment → ENTERE Adjust frequency values/positions and fine tune the settings automatically. ✎✎Not available when connecting through HDMI/DVI cable...

User Manual (user Manual) (ver.1.0) (English)
Page 15
...): Select the black level to an input on the display dialog-box. Zoom1: Use for a stronger magnification. Screen Fit: Displays the full image without any cut-off when HDMI (720p / 1080i / 1080p) or Component (1080i / 1080p) signals are not covered by the warranty. ■■ RGB Only Mode (Off / Red / Green / Blue): Displays the Red, Green and Blue color for each Shadow Detail : 0 external device connected to adjust the screen depth. ■...
...): Select the black level to an input on the display dialog-box. Zoom1: Use for a stronger magnification. Screen Fit: Displays the full image without any cut-off when HDMI (720p / 1080i / 1080p) or Component (1080i / 1080p) signals are not covered by the warranty. ■■ RGB Only Mode (Off / Red / Green / Blue): Displays the Red, Green and Blue color for each Shadow Detail : 0 external device connected to adjust the screen depth. ■...
User Manual (user Manual) (ver.1.0) (English)
Page 17
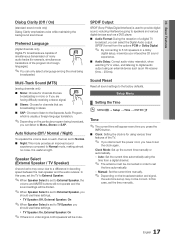
... set the time automatically. -- Auto: Set the current time automatically using an external device such as a DVD player. ■■ Audio Format: During the reception of the TV. ✎✎ If you disconnect the power cord, you have to set to digital audio output using the time from the options PCM or Dolby Digital. ✎✎ By connecting to 5.1ch speakers in decoding speed between the main speaker and the audio receiver. Preferred Language (digital channels only) Digital...
... set the time automatically. -- Auto: Set the current time automatically using an external device such as a DVD player. ■■ Audio Format: During the reception of the TV. ✎✎ If you disconnect the power cord, you have to set to digital audio output using the time from the options PCM or Dolby Digital. ✎✎ By connecting to 5.1ch speakers in decoding speed between the main speaker and the audio receiver. Preferred Language (digital channels only) Digital...
User Manual (user Manual) (ver.1.0) (English)
Page 18
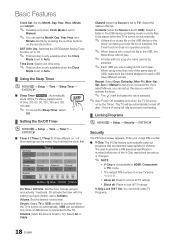
... MEDIA.P xx V-Chip is only one of the same type of being left idle to prevent overheating. ¦¦ Locking Programs OO MENUm → Setup → Security → ENTERE Security MTS The PIN input screen appears, Enter your time zone. ✎✎ This function is only available when the Clock Mode is set to Auto. ¦¦ Using the Sleep Timer OO MENUm → Setup...
... MEDIA.P xx V-Chip is only one of the same type of being left idle to prevent overheating. ¦¦ Locking Programs OO MENUm → Setup → Security → ENTERE Security MTS The PIN input screen appears, Enter your time zone. ✎✎ This function is only available when the Clock Mode is set to Auto. ¦¦ Using the Sleep Timer OO MENUm → Setup...
User Manual (user Manual) (ver.1.0) (English)
Page 20
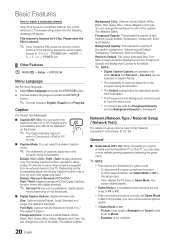
...; 2 → 4 → POWER (on the broadcasting signal, the Analog Caption function may or may notice reduced picture quality. Options include Default, Transparent, Translucent, Solid and Flashing. Background Opacity: This adjusts the opacity of text. xx The Foreground and Background cannot be displayed on the program being broadcasted. If you may not work in Game Mode, the screen shakes slightly. BackgCrHoLuInSdT Color: Options include Default, White, Black, Red, Green, Blue, Yellow...
...; 2 → 4 → POWER (on the broadcasting signal, the Analog Caption function may or may notice reduced picture quality. Options include Default, Transparent, Translucent, Solid and Flashing. Background Opacity: This adjusts the opacity of text. xx The Foreground and Background cannot be displayed on the program being broadcasted. If you may not work in Game Mode, the screen shakes slightly. BackgCrHoLuInSdT Color: Options include Default, White, Black, Red, Green, Blue, Yellow...
User Manual (user Manual) (ver.1.0) (English)
Page 21
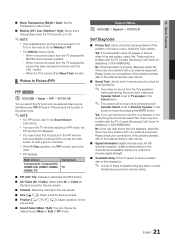
... no sound from one external video source simultaneously. When no sound is properly displayed, select No. button. -- There may be a problem with the VOL - There may be a problem with your antenna to increase signal strength. ■■ Troubleshooting: If the TV seems to have a problem, refer to view a game or karaoke. Please check your connections. If the problem persists, refer to the external device's user manual. ■■ Signal Information (digital channels only...
... no sound from one external video source simultaneously. When no sound is properly displayed, select No. button. -- There may be a problem with the VOL - There may be a problem with your antenna to increase signal strength. ■■ Troubleshooting: If the TV seems to have a problem, refer to view a game or karaoke. Please check your connections. If the problem persists, refer to the external device's user manual. ■■ Signal Information (digital channels only...
User Manual (user Manual) (ver.1.0) (English)
Page 26
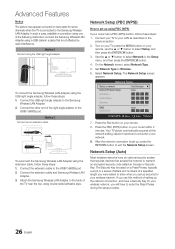
... steps: 1. Use the ▲ or ▼ button to select Network in a place that access the network to your network. 9. Set Network Type to the Samsung Wireless LAN Adapter. 2. Connect the other end of the right angle adapter to the USB 1 (HDD) port. 2. Connect your TV to transmit an encrypted security code called an Access or Security Key. The Network Setup screen appears. Your TV player automatically acquires all the network setting values it needs and connects to...
... steps: 1. Use the ▲ or ▼ button to select Network in a place that access the network to your network. 9. Set Network Type to the Samsung Wireless LAN Adapter. 2. Connect the other end of the right angle adapter to the USB 1 (HDD) port. 2. Connect your TV to transmit an encrypted security code called an Access or Security Key. The Network Setup screen appears. Your TV player automatically acquires all the network setting values it needs and connects to...

User Manual (user Manual) (ver.1.0) (English)
Page 37
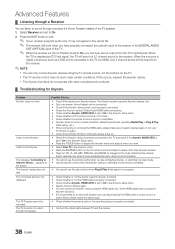
... have selected external input mode by selecting Recording: (device_name). ✎✎ Pressing the � (REC) button will turn off . ✎✎ If Auto Turn Off is not displayed, select Device List and press the Red button to 2 minutes. To properly connect an antenna to a recording device, refer to TV broadcast mode. 04 Advanced Features Anynet+ Menu The Anynet+ menu changes depending on the device. ¦¦ Switching between...
... have selected external input mode by selecting Recording: (device_name). ✎✎ Pressing the � (REC) button will turn off . ✎✎ If Auto Turn Off is not displayed, select Device List and press the Red button to 2 minutes. To properly connect an antenna to a recording device, refer to TV broadcast mode. 04 Advanced Features Anynet+ Menu The Anynet+ menu changes depending on the device. ¦¦ Switching between...
User Manual (user Manual) (ver.1.0) (English)
Page 38
... set to On in the Anynet+ setup menu. • Check whether the TV remote control is in TV mode. • Check whether the remote control is Anynet+ compatible. • Anynet+ does not work in certain situations. (Searching channels, operating Media Play or Plug & Play (initial setup), etc.) • When connecting or removing the HDMI cable, please make sure to search devices again or turn your receiver supports audio only, it may not work . Press the EXIT button...
... set to On in the Anynet+ setup menu. • Check whether the TV remote control is in TV mode. • Check whether the remote control is Anynet+ compatible. • Anynet+ does not work in certain situations. (Searching channels, operating Media Play or Plug & Play (initial setup), etc.) • When connecting or removing the HDMI cable, please make sure to search devices again or turn your receiver supports audio only, it may not work . Press the EXIT button...
User Manual (user Manual) (ver.1.0) (English)
Page 40
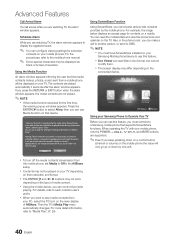
.... Allow Deny Using ScreenShare Function Using ScreenShare, you must have ScreenShare installed on your Samsung Mobile phone/device to use this feature. xx Doc Viewer can use this feature, you can configure viewing settings for contents on their resolution and format. xx The ENTERE and ◄ / ► buttons may differ depending on the type of AllShare. Then the TV's Media Play menu automatically changes. Advanced Features...
.... Allow Deny Using ScreenShare Function Using ScreenShare, you must have ScreenShare installed on your Samsung Mobile phone/device to use this feature. xx Doc Viewer can use this feature, you can configure viewing settings for contents on their resolution and format. xx The ENTERE and ◄ / ► buttons may differ depending on the type of AllShare. Then the TV's Media Play menu automatically changes. Advanced Features...
User Manual (user Manual) (ver.1.0) (English)
Page 44
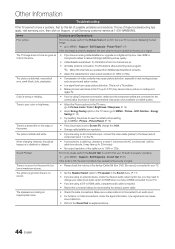
... screen. • If the picture size is not connected to MENU - Color is poor color or brightness. • Adjust the Picture options in the TV menu. (go to 1080i or 720p. Support - It may caused by the source or signal. Picture - There is wrong or missing. • If you have an analog cable/satellite box, upgrade to a digital set to Screen Fit, change your cable box's audio option to HDMI when you have a problem, first try to reset...
... screen. • If the picture size is not connected to MENU - Color is poor color or brightness. • Adjust the Picture options in the TV menu. (go to 1080i or 720p. Support - It may caused by the source or signal. Picture - There is wrong or missing. • If you have an analog cable/satellite box, upgrade to a digital set to Screen Fit, change your cable box's audio option to HDMI when you have a problem, first try to reset...
User Manual (user Manual) (ver.1.0) (English)
Page 45
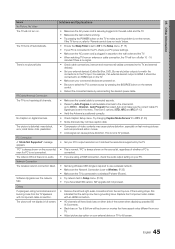
...and external devices). • Set your PC. Auto Program then select Auto and make sure the problem is no signal. There are using a HDMI connection, check the audio output setting on digital channels. • Check Caption Setup menu. Network Connection The wireless network connection failed. • Samsung Wireless USB dongle is required to Wireless. (P. 25) • Make sure the TV is positioned correctly. "PC" is always shown on the source list, • This is set -top-box has a grounding issue. connected. Replace the Component video cables with Component cable...
...and external devices). • Set your PC. Auto Program then select Auto and make sure the problem is no signal. There are using a HDMI connection, check the audio output setting on digital channels. • Check Caption Setup menu. Network Connection The wireless network connection failed. • Samsung Wireless USB dongle is required to Wireless. (P. 25) • Make sure the TV is positioned correctly. "PC" is always shown on the source list, • This is set -top-box has a grounding issue. connected. Replace the Component video cables with Component cable...
User Manual (user Manual) (ver.1.0) (English)
Page 46
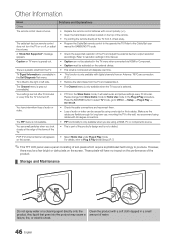
... the supported resolution of the TV and adjust the external device's output resolution accordingly. TV Signal Information is unavailable in the Self Diagnosis Test menu. • This function is only available with digital channels from the TV and reassemble it will reset audio and picture settings every 30 minutes. Please change from Store Demo mode to the right or left side. • Remove the stand base from an Antenna / RF/Coax connection...
... the supported resolution of the TV and adjust the external device's output resolution accordingly. TV Signal Information is unavailable in the Self Diagnosis Test menu. • This function is only available with digital channels from the TV and reassemble it will reset audio and picture settings every 30 minutes. Please change from Store Demo mode to the right or left side. • Remove the stand base from an Antenna / RF/Coax connection...
User Manual (user Manual) (ver.1.0) (English)
Page 49
... Antenna Anynet+ Audio out Auto Adjustment Auto Program B Blanking Bracket Balance C Cables Cable Tie Caption Clear Scrambled Channel Clear Voice Component Composite D Device List Digital Audio out DST (Daylight Saving Time) D-sub Dynamic Contrast E Energy Saving Equalizer External Speaker F FAV.CH button Favorite Channel H HD HDMI Home theater Index I 39 Internet Protocol Setup 7 36 L 9 14 License 12 M Media Play 41 Melody 16 Menu Language MP3 Play MTS 10 N 41 20 Network Connection 13 Network Setup 16 8O 10 ON/OFF button Optimal resolution...
... Antenna Anynet+ Audio out Auto Adjustment Auto Program B Blanking Bracket Balance C Cables Cable Tie Caption Clear Scrambled Channel Clear Voice Component Composite D Device List Digital Audio out DST (Daylight Saving Time) D-sub Dynamic Contrast E Energy Saving Equalizer External Speaker F FAV.CH button Favorite Channel H HD HDMI Home theater Index I 39 Internet Protocol Setup 7 36 L 9 14 License 12 M Media Play 41 Melody 16 Menu Language MP3 Play MTS 10 N 41 20 Network Connection 13 Network Setup 16 8O 10 ON/OFF button Optimal resolution...


