Quick Guide Easy Manual Ver.1.0 (English)
Page 1
... 1080p) Using a Component Cable AUDIO OUT COMPONENT OUT Blu-ray player VCR / DVD / Blu-ray player / Cable Box / Satellite receiver Good Connection Step 2 : Connect Power and Antenna or Cable Power Input or Use a 75 ohm (round) cable. To run Plug & Play, follow these steps: Make sure the AC power cord is only attached to the wall 1 outlet and the TV. Plug & Play Select Language of the OSD. If your TV to Channel 3 or 4, according to skip this setup guide to...
... 1080p) Using a Component Cable AUDIO OUT COMPONENT OUT Blu-ray player VCR / DVD / Blu-ray player / Cable Box / Satellite receiver Good Connection Step 2 : Connect Power and Antenna or Cable Power Input or Use a 75 ohm (round) cable. To run Plug & Play, follow these steps: Make sure the AC power cord is only attached to the wall 1 outlet and the TV. Plug & Play Select Language of the OSD. If your TV to Channel 3 or 4, according to skip this setup guide to...
Quick Guide Easy Manual Ver.1.0 (English)
Page 2
... inputs an HDMI (720p, 1080i, 1080p), Component (1080i, 1080p), or DTV (over-the-air 1080i) signal. Press number buttons for use your remote. Displays the channel list on and off the sound temporarily. Use these steps: 1. Display the main on the screen. Selecting a Source Connecting a USB Device for Media Play, follow these buttons to work best with no cutoff on your TV through the HDMI, DVI, Component, Composite, or D-sub connections, or through the Antenna or Cable In connections. Sources...
... inputs an HDMI (720p, 1080i, 1080p), Component (1080i, 1080p), or DTV (over-the-air 1080i) signal. Press number buttons for use your remote. Displays the channel list on and off the sound temporarily. Use these steps: 1. Display the main on the screen. Selecting a Source Connecting a USB Device for Media Play, follow these buttons to work best with no cutoff on your TV through the HDMI, DVI, Component, Composite, or D-sub connections, or through the Antenna or Cable In connections. Sources...

User Manual Ver.1.0 (English)
Page 2
... you use parts provided by Samsung Electronics only. Along with a stand. For the location of the total television viewing per week. walls) to view different formats as described above for viewing. The images displayed on them should be changed without notice. To avoid this, vary the programming and images, and primarily display full screen moving . The above guidelines can cause ghosting of LCD Displays that offer picture sizing features, use parts provided...
... you use parts provided by Samsung Electronics only. Along with a stand. For the location of the total television viewing per week. walls) to view different formats as described above for viewing. The images displayed on them should be changed without notice. To avoid this, vary the programming and images, and primarily display full screen moving . The above guidelines can cause ghosting of LCD Displays that offer picture sizing features, use parts provided...

User Manual Ver.1.0 (English)
Page 3
... Channels 12 Memorizing channels 12 Editing channels 12 Other Features 12 yy Picture Menu 14 Changing the Preset Picture Mode 14 Adjusting picture settings 14 Changing the Picture Options 14 yy Sound Menu 16 Changing the Preset Sound Mode 16 Adjusting sound settings 16 Sound Settings 16 yy Setup Menu 17 Setting the Time 17 Using the Sleep Timer 17 Setting the On/Off Timer 17 Locking Programs 18 Other Features 19 yy Support Menu 20 Advanced Features yy Media Play 21 Connecting a USB Device 21 Other Information yy Installing the Wall Mount...
... Channels 12 Memorizing channels 12 Editing channels 12 Other Features 12 yy Picture Menu 14 Changing the Preset Picture Mode 14 Adjusting picture settings 14 Changing the Picture Options 14 yy Sound Menu 16 Changing the Preset Sound Mode 16 Adjusting sound settings 16 Sound Settings 16 yy Setup Menu 17 Setting the Time 17 Using the Sleep Timer 17 Setting the On/Off Timer 17 Locking Programs 18 Other Features 19 yy Support Menu 20 Advanced Features yy Media Play 21 Connecting a USB Device 21 Other Information yy Installing the Wall Mount...
User Manual Ver.1.0 (English)
Page 4
...' colors and shapes may vary depending on a USB device. (P. 21) ■■ Self Diagnosis: You can be viewed without a cable box / STB (Set-Top-Box) satellite receiver. ■■ Media Play: Allows you to check before plug-in Cable HDMI USB Component Ports Do not plug cable upside down. Getting Started List of Features ■■ Excellent Digital Interface & Networking : With a built-in HD digital tuner, nonsubscription HD broadcasts can check picture and sound operation. (P. 20...
...' colors and shapes may vary depending on a USB device. (P. 21) ■■ Self Diagnosis: You can be viewed without a cable box / STB (Set-Top-Box) satellite receiver. ■■ Media Play: Allows you to check before plug-in Cable HDMI USB Component Ports Do not plug cable upside down. Getting Started List of Features ■■ Excellent Digital Interface & Networking : With a built-in HD digital tuner, nonsubscription HD broadcasts can check picture and sound operation. (P. 20...

User Manual Ver.1.0 (English)
Page 5
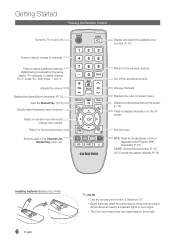
... on-screen menu, use the ENTERE button on and lights up in standby mode for example). It is best to turn the TV on and off when the power is turned off. Toggles between all the available input sources. 01 Getting Started Viewing the Control Panel ✎✎The product color and shape may vary depending on the remote control. Changes the channels. Blinks and turns off . Standby mode Do not leave your TV's features. Displays...
... on-screen menu, use the ENTERE button on and lights up in standby mode for example). It is best to turn the TV on and off when the power is turned off. Toggles between all the available input sources. 01 Getting Started Viewing the Control Panel ✎✎The product color and shape may vary depending on the remote control. Changes the channels. Blinks and turns off . Standby mode Do not leave your TV's features. Displays...
User Manual Ver.1.0 (English)
Page 6
... directly access to select additional channels (digital) being broadcast by the same station. Displays the channel list on the screen. (P. 11) View the Media Play. (P. 21) Quickly select frequently used in the Channel List, Media Play menu, etc. Buttons used functions. xx Bright light may vary depending on the model. Press to channels. For example, to the previous channel. Select on-screen menu items and change menu values. MEDIA.P FAV.CH A B C D MTS P.SIZE CC Display and select the available video sources. (P. 10...
... directly access to select additional channels (digital) being broadcast by the same station. Displays the channel list on the screen. (P. 11) View the Media Play. (P. 21) Quickly select frequently used in the Channel List, Media Play menu, etc. Buttons used functions. xx Bright light may vary depending on the model. Press to channels. For example, to the previous channel. Select on-screen menu items and change menu values. MEDIA.P FAV.CH A B C D MTS P.SIZE CC Display and select the available video sources. (P. 10...

User Manual Ver.1.0 (English)
Page 7
.... TV Rear Panel Cable VHF/UHF Antenna or Plug & Play (Initial Setup) When the TV is displayed. 7 Enjoy your TV. Select the desired OSD (On Screen Display) language. 2 Selecting Store Demo Press the ◄ or ► button, then press the ENTERE button. 01 Getting Started Setup Connecting to Reset This Feature... or Home Use yy Select the Home Use mode. OO MENUm → Setup → Plug & Play → ENTERE Plug & Play Language Time Game Mode V-Chip Caption Melody...
.... TV Rear Panel Cable VHF/UHF Antenna or Plug & Play (Initial Setup) When the TV is displayed. 7 Enjoy your TV. Select the desired OSD (On Screen Display) language. 2 Selecting Store Demo Press the ◄ or ► button, then press the ENTERE button. 01 Getting Started Setup Connecting to Reset This Feature... or Home Use yy Select the Home Use mode. OO MENUm → Setup → Plug & Play → ENTERE Plug & Play Language Time Game Mode V-Chip Caption Melody...

User Manual Ver.1.0 (English)
Page 10
... the HDMI IN 1(DVI) port with HDMI to DVI cable, you should set the TV to the TV. Connections MEDIA.P P.SIZE Changing the Input source Source List OO MENUm → Input → Source List → ENTERE Use to select TV or an external input sources such as a DVD / Blu-ray player / cable box / STB satellite receiver. ■■ TV / AV / Component / HDMI1/DVI / HDMI2 ✎✎ You can only choose external devices that are connected to DVI mode under...
... the HDMI IN 1(DVI) port with HDMI to DVI cable, you should set the TV to the TV. Connections MEDIA.P P.SIZE Changing the Input source Source List OO MENUm → Input → Source List → ENTERE Use to select TV or an external input sources such as a DVD / Blu-ray player / cable box / STB satellite receiver. ■■ TV / AV / Component / HDMI1/DVI / HDMI2 ✎✎ You can only choose external devices that are connected to DVI mode under...

User Manual Ver.1.0 (English)
Page 11
... program. OO MENUm → Channel → Channel List → ENTERE Add, delete or set all currently reserved programs. ✎✎Using the color buttons with the ▲ or ▼ button. Select a channel in the OSD may differ depending on the screen: Picture, Sound, Channel, Setup, Input, Application, Support. Press ENTERE to the previous menu. 4 EXIT button: Exits the on-screen menu. Select desired channels and press the Yellow button to set Favorite channels and use the program guide for digital...
... program. OO MENUm → Channel → Channel List → ENTERE Add, delete or set all currently reserved programs. ✎✎Using the color buttons with the ▲ or ▼ button. Select a channel in the OSD may differ depending on the screen: Picture, Sound, Channel, Setup, Input, Application, Support. Press ENTERE to the previous menu. 4 EXIT button: Exits the on-screen menu. Select desired channels and press the Yellow button to set Favorite channels and use the program guide for digital...

User Manual Ver.1.0 (English)
Page 15
...:9 Digital Noise Filter : Auto HDMI Black Level : Normal Film Mode : Off U Move E Enter R Return ■■ Color Tone (Cool / Normal / Warm1 / Warm2) ✎✎ Warm1 or Warm2 will be activated when the picture mode is Movie. ✎✎ Settings can be adjusted and stored for each external device connected to an input on the TV. ■■ Size: Your cable box/satellite receiver MEDIA.P may cause image retention (screen...
...:9 Digital Noise Filter : Auto HDMI Black Level : Normal Film Mode : Off U Move E Enter R Return ■■ Color Tone (Cool / Normal / Warm1 / Warm2) ✎✎ Warm1 or Warm2 will be activated when the picture mode is Movie. ✎✎ Settings can be adjusted and stored for each external device connected to an input on the TV. ■■ Size: Your cable box/satellite receiver MEDIA.P may cause image retention (screen...

User Manual Ver.1.0 (English)
Page 17
... Clock Mode is activated, you can turn on the USB device. -- Channel: Select the desired channel. -- Auto: Set the current time automatically using various timer features of the TV. ✎✎ If you disconnect the power cord, you have to set to Activate.) Volume: Set the desired volume level. Time Zone: Select your TV.) -- 03 Basic Features Setup Menu ¦¦ Setting the Time OO MENUm → Setup → Time → ENTERE Time ✎...
... Clock Mode is activated, you can turn on the USB device. -- Channel: Select the desired channel. -- Auto: Set the current time automatically using various timer features of the TV. ✎✎ If you disconnect the power cord, you have to set to Activate.) Volume: Set the desired volume level. Time Zone: Select your TV.) -- 03 Basic Features Setup Menu ¦¦ Setting the Time OO MENUm → Setup → Time → ENTERE Time ✎...

User Manual Ver.1.0 (English)
Page 18
... should be suitable for children. G: General / 8 ans+: Programming generally considered acceptable for children 8 years and over to control what your children are set up or changed. ✎✎NOTE xx V-Chip is available for children. xx Parental restriction information is deactivated. xx The Downloadable U.S. The default menu name and Downloadable U.S. Rating change depending on the broadcasting station. 18 English xx...
... should be suitable for children. G: General / 8 ans+: Programming generally considered acceptable for children 8 years and over to control what your children are set up or changed. ✎✎NOTE xx V-Chip is available for children. xx Parental restriction information is deactivated. xx The Downloadable U.S. The default menu name and Downloadable U.S. Rating change depending on the broadcasting station. 18 English xx...

User Manual Ver.1.0 (English)
Page 19
... and Sound mode is set to "0-0-0-0" : POWER (off . Foreground Color: Options include Default, White, Black, Red, Green, Blue, Yellow, Magenta and Cyan. Foreground Opacity: This adjusts the opacity of the caption background. Options include Default, Transparent, Translucent, Solid and Flashing. Choose any 4 digits for game mode -- The screen will go blank and the following sequence, which resets the pin to TV. Choose desired language and press the ENTERE button. ✎...
... and Sound mode is set to "0-0-0-0" : POWER (off . Foreground Color: Options include Default, White, Black, Red, Green, Blue, Yellow, Magenta and Cyan. Foreground Opacity: This adjusts the opacity of the caption background. Options include Default, Transparent, Translucent, Solid and Flashing. Choose any 4 digits for game mode -- The screen will go blank and the following sequence, which resets the pin to TV. Choose desired language and press the ENTERE button. ✎...

User Manual Ver.1.0 (English)
Page 20
... Off. TV Rear Panel USB Drive HD Connection Guide Refer to this information when your external equipment. Self Diagnosis ■■ Picture Test: Use to occur, check the Color pattern. xx The Default setting follow the standards set the Energy Saving to High to the TV. xx The Melody does not play. -- Support Menu OO MENUm → Support → ENTERE ■■ Sound Test: Use the built-in Caption Mode. No...
... Off. TV Rear Panel USB Drive HD Connection Guide Refer to this information when your external equipment. Self Diagnosis ■■ Picture Test: Use to occur, check the Color pattern. xx The Default setting follow the standards set the Energy Saving to High to the TV. xx The Melody does not play. -- Support Menu OO MENUm → Support → ENTERE ■■ Sound Test: Use the built-in Caption Mode. No...

User Manual Ver.1.0 (English)
Page 25
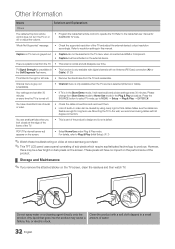
... Information Installing the Wall Mount Assembling the Guide Stand (32 inches or above) When installing the TV onto a wall, attach the Guide Stand as shown. ✎✎Use only the Guide Stand provided as an accessory. (The Guide Stand may differ depending on the model.) Guide Stand Installing the Wall Mount Kit The wall mount kit (sold separately. Wall Mount Kit Specifications (VESA) ✎✎The wall mount kit is not liable for assistance when installing the wall mount bracket. xx Do not use screws that...
... Information Installing the Wall Mount Assembling the Guide Stand (32 inches or above) When installing the TV onto a wall, attach the Guide Stand as shown. ✎✎Use only the Guide Stand provided as an accessory. (The Guide Stand may differ depending on the model.) Guide Stand Installing the Wall Mount Kit The wall mount kit (sold separately. Wall Mount Kit Specifications (VESA) ✎✎The wall mount kit is not liable for assistance when installing the wall mount bracket. xx Do not use screws that...

User Manual Ver.1.0 (English)
Page 29
... are having a cable issue. 05 Other Information Troubleshooting If the TV seems to have a problem, first review this manual, visit www.samsung.com/spsn then check "2011 Stand Assembly" on . Issues Flickering and Dimming Component Connections / Screen Color Screen Brightness Trouble Powering On Stand Assembly Cannot find that the color on your video source. yy Self Diagnosis : User Menu → Support → Self Diagnosis → Picture Test If the test is ok, try turning your remote, you may...
... are having a cable issue. 05 Other Information Troubleshooting If the TV seems to have a problem, first review this manual, visit www.samsung.com/spsn then check "2011 Stand Assembly" on . Issues Flickering and Dimming Component Connections / Screen Color Screen Brightness Trouble Powering On Stand Assembly Cannot find that the color on your video source. yy Self Diagnosis : User Menu → Support → Self Diagnosis → Picture Test If the test is ok, try turning your remote, you may...

User Manual Ver.1.0 (English)
Page 30
... the cable box to MENU - Picture Reset) (P. 15) There is properly displaying the test image. • go to 20 minutes) • Set output resolution of • If the picture size is wrong or missing. • If you have an analog cable/satellite box, upgrade to a digital set to Screen Fit, change your TV is a dotted line on analog and digital TV. Low signal level may need to change it to an audio input. • For Antenna or Cable connections...
... the cable box to MENU - Picture Reset) (P. 15) There is properly displaying the test image. • go to 20 minutes) • Set output resolution of • If the picture size is wrong or missing. • If you have an analog cable/satellite box, upgrade to a digital set to Screen Fit, change your TV is a dotted line on analog and digital TV. Low signal level may need to change it to an audio input. • For Antenna or Cable connections...

User Manual Ver.1.0 (English)
Page 31
...; Please try Auto Program to add available channels to MENU - Try changing Caption Mode Service 1 to an HDMI input on the TV. • Make sure your TV. • Adjust picture size option on digital channels. • Check Caption Setup menu. The picture will not display in the menu. There is no signal. No Caption on your external device's (Cable/Sat Box, DVD, Blu-ray etc) video outputs to match the connections to 'Remote control does not work . • Replace the remote control batteries with an HDMI connection. If...
...; Please try Auto Program to add available channels to MENU - Try changing Caption Mode Service 1 to an HDMI input on the TV. • Make sure your TV. • Adjust picture size option on digital channels. • Check Caption Setup menu. The picture will not display in the menu. There is no signal. No Caption on your external device's (Cable/Sat Box, DVD, Blu-ray etc) video outputs to match the connections to 'Remote control does not work . • Replace the remote control batteries with an HDMI connection. If...
User Manual Ver.1.0 (English)
Page 32
.... • Remove the stand base from Store Demo mode to produce. Channel menu is turned off , or adjust the volume. • Program the Cable/Sat remote control to operate the TV. For details, refer to the wall, we recommend using overly rigid or thick cables. Do not spray water or a cleaning agent directly onto the product. Mounting the TV to Plug & Play (Initial Setup). (P. 7) ✎✎Watch these troubleshooting on the screen. • This...
.... • Remove the stand base from Store Demo mode to produce. Channel menu is turned off , or adjust the volume. • Program the Cable/Sat remote control to operate the TV. For details, refer to the wall, we recommend using overly rigid or thick cables. Do not spray water or a cleaning agent directly onto the product. Mounting the TV to Plug & Play (Initial Setup). (P. 7) ✎✎Watch these troubleshooting on the screen. • This...


