User Manual (ENGLISH)
Page 4
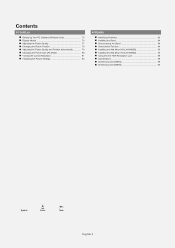
... 81 Initializing the Picture Settings 82 APPENDIX Identifying Problems 83 Installing the Stand 84 Disconnecting the Stand 84 Stand Swivel Function 84 Installing the Wall Mount Kit (LN-S4095D 85 Installing the Wall Mount Kit (LN-S4695D 86 Using the Anti-Theft Kensington Lock 88 Specifications 88 Dimensions...
... 81 Initializing the Picture Settings 82 APPENDIX Identifying Problems 83 Installing the Stand 84 Disconnecting the Stand 84 Stand Swivel Function 84 Installing the Wall Mount Kit (LN-S4095D 85 Installing the Wall Mount Kit (LN-S4695D 86 Using the Anti-Theft Kensington Lock 88 Specifications 88 Dimensions...
User Manual (ENGLISH)
Page 87
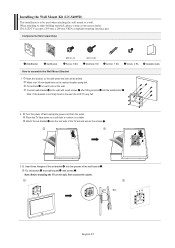
... connect the cables. Connect wall-bracket to the wall with screws . Note: Before installing the TV on the wall. Installing the Wall Mount Kit (LN-S4095D) This installation is not firmly fixed to the wall, the LCD TV may fall. Note: If the bracket is to a wall. Installation Guide 2 Turn the power... off and unplug the power cord from the outlet. Place the TV face down on a soft cloth...
... connect the cables. Connect wall-bracket to the wall with screws . Note: Before installing the TV on the wall. Installing the Wall Mount Kit (LN-S4095D) This installation is not firmly fixed to the wall, the LCD TV may fall. Note: If the bracket is to a wall. Installation Guide 2 Turn the power... off and unplug the power cord from the outlet. Place the TV face down on a soft cloth...
User Manual (ENGLISH)
Page 88
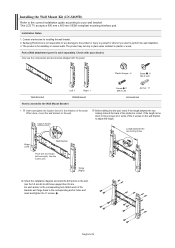
... all or some of the brackets and hinge holes to drill holes deeper than 35 mm. English-86 This LCD TV accepts a 600 mm x 400 mm VESA-compliant mounting interface pad. Samsung Electronics is correct. Use the correct one. Length between the two locking holes at the back of the arrow... for any damage to the product or injury to yourself or others if you elect to perform the wall installation. 3. Installing the Wall Mount Kit (LN-S4695D) Refer to the correct installation guide according to your dealer.) Only use the components and accessories shipped with the panel. This product is...
... all or some of the brackets and hinge holes to drill holes deeper than 35 mm. English-86 This LCD TV accepts a 600 mm x 400 mm VESA-compliant mounting interface pad. Samsung Electronics is correct. Use the correct one. Length between the two locking holes at the back of the arrow... for any damage to the product or injury to yourself or others if you elect to perform the wall installation. 3. Installing the Wall Mount Kit (LN-S4695D) Refer to the correct installation guide according to your dealer.) Only use the components and accessories shipped with the panel. This product is...
User Manual (ENGLISH)
Page 89
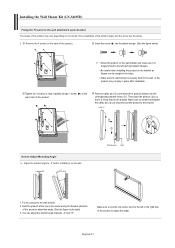
... sure it is securely fixed to the wall, or the product may vary depending on the model. (The assemblies of the product. LCD TV How to Adjust Mounting Angle Adjust the bracket angle to the rear holes of the arrow) to adjust the angle. (See the figure to the bracket. ... to securely hold the product to the right) 3. English-87 Hold the product at the top in place after installation. Installing the Wall Mount Kit (LN-S4695D) Fixing the TV panel to the wall bracket. 2. Fix the product to the wall attachment panel bracket The shape of the product may not stay in the...
... sure it is securely fixed to the wall, or the product may vary depending on the model. (The assemblies of the product. LCD TV How to Adjust Mounting Angle Adjust the bracket angle to the rear holes of the arrow) to adjust the angle. (See the figure to the bracket. ... to securely hold the product to the right) 3. English-87 Hold the product at the top in place after installation. Installing the Wall Mount Kit (LN-S4695D) Fixing the TV panel to the wall bracket. 2. Fix the product to the wall attachment panel bracket The shape of the product may not stay in the...


