
User Manual (ENGLISH)
Page 4
... Set-top box 15 Connecting an Amplifier/DVD Home Theater 15 Connecting a DVD/Set-top box via DVI 16 Connecting a DVD/Set-top box via HDMI 17 Connecting a PC 18 Chapter 3: Operation Turning the TV On and Off 19 Changing Channels 19 Using the Channel Buttons 19 Using the Number Buttons...
... Set-top box 15 Connecting an Amplifier/DVD Home Theater 15 Connecting a DVD/Set-top box via DVI 16 Connecting a DVD/Set-top box via HDMI 17 Connecting a PC 18 Chapter 3: Operation Turning the TV On and Off 19 Changing Channels 19 Using the Channel Buttons 19 Using the Number Buttons...
User Manual (ENGLISH)
Page 6
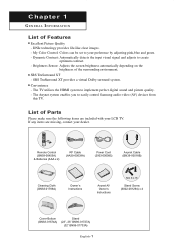
... x 4 Cover-Bottom (BN63-01674A) Stand (23", 26" BN96-01727A) (32" BN96-01733A) English-1 The TV utilizes the HDMI system to your LCD TV. My Color Control: Colors can be set to implement perfect digital sound and picture quality. - Brightness Sensor:...-like clear images. - The Anynet system enables you to create optimum contrast. - Dynamic Contrast: Automatically detects the input visual signal and adjusts to easily control Samsung audio-video (AV) devices from this TV. If any items are included with your preference by adjusting pink,blue and green. - Chapter 1 G E N E R ...
... x 4 Cover-Bottom (BN63-01674A) Stand (23", 26" BN96-01727A) (32" BN96-01733A) English-1 The TV utilizes the HDMI system to your LCD TV. My Color Control: Colors can be set to implement perfect digital sound and picture quality. - Brightness Sensor:...-like clear images. - The Anynet system enables you to create optimum contrast. - Dynamic Contrast: Automatically detects the input visual signal and adjusts to easily control Samsung audio-video (AV) devices from this TV. If any items are included with your preference by adjusting pink,blue and green. - Chapter 1 G E N E R ...
User Manual (ENGLISH)
Page 7
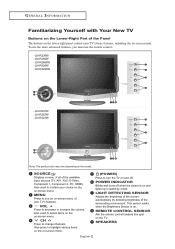
... M AT I O N Familiarizing Yourself with Your New TV Buttons on the Lower-Right Part of the available input sources (TV, AV1, AV2, S-Video, Component 1, Component 2, PC, HDMI). LN-R3228W - SOURCE Displays a menu of all of the Panel The buttons on the lower-right panel control your TV's basic features, including the on . VOL + ...by mode. Also used to select items on the on -screen menu. LN-R237W - LN-R267W - LN-R268W - LN-R238W - To use the more advanced features, you must use the remote control. - LN-R327W Note: The product color may vary depending on the TV. Also ...
... M AT I O N Familiarizing Yourself with Your New TV Buttons on the Lower-Right Part of the available input sources (TV, AV1, AV2, S-Video, Component 1, Component 2, PC, HDMI). LN-R3228W - SOURCE Displays a menu of all of the Panel The buttons on the lower-right panel control your TV's basic features, including the on . VOL + ...by mode. Also used to select items on the on -screen menu. LN-R237W - LN-R267W - LN-R268W - LN-R238W - To use the more advanced features, you must use the remote control. - LN-R327W Note: The product color may vary depending on the TV. Also ...
User Manual (ENGLISH)
Page 8
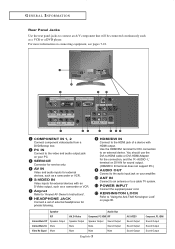
... a VCR or a DVD player. SERVICE Connector for private listening. ANT IN Connect to an antenna or to "Anynet AV Owner's Instructions". Use the HDMI/DVI terminal for sound output. (HDMI/DVI IN terminal does not support PC.) AUDIO OUT Connect to an external device. For more information on your PC. G E N E R A L I N F... S-Video output, such as a camcorder or VCR. POWER INPUT Connect the supplied power cord. You should use the DVI-to-HDMI cable or DVI-HDMI Adapter for the connection, and the 'R -AUDIO -L' terminal on DVI-IN for DVI connection to the audio input jack on ...
... a VCR or a DVD player. SERVICE Connector for private listening. ANT IN Connect to an antenna or to "Anynet AV Owner's Instructions". Use the HDMI/DVI terminal for sound output. (HDMI/DVI IN terminal does not support PC.) AUDIO OUT Connect to an external device. For more information on your PC. G E N E R A L I N F... S-Video output, such as a camcorder or VCR. POWER INPUT Connect the supplied power cord. You should use the DVI-to-HDMI cable or DVI-HDMI Adapter for the connection, and the 'R -AUDIO -L' terminal on DVI-IN for DVI connection to the audio input jack on ...

User Manual (ENGLISH)
Page 21
DVD Player Rear Panel TV Rear Panel DVI-to-HDMI Cable (Option) 2 Connect an audio cable between the HDMI/DVI connector on the TV and the DVI connector on the DVD player/Set-top box. CONNECTIONS Connecting a DVD/Set-top box via DVI This can be applied only if there is the DVI Output connector on the external device. 1 Connect a DVI-to-HDMI cable or DVI-HDMI adapter between the DVI IN [R-AUDIO-L] jack on the TV and the AUDIO OUT jacks on the DVD player/Set-top box. DVD Player Rear Panel TV Rear Panel Audio Cable (Option) DVI-to-HDMI Cable (Option) English-16
DVD Player Rear Panel TV Rear Panel DVI-to-HDMI Cable (Option) 2 Connect an audio cable between the HDMI/DVI connector on the TV and the DVI connector on the DVD player/Set-top box. CONNECTIONS Connecting a DVD/Set-top box via DVI This can be applied only if there is the DVI Output connector on the external device. 1 Connect a DVI-to-HDMI cable or DVI-HDMI adapter between the DVI IN [R-AUDIO-L] jack on the TV and the AUDIO OUT jacks on the DVD player/Set-top box. DVD Player Rear Panel TV Rear Panel Audio Cable (Option) DVI-to-HDMI Cable (Option) English-16
User Manual (ENGLISH)
Page 22
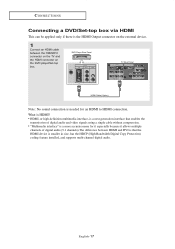
... signals using a single cable without compression. • "Multimedia interface" is a more accurate name for an HDMI to HDMI connection. CONNECTIONS Connecting a DVD/Set-top box via HDMI This can be applied only if there is smaller in size, has the HDCP (High Bandwidth Digital Copy Protection...) coding feature installed, and supports multi-channel digital audio. English-17 DVD Player Rear Panel TV Rear Panel HDMI Cable (Option) Note: No sound connection is needed for it especially because it allows multiple channels of digital audio (5.1 channels).The ...
... signals using a single cable without compression. • "Multimedia interface" is a more accurate name for an HDMI to HDMI connection. CONNECTIONS Connecting a DVD/Set-top box via HDMI This can be applied only if there is smaller in size, has the HDCP (High Bandwidth Digital Copy Protection...) coding feature installed, and supports multi-channel digital audio. English-17 DVD Player Rear Panel TV Rear Panel HDMI Cable (Option) Note: No sound connection is needed for it especially because it allows multiple channels of digital audio (5.1 channels).The ...
User Manual (ENGLISH)
Page 33
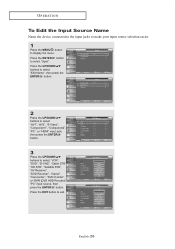
.../DOWN buttons to select "Edit Name", then press the ENTER button. 2 Press the UP/DOWN buttons to select "AV1", "AV2", "S-Video", "Component1", "Component2", "PC", or "HDMI" input jack, then press the ENTER button. 3 Press the UP/DOWN buttons to display the menu. English-28 O P E R AT I O N To Edit the Input Source Name...
.../DOWN buttons to select "Edit Name", then press the ENTER button. 2 Press the UP/DOWN buttons to select "AV1", "AV2", "S-Video", "Component1", "Component2", "PC", or "HDMI" input jack, then press the ENTER button. 3 Press the UP/DOWN buttons to display the menu. English-28 O P E R AT I O N To Edit the Input Source Name...

User Manual (ENGLISH)
Page 46
... ENTER button. PICTURE CONTROL Selecting a Signal Source (External A/V) for PIP 3 Press the UP/DOWN buttons to select "Source", then press the ENTER button. [PC/HDMI modes only] Select the source of the PIP and Main image 4 Press the UP/DOWN buttons to select "Swap", then press the ENTER button. When... the main picture is set to PC/HDMI, only TV/AV1/ AV2/S-Video/Component1/ Component2 can be selected. If main picture is in the PIP window. Press the UP/DOWN buttons to ...
... ENTER button. PICTURE CONTROL Selecting a Signal Source (External A/V) for PIP 3 Press the UP/DOWN buttons to select "Source", then press the ENTER button. [PC/HDMI modes only] Select the source of the PIP and Main image 4 Press the UP/DOWN buttons to select "Swap", then press the ENTER button. When... the main picture is set to PC/HDMI, only TV/AV1/ AV2/S-Video/Component1/ Component2 can be selected. If main picture is in the PIP window. Press the UP/DOWN buttons to ...
User Manual (ENGLISH)
Page 47
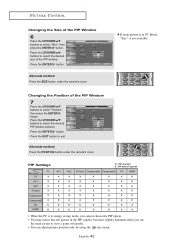
... only by using the size menu. PIP Settings Sub Picture TV Main Picture TV X AV1 X AV2 X S-Video X Component1 X Component2 X PC O HDMI O AV1 X X X X X X O O AV2 X X X X X X O O O : PIP operates X : PIP doesn't operate S-Video Component1 Component2 PC HDMI X X X X O X X X X O X X X X O X X X X O X X X X O X X X X O O O O X X O O O X X • When the PC is in energy saving mode, you cannot choose the PIP option. • You may notice...
... only by using the size menu. PIP Settings Sub Picture TV Main Picture TV X AV1 X AV2 X S-Video X Component1 X Component2 X PC O HDMI O AV1 X X X X X X O O AV2 X X X X X X O O O : PIP operates X : PIP doesn't operate S-Video Component1 Component2 PC HDMI X X X X O X X X X O X X X X O X X X X O X X X X O X X X X O O O O X X O O O X X • When the PC is in energy saving mode, you cannot choose the PIP option. • You may notice...


