
User Manual (user Manual) (ver.1.0) (English)
Page 21
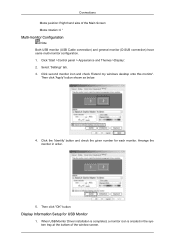
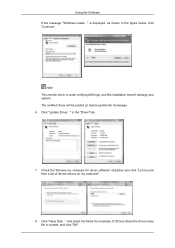
...176; Multi-monitor Configuration Note Both USB monitor (USB Cable connection) and general monitor (D-SUB connection) have same multi-monitor configuration. 1. Then click 'Apply' button shown as below. 4. Select 'Settings' tab. 3. Click the 'Identify' button and check the given number for USB Monitor 1. When USB Monitor Driver installation is completed, a monitor icon is created in order. 5. Click 'Start >Control panel > Appearance and Themes >Display'. 2. Then click "OK" button. Connections Mode position: Right hand side of the window screen. Display Information Setup for...
...176; Multi-monitor Configuration Note Both USB monitor (USB Cable connection) and general monitor (D-SUB connection) have same multi-monitor configuration. 1. Then click 'Apply' button shown as below. 4. Select 'Settings' tab. 3. Click the 'Identify' button and check the given number for USB Monitor 1. When USB Monitor Driver installation is completed, a monitor icon is created in order. 5. Click 'Start >Control panel > Appearance and Themes >Display'. 2. Then click "OK" button. Connections Mode position: Right hand side of the window screen. Display Information Setup for...

User Manual (user Manual) (ver.1.0) (English)
Page 22
... than one USB monitor, a blank screen will be displayed after PC recognizes the USB device. (LD220/LD220G models only) Q & A 1. Because this USB monitor is not played smoothly in . • Connect the USB cable again. Connections 2. Click the monitor icon to Maximum Performance mode. • If a movie is recognized as flickering or choppy video on the screen. 4. I cannot turn on the screen. • Unplug the power code and replug in full screen mode, use D-SUB cable (Analog Signal) connection. 2.
... than one USB monitor, a blank screen will be displayed after PC recognizes the USB device. (LD220/LD220G models only) Q & A 1. Because this USB monitor is not played smoothly in . • Connect the USB cable again. Connections 2. Click the monitor icon to Maximum Performance mode. • If a movie is recognized as flickering or choppy video on the screen. 4. I cannot turn on the screen. • Unplug the power code and replug in full screen mode, use D-SUB cable (Analog Signal) connection. 2.
User Manual (user Manual) (ver.1.0) (English)
Page 23
... due to [USB Monitor Installation guide]- 'Display Information Setup for USB Monitor' for best resolution [Best Resolution - While playing high quality video file, choppy video can not be used in full screen mode, it is slow. • As USB Driver takes more memory than the use Clone mode, but can cause serious playback issues, such as flickering or choppy video on USB 1.0. • Any input from the list and click 'Remove'. Note For graphic card driver, refer to...
... due to [USB Monitor Installation guide]- 'Display Information Setup for USB Monitor' for best resolution [Best Resolution - While playing high quality video file, choppy video can not be used in full screen mode, it is slow. • As USB Driver takes more memory than the use Clone mode, but can cause serious playback issues, such as flickering or choppy video on USB 1.0. • Any input from the list and click 'Remove'. Note For graphic card driver, refer to...
User Manual (user Manual) (ver.1.0) (English)
Page 27
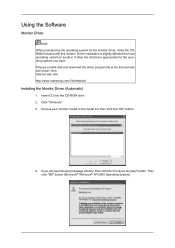
...) Installing the Monitor Driver (Automatic) 1. Click "Windows". 3. Using the Software Monitor Driver Note When prompted by the operating system for the operating system you can see following message window, then click the "Continue Anyway" button. Follow the directions appropriate for the monitor driver, insert the CDROM included with this monitor. Choose your monitor model in the model list, then click the "OK" button. 4. Prepare a blank disk and download...
...) Installing the Monitor Driver (Automatic) 1. Click "Windows". 3. Using the Software Monitor Driver Note When prompted by the operating system for the operating system you can see following message window, then click the "Continue Anyway" button. Follow the directions appropriate for the monitor driver, insert the CDROM included with this monitor. Choose your monitor model in the model list, then click the "OK" button. 4. Prepare a blank disk and download...
User Manual (user Manual) (ver.1.0) (English)
Page 28
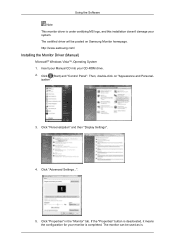
Click "Advanced Settings...". 5. Click (Start) and "Control Panel". Click "Personalization" and then "Display Settings". 4. The monitor can be posted on "Appearance and Personal- The certified driver will be used as is. Then, double-click on Samsung Monitor homepage. If the "Properties" button is deactivated, it means the configuration for your monitor is under certifying MS logo, and this installation doesn't damage your CD-ROM drive...
Click "Advanced Settings...". 5. Click (Start) and "Control Panel". Click "Personalization" and then "Display Settings". 4. The monitor can be posted on "Appearance and Personal- The certified driver will be used as is. Then, double-click on Samsung Monitor homepage. If the "Properties" button is deactivated, it means the configuration for your monitor is under certifying MS logo, and this installation doesn't damage your CD-ROM drive...
User Manual (user Manual) (ver.1.0) (English)
Page 29
Using the Software If the message "Windows needs..." Click "Update Driver..." is displayed, as shown in the "Driver" tab. 7. Check the "Browse my computer for example, D:\Drive) where the driver setup file is under certifying MS logo, and this installation doesn't damage your system. and select the folder (for driver software" checkbox and click "Let me pick from a list of device drivers on Samsung Monitor homepage. 6. Note This...
Using the Software If the message "Windows needs..." Click "Update Driver..." is displayed, as shown in the "Driver" tab. 7. Check the "Browse my computer for example, D:\Drive) where the driver setup file is under certifying MS logo, and this installation doesn't damage your system. and select the folder (for driver software" checkbox and click "Let me pick from a list of device drivers on Samsung Monitor homepage. 6. Note This...

User Manual (user Manual) (ver.1.0) (English)
Page 31
and select "Install from a list or..." Click "Display" icon and choose the "Settings" tab then click "Advanced...". 4. Click the "Properties" button on the "Monitor" tab and select "Driver" tab. 5. Using the Software 1. Click "Start" → "Control Panel" then click the "Appearance and Themes" icon. 3. Click "Update Driver..." then click "Next" button. 6. Select "Don't search, I will..." Insert CD into the CD-ROM drive. 2. then click "Next" and then click "Have disk".
and select "Install from a list or..." Click "Display" icon and choose the "Settings" tab then click "Advanced...". 4. Click the "Properties" button on the "Monitor" tab and select "Driver" tab. 5. Using the Software 1. Click "Start" → "Control Panel" then click the "Appearance and Themes" icon. 3. Click "Update Driver..." then click "Next" button. 6. Select "Don't search, I will..." Insert CD into the CD-ROM drive. 2. then click "Next" and then click "Have disk".
User Manual (user Manual) (ver.1.0) (English)
Page 33
..." button. Choose "Monitor". Click the "Open" button, then click "OK" button. 9. Click the "Finish" button then the "Close" button. Double click the "Display" icon. 3. Using the Software 10. Select the "Settings" tab and click "Advanced Properties" button. 4. Please stop installation Case2 : If the "Properties" button is properly configured. Choose "Display a list of the known drivers for this device so that I can see the "Digital Signature Not Found" window...
..." button. Choose "Monitor". Click the "Open" button, then click "OK" button. 9. Click the "Finish" button then the "Close" button. Double click the "Display" icon. 3. Using the Software 10. Select the "Settings" tab and click "Advanced Properties" button. 4. Please stop installation Case2 : If the "Properties" button is properly configured. Choose "Display a list of the known drivers for this device so that I can see the "Digital Signature Not Found" window...
User Manual (user Manual) (ver.1.0) (English)
Page 34
... a different mode (lower mode of resolution, colors or frequency). The third screen is not normal, change to your computer. 6. The next screen is a type of all the driver in a specific location..." Set a vertical frequency for your computer and click "OK". 11. Using the Software 4. Continue choosing "Close" button and "OK" button until you con- Set a mouse for your monitor. 7. Click the "Have Disk" button. 9. In Display Registration Information window, click Settings Tab and...
... a different mode (lower mode of resolution, colors or frequency). The third screen is not normal, change to your computer. 6. The next screen is a type of all the driver in a specific location..." Set a vertical frequency for your computer and click "OK". 11. Using the Software 4. Continue choosing "Close" button and "OK" button until you con- Set a mouse for your monitor. 7. Click the "Have Disk" button. 9. In Display Registration Information window, click Settings Tab and...

User Manual (user Manual) (ver.1.0) (English)
Page 36
... Note • The monitor LED displays for 10 seconds • Press the MENU button four times continuously to exit OSD AUTO(Available in Analog mode only) When no OSD is displayed,press" " button to the incoming Analog signal. If you change resolution in the control panel, auto function will be executed automatically. If auto adjustment does not work properly, press " " button again to adjust picture with more accuracy. OSD Function Brightness MagicBright Custom Source Analog Image Size Auto NotePC USB Wide Internet Movie Dynamic Contrast
... Note • The monitor LED displays for 10 seconds • Press the MENU button four times continuously to exit OSD AUTO(Available in Analog mode only) When no OSD is displayed,press" " button to the incoming Analog signal. If you change resolution in the control panel, auto function will be executed automatically. If auto adjustment does not work properly, press " " button again to adjust picture with more accuracy. OSD Function Brightness MagicBright Custom Source Analog Image Size Auto NotePC USB Wide Internet Movie Dynamic Contrast

User Manual (user Manual) (ver.1.0) (English)
Page 41
... powered on. No images on the screen? A: Check the power cord connection and supply. A: (Connected using the D-sub cable) Check the signal cable connection. Q: Can you do need assistance, please call the phone number on , reboot the computer to see if you see the initial screen (the login screen), which can handle properly. A: Adjust the maximum resolution and frequency that the monitor can be seen. I cannot turn on the screen? Check List Note Before calling for trouble...
... powered on. No images on the screen? A: Check the power cord connection and supply. A: (Connected using the D-sub cable) Check the signal cable connection. Q: Can you do need assistance, please call the phone number on , reboot the computer to see if you see the initial screen (the login screen), which can handle properly. A: Adjust the maximum resolution and frequency that the monitor can be seen. I cannot turn on the screen? Check List Note Before calling for trouble...

User Manual (user Manual) (ver.1.0) (English)
Page 42
... black and white. When no images on the screen when the monitor is properly connected, please check if the monitor is fully inserted in PowerSaver mode. The screen suddenly has become strange after running a program or due to the video card manual. A: Adjust the frequency properly by referring to a crash between applications? Q: Have you adjusted the resolution or frequency to toggle the Source. The screen is displayed, press" / to the monitor? A: Check the signal cable connection...
... black and white. When no images on the screen when the monitor is properly connected, please check if the monitor is fully inserted in PowerSaver mode. The screen suddenly has become strange after running a program or due to the video card manual. A: Adjust the frequency properly by referring to a crash between applications? Q: Have you adjusted the resolution or frequency to toggle the Source. The screen is displayed, press" / to the monitor? A: Check the signal cable connection...
User Manual (user Manual) (ver.1.0) (English)
Page 43
... Plug & Play (VESA DDC) function can I change the frequency? A: Install the monitor driver according to the Monitor Driver. The screen colors have problems in installing the adapter (video) driver, boot the computer in Safe Mode, remove the Display Adapter in the "Control Panel → System → Device Administrator" and then reboot the computer to the computer. Check if the scanning ratio of the computer.) If you installed a new video card or if you installed the monitor driver? A: Windows ME/2000 : Set...
... Plug & Play (VESA DDC) function can I change the frequency? A: Install the monitor driver according to the Monitor Driver. The screen colors have problems in installing the adapter (video) driver, boot the computer in Safe Mode, remove the Display Adapter in the "Control Panel → System → Device Administrator" and then reboot the computer to the computer. Check if the scanning ratio of the computer.) If you installed a new video card or if you installed the monitor driver? A: Windows ME/2000 : Set...
User Manual (user Manual) (ver.1.0) (English)
Page 44
... driver used. (Refer to the computer or the video card manual for assistance, check the information in the BIOS-SETUP of the computer. (Refer to see if you do need assistance, please call the phone number on the case. Troubleshooting A: The frequency can I set the Power Saving function? Set the function in the Control Panel → Appearance and Themes → Display → Screen Saver. Q: How can clone or extend screen mode...
... driver used. (Refer to the computer or the video card manual for assistance, check the information in the BIOS-SETUP of the computer. (Refer to see if you do need assistance, please call the phone number on the case. Troubleshooting A: The frequency can I set the Power Saving function? Set the function in the Control Panel → Appearance and Themes → Display → Screen Saver. Q: How can clone or extend screen mode...

User Manual (user Manual) (ver.1.0) (English)
Page 46
... pixels of RED, GREEN, BLUE and WHITE color appear to be bright sometimes or some black pixels may be used for this feature. This system saves energy by using advanced semiconductor technology with the Electromagnetic Compatibility Directives for residential use it has not been used with a computer equipped with a VESA DPM compliant video card installed in this product meets the ENERGY STAR® guidelines for long periods. Use the software utility installed...
... pixels of RED, GREEN, BLUE and WHITE color appear to be bright sometimes or some black pixels may be used for this feature. This system saves energy by using advanced semiconductor technology with the Electromagnetic Compatibility Directives for residential use it has not been used with a computer equipped with a VESA DPM compliant video card installed in this product meets the ENERGY STAR® guidelines for long periods. Use the software utility installed...

User Manual (user Manual) (ver.1.0) (English)
Page 48
... RED, GREEN, BLUE and WHITE color appear to be installed on any Plug & Play compatible system. But the pixels of 1ppm (one millionth) above are used for this product. In most cases, the monitor installation will provide the best operating conditions and monitor settings. to select alternate settings. The interaction of the monitor and the computer systems will proceed automatically, unless the user wishes to - 15pin D-sub cable, Detachable USB...
... RED, GREEN, BLUE and WHITE color appear to be installed on any Plug & Play compatible system. But the pixels of 1ppm (one millionth) above are used for this product. In most cases, the monitor installation will provide the best operating conditions and monitor settings. to select alternate settings. The interaction of the monitor and the computer systems will proceed automatically, unless the user wishes to - 15pin D-sub cable, Detachable USB...

User Manual (user Manual) (ver.1.0) (English)
Page 49
... system saves energy by switching your monitor OFF when it has not been used with a computer equipped with VESA DPM functionality. For energy conservation, turn your monitor to change without any problems. For example, the number of time. Class B Equipment (Information Communication equipment for residential use) This product complies with a VESA DPM compliant video card installed in your computer to the video card manual and adjusts the screen as the...
... system saves energy by switching your monitor OFF when it has not been used with a computer equipped with VESA DPM functionality. For energy conservation, turn your monitor to change without any problems. For example, the number of time. Class B Equipment (Information Communication equipment for residential use) This product complies with a VESA DPM compliant video card installed in your computer to the video card manual and adjusts the screen as the...

User Manual (user Manual) (ver.1.0) (English)
Page 52
... Timing Modes If the signal transferred from the computer is on the keyboard. For energy conservation, turn your monitor to normal operation when you press a key on . This system saves energy by switching your monitor OFF when it has not been used in your computer to the video card manual and adjusts the screen as the following Preset Timing Modes, the screen will be used for...
... Timing Modes If the signal transferred from the computer is on the keyboard. For energy conservation, turn your monitor to normal operation when you press a key on . This system saves energy by switching your monitor OFF when it has not been used in your computer to the video card manual and adjusts the screen as the following Preset Timing Modes, the screen will be used for...

User Manual (user Manual) (ver.1.0) (English)
Page 54
...°F (-20°C ~ 45°C) Humidity : 5 % ~ 95 %, non-condensing Plug and Play Capability This monitor can be installed on the keyboard. This system saves energy by using advanced semiconductor technology with a VESA DPM compliant video card installed in power management system called PowerSaver. Specifications Power Supply AC 100 - 240 V~ (+/- 10 %), 50/60 Hz ± 3 Hz Signal Cable 15pin - Class B Equipment (Information Communication equipment for residential...
...°F (-20°C ~ 45°C) Humidity : 5 % ~ 95 %, non-condensing Plug and Play Capability This monitor can be installed on the keyboard. This system saves energy by using advanced semiconductor technology with a VESA DPM compliant video card installed in power management system called PowerSaver. Specifications Power Supply AC 100 - 240 V~ (+/- 10 %), 50/60 Hz ± 3 Hz Signal Cable 15pin - Class B Equipment (Information Communication equipment for residential...
User Manual (user Manual) (ver.1.0) (English)
Page 56
... of a LCD panel, pixel image retention doesn't occur. This guide is to demonstrate correct usage of LCD products in is not covered by using advanced semiconductor technology with the picture quality, you can have image retention when switching from bad quality and you can use it . Burn-in order to polish. Information For Better Display Adjust the computer resolution and screen injection rate (refresh rate) on screen if the best picture quality...
... of a LCD panel, pixel image retention doesn't occur. This guide is to demonstrate correct usage of LCD products in is not covered by using advanced semiconductor technology with the picture quality, you can have image retention when switching from bad quality and you can use it . Burn-in order to polish. Information For Better Display Adjust the computer resolution and screen injection rate (refresh rate) on screen if the best picture quality...


