User Manual (ENGLISH)
Page 7
... memo 080 Protecting images 081 Deleting images 081 DPOF 083 Copy To Card 084 PictBridge 085 PictBridge : Picture Selection 086 PictBridge : Print Setting 086 PictBridge : Reset 087 Important notes 088 Warning indicator 089 Before contacting a service centre 091 Specifications SOFTWARE 094 Software Notes 094 System Requirements 095 About the software 096... disk 102 Setting up the USB Driver for MAC 102 Using the USB Driver for MAC 102 Removing the USB Driver for Windows 98SE 103 Samsung Master 106 FAQ
... memo 080 Protecting images 081 Deleting images 081 DPOF 083 Copy To Card 084 PictBridge 085 PictBridge : Picture Selection 086 PictBridge : Print Setting 086 PictBridge : Reset 087 Important notes 088 Warning indicator 089 Before contacting a service centre 091 Specifications SOFTWARE 094 Software Notes 094 System Requirements 095 About the software 096... disk 102 Setting up the USB Driver for MAC 102 Using the USB Driver for MAC 102 Removing the USB Driver for Windows 98SE 103 Samsung Master 106 FAQ
User Manual (ENGLISH)
Page 21
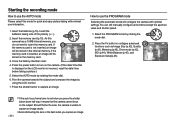
... easy picture taking with optimal settings.You can still manually configure all functions except the aperture value and shutter speed. 1. As this camera has a 10MB internal memory, you press the shutter button down half way, it means that is unable to capture an image clearly...the recording mode How to use the PROGRAM mode Selecting the automatic mode will configure the camera with minimal user interaction. 1. Select the PROGRAM mode by using the LCD monitor. 7. If the memory card is incorrect, reset the date/ time before taking note of the polarity (+ / -). 2. Insert the ...
... easy picture taking with optimal settings.You can still manually configure all functions except the aperture value and shutter speed. 1. As this camera has a 10MB internal memory, you press the shutter button down half way, it means that is unable to capture an image clearly...the recording mode How to use the PROGRAM mode Selecting the automatic mode will configure the camera with minimal user interaction. 1. Select the PROGRAM mode by using the LCD monitor. 7. If the memory card is incorrect, reset the date/ time before taking note of the polarity (+ / -). 2. Insert the ...

User Manual (ENGLISH)
Page 54
... & Time yy/mm/dd Off p.54 dd/mm/yy mm/dd/yy Imprint Off Date&Time Date p.55 - Menu tab Main menu File Sub menu Reset Series Page p.54 Language p.54 Menu tab (Setup menu 2) Main menu Quick View Power Off LCD Save Video Out Format... Reset Sub menu Off 0.5, 1, 3 sec Off 1, 3, 5, 10 min Off On NTSC PAL No Yes No Yes Menus are default settings. You can set up basic settings. ...
... & Time yy/mm/dd Off p.54 dd/mm/yy mm/dd/yy Imprint Off Date&Time Date p.55 - Menu tab Main menu File Sub menu Reset Series Page p.54 Language p.54 Menu tab (Setup menu 2) Main menu Quick View Power Off LCD Save Video Out Format... Reset Sub menu Off 0.5, 1, 3 sec Off 1, 3, 5, 10 min Off On NTSC PAL No Yes No Yes Menus are default settings. You can set up basic settings. ...
User Manual (ENGLISH)
Page 55
... and time setup. The first stored folder name is 100SSCAM, and the first file name of L830 is removed and inserted again, the language setting will be shifted to the left of its current... LANGUAGE There is used with the memory card conform to the DCF (Design rule for Camera File systems) format. Maximum numbers of languages that can change the date and time that ... - Setup menu 1 ( ) File name This function allows the user to select the file naming format. [Reset] [Series] : After using numbers that will be displayed on the captured images and set from SL380001 SL380002 ~...
... and time setup. The first stored folder name is 100SSCAM, and the first file name of L830 is removed and inserted again, the language setting will be shifted to the left of its current... LANGUAGE There is used with the memory card conform to the DCF (Design rule for Camera File systems) format. Maximum numbers of languages that can change the date and time that ... - Setup menu 1 ( ) File name This function allows the user to select the file naming format. [Reset] [Series] : After using numbers that will be displayed on the captured images and set from SL380001 SL380002 ~...

User Manual (ENGLISH)
Page 56
... adjust the LCD brightness. - The imprint function is applied only to include DATE / TIME on still images. The start -up image will be deleted by [Reset] menu. The Date & Time are imprinted at the bottom right side of the still image. Depending on the manufacturer and print mode, the date printed... AF Lamp Back Off On OK Set Start up image You can select the image that is first displayed on the LCD monitor whenever the camera is an option to still images except for the start -up image with the [Start Image] in the [RESIZE] menu in photo frame effect mode...
... adjust the LCD brightness. - The imprint function is applied only to include DATE / TIME on still images. The start -up image will be deleted by [Reset] menu. The Date & Time are imprinted at the bottom right side of the still image. Depending on the manufacturer and print mode, the date printed... AF Lamp Back Off On OK Set Start up image You can select the image that is first displayed on the LCD monitor whenever the camera is an option to still images except for the start -up image with the [Start Image] in the [RESIZE] menu in photo frame effect mode...

User Manual (ENGLISH)
Page 57
SETUP 2 Quick View Power Off LCD Save Video Out Format Reset Back 2 Off 0.5 sec 1 sec 3 sec OK Set > Auto power off This function switches the camera off after a set the [LCD save] menu of Playback Mode. After replacing the battery, the power off function will be ...preserved. - SETUP 2 Quick View Power Off LCD Save Video Out Format Reset Back 2 Off On OK Set - Sub menus [Off] : The quick view function can't be idle (Camera status lamp:Blinking) automatically. Note that the automatic power off setting will be activated. [0.5, 1, 3...
SETUP 2 Quick View Power Off LCD Save Video Out Format Reset Back 2 Off 0.5 sec 1 sec 3 sec OK Set > Auto power off This function switches the camera off after a set the [LCD save] menu of Playback Mode. After replacing the battery, the power off function will be ...preserved. - SETUP 2 Quick View Power Off LCD Save Video Out Format Reset Back 2 Off On OK Set - Sub menus [Off] : The quick view function can't be idle (Camera status lamp:Blinking) automatically. Note that the automatic power off setting will be activated. [0.5, 1, 3...
User Manual (ENGLISH)
Page 58
... When using a TV as an external monitor, you will be a digital noise on the external monitor, but it is not in the centre of the screen, use the TV controls to select the external or AV channel of the camera. When the camera is connected to an external monitor, some parts of device... (monitor or TV, etc.) to which the camera is connected to an external monitor, the image and menus on the external monitor and the LCD monitor of the TV. - sound > Yellow - Video White - SETUP 2 Quick View Power Off LCD Save Video Out Format Reset Back 2 NTSC PAL OK Set - PAL : Australia...
... When using a TV as an external monitor, you will be a digital noise on the external monitor, but it is not in the centre of the screen, use the TV controls to select the external or AV channel of the camera. When the camera is connected to an external monitor, some parts of device... (monitor or TV, etc.) to which the camera is connected to an external monitor, the image and menus on the external monitor and the LCD monitor of the TV. - sound > Yellow - Video White - SETUP 2 Quick View Power Off LCD Save Video Out Format Reset Back 2 NTSC PAL OK Set - PAL : Australia...

User Manual (ENGLISH)
Page 59
... Off LCD Save Video Out Format Reset Back 2 No Yes OK Set Initialisation All camera menu and function settings will be restored to confirm the selection will be displayed. Sub menus [No] : Settings will not be deleted. A memory card that has a file this camera can't recognise or one that has... been formatted using this camera. Sub menus [No] : The memory will not be formatted. SETUP 2 Quick View Power Off LCD Save Video Out Format Reset Back 2 No Yes OK Set Be sure to your PC before formatting the memory. - Setup menu 2 ( ) Formatting a memory This ...
... Off LCD Save Video Out Format Reset Back 2 No Yes OK Set Initialisation All camera menu and function settings will be restored to confirm the selection will be displayed. Sub menus [No] : Settings will not be deleted. A memory card that has a file this camera can't recognise or one that has... been formatted using this camera. Sub menus [No] : The memory will not be formatted. SETUP 2 Quick View Power Off LCD Save Video Out Format Reset Back 2 No Yes OK Set Be sure to your PC before formatting the memory. - Setup menu 2 ( ) Formatting a memory This ...

User Manual (ENGLISH)
Page 78
... A4 A3 Auto Full 1 2 4 8 9 16 Index Secondary Menu - Setting up the play back function using the LCD monitor This menu is available while the camera is connected to a PictBridge supporting printer (direct connection to change without prior notice. > Page p.86 Menus are subject to the... camera, sold separately) with a USB cable. Page p.85 p.86 Menu Tab Main Menu Type Quality Date Print File Name Reset Sub Menu Auto Plain Photo FastPhoto Auto Draft Normal Fine Auto Off On Auto Off On...
... A4 A3 Auto Full 1 2 4 8 9 16 Index Secondary Menu - Setting up the play back function using the LCD monitor This menu is available while the camera is connected to a PictBridge supporting printer (direct connection to change without prior notice. > Page p.86 Menus are subject to the... camera, sold separately) with a USB cable. Page p.85 p.86 Menu Tab Main Menu Type Quality Date Print File Name Reset Sub Menu Auto Plain Photo FastPhoto Auto Draft Normal Fine Auto Off On Auto Off On...
User Manual (ENGLISH)
Page 85
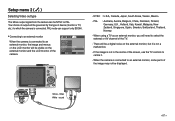
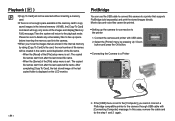
...to connect this case, remove the cable and do the step 1 and 2 again. When the [Reset] of the file name. - PictBridge You can use the USB cable to avoid duplication of the [...Card], the last stored image of the images and display [Memory Full!] message. In this camera to the camera through USB cable with USB cable. 2. Then the system will copy only some of the...PictBridge (sold separately) and print the stored images directly. Select USB Computer Printer OK Confirm Connecting the Camera to the playback mode. Please be created in the internal memory (10 MB), the [Copy To ...
...to connect this case, remove the cable and do the step 1 and 2 again. When the [Reset] of the file name. - PictBridge You can use the USB cable to avoid duplication of the [...Card], the last stored image of the images and display [Memory Full!] message. In this camera to the camera through USB cable with USB cable. 2. Then the system will copy only some of the...PictBridge (sold separately) and print the stored images directly. Select USB Computer Printer OK Confirm Connecting the Camera to the playback mode. Please be created in the internal memory (10 MB), the [Copy To ...
User Manual (ENGLISH)
Page 87
... Type Set the quality of the printing paper Auto, Plain, Photo, FastPhoto Quality Set the quality of the picture to Auto, Draft, Normal, be reset. For your printer's default setting, refer to select the desired sub menu value, and then press the OK button. If not supported, the menus ... menu Size Set the size of the printing paper Auto, PostCard, Card, 4X6, L, 2L, Letter, A4, A3 Layout Set the number of pictures to be reset. And then press the Right button. 2. If [Yes] is selected : Settings will display. 2. PictBridge : Print Setting You can select the Paper Size, Print ...
... Type Set the quality of the printing paper Auto, Plain, Photo, FastPhoto Quality Set the quality of the picture to Auto, Draft, Normal, be reset. For your printer's default setting, refer to select the desired sub menu value, and then press the OK button. If not supported, the menus ... menu Size Set the size of the printing paper Auto, PostCard, Card, 4X6, L, 2L, Letter, A4, A3 Layout Set the number of pictures to be reset. And then press the Right button. 2. If [Yes] is selected : Settings will display. 2. PictBridge : Print Setting You can select the Paper Size, Print ...
User Manual (ENGLISH)
Page 91
... and switch the camera on The images are unclear A picture was taken of image is different to the FLASH instruction (p.30) Incorrect date and time is displayed The date and time have been set incorrectly or the camera has adopted the default settings → Reset the date and ...time correctly The camera buttons do not operate Camera malfunction → Remove/re-insert battery and switch the camera on The battery is exhausted → Insert fresh batteries (p.15...
... and switch the camera on The images are unclear A picture was taken of image is different to the FLASH instruction (p.30) Incorrect date and time is displayed The date and time have been set incorrectly or the camera has adopted the default settings → Reset the date and ...time correctly The camera buttons do not operate Camera malfunction → Remove/re-insert battery and switch the camera on The battery is exhausted → Insert fresh batteries (p.15...
User Manual (ENGLISH)
Page 92
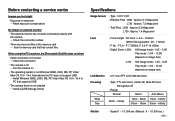
...connection is incorrect → Check the connection The camera is off → Turn the camera on image size) LCD Monitor - 2.5" color TFT LCD (230,000 dots) Focusing Wide Tele - F No. : F 3.0 ~ F 7.7(Wide), F 5.6~F 14.1(Tele) - Type : 1/2.5" CCD - Digital Zoom : L830 : ·Still Image mode : 1.0X ~ ... contacting a service centre Images are too bright Exposure is excessive → Reset exposure compensation No image on external monitor The external monitor has not been connected properly with the camera → Check the connection cables There are incorrect files in the memory card...
...connection is incorrect → Check the connection The camera is off → Turn the camera on image size) LCD Monitor - 2.5" color TFT LCD (230,000 dots) Focusing Wide Tele - F No. : F 3.0 ~ F 7.7(Wide), F 5.6~F 14.1(Tele) - Type : 1/2.5" CCD - Digital Zoom : L830 : ·Still Image mode : 1.0X ~ ... contacting a service centre Images are too bright Exposure is excessive → Reset exposure compensation No image on external monitor The external monitor has not been connected properly with the camera → Check the connection cables There are incorrect files in the memory card...


