
User Manual
Page 2
.... ● If you intend to use of their respective companies. Install the camera driver that the camera is operating properly prior to when you require After Sales service, please bring the camera and the cause of the camera malfunction (such as battery, Memory card etc.) to the A/S centre. ● Please check that is.... Check [Removable Disk] Open Window's EXPLORER and search for [Removable Disk]. (p.85) ● If you for buying a Samsung Digital Camera. ● Prior to using this manual are registered trademarks of images on the memory card to the use it on. If the power ...
.... ● If you intend to use of their respective companies. Install the camera driver that the camera is operating properly prior to when you require After Sales service, please bring the camera and the cause of the camera malfunction (such as battery, Memory card etc.) to the A/S centre. ● Please check that is.... Check [Removable Disk] Open Window's EXPLORER and search for [Removable Disk]. (p.85) ● If you for buying a Samsung Digital Camera. ● Prior to using this manual are registered trademarks of images on the memory card to the use it on. If the power ...
User Manual
Page 3
...Samsung Camera Service centre. If an accident should be the case, allow the camera to sit idle for a few minutes to allow it may cause a fire or electric shock. ■ Do not operate this product and accessories out of reach of children or animals to prevent accidents e.g.: •Swallowing battery or small camera... accessories. This may adversely affect the camera's internal components and could increase the risk of explosion. ■ Should any way. Warning...
...Samsung Camera Service centre. If an accident should be the case, allow the camera to sit idle for a few minutes to allow it may cause a fire or electric shock. ■ Do not operate this product and accessories out of reach of children or animals to prevent accidents e.g.: •Swallowing battery or small camera... accessories. This may adversely affect the camera's internal components and could increase the risk of explosion. ■ Should any way. Warning...
User Manual
Page 4
...that any connector cords or cables to other devices are using the AC Charger. Avoid leaving magnetic strip cards near case. Battery may leak corrosive electrolyte and permanently damage the camera's components. ■ Do not fire the flash while it is switched on how to use the memory card 13 RECORDING... to watch out for using it is in fire. •Do not insert the battery with the polarities reversed. ■ Remove the battery when not planning to use , always switch off the camera before moving the camera. Do not touch the flash after using the EPS mode 18 ■How to ...
...that any connector cords or cables to other devices are using the AC Charger. Avoid leaving magnetic strip cards near case. Battery may leak corrosive electrolyte and permanently damage the camera's components. ■ Do not fire the flash while it is switched on how to use the memory card 13 RECORDING... to watch out for using it is in fire. •Do not insert the battery with the polarities reversed. ■ Remove the battery when not planning to use , always switch off the camera before moving the camera. Do not touch the flash after using the EPS mode 18 ■How to ...

User Manual
Page 6
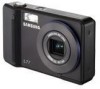
...correct contents before using this product. To buy the optional equipment, contact your nearest Samsung dealer or Samsung service centre. < Included items > Camera case User manual, Product warranty Camera strap Software CD (see p.81) Computer (see p.85) PictBridge compatible printer (...see p.71) DPOF compatible printer (see p.68) SD memory card / MMC (see p.12) AC cord Charger (SBC-L7) Rechargeable battery...
...correct contents before using this product. To buy the optional equipment, contact your nearest Samsung dealer or Samsung service centre. < Included items > Camera case User manual, Product warranty Camera strap Software CD (see p.81) Computer (see p.85) PictBridge compatible printer (...see p.71) DPOF compatible printer (see p.68) SD memory card / MMC (see p.12) AC cord Charger (SBC-L7) Rechargeable battery...
User Manual
Page 9
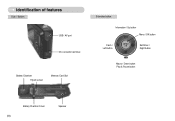
Identification of features Side / Bottom USB / AV port DC connection terminal Battery Chamber Tripod socket Memory Card Slot 5-function button Information / Up button Menu / OK button Flash / Left button Self-timer / Right button Macro / Down button Play & Pause button 《8》 Battery Chamber Cover Speaker
Identification of features Side / Bottom USB / AV port DC connection terminal Battery Chamber Tripod socket Memory Card Slot 5-function button Information / Up button Menu / OK button Flash / Left button Self-timer / Right button Macro / Down button Play & Pause button 《8》 Battery Chamber Cover Speaker

User Manual
Page 10
... The lamp is off When the printer is printing The lamp blinks The lamp turns on When the AF activates (The camera focus on the subject) The lamp blinks (The camera doesn't focus on the subject) ■ Mode icon : Refer to a PC The lamp lights up (LCD monitor ... After taking a pictur The lamp blinks while saving the image data and turns off after initializing the device) Transmitting Data with the camera. ■ SLB-0637 rechargeable battery Specification Model Type Capacity Voltage Charging time SLB-0637 Lithium Ion 660mAh 3.7V Approx. 90 MIN (Using the SBC-L7) 《9》...
... The lamp is off When the printer is printing The lamp blinks The lamp turns on When the AF activates (The camera focus on the subject) The lamp blinks (The camera doesn't focus on the subject) ■ Mode icon : Refer to a PC The lamp lights up (LCD monitor ... After taking a pictur The lamp blinks while saving the image data and turns off after initializing the device) Transmitting Data with the camera. ■ SLB-0637 rechargeable battery Specification Model Type Capacity Voltage Charging time SLB-0637 Lithium Ion 660mAh 3.7V Approx. 90 MIN (Using the SBC-L7) 《9》...
User Manual
Page 11
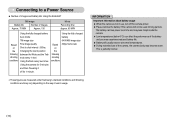
... to shot interval : 30Sec. conditions Using the flash every two times Using the camera for 5 minutes and then Powering it off the camera power. ● Please remove the battery if the camera will usually recover at normal temperatures. ● During extended use , turn off ...Samsung's standard conditions and Shooting conditions and may vary depending on the Fine image quality Shot to a Power Source ■ Number of images and battery life: Using the SLB-0637 Still image Battery life Number of the camera, the camera body may experience reduced battery life. ● Battery...
... to shot interval : 30Sec. conditions Using the flash every two times Using the camera for 5 minutes and then Powering it off the camera power. ● Please remove the battery if the camera will usually recover at normal temperatures. ● During extended use , turn off ...Samsung's standard conditions and Shooting conditions and may vary depending on the Fine image quality Shot to a Power Source ■ Number of images and battery life: Using the SLB-0637 Still image Battery life Number of the camera, the camera body may experience reduced battery life. ● Battery...
User Manual
Page 12
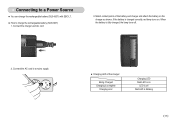
... fully charged, the lamp turns off Red LED is blinking 《11》 Connect the charger and AC cord 3. If the battery is off . 2. Match contact points of the charger Being Charged Charging is complete Charging error Charging LED Red LED is on LED is charged correctly, ...red lamp turns on the charger as shown. Connect the AC cord to charge the rechargeable battery (SLB-0637) 1. Connecting to a Power Source ■ You can charge the rechargeable battery (SLB-0637) with SBC-L7. ■ How to a mains supply. ■ Charging LED of the...
... fully charged, the lamp turns off Red LED is blinking 《11》 Connect the charger and AC cord 3. If the battery is off . 2. Match contact points of the charger Being Charged Charging is complete Charging error Charging LED Red LED is on LED is charged correctly, ...red lamp turns on the charger as shown. Connect the AC cord to charge the rechargeable battery (SLB-0637) 1. Connecting to a Power Source ■ You can charge the rechargeable battery (SLB-0637) with SBC-L7. ■ How to a mains supply. ■ Charging LED of the...
User Manual
Page 13
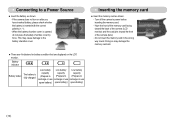
...Inserting the memory card ■ Insert the memory card as shown - Turn off the camera's power before inserting the memory card. - Battery indicator Battery status The battery is fully charged Low battery Low battery Low battery capacity capacity capacity (Prepare to (Prepare to (Prepare to a Power Source ■ ...LCD monitor. Have the front of the memory card facing toward the back of the camera (LCD monitor) and the card pins toward the front of the camera (lens) - When the battery chamber cover is inserted with the correct polarity (+ / -). - Connecting to recharge ...
...Inserting the memory card ■ Insert the memory card as shown - Turn off the camera's power before inserting the memory card. - Battery indicator Battery status The battery is fully charged Low battery Low battery Low battery capacity capacity capacity (Prepare to (Prepare to (Prepare to a Power Source ■ ...LCD monitor. Have the front of the memory card facing toward the back of the camera (LCD monitor) and the card pins toward the front of the camera (lens) - When the battery chamber cover is inserted with the correct polarity (+ / -). - Connecting to recharge ...
User Manual
Page 16
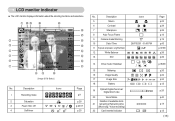
... Status] No. Description 5 Macro 6 Contrast 7 Sharpness 8 Auto Focus Frame 9 Camera shake Warning 10 Date / Time 11 Exposure compensation / LongTime Shutter 12 White Balance 13 ISO 14 Drive mode / Stabiliser 15 Metering 16 Image Quality 17 Image Size 18 Battery 19 Optical/ Digital Zoom bar/ Digital Zoom rate 20 Voice Memo Number of available shots...
... Status] No. Description 5 Macro 6 Contrast 7 Sharpness 8 Auto Focus Frame 9 Camera shake Warning 10 Date / Time 11 Exposure compensation / LongTime Shutter 12 White Balance 13 ISO 14 Drive mode / Stabiliser 15 Metering 16 Image Quality 17 Image Size 18 Battery 19 Optical/ Digital Zoom bar/ Digital Zoom rate 20 Voice Memo Number of available shots...
User Manual
Page 17
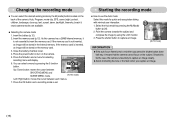
...INFORMATION ●If the auto focus frame turns to turn on the back of the camera. Close the battery chamber cover. 4. You can select the desired working mode by the M (mode) button located on the camera. 5. Starting the recording mode ■ How to insert the memory card. Should..., an image will display. Select the Auto mode by using the LCD monitor. 3. Point the camera towards the subject and compose the image by pressing the M (Mode) button (p.26). 2. AUTO 6. Insert the battery (p.12). 2. If the memory card is set. SCENE [AUTO mode] Left / Right button:...
...INFORMATION ●If the auto focus frame turns to turn on the back of the camera. Close the battery chamber cover. 4. You can select the desired working mode by the M (mode) button located on the camera. 5. Starting the recording mode ■ How to insert the memory card. Should..., an image will display. Select the Auto mode by using the LCD monitor. 3. Point the camera towards the subject and compose the image by pressing the M (Mode) button (p.26). 2. AUTO 6. Insert the battery (p.12). 2. If the memory card is set. SCENE [AUTO mode] Left / Right button:...
User Manual
Page 20
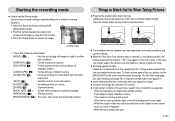
Select the Scene mode by using the LCD monitor. 3. Taking a picture against the sun may not perform as expected. - Point the camera towards the subject and compose the image by backlight. [FIREWORK] ( ) : Firework scenes. [BEACH&SNOW] ( ) : For ocean, lake, beach and snowscape scenes....as a stick or flagpole). - Starting the recording mode ■ How to use a tripod, support the camera on the LCD monitor. Press the shutter button to confirm focus and flash battery charge. Press the shutter button all way down half way. Lightly press the shutter button to capture an ...
Select the Scene mode by using the LCD monitor. 3. Taking a picture against the sun may not perform as expected. - Point the camera towards the subject and compose the image by backlight. [FIREWORK] ( ) : Firework scenes. [BEACH&SNOW] ( ) : For ocean, lake, beach and snowscape scenes....as a stick or flagpole). - Starting the recording mode ■ How to use a tripod, support the camera on the LCD monitor. Press the shutter button to confirm focus and flash battery charge. Press the shutter button all way down half way. Lightly press the shutter button to capture an ...
User Manual
Page 21
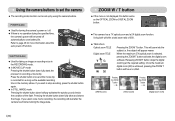
...button. Press the shutter button once and the movie clip is recorded for as long as the OPTICAL ZOOM or DIGITAL ZOOM button. ● This camera has a 7X optical zoom and a 5X digital zoom function. ZOOM W / T button ● If the menu is no effect. the subject will appear...button stops the digital zooming at the required setting. Once the maximum digital zoom (5X) is selected, pressing the ZOOM T button activates the digital zoom software. Using the camera buttons to set the camera ■ The recording mode function can be turned off automatically to save battery life. Refer to...
...button. Press the shutter button once and the movie clip is recorded for as long as the OPTICAL ZOOM or DIGITAL ZOOM button. ● This camera has a 7X optical zoom and a 5X digital zoom function. ZOOM W / T button ● If the menu is no effect. the subject will appear...button stops the digital zooming at the required setting. Once the maximum digital zoom (5X) is selected, pressing the ZOOM T button activates the digital zoom software. Using the camera buttons to set the camera ■ The recording mode function can be turned off automatically to save battery life. Refer to...

User Manual
Page 25
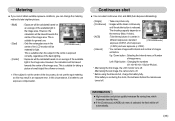
...mode Auto flash Description If the subject or background is prohibited. When you capture an image in flash The flash fires regardless of the battery. ● Under normal operating conditions the charging time for the flash is caused by using the red-eye reduction function. The brighter ...press the shutter button after selecting the Auto, Fill-in the captured image. If the battery is too close or highly reflective. ● When taking an image in a poorly lit condition with poor light, the camera shake warning indicator ( ) will display on the LCD monitor. Flash off The flash...
...mode Auto flash Description If the subject or background is prohibited. When you capture an image in flash The flash fires regardless of the battery. ● Under normal operating conditions the charging time for the flash is caused by using the red-eye reduction function. The brighter ...press the shutter button after selecting the Auto, Fill-in the captured image. If the battery is too close or highly reflective. ● When taking an image in a poorly lit condition with poor light, the camera shake warning indicator ( ) will display on the LCD monitor. Flash off The flash...
User Manual
Page 36
... image area. Left / Right button : Changing the numbers (01 min-60 min / 02 pics-99 pics). * After taking the last image, the camera turns off . This is selected, the flash will be biased towards the centre of the available light in an exposure error. INFORMATION ● High resolution... button is out during the shots, the last taken before . However, the calculation will be biased towards the centre of image menu. If the battery is released. In this may result in the image area. After taking the first image, the LCD monitor turns off . * Before using the...
... image area. Left / Right button : Changing the numbers (01 min-60 min / 02 pics-99 pics). * After taking the last image, the camera turns off . This is selected, the flash will be biased towards the centre of the available light in an exposure error. INFORMATION ● High resolution... button is out during the shots, the last taken before . However, the calculation will be biased towards the centre of image menu. If the battery is released. In this may result in the image area. After taking the first image, the LCD monitor turns off . * Before using the...
User Manual
Page 46
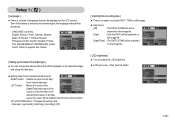
... LCD Start Image ◀ Back Off Date Date&Time OK Set [ LCD brightness ] ■ You can be imprinted on the LCD monitor. Even if the battery is removed and inserted again, the language setting will be displayed on the image file. SETUP1 File Language Date&Time Imprint LCD Start Image ◀...
... LCD Start Image ◀ Back Off Date Date&Time OK Set [ LCD brightness ] ■ You can be imprinted on the LCD monitor. Even if the battery is removed and inserted again, the language setting will be displayed on the image file. SETUP1 File Language Date&Time Imprint LCD Start Image ◀...

User Manual
Page 47
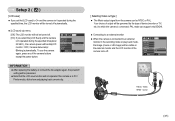
After replacing the battery, the power off function will not SETUP2 Quick View Power Off LCD Save Video Out Format Reset ◀ Back 1 min 3 min 5 min 10 min OK Set operate if the camera is turned on. ● Start up image : [Off], [LOGO], [User Image1], [User Image2] - Setup 1 ( )... Out Format Reset ◀ Back Off 0.5 sec 1 sec 3 sec OK Set [ Auto power off ] ■ This function switches the camera off after a set in order to prevent unnecessary battery drainage. ● Sub menus [1, 3, 5, 10 min] : The power will be activated. [0.5, 1, 3 sec] : The captured image is...
After replacing the battery, the power off function will not SETUP2 Quick View Power Off LCD Save Video Out Format Reset ◀ Back 1 min 3 min 5 min 10 min OK Set operate if the camera is turned on. ● Start up image : [Off], [LOGO], [User Image1], [User Image2] - Setup 1 ( )... Out Format Reset ◀ Back Off 0.5 sec 1 sec 3 sec OK Set [ Auto power off ] ■ This function switches the camera off after a set in order to prevent unnecessary battery drainage. ● Sub menus [1, 3, 5, 10 min] : The power will be activated. [0.5, 1, 3 sec] : The captured image is...
User Manual
Page 48
... connected to an external monitor ● When the camera is connected. Video White - sound 《47》 SETUP2 Quick View Power Off LCD Save Video Out Format Reset ◀ Back Off On OK Set INFORMATION ● After replacing the battery or connect the AC adapter again, the poweroff setting will ...be preserved. ● Note that the LCD save ] sub menu [Off]: The LCD monitor will not be turned off. [On]: If you set the [LCD save] to On and the camera isn't operated during the ...
... connected to an external monitor ● When the camera is connected. Video White - sound 《47》 SETUP2 Quick View Power Off LCD Save Video Out Format Reset ◀ Back Off On OK Set INFORMATION ● After replacing the battery or connect the AC adapter again, the poweroff setting will ...be preserved. ● Note that the LCD save ] sub menu [Off]: The LCD monitor will not be turned off. [On]: If you set the [LCD save] to On and the camera isn't operated during the ...
User Manual
Page 52
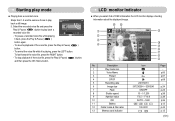
... the Play & Pause( ) button again. - Description 1 Play mode icon 2 Voice Memo 3 Protect 4 DPOF 5 Recording date 6 Image size 7 Flash 8 Shutter speed 9 Aperture value 10 ISO 11 Battery 12 Folder name & File name 13 Memory card indicator Icon 2007/02/01 3072X2304 ~ 320X240 ON/OFF 15 ~ 1/1,250 F3.5 ~ F10.8 AUTO ~ 1600 100-0031...
... the Play & Pause( ) button again. - Description 1 Play mode icon 2 Voice Memo 3 Protect 4 DPOF 5 Recording date 6 Image size 7 Flash 8 Shutter speed 9 Aperture value 10 ISO 11 Battery 12 Folder name & File name 13 Memory card indicator Icon 2007/02/01 3072X2304 ~ 320X240 ON/OFF 15 ~ 1/1,250 F3.5 ~ F10.8 AUTO ~ 1600 100-0031...

User Manual
Page 75
...or downloaded, the data transfer may be used for camera malfunctions. 《74》 If the camera is subjected to direct sunlight, it will turn off to avoid damage and keep the camera in its performance. Samsung cannot be held responsible for a long period, an... If the digital camera is dispersed. Moisture built up can damage the LCD monitor. Pay attention not to disassemble or modify the camera. ■ Under certain conditions, static electricity can occur. Take a picture for testing the camera condition and prepare extra battery. - If this camera to gently ...
...or downloaded, the data transfer may be used for camera malfunctions. 《74》 If the camera is subjected to direct sunlight, it will turn off to avoid damage and keep the camera in its performance. Samsung cannot be held responsible for a long period, an... If the digital camera is dispersed. Moisture built up can damage the LCD monitor. Pay attention not to disassemble or modify the camera. ■ Under certain conditions, static electricity can occur. Take a picture for testing the camera condition and prepare extra battery. - If this camera to gently ...


