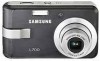
User Manual
Page 2
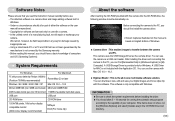
..., servicings may result from camera malfunction. ● Keep the manual in a safe place. ● If you use a card reader to copy the images on the memory card to use the supplied USB cable to connect the camera to your PC. Install the camera driver that may not be damaged. Instructions ■ Use this camera in the following order Set up the camera driver Before connecting the camera to a PC, via the USB cable, you will need to turn it...
..., servicings may result from camera malfunction. ● Keep the manual in a safe place. ● If you use a card reader to copy the images on the memory card to use the supplied USB cable to connect the camera to your PC. Install the camera driver that may not be damaged. Instructions ■ Use this camera in the following order Set up the camera driver Before connecting the camera to a PC, via the USB cable, you will need to turn it...
User Manual
Page 4
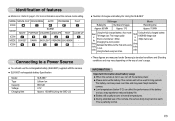
... / 5-function button 8 ■Self-timer lamp 8 ■Camera Status Lamp 8 ■Mode icon 9 ●Connecting to a Power Source 9 ●Inserting the memory card 10 ●Instructions on how to use the memory card 11 RECORDING ●LCD monitor indicator 13 ●Changing the recording mode 14 ■Selecting the [MODE] menu 14 ■Changing the recording mode 14 ●Starting the recording mode 15 ■How to use the Auto mode 15 ■How to use the Movie clip mode 16 ■Recording the movie clip without sound...
... / 5-function button 8 ■Self-timer lamp 8 ■Camera Status Lamp 8 ■Mode icon 9 ●Connecting to a Power Source 9 ●Inserting the memory card 10 ●Instructions on how to use the memory card 11 RECORDING ●LCD monitor indicator 13 ●Changing the recording mode 14 ■Selecting the [MODE] menu 14 ■Changing the recording mode 14 ●Starting the recording mode 15 ■How to use the Auto mode 15 ■How to use the Movie clip mode 16 ■Recording the movie clip without sound...
User Manual
Page 5
...;Size 34 ■Quality / Frame rate 34 ■Metering 35 ■Continuous shot 35 ■Sharpness 35 ■OSD (On Screen Display) information 36 PLAY ●Starting play mode 36 ■Playing back a movie clip 37 ■Movie clip capture function 37 ■How to capture the movie clip 37 ■On camera movie trimming 37 ■Playing back a recorded voice 38 ●LCD monitor indicator 38 ●Using the camera buttons to adjust...
...;Size 34 ■Quality / Frame rate 34 ■Metering 35 ■Continuous shot 35 ■Sharpness 35 ■OSD (On Screen Display) information 36 PLAY ●Starting play mode 36 ■Playing back a movie clip 37 ■Movie clip capture function 37 ■How to capture the movie clip 37 ■On camera movie trimming 37 ■Playing back a recorded voice 38 ●LCD monitor indicator 38 ●Using the camera buttons to adjust...
User Manual
Page 10
... of user's usage. Changing the zoom position between the Wide and the Tele ends every 1 shot. MODE MOVIE CLIP VOICE RECORDING AUTO PROGRAM PLAY ICON SCENE MODE NIGHT PORTRAIT CHILDREN LANDSCAPE TEXT CLOSE UP ICON MODE SUNSET DAWN BACKLIGHT FIREWORKS BEACH&SNOW - ICON - Using the flash every two times Based on the fol owing shooting conditions Using the fully charged battery 640X480 image size 30fps frame rate ※These figures are measured under Samsung...
... of user's usage. Changing the zoom position between the Wide and the Tele ends every 1 shot. MODE MOVIE CLIP VOICE RECORDING AUTO PROGRAM PLAY ICON SCENE MODE NIGHT PORTRAIT CHILDREN LANDSCAPE TEXT CLOSE UP ICON MODE SUNSET DAWN BACKLIGHT FIREWORKS BEACH&SNOW - ICON - Using the flash every two times Based on the fol owing shooting conditions Using the fully charged battery 640X480 image size 30fps frame rate ※These figures are measured under Samsung...

User Manual
Page 16
... mode selection menu will display. 7. Select the Auto mode by using the LCD monitor. 4. Select the [FULL] sub menu on the back of still image selected in the [MODE SET] menu will display. 6. To select the Auto, Program, Movie clip or Scene modes, press the Left / Right button. Changing the recording mode ● Changing the recording mode : If the [FULL] menu was selected Steps from 1-4 are the same as those for shooting basic still images. 1. The recording mode...
... mode selection menu will display. 7. Select the Auto mode by using the LCD monitor. 4. Select the [FULL] sub menu on the back of still image selected in the [MODE SET] menu will display. 6. To select the Auto, Program, Movie clip or Scene modes, press the Left / Right button. Changing the recording mode ● Changing the recording mode : If the [FULL] menu was selected Steps from 1-4 are the same as those for shooting basic still images. 1. The recording mode...

User Manual
Page 19
... shiny. - The recording time will still be displayed on a solid surface or change to stop recording, press the shutter button again. [VOICE RECORDING mode] - If the subject is moving at high speed. - File type : *.wav * A distance of Movie clip mode, select the VOICE RECORDING mode by using the LCD monitor. ■ Under certain conditions the auto focus system may appear on shooting conditions and camera settings. ■ When the Flash Off or Slow...
... shiny. - The recording time will still be displayed on a solid surface or change to stop recording, press the shutter button again. [VOICE RECORDING mode] - If the subject is moving at high speed. - File type : *.wav * A distance of Movie clip mode, select the VOICE RECORDING mode by using the LCD monitor. ■ Under certain conditions the auto focus system may appear on shooting conditions and camera settings. ■ When the Flash Off or Slow...
User Manual
Page 39
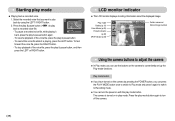
LCD monitor indicator ■ The LCD monitor displays shooting information about the displayed image. The camera is playing, press the LEFT button. Play mode Battery (p.10) Voice Memo (p.40) Protect indicator (p.46) DPOF indicator (p.48) Folder name and Stored image number Using the camera buttons to adjust the camera ■ In Play mode, you can turn off the camera. 《38》 Play mode button ■ If you have turned on with the play mode button. To resume playback of the voice file, press the play & pause button again. - To...
LCD monitor indicator ■ The LCD monitor displays shooting information about the displayed image. The camera is playing, press the LEFT button. Play mode Battery (p.10) Voice Memo (p.40) Protect indicator (p.46) DPOF indicator (p.48) Folder name and Stored image number Using the camera buttons to adjust the camera ■ In Play mode, you can turn off the camera. 《38》 Play mode button ■ If you have turned on with the play mode button. To resume playback of the voice file, press the play & pause button again. - To...

User Manual
Page 48
... Card". COPY TO CARD No Yes - [Yes] : All images, movie clips and voice recording files saved in the internal memory (20MB), the [COPY TO CARD] command will not be deleted even if you to the play mode. After copying has been completed, the screen will return to delete marked images. [All Pics] : Displays confirmation window. Then the system will return to display the confirmation message. Select the [Yes] menu and press the OK button to the playback mode...
... Card". COPY TO CARD No Yes - [Yes] : All images, movie clips and voice recording files saved in the internal memory (20MB), the [COPY TO CARD] command will not be deleted even if you to the play mode. After copying has been completed, the screen will return to delete marked images. [All Pics] : Displays confirmation window. Then the system will return to display the confirmation message. Select the [Yes] menu and press the OK button to the playback mode...

User Manual
Page 49
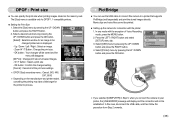
... Voice recording files. ■ If a memory card is selected : Cancel the index print setting. DPOF ■ DPOF (Digital Print Order Format) allows you to embed print quantity information on a stored image. 1. Select the pictures to be printed in the LCD, but are printed as index type. 1. Select the [Standard] menu by pressing the UP / DOWN button. If an image carries DPOF instructions, the DPOF indicator ( ) will display on your memory card's MISC folder. If...
... Voice recording files. ■ If a memory card is selected : Cancel the index print setting. DPOF ■ DPOF (Digital Print Order Format) allows you to embed print quantity information on a stored image. 1. Select the pictures to be printed in the LCD, but are printed as index type. 1. Select the [Standard] menu by pressing the UP / DOWN button. If an image carries DPOF instructions, the DPOF indicator ( ) will display on your memory card's MISC folder. If...
User Manual
Page 50
... the memory card. Press the LEFT / RIGHT button and select [SETUP] menu tab. 3. AF Lamp Sound USB LCD Video Out Back: SETUP Computer Printer Set:OK ※ If you selected [COMPUTER] in Step 5, when you connect the camera to your printer, the [USB ERROR!] message will display and the connection will disappear. [All Pics] : Change print size of all of Voice Recording mode, press the MENU button. 2. DPOF : Print size ■ You can use the USB cable to connect this case, disconnect the USB cable, and...
... the memory card. Press the LEFT / RIGHT button and select [SETUP] menu tab. 3. AF Lamp Sound USB LCD Video Out Back: SETUP Computer Printer Set:OK ※ If you selected [COMPUTER] in Step 5, when you connect the camera to your printer, the [USB ERROR!] message will display and the connection will disappear. [All Pics] : Change print size of all of Voice Recording mode, press the MENU button. 2. DPOF : Print size ■ You can use the USB cable to connect this case, disconnect the USB cable, and...
User Manual
Page 54
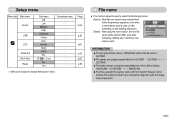
... File Power Off Language Format Date&Time Back: SETUP Series Reset Set:OK formatting, deleting all or inserting a new memory card. Setup menu Menu tab Main menu Sound USB LCD Video Out Quick View Reset Sub menu Off Low Medium High Computer Printer Dark Normal Bright NTSC PAL Off, 0.5, 1, 3 sec No Yes Secondary menu - Page p.55 p.55 p56 p.56 p.56 p.56 ※ Menus are named using the reset function, the next file name will be set from 0001 even after deleting all pictures. [Reset] : After using numbers...
... File Power Off Language Format Date&Time Back: SETUP Series Reset Set:OK formatting, deleting all or inserting a new memory card. Setup menu Menu tab Main menu Sound USB LCD Video Out Quick View Reset Sub menu Off Low Medium High Computer Printer Dark Normal Bright NTSC PAL Off, 0.5, 1, 3 sec No Yes Secondary menu - Page p.55 p.55 p56 p.56 p.56 p.56 ※ Menus are named using the reset function, the next file name will be set from 0001 even after deleting all pictures. [Reset] : After using numbers...
User Manual
Page 55
... another camera. ● Always format the memory card using other cameras, memory card readers, or PCs, you insert a memory card that has a file this camera can be deleted. If [Yes] is used for formatting the memory. Press the menu button twice and the menu display will be formatted. Be sure to download important images to your PC before formatting the memory. If you ran FORMAT in connecting the computer or printer, slide show, playing back a voice recording, playing back a movie clip and taking a composite shot...
... another camera. ● Always format the memory card using other cameras, memory card readers, or PCs, you insert a memory card that has a file this camera can be deleted. If [Yes] is used for formatting the memory. Press the menu button twice and the menu display will be formatted. Be sure to download important images to your PC before formatting the memory. If you ran FORMAT in connecting the computer or printer, slide show, playing back a voice recording, playing back a movie clip and taking a composite shot...

User Manual
Page 56
... Sound USB Back: SETUP Off On Set:OK ※ The Auto Focus lamp will function while using the USB cable. [Computer] : Select this if you to display the local date and time on how to connect the camera to the [Date&Time] main menu if the cursor is set up . Setting up the Date / Time / Date type ■ You can change the date and time that you select [Off] menu and take an image in the [Text] scene mode and photo...
... Sound USB Back: SETUP Off On Set:OK ※ The Auto Focus lamp will function while using the USB cable. [Computer] : Select this if you to display the local date and time on how to connect the camera to the [Date&Time] main menu if the cursor is set up . Setting up the Date / Time / Date type ■ You can change the date and time that you select [Off] menu and take an image in the [Text] scene mode and photo...
User Manual
Page 59
... on Using the Lens - If this camera in its performance. If the lens is a good idea to remove the battery and the memory card if you capture an image. - It is subjected to direct sunlight, it will turn the camera off and wait for an extended period of the image sensor. - Keep this unit in discoloration and deterioration of time. ■ If the camera is transferred...
... on Using the Lens - If this camera in its performance. If the lens is a good idea to remove the battery and the memory card if you capture an image. - It is subjected to direct sunlight, it will turn the camera off and wait for an extended period of the image sensor. - Keep this unit in discoloration and deterioration of time. ■ If the camera is transferred...

User Manual
Page 60
... memory card again → Insert the memory card and format the memory card. (p.54) Card Locked! •The memory card is locked → SD memory card : Slide the write protect switch to the top of the memory card Memory Full! •There is insufficient memory capacity to take an image → Insert a new memory card → Delete unnecessary image files to fire. Samsung cannot be affected by static electricity. Out Of Number •When selecting too many printing pages in Flash Photography mode. Important...
... memory card again → Insert the memory card and format the memory card. (p.54) Card Locked! •The memory card is locked → SD memory card : Slide the write protect switch to the top of the memory card Memory Full! •There is insufficient memory capacity to take an image → Insert a new memory card → Delete unnecessary image files to fire. Samsung cannot be affected by static electricity. Out Of Number •When selecting too many printing pages in Flash Photography mode. Important...
User Manual
Page 61
... only remove it in order to take images Camera does not take images when pressing the Shutter button •There is insufficient memory capacity → Delete unnecessary image files •The memory card has not been formatted → Format the memory card (p.54) •The memory card is exhausted → Insert a new memory card •The memory card is locked → Refer to [Card Locked!] error message •The camera's power is off → Turn the camera power on 《60》 •The battery...
... only remove it in order to take images Camera does not take images when pressing the Shutter button •There is insufficient memory capacity → Delete unnecessary image files •The memory card has not been formatted → Format the memory card (p.54) •The memory card is exhausted → Insert a new memory card •The memory card is locked → Refer to [Card Locked!] error message •The camera's power is off → Turn the camera power on 《60》 •The battery...
User Manual
Page 62
....) ■ Exposure - Modes : Auto, Auto & Red-eye reduction, Fill-in the memory card → Insert a memory card that supports USB. •The camera driver is not Windows 98, 98SE, 2000, ME, XP/ Mac OS 10.0 ~ 10.3. Alternatively the PC does not support USB. → Install Windows 98, 98SE, 2000, ME, XP/ Mac OS 10.0 ~ 10.3 to the original scene •White balance or effect setting is incorrect → Select appropriate White balance and effect Images are too...
....) ■ Exposure - Modes : Auto, Auto & Red-eye reduction, Fill-in the memory card → Insert a memory card that supports USB. •The camera driver is not Windows 98, 98SE, 2000, ME, XP/ Mac OS 10.0 ~ 10.3. Alternatively the PC does not support USB. → Install Windows 98, 98SE, 2000, ME, XP/ Mac OS 10.0 ~ 10.3 to the original scene •White balance or effect setting is incorrect → Select appropriate White balance and effect Images are too...
User Manual
Page 64
...;Before reading this manual, you can find [Removable Disk] in the CD-ROM Drive root directory. 《63》 Before connecting the camera to check the system requirements before use. •The attached software is not included with Windows. This camera uses the USB Storage Driver as a USB card reader. This software is based on English Edition of your digital images and movie clips clip with Mac OS 10.0 ~ 10...
...;Before reading this manual, you can find [Removable Disk] in the CD-ROM Drive root directory. 《63》 Before connecting the camera to check the system requirements before use. •The attached software is not included with Windows. This camera uses the USB Storage Driver as a USB card reader. This software is based on English Edition of your digital images and movie clips clip with Mac OS 10.0 ~ 10...
User Manual
Page 66
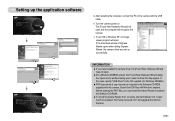
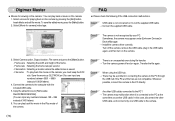
... Master opens after starting Digimax Master, the camera driver was set up the application software 3. Visit "www.microsoft.com" and upgrade the Internet Explorer 《65》 Turn the camera power on. Setting up successfully. Before opening the PDF files, you to the camera with the USB cable. 4. INFORMATION ● If you have installed the camera driver, the [Found New Hardware Wizard] may appear. In this camera. After restarting the computer, connect the...
... Master opens after starting Digimax Master, the camera driver was set up the application software 3. Visit "www.microsoft.com" and upgrade the Internet Explorer 《65》 Turn the camera power on. Setting up successfully. Before opening the PDF files, you to the camera with the USB cable. 4. INFORMATION ● If you have installed the camera driver, the [Found New Hardware Wizard] may appear. In this camera. After restarting the computer, connect the...
User Manual
Page 73
... camera 1. Sometimes, the camera may be a problem in Device Manager. → Install the camera driver correctly. Copy the edited movie to the PC through the USB hub if the PC and the hub are not compatible. Digimax Master ■ Movies for viewing on the camera : You can play back the movie in the USB cable again, and then turn on the camera. 3. Connect the camera to the PC directly. Case 4 When using the USB...
... camera 1. Sometimes, the camera may be a problem in Device Manager. → Install the camera driver correctly. Copy the edited movie to the PC through the USB hub if the PC and the hub are not compatible. Digimax Master ■ Movies for viewing on the camera : You can play back the movie in the USB cable again, and then turn on the camera. 3. Connect the camera to the PC directly. Case 4 When using the USB...


