User Manual
Page 2
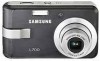
... any loss or damages that the manufacturer accepts no responsibility for buying a Samsung Digital Camera. ● Prior to using this camera, please read the user manual thoroughly. ● If you require After Sales service, please bring the camera and the cause of the camera malfunction (such as battery, Memory card etc.) to the A/S centre. ● Please...
... any loss or damages that the manufacturer accepts no responsibility for buying a Samsung Digital Camera. ● Prior to using this camera, please read the user manual thoroughly. ● If you require After Sales service, please bring the camera and the cause of the camera malfunction (such as battery, Memory card etc.) to the A/S centre. ● Please...
User Manual
Page 8
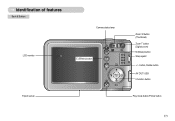
button, Delete button AV OUT/ USB 5 function button Play mode button/Printer button 《7》 Identification of features Back & Bottom Camera status lamp LCD monitor E (Effects) button Tripod socket Zoom W button (Thumbnail) Zoom T button (Digital zoom) M (Mode) button Strap eyelet + / -
button, Delete button AV OUT/ USB 5 function button Play mode button/Printer button 《7》 Identification of features Back & Bottom Camera status lamp LCD monitor E (Effects) button Tripod socket Zoom W button (Thumbnail) Zoom T button (Digital zoom) M (Mode) button Strap eyelet + / -
User Manual
Page 12
... another digital camera or memory card reader. ● If the memory card is an electronic precision device. To use the memory card in this camera, format the memory card using a newly purchased memory for lost data. ● It is removed while recording, deleting (formatting) or reading. ● Samsung cannot ...card will need to purchase a new memory card. Wear and tear on the memory card is not covered by another digital camera. If the power is switched off the camera power whenever the memory card is being inserted or removed. ● Repeated use of extended use, you may become...
... another digital camera or memory card reader. ● If the memory card is an electronic precision device. To use the memory card in this camera, format the memory card using a newly purchased memory for lost data. ● It is removed while recording, deleting (formatting) or reading. ● Samsung cannot ...card will need to purchase a new memory card. Wear and tear on the memory card is not covered by another digital camera. If the power is switched off the camera power whenever the memory card is being inserted or removed. ● Repeated use of extended use, you may become...
User Manual
Page 13
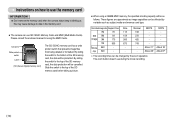
Instructions on how to use the memory card INFORMATION ● Don't remove the memory card when the camera status lamp is blinking as this may cause damage to data in the memory card. ■ The camera can be as follows. Please consult the enclosed manual for using a 256MB MMC memory, the specified ... Cards. These figures are approximate as subject matter and memory card type. About 11' About 40' 15FPS - Card pins Write protect switch Label [SD (Secure Digital) memory card] The SD/ SDHC memory card has a write protect switch that prevents image files from being deleted or formatted.
Instructions on how to use the memory card INFORMATION ● Don't remove the memory card when the camera status lamp is blinking as this may cause damage to data in the memory card. ■ The camera can be as follows. Please consult the enclosed manual for using a 256MB MMC memory, the specified ... Cards. These figures are approximate as subject matter and memory card type. About 11' About 40' 15FPS - Card pins Write protect switch Label [SD (Secure Digital) memory card] The SD/ SDHC memory card has a write protect switch that prevents image files from being deleted or formatted.
User Manual
Page 14
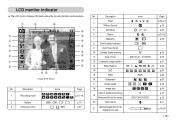
... 9 Auto focus frame 10 Camera shake warning 11 Date / Time 12 Exposure compensation 13 White Balance 14 ISO 15 RGB 16 Sharpness 17 Image quality 18 Image size Number of available shots remaining 19 Remaining time (Movie clip / Voice recording) 20 Voice memo 21 Optical/ Digital Zoom bar/ Digital Zoom rate Icons 2007...
... 9 Auto focus frame 10 Camera shake warning 11 Date / Time 12 Exposure compensation 13 White Balance 14 ISO 15 RGB 16 Sharpness 17 Image quality 18 Image size Number of available shots remaining 19 Remaining time (Movie clip / Voice recording) 20 Voice memo 21 Optical/ Digital Zoom bar/ Digital Zoom rate Icons 2007...
User Manual
Page 20
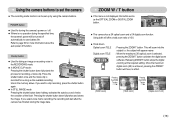
... data. If you wish to page 54 for as long as the OPTICAL ZOOM or DIGITAL ZOOM button. ● This camera has a 3X optical zoom and a 5X digital zoom function. Once the maximum digital zoom (5X) is recorded for more information about the auto power off function. Pressing ... button down fully starts the process for turning the camera's power on / off automatically to set the camera ■ The recording mode function can be turned off . ● If there is selected, pressing the ZOOM T button activates the digital zoom software. Shutter button ● Used for taking...
... data. If you wish to page 54 for as long as the OPTICAL ZOOM or DIGITAL ZOOM button. ● This camera has a 3X optical zoom and a 5X digital zoom function. Once the maximum digital zoom (5X) is recorded for more information about the auto power off function. Pressing ... button down fully starts the process for turning the camera's power on / off automatically to set the camera ■ The recording mode function can be turned off . ● If there is selected, pressing the ZOOM T button activates the digital zoom software. Shutter button ● Used for taking...
User Manual
Page 21
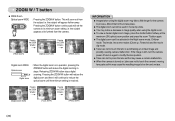
...subject appears at the maximum (3X) optical zoom position and press the zoom T button again. ● The digital zoom can't be activated in steps. If the image is dim, turn the camera power off and on again to modify the lens position. ● Take care not to press the lens as... reduce the optical zoom until the minimum setting is in operation, pressing the ZOOM W button will set the camera to be used in movie clip shots. ● You may take place. ● The digital zoom cannot be dim and unclear. 《20》 Pressing the ZOOM W button Pressing the ZOOM W button...
...subject appears at the maximum (3X) optical zoom position and press the zoom T button again. ● The digital zoom can't be activated in steps. If the image is dim, turn the camera power off and on again to modify the lens position. ● Take care not to press the lens as... reduce the optical zoom until the minimum setting is in operation, pressing the ZOOM W button will set the camera to be used in movie clip shots. ● You may take place. ● The digital zoom cannot be dim and unclear. 《20》 Pressing the ZOOM W button Pressing the ZOOM W button...
User Manual
Page 28
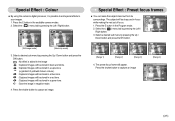
...Press the shutter button to capture an image. Select a desired sub menu by pressing the Left / Right button. Press the E button in the available camera modes. 2. Select the ( ) menu tab by pressing the Up / Down button and press the OK button. Press the shutter button to capture an ...button and press the OK button. : No effect is possible to add special effects to your images. 1. Special Effect : Colour ■ By using the camera's digital processor, it is added to the image : Captured images will be stored in black and white. : Captured images will be stored in a sepia tone ...
...Press the shutter button to capture an image. Select a desired sub menu by pressing the Left / Right button. Press the E button in the available camera modes. 2. Select the ( ) menu tab by pressing the Up / Down button and press the OK button. Press the shutter button to capture an ...button and press the OK button. : No effect is possible to add special effects to your images. 1. Special Effect : Colour ■ By using the camera's digital processor, it is added to the image : Captured images will be stored in black and white. : Captured images will be stored in a sepia tone ...
User Manual
Page 42
... file, or a movie clip is not showing, press the LEFT button to select the next image. - Delete? Select the sub menu values by using the camera's digital processor, it again will be displayed on the memory card. 1. Exit:E : Captured images will be stored in a red tone. : Captured images will be stored in...
... file, or a movie clip is not showing, press the LEFT button to select the next image. - Delete? Select the sub menu values by using the camera's digital processor, it again will be displayed on the memory card. 1. Exit:E : Captured images will be stored in a red tone. : Captured images will be stored in...

User Manual
Page 57
...type INFORMATION ● When using a TV as those indicated on the LCD monitor for DATE / TIME, LANGUAGE, and VIDEO OUT will not be a digital noise on the external monitor, but it is not a malfunction. ● If the image is selected : Settings will be restored to their defaults. ... NTSC PAL Set:OK Yellow - Quick view is briefly displayed during the selected time. Selecting Video out type ■ The Movie output signal from the camera can be activated. [0.5, 1, 3sec] : The captured image is possible only with still images. [Off] : The quick view function can view the...
...type INFORMATION ● When using a TV as those indicated on the LCD monitor for DATE / TIME, LANGUAGE, and VIDEO OUT will not be a digital noise on the external monitor, but it is not a malfunction. ● If the image is selected : Settings will be restored to their defaults. ... NTSC PAL Set:OK Yellow - Quick view is briefly displayed during the selected time. Selecting Video out type ■ The Movie output signal from the camera can be activated. [0.5, 1, 3sec] : The captured image is possible only with still images. [Off] : The quick view function can view the...
User Manual
Page 59
... may result in failure or may damage the body shell of the camera and also affect its protective carry case at least 1 hour until the moisture has dispersed. ■ Caution on the surface of the lens. ■ If the digital camera is not used for an extended period of time. ■ If... the camera is transferred from a cold to come into contact with a soft cloth. Avoid obstructing the lens or the flash when...
... may result in failure or may damage the body shell of the camera and also affect its protective carry case at least 1 hour until the moisture has dispersed. ■ Caution on the surface of the lens. ■ If the digital camera is not used for an extended period of time. ■ If... the camera is transferred from a cold to come into contact with a soft cloth. Avoid obstructing the lens or the flash when...
User Manual
Page 62
...eye reduction, Fill-in the memory card → Insert a memory card that supports USB. •The camera driver is not installed → Install a [USB Storage Driver] Specifications ■ Image Sensor - Effective Pixel : Approx. 7.2Mega-pixel - Digital Zoom :ㆍStill Image mode : 1.0X ~ 5.0X ㆍPlay mode : 1.0X ~ 10.... → Reset exposure compensation No image on external monitor •The external monitor has not been connected properly with the camera → Check the connection cables •There are incorrect files in flash, Slow sync, Flash off → Turn the...
...eye reduction, Fill-in the memory card → Insert a memory card that supports USB. •The camera driver is not installed → Install a [USB Storage Driver] Specifications ■ Image Sensor - Effective Pixel : Approx. 7.2Mega-pixel - Digital Zoom :ㆍStill Image mode : 1.0X ~ 5.0X ㆍPlay mode : 1.0X ~ 10.... → Reset exposure compensation No image on external monitor •The external monitor has not been connected properly with the camera → Check the connection cables •There are incorrect files in flash, Slow sync, Flash off → Turn the...
User Manual
Page 63
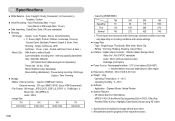
...Dimensions (WxHxD) : 96.9 X 56.8 X 20.5 mm ■ Weight : 130g - Editing : Trimming, Rotating, Resizing, Colour Effect ■ Interface : Digital output connector : USB 2.0 (Mass Storage Class) Video Out : Pal & NTSC selectable Audio : Mono (without prior notice. ※ All trademarks are the property... Powerful Effect (Colour, Highlight), Easy Mode Change using "M" button ※ Specifications are measured under Samsung's standard conditions and may vary depending on shooting conditions and camera settings. ■ Image Play - Capacity (256MB MMC) 7M 5M 3M 1M Superfine 76 93 ...
...Dimensions (WxHxD) : 96.9 X 56.8 X 20.5 mm ■ Weight : 130g - Editing : Trimming, Rotating, Resizing, Colour Effect ■ Interface : Digital output connector : USB 2.0 (Mass Storage Class) Video Out : Pal & NTSC selectable Audio : Mono (without prior notice. ※ All trademarks are the property... Powerful Effect (Colour, Highlight), Easy Mode Change using "M" button ※ Specifications are measured under Samsung's standard conditions and may vary depending on shooting conditions and camera settings. ■ Image Play - Capacity (256MB MMC) 7M 5M 3M 1M Superfine 76 93 ...
User Manual
Page 64
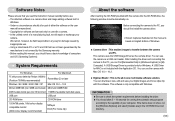
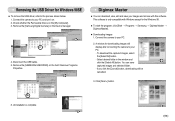
... allow 5 ~ 10 seconds for use with Windows. After installing the driver and connecting this camera to the capability of your camera. A USB Driver for Windows. You can download, view, edit and save your digital images and movie clips clip with Mac OS 10.0 ~ 10.3. ■ Digimax Master :...-ROM Drive root directory. 《63》 INFORMATION ● Be sure to transfer between the camera and PC. We cannot, however, be held responsible in any way for damage caused by the Samsung warranty. •Before reading this manual, you should have a basic knowledge of computers and O/S ...
... allow 5 ~ 10 seconds for use with Windows. After installing the driver and connecting this camera to the capability of your camera. A USB Driver for Windows. You can download, view, edit and save your digital images and movie clips clip with Mac OS 10.0 ~ 10.3. ■ Digimax Master :...-ROM Drive root directory. 《63》 INFORMATION ● Be sure to transfer between the camera and PC. We cannot, however, be held responsible in any way for damage caused by the Samsung warranty. •Before reading this manual, you should have a basic knowledge of computers and O/S ...
User Manual
Page 70
...Samsung Digital Camera] on the [My Computer]. 3. This software is only compatible with this software. If you click the [Cancel] button, downloading will display after connecting the camera to your PC and turn it on the Add / Remove Programs Properties. Disconnect the USB cable. 5. Connect the camera... click [Start → Programs → Samsung → Digimax Master → Digimax Master]. ● Downloading images 1. Click [Next >] button. 6. Check whether the Removable Disk is complete. 《69》 Connect the camera to the process shown below. 1. To ...
...Samsung Digital Camera] on the [My Computer]. 3. This software is only compatible with this software. If you click the [Cancel] button, downloading will display after connecting the camera to your PC and turn it on the Add / Remove Programs Properties. Disconnect the USB cable. 5. Connect the camera... click [Start → Programs → Samsung → Digimax Master → Digimax Master]. ● Downloading images 1. Click [Next >] button. 6. Check whether the Removable Disk is complete. 《69》 Connect the camera to the process shown below. 1. To ...


