User Manual
Page 3
...Additional e-Manual Features 42 Accessing the Menu from the e-Manual 42 Loading Reference Pages 42 Updating the e-Manual to a Samsung Account 36 Deleting a Samsung Account from Favorite List Channels Only Smart Features Smart Hub 30 Testing Smart Hub connections 31 Opening the First Screen 31...the Guide 58 Viewing Detailed Information 58 Checking Current Program Info 58 Changing the broadcast signal 58 Digital Channel Signal Info and Strength Setting Up a Schedule Viewing 59 Digital Channel Schedule Viewing 60 Analog Channel Schedule Viewing 61 Canceling a Schedule Viewing 61 Editing a ...
...Additional e-Manual Features 42 Accessing the Menu from the e-Manual 42 Loading Reference Pages 42 Updating the e-Manual to a Samsung Account 36 Deleting a Samsung Account from Favorite List Channels Only Smart Features Smart Hub 30 Testing Smart Hub connections 31 Opening the First Screen 31...the Guide 58 Viewing Detailed Information 58 Checking Current Program Info 58 Changing the broadcast signal 58 Digital Channel Signal Info and Strength Setting Up a Schedule Viewing 59 Digital Channel Schedule Viewing 60 Analog Channel Schedule Viewing 61 Canceling a Schedule Viewing 61 Editing a ...
User Manual
Page 4
...Storage Media 100 Automatically Scanning when the TV is Powered On 100 Automatically Adding malicious code to the Blocked List Using Other Functions 101 Setting Up a Password 101 Changing the Menu Language 101 Checking Notifications 101 Adjusting the Menu Transparency 102 White Text on Black Background (High ...Hub's Focus Area 102 Enjoying Rich Colors and Superior Picture Quality (BD Wise) 102 Locking/Unlocking the Panel Keys 102 Showing/Hiding the Samsung Logo while Booting 102 Enabling Game Mode 103 Registering the TV as a DivX-Certified Device (To Watch For Pay DivX Movies) 104 Restoring...
...Storage Media 100 Automatically Scanning when the TV is Powered On 100 Automatically Adding malicious code to the Blocked List Using Other Functions 101 Setting Up a Password 101 Changing the Menu Language 101 Checking Notifications 101 Adjusting the Menu Transparency 102 White Text on Black Background (High ...Hub's Focus Area 102 Enjoying Rich Colors and Superior Picture Quality (BD Wise) 102 Locking/Unlocking the Panel Keys 102 Showing/Hiding the Samsung Logo while Booting 102 Enabling Game Mode 103 Registering the TV as a DivX-Certified Device (To Watch For Pay DivX Movies) 104 Restoring...
User Manual
Page 5
... Codecs 120 Supported Video Codecs Read After Installing the TV 122 Picture Sizes and Input Signals 122 Installing an Anti-Theft Lock 123 Read Before Setting Up a Wireless Internet Connection Read Before Connecting a Computer (Supported Resolutions) 124 LED 5, 6 series 124 IBM 124 MAC 125 VESA DMT 126 LED 4 series 126 IBM...
... Codecs 120 Supported Video Codecs Read After Installing the TV 122 Picture Sizes and Input Signals 122 Installing an Anti-Theft Lock 123 Read Before Setting Up a Wireless Internet Connection Read Before Connecting a Computer (Supported Resolutions) 124 LED 5, 6 series 124 IBM 124 MAC 125 VESA DMT 126 LED 4 series 126 IBM...

User Manual
Page 10
... the external speaker to the TV's digital audio output connector and the device's digital audio input connector. To turn off the TV's speakers, set TV Sound Output (Sound > Speaker Settings > TV Sound Output) to something other than TV Speaker. "" Digital audio is reversed. Sync problems may vary depending on the model. "" Adjust...
... the external speaker to the TV's digital audio output connector and the device's digital audio input connector. To turn off the TV's speakers, set TV Sound Output (Sound > Speaker Settings > TV Sound Output) to something other than TV Speaker. "" Digital audio is reversed. Sync problems may vary depending on the model. "" Adjust...

User Manual
Page 14
... the computer, select [Control Panel] > [Network and Internet] > [Network and Sharing Center] > [Change advanced sharing settings], and then select [Choose media streaming options...] to access data, disable File Sharing. Select [Settings] > [Library Management], and then add the location where photo, video, and music files are saved to play them... Windows Media Player, and then play or view them on the TV. "" As long as File Sharing is configured. 2. From the list, set the TV to the same router or AP. Once you can move the files to the same router or AP, a home network is activated,...
... the computer, select [Control Panel] > [Network and Internet] > [Network and Sharing Center] > [Change advanced sharing settings], and then select [Choose media streaming options...] to access data, disable File Sharing. Select [Settings] > [Library Management], and then add the location where photo, video, and music files are saved to play them... Windows Media Player, and then play or view them on the TV. "" As long as File Sharing is configured. 2. From the list, set the TV to the same router or AP. Once you can move the files to the same router or AP, a home network is activated,...
User Manual
Page 16
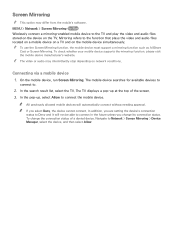
..., the mobile device must support a mirroring function such as AllShare Cast or Screen Mirroring. In the search result list, select the TV. "" If you are setting the device's connection status to Deny and it will automatically connect without needing approval. "" The video or audio may differ from the mobile's software. On...
..., the mobile device must support a mirroring function such as AllShare Cast or Screen Mirroring. In the search result list, select the TV. "" If you are setting the device's connection status to Deny and it will automatically connect without needing approval. "" The video or audio may differ from the mobile's software. On...

User Manual
Page 20
... the connected devices. ●● Remove USB: Use to safely remove a USB device connected to . 2. "" This option is only available when Anynet+ (HDMI-CEC) is set to an input source, follow these steps: 1. The Source List appears across the top of the TV. To assign a device name to On. From the...
... the connected devices. ●● Remove USB: Use to safely remove a USB device connected to . 2. "" This option is only available when Anynet+ (HDMI-CEC) is set to an input source, follow these steps: 1. The Source List appears across the top of the TV. To assign a device name to On. From the...
User Manual
Page 21
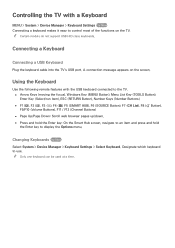
..., navigate to an item and press and hold the Enter key to display the Options menu. Changing Keyboards Try Now Select System > Device Manager > Keyboard Settings > Select Keyboard. "" Only one keyboard can be used at a time. Connecting a Keyboard Connecting a USB Keyboard Plug the keyboard cable into the TV's USB port...."" Certain models do not support USB HID class keyboards. Using the Keyboard Use the following remote features with a Keyboard MENU > System > Device Manager > Keyboard Settings Try Now Connecting a keyboard makes it easy to use. A connection message appears on the TV.
..., navigate to an item and press and hold the Enter key to display the Options menu. Changing Keyboards Try Now Select System > Device Manager > Keyboard Settings > Select Keyboard. "" Only one keyboard can be used at a time. Connecting a Keyboard Connecting a USB Keyboard Plug the keyboard cable into the TV's USB port...."" Certain models do not support USB HID class keyboards. Using the Keyboard Use the following remote features with a Keyboard MENU > System > Device Manager > Keyboard Settings Try Now Connecting a keyboard makes it easy to use. A connection message appears on the TV.
User Manual
Page 22
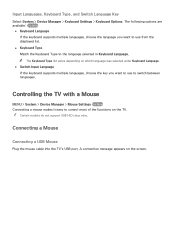
Input Languages, Keyboard Type, and Switch Language Key Select System > Device Manager > Keyboard Settings > Keyboard Options. Connecting a Mouse Connecting a USB Mouse Plug the mouse cable into the TV's USB port. A connection message appears on the TV. "" ...multiple languages, choose the language you want to use to switch between languages. Controlling the TV with a Mouse MENU > System > Device Manager > Mouse Settings Try Now Connecting a mouse makes it easy to the language selected in Keyboard Language. "" The Keyboard Type list varies depending on which language was selected...
Input Languages, Keyboard Type, and Switch Language Key Select System > Device Manager > Keyboard Settings > Keyboard Options. Connecting a Mouse Connecting a USB Mouse Plug the mouse cable into the TV's USB port. A connection message appears on the TV. "" ...multiple languages, choose the language you want to use to switch between languages. Controlling the TV with a Mouse MENU > System > Device Manager > Mouse Settings Try Now Connecting a mouse makes it easy to the language selected in Keyboard Language. "" The Keyboard Type list varies depending on which language was selected...

User Manual
Page 23
... to control the TV in the same way you can be used . Changing Mouse Buttons and Pointer Speed Try Now Select System > Device Manager > Mouse Settings > Mouse Options. Left-clicking once while using . ●● Scrolling the TV Menu or Screen Move the mouse wheel up /down . "" Only one mouse can...: ●● Primary Button Choose which mouse to the TV, a pointer appears on the current screen. Changing Mice Try Now Select System > Device Manager > Mouse Settings > Select Mouse.
... to control the TV in the same way you can be used . Changing Mouse Buttons and Pointer Speed Try Now Select System > Device Manager > Mouse Settings > Mouse Options. Left-clicking once while using . ●● Scrolling the TV Menu or Screen Move the mouse wheel up /down . "" Only one mouse can...: ●● Primary Button Choose which mouse to the TV, a pointer appears on the current screen. Changing Mice Try Now Select System > Device Manager > Mouse Settings > Select Mouse.

User Manual
Page 26
Once it is successful, you will see a confirmation message. Select OK. If the attempt fails, try again, or connect manually. ●● Wall-mounted LAN Outlet Connecting to a Wired Internet Network Automatically MENU > Network > Network Settings Try Now Automatically connect to an available network. The TV attempts to connect to an available network. 1. Set the Network type to Wired, and then select Connect. 2.
Once it is successful, you will see a confirmation message. Select OK. If the attempt fails, try again, or connect manually. ●● Wall-mounted LAN Outlet Connecting to a Wired Internet Network Automatically MENU > Network > Network Settings Try Now Automatically connect to an available network. The TV attempts to connect to an available network. 1. Set the Network type to Wired, and then select Connect. 2.

User Manual
Page 27
... versus Static IP Addresses" section for more information on dynamic IP and static IP addresses. 1. Network Settings Select your Internet Service Provider (ISP). Network Settings Connection verification cancelled. Once the network connection has been interrupted, select IP Settings. Wired network connection test is stopped. Connecting to a Wired Internet Network Manually MENU > Network > Network...
... versus Static IP Addresses" section for more information on dynamic IP and static IP addresses. 1. Network Settings Select your Internet Service Provider (ISP). Network Settings Connection verification cancelled. Once the network connection has been interrupted, select IP Settings. Wired network connection test is stopped. Connecting to a Wired Internet Network Manually MENU > Network > Network...
User Manual
Page 28
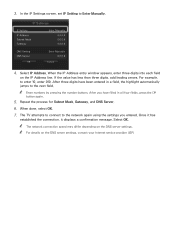
... you entered. When done, select OK. 7. "" The network connection speed may differ depending on the DNS server settings, contact your Internet service provider (ISP). The TV attempts to connect to the next field. "" For details on the DNS server..., press the E button again. 5. Once it has established the connection, it displays a confirmation message. IP Settings IP Setting IP Address Subnet Mask Gateway Enter Manually 0.0.0.0 0.0.0.0 0.0.0.0 DNS Setting DNS Server OK Enter Manually 0.0.0.0 Cancel 4. Select IP Address. Select OK. 3. If the value has less than...
... you entered. When done, select OK. 7. "" The network connection speed may differ depending on the DNS server settings, contact your Internet service provider (ISP). The TV attempts to connect to the next field. "" For details on the DNS server..., press the E button again. 5. Once it has established the connection, it displays a confirmation message. IP Settings IP Setting IP Address Subnet Mask Gateway Enter Manually 0.0.0.0 0.0.0.0 0.0.0.0 DNS Setting DNS Server OK Enter Manually 0.0.0.0 Cancel 4. Select IP Address. Select OK. 3. If the value has less than...
User Manual
Page 29
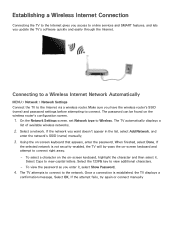
On the Network Settings screen, set Network type to view additional characters. -- Select a network. Using the on the wireless router's configuration screen. 1. When finished, select Done. If the selected network is ... you access to online services and SMART features, and lets you have the wireless router's SSID (name) and password settings before attempting to connect. Connecting to a Wireless Internet Network Automatically MENU > Network > Network Settings Connect the TV to the network. The TV automatically displays a list of available wireless networks. 2. To view the...
On the Network Settings screen, set Network type to view additional characters. -- Select a network. Using the on the wireless router's configuration screen. 1. When finished, select Done. If the selected network is ... you access to online services and SMART features, and lets you have the wireless router's SSID (name) and password settings before attempting to connect. Connecting to a Wireless Internet Network Automatically MENU > Network > Network Settings Connect the TV to the network. The TV automatically displays a list of available wireless networks. 2. To view the...
User Manual
Page 30
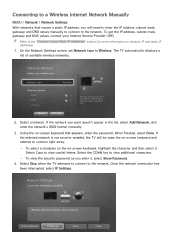
... character and then select it , select Show Password. 4. Select Stop when the TV attempts to connect to the internet. Change Network IP Settings Retry Close The TV automatically displays a list of available wireless networks. Using the on dynamic IP and static IP addresses. 1. Once the network... Internet Service Provider (ISP). If the selected network is stopped. Connecting to a Wireless Internet Network Manually MENU > Network > Network Settings With networks that appears, enter the password. To get the IP address, subnet mask, gateway and DNS values, contact your network ...
... character and then select it , select Show Password. 4. Select Stop when the TV attempts to connect to the internet. Change Network IP Settings Retry Close The TV automatically displays a list of available wireless networks. Using the on dynamic IP and static IP addresses. 1. Once the network... Internet Service Provider (ISP). If the selected network is stopped. Connecting to a Wireless Internet Network Manually MENU > Network > Network Settings With networks that appears, enter the password. To get the IP address, subnet mask, gateway and DNS values, contact your network ...
User Manual
Page 31
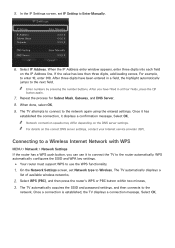
... enter 010. Once it has established the connection, it to connect the TV to a Wireless Internet Network with WPS MENU > Network > Network Settings If the router has a WPS push button, you have been entered in all four fields, press the E button again. 7. Select OK. ...The TV automatically acquires the SSID and password settings, and then connects to Enter Manually. Once a connection is established, the TV displays a connection message. "" Enter numbers by pressing the number buttons....
... enter 010. Once it has established the connection, it to connect the TV to a Wireless Internet Network with WPS MENU > Network > Network Settings If the router has a WPS push button, you have been entered in all four fields, press the E button again. 7. Select OK. ...The TV automatically acquires the SSID and password settings, and then connects to Enter Manually. Once a connection is established, the TV displays a connection message. "" Enter numbers by pressing the number buttons....
User Manual
Page 32
.... Troubleshooting Internet Connectivity Issues If you are not able to connect the TV to the network Do the following or configure the IP Settings manually. 1. IP auto setting failed Do the following : 1. Ensure that the DHCP server is on, try turning if off and on the router and reset ...the router. 2. Ensure that the Internet LAN cable is plugged in. If it back in IP Settings. 3. If this does not work , contact your Internet Service Provider. Connected to a local network, but not to the router's external LAN port. 2. ...
.... Troubleshooting Internet Connectivity Issues If you are not able to connect the TV to the network Do the following or configure the IP Settings manually. 1. IP auto setting failed Do the following : 1. Ensure that the DHCP server is on, try turning if off and on the router and reset ...the router. 2. Ensure that the Internet LAN cable is plugged in. If it back in IP Settings. 3. If this does not work , contact your Internet Service Provider. Connected to a local network, but not to the router's external LAN port. 2. ...
User Manual
Page 33
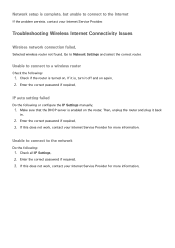
...Wireless Internet Connectivity Issues Wireless network connection failed, Selected wireless router not found. Check if the router is enabled on . IP auto setting failed Do the following : 1. Unable to connect to the Internet If the problem persists, contact your Internet Service Provider for more information... required. Enter the correct password if required. 3. Make sure that the DHCP server is turned on the router. Unable to connect to Network Settings and select the correct router. Network setup is , turn it off and on again. 2. Then, unplug the router and plug it is ...
...Wireless Internet Connectivity Issues Wireless network connection failed, Selected wireless router not found. Check if the router is enabled on . IP auto setting failed Do the following : 1. Unable to connect to the Internet If the problem persists, contact your Internet Service Provider for more information... required. Enter the correct password if required. 3. Make sure that the DHCP server is turned on the router. Unable to connect to Network Settings and select the correct router. Network setup is , turn it off and on again. 2. Then, unplug the router and plug it is ...

User Manual
Page 34
.... Checking the Internet Connection Status MENU > Network > Network Status Try Now Network Network Status Network Settings Wi-Fi Direct Multimedia Device Settings Screen Mirroring Device Name [TV]Samsung L... "" Your TV's menu may differ from the image above, depending on the model. Network setup... is connected to the Internet 1. Check the DNS values in IP Settings. 3. Connected to a local network, ...
.... Checking the Internet Connection Status MENU > Network > Network Status Try Now Network Network Status Network Settings Wi-Fi Direct Multimedia Device Settings Screen Mirroring Device Name [TV]Samsung L... "" Your TV's menu may differ from the image above, depending on the model. Network setup... is connected to the Internet 1. Check the DNS values in IP Settings. 3. Connected to a local network, ...

User Manual
Page 36
... history by selecting Reset in the Smart Hub > First Screen Settings menu. Press the SMART HUB button to a desired item. 2. The Options menu appears. 3. You will move to open the First Screen, and select Reset. Press ... and remove your selection. 2. Resetting Smart Hub's First Screen MENU > Smart Hub > First Screen Settings > Reset Reset lets you would on the screen. On the Panel screen for each service panel, the following are available: ●● SAMSUNG APPS You can also delete your favorite item 1. Deleting browsing history 1. "" However, the Favorites...
... history by selecting Reset in the Smart Hub > First Screen Settings menu. Press the SMART HUB button to a desired item. 2. The Options menu appears. 3. You will move to open the First Screen, and select Reset. Press ... and remove your selection. 2. Resetting Smart Hub's First Screen MENU > Smart Hub > First Screen Settings > Reset Reset lets you would on the screen. On the Panel screen for each service panel, the following are available: ●● SAMSUNG APPS You can also delete your favorite item 1. Deleting browsing history 1. "" However, the Favorites...


