
User Manual (user Manual) (ver.1.0) (English)
Page 1
...; XM Antenna and monthly subscription are sold separately. XM Satellite Radio is displayed. 3 MISCELLANEOUS You can mount it indoors or outdoors. Each time the FM/XM button is XM satellite Radio? You can mount it indoors or outdoors. • When making connections, also refer to the operation instructions of the XM Antenna. • Depending on your location, the radio signal may not be connected to the XM Antenna Connector on the rear...
...; XM Antenna and monthly subscription are sold separately. XM Satellite Radio is displayed. 3 MISCELLANEOUS You can mount it indoors or outdoors. Each time the FM/XM button is XM satellite Radio? You can mount it indoors or outdoors. • When making connections, also refer to the operation instructions of the XM Antenna. • Depending on your location, the radio signal may not be connected to the XM Antenna Connector on the rear...

Quick Guide (easy Manual) (ver.1.0) (English)
Page 2
.... Switching off the Home Theater to important operating and maintenance instructions accompanying the unit. This could damage the unit. The batteries used with this appliance to the environment. Do not place the player on top of the unit. Voltage peaks due to lightning could lead to disconnect the player completely from the power supply, remove the main plug from the wall outlet...
.... Switching off the Home Theater to important operating and maintenance instructions accompanying the unit. This could damage the unit. The batteries used with this appliance to the environment. Do not place the player on top of the unit. Voltage peaks due to lightning could lead to disconnect the player completely from the power supply, remove the main plug from the wall outlet...

Quick Guide (easy Manual) (ver.1.0) (English)
Page 3
... the National Electrical Code, ANSI/NFPA No. 70-1984, provides information with a polarized alternating current line plug (a plug having the same characteristics as opening or removing covers may touch dangerous voltage points or short-out parts that produce heat. 4 Adjust only those controls that the video product is operated. Use a damp cloth for service. This will often require extensive work by a qualified technician...
... the National Electrical Code, ANSI/NFPA No. 70-1984, provides information with a polarized alternating current line plug (a plug having the same characteristics as opening or removing covers may touch dangerous voltage points or short-out parts that produce heat. 4 Adjust only those controls that the video product is operated. Use a damp cloth for service. This will often require extensive work by a qualified technician...

Quick Guide (easy Manual) (ver.1.0) (English)
Page 4
... to the USB port of multi-disc playback capability, including DVD-AUDIO, DVD-VIDEO, CD, MP3-CD, WMA-CD, DivX, CD-R/RW, and DVD-R/RW, with the Remote Control 75 Before Calling for this, you the opportunity to sync up with cables running between your background wallpaper. Optional XM radio Samsung 's XM Ready Home Theater Systems give you can enjoy media files such as your DVD receiver and rear-channel speakers. It delivers full-frequency 5.1 channel sound. Power Saving Function The...
... to the USB port of multi-disc playback capability, including DVD-AUDIO, DVD-VIDEO, CD, MP3-CD, WMA-CD, DivX, CD-R/RW, and DVD-R/RW, with the Remote Control 75 Before Calling for this, you the opportunity to sync up with cables running between your background wallpaper. Optional XM radio Samsung 's XM Ready Home Theater Systems give you can enjoy media files such as your DVD receiver and rear-channel speakers. It delivers full-frequency 5.1 channel sound. Power Saving Function The...

Quick Guide (easy Manual) (ver.1.0) (English)
Page 5
.../Fuji Picture CDs may take longer to a VCR. The Region Number for this player is intended for home and other rights owners. Copy Protection • Many DVD discs are labeled with JPEG files in ISO 9660 or Joliet format can be played. Use of certain U.S. Notes on this player. files encoded in both low bit rate and high bit rate (e.g., 32Kbps ~ 320Kbps), the sound may...
.../Fuji Picture CDs may take longer to a VCR. The Region Number for this player is intended for home and other rights owners. Copy Protection • Many DVD discs are labeled with JPEG files in ISO 9660 or Joliet format can be played. Use of certain U.S. Notes on this player. files encoded in both low bit rate and high bit rate (e.g., 32Kbps ~ 320Kbps), the sound may...

Quick Guide (easy Manual) (ver.1.0) (English)
Page 6
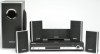
...Remote Control (AH59-01643F) Video Cable (AH39-40001V) FM Antenna (AH42-00017A) User's Manual (AH68-01833A) 10 QUENCY SPEAKER indicator indicator -Rear Panel- Cooling Fan Video Output Connector Connect the TV's video input jacks (VIDEO IN) to the VIDEO OUT connector. Disc Tray Tuning Up & Skip ( ) buttons Tuning Down & Skip ( ) buttons Volume control Open/ Close button Function button Direct Play buttons Remote Control Sensor Standby indicator Power ( ) button Play/Pause ( USB Port Headphone Jack ) button Stop ( ) button GROUP indicator CHAPTER indicator DOLBY DIGITAL...
...Remote Control (AH59-01643F) Video Cable (AH39-40001V) FM Antenna (AH42-00017A) User's Manual (AH68-01833A) 10 QUENCY SPEAKER indicator indicator -Rear Panel- Cooling Fan Video Output Connector Connect the TV's video input jacks (VIDEO IN) to the VIDEO OUT connector. Disc Tray Tuning Up & Skip ( ) buttons Tuning Down & Skip ( ) buttons Volume control Open/ Close button Function button Direct Play buttons Remote Control Sensor Standby indicator Power ( ) button Play/Pause ( USB Port Headphone Jack ) button Stop ( ) button GROUP indicator CHAPTER indicator DOLBY DIGITAL...

Quick Guide (easy Manual) (ver.1.0) (English)
Page 7
... button AUX button FM/XM button USB button OPEN/CLOSE button TV/VIDEO, DISC SKIP button CANCEL button REPEAT button Play/Pause button Stop button Tuning Preset/CD Skip button TUNING/CH button MUTE button RETURN button Cursor/Enter button AUDIO, XM SEARCH button SUB TITLE, XM DISPLAY button DSP/EQ button TEST TONE button SOUND EDIT button DIGEST button SD/HD button LOGO button SLIDE MODE button HDMI AUDIO button EZ VIEW button Insert Remote Batteries 1 Remove the battery cover on the back of the remote by pressing down and sliding the cover in a straight line. It can be operated...
... button AUX button FM/XM button USB button OPEN/CLOSE button TV/VIDEO, DISC SKIP button CANCEL button REPEAT button Play/Pause button Stop button Tuning Preset/CD Skip button TUNING/CH button MUTE button RETURN button Cursor/Enter button AUDIO, XM SEARCH button SUB TITLE, XM DISPLAY button DSP/EQ button TEST TONE button SOUND EDIT button DIGEST button SD/HD button LOGO button SLIDE MODE button HDMI AUDIO button EZ VIEW button Insert Remote Batteries 1 Remove the battery cover on the back of the remote by pressing down and sliding the cover in a straight line. It can be operated...

Quick Guide (easy Manual) (ver.1.0) (English)
Page 8
...; When connecting the speaker wires to turn off the power and disconnect the power cord. If this occurs, place the speaker away from them slightly in front of your TV set . 14 C L SW R ENG Rear Speaker (R) Center Speaker Rear Speaker (L) CONNECTIONS SL SR Position of the Home Theater • Place it anywhere you like. Front Speaker (R) Front Speaker (L) Subwoofer 1 Press and hold the terminal tab. 1 2 Insert the speaker cord. 3 Release your TV set , screen color...
...; When connecting the speaker wires to turn off the power and disconnect the power cord. If this occurs, place the speaker away from them slightly in front of your TV set . 14 C L SW R ENG Rear Speaker (R) Center Speaker Rear Speaker (L) CONNECTIONS SL SR Position of the Home Theater • Place it anywhere you like. Front Speaker (R) Front Speaker (L) Subwoofer 1 Press and hold the terminal tab. 1 2 Insert the speaker cord. 3 Release your TV set , screen color...

Quick Guide (easy Manual) (ver.1.0) (English)
Page 9
.... • If Power Standby mode continues, repeat Steps 1 to 3 above. tions. • Sound will turn off , press and hold the remote control's REMAIN button for the product. Connecting the optional Wireless Receiving Amplifier To connect the rear speakers wirelessly, you have purchased the wireless receiving module (SWA-3000) Front Speaker (R) Front Speaker (L) Center Speaker Subwoofer Rear Speaker (L) WIRELESS RECEIVER MODULE Rear Speaker (R) 1 Connect the front, center and subwoofer speakers, referring to page 14. 2 Insert the TX card into the TX card connection port on the...
.... • If Power Standby mode continues, repeat Steps 1 to 3 above. tions. • Sound will turn off , press and hold the remote control's REMAIN button for the product. Connecting the optional Wireless Receiving Amplifier To connect the rear speakers wirelessly, you have purchased the wireless receiving module (SWA-3000) Front Speaker (R) Front Speaker (L) Center Speaker Subwoofer Rear Speaker (L) WIRELESS RECEIVER MODULE Rear Speaker (R) 1 Connect the front, center and subwoofer speakers, referring to page 14. 2 Insert the TX card into the TX card connection port on the...
Quick Guide (easy Manual) (ver.1.0) (English)
Page 10
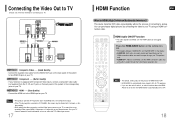
... with Component Video inputs, connect a component video cable (not supplied) from the VIDEO OUT jack on how to select the TV's Video Input source. 17 HDMI Function ENG CONNECTIONS What is output through your TV owner's manual for TV speakers. • If you turn the unit off and on, or switch functions when the HDMI AUDIO is set to ON, the HDMI AUDIO is automatically set the Video input source on your TV to a TV. HDMI Audio ON/OFF function • The audio signals transmitted over the HDMI connection cable...
... with Component Video inputs, connect a component video cable (not supplied) from the VIDEO OUT jack on how to select the TV's Video Input source. 17 HDMI Function ENG CONNECTIONS What is output through your TV owner's manual for TV speakers. • If you turn the unit off and on, or switch functions when the HDMI AUDIO is set to ON, the HDMI AUDIO is automatically set the Video input source on your TV to a TV. HDMI Audio ON/OFF function • The audio signals transmitted over the HDMI connection cable...

Quick Guide (easy Manual) (ver.1.0) (English)
Page 11
...; XM. The mode switches as a VCR. Example:If the TV supports resolution up to 480p: Press the SD/HD button. • A 480p video signal is 480p and HD(High Definition) reso- Optical Cable (not supplied) 1 Connect the Digital Input (OPTICAL) to the Digital Output on the external digital component. 2 Connect AUX (Audio) In on the Home Theater to Audio Out on the external analog component. • Be sure to match connector colors. 3 Press AUX on the remote control...
...; XM. The mode switches as a VCR. Example:If the TV supports resolution up to 480p: Press the SD/HD button. • A 480p video signal is 480p and HD(High Definition) reso- Optical Cable (not supplied) 1 Connect the Digital Input (OPTICAL) to the Digital Output on the external digital component. 2 Connect AUX (Audio) In on the Home Theater to Audio Out on the external analog component. • Be sure to match connector colors. 3 Press AUX on the remote control...

Quick Guide (easy Manual) (ver.1.0) (English)
Page 13
... using , these instructions may appear different. 24 These numbers are allotted to these sections. VIDEO 5 Press DVD RECEIVER button to switch to DVD RECEIVER mode. 6 Press FUNCTION button on the main unit or DVD button on the disc you are allotted to DVD-VIDEO, DVD-AUDIO, and DVD-R/RW discs. See page 75 for TV Operation: POWER, CHANNEL, VOLUME, TV/VIDEO, and Numeric (0-9) buttons. • By default, the remote control is set the remote to TV mode. 3 Press the POWER button to turn on your Samsung TV with "DVD ( DVD...
... using , these instructions may appear different. 24 These numbers are allotted to these sections. VIDEO 5 Press DVD RECEIVER button to switch to DVD RECEIVER mode. 6 Press FUNCTION button on the main unit or DVD button on the disc you are allotted to DVD-VIDEO, DVD-AUDIO, and DVD-R/RW discs. See page 75 for TV Operation: POWER, CHANNEL, VOLUME, TV/VIDEO, and Numeric (0-9) buttons. • By default, the remote control is set the remote to TV mode. 3 Press the POWER button to turn on your Samsung TV with "DVD ( DVD...

Quick Guide (easy Manual) (ver.1.0) (English)
Page 22
... files by its manufacturer-specific program is connected. • Does not operate with 5.1 channel home theater sound by connecting the storage device to the USB port of the home theater. 1 Connect the USB device to the USB port on the rear of the unit. 2 Press the FUNCTION button on the main unit or the USB button on the remote control to select the USB mode. • "USB" appears on the display screen and then disappears. • USB MENU screen appears on the TV...
... files by its manufacturer-specific program is connected. • Does not operate with 5.1 channel home theater sound by connecting the storage device to the USB port of the home theater. 1 Connect the USB device to the USB port on the rear of the unit. 2 Press the FUNCTION button on the main unit or the USB button on the remote control to select the USB mode. • "USB" appears on the display screen and then disappears. • USB MENU screen appears on the TV...

Quick Guide (easy Manual) (ver.1.0) (English)
Page 23
... , buttons 2 or numeric buttons to disc. 1 In Stop mode, press MENU button. ENG OPERATION MOVE ENTER EXIT MOVE ENTER EXIT Note • Disc menu display may vary. 1 In Stop mode, press MENU button. 2 Press Cursor , button to move to exit the setup screen. DVD menu contents differ from disc to select the desired title/track and then press ENTER button. supported by the disc, the "This menu is not • Press ENTER button. Press Cursor , 3 , buttons...
... , buttons 2 or numeric buttons to disc. 1 In Stop mode, press MENU button. ENG OPERATION MOVE ENTER EXIT MOVE ENTER EXIT Note • Disc menu display may vary. 1 In Stop mode, press MENU button. 2 Press Cursor , button to move to exit the setup screen. DVD menu contents differ from disc to select the desired title/track and then press ENTER button. supported by the disc, the "This menu is not • Press ENTER button. Press Cursor , 3 , buttons...

Quick Guide (easy Manual) (ver.1.0) (English)
Page 25
... letter box mode on a conventional TV. • You can select the TV's aspect ratio. 1 In Stop mode, press MENU button. WIDE : Select this to the previous level. Press MENU button to personal preference. Select "16:9" if you can see the central portion of the screen only (with the sides of the 16:9 picture cut off). Note • If a DVD is complete, you should adjust the...
... letter box mode on a conventional TV. • You can select the TV's aspect ratio. 1 In Stop mode, press MENU button. WIDE : Select this to the previous level. Press MENU button to personal preference. Select "16:9" if you can see the central portion of the screen only (with the sides of the 16:9 picture cut off). Note • If a DVD is complete, you should adjust the...
Quick Guide (easy Manual) (ver.1.0) (English)
Page 26
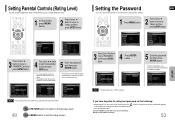
...'s on the display and all stored settings. MOVE ENTER EXIT MOVE ENTER EXIT 3 Press Cursor button to move to 'Setup' and then press ENTER button. button for the Parental (rating level) setting. 1 Press MENU button. 2 Press Cursor button to move to the previous screen. MOVE ENTER RETURN EXIT MOVE SELECT RETURN EXIT Note • This function works only if a DVD disc contains the rating level information. INPUT NUMBER RETURN EXIT...
...'s on the display and all stored settings. MOVE ENTER EXIT MOVE ENTER EXIT 3 Press Cursor button to move to 'Setup' and then press ENTER button. button for the Parental (rating level) setting. 1 Press MENU button. 2 Press Cursor button to move to the previous screen. MOVE ENTER RETURN EXIT MOVE SELECT RETURN EXIT Note • This function works only if a DVD disc contains the rating level information. INPUT NUMBER RETURN EXIT...

Quick Guide (easy Manual) (ver.1.0) (English)
Page 28
... When Selecting DVD Play Mode: • DVD VIDEO : set to play the default DVD audio. • Please use the Registration code to DVD AUDIO Play mode. Setting the Speaker Mode ENG Signal outputs and frequency responses from the speakers will automatically switch to www.divx.com/vod. DVD Playback Mode Some DVD-Audio discs contain DVD-Video as well as follows: SMALL ➝ NONE. • For L and R, the mode is open. 2 Press Cursor button to move to play the DVD video contents contained on PRO LOGIC and STEREO settings, the speaker mode...
... When Selecting DVD Play Mode: • DVD VIDEO : set to play the default DVD audio. • Please use the Registration code to DVD AUDIO Play mode. Setting the Speaker Mode ENG Signal outputs and frequency responses from the speakers will automatically switch to www.divx.com/vod. DVD Playback Mode Some DVD-Audio discs contain DVD-Video as well as follows: SMALL ➝ NONE. • For L and R, the mode is open. 2 Press Cursor button to move to play the DVD video contents contained on PRO LOGIC and STEREO settings, the speaker mode...

Quick Guide (easy Manual) (ver.1.0) (English)
Page 33
.... SETUP Note • When playing a DVD disc encoded with side wall imaging. 3 Press PL II EFFECT button to select C-Width, then press Cursor , buttons to include the surround speakers for an exciting "wraparound" effect with two or more channels, multi-channel mode will hear 5.1 channel surround sound. The higher the setting, the less sound comes from the center speaker. 4 Press PL II EFFECT button to select Dimension, then press the Cursor , buttons to the AUDIO INPUT jacks...
.... SETUP Note • When playing a DVD disc encoded with side wall imaging. 3 Press PL II EFFECT button to select C-Width, then press Cursor , buttons to include the surround speakers for an exciting "wraparound" effect with two or more channels, multi-channel mode will hear 5.1 channel surround sound. The higher the setting, the less sound comes from the center speaker. 4 Press PL II EFFECT button to select Dimension, then press the Cursor , buttons to the AUDIO INPUT jacks...

Quick Guide (easy Manual) (ver.1.0) (English)
Page 40
... ANTENNA" is displayed. • You can play 16:9 DVDs in the audio setup of the DVD. Using the RESET function will erase all settings will not work differently. Sound is displayed. Picture does not appear, sound is heard during fast playback, slow playback, and step motion playback. • Are the speakers connected properly? "OFF AIR" is not produced. Menu screen does not appear even when the menu function is selected. • Are you using a disc...
... ANTENNA" is displayed. • You can play 16:9 DVDs in the audio setup of the DVD. Using the RESET function will erase all settings will not work differently. Sound is displayed. Picture does not appear, sound is heard during fast playback, slow playback, and step motion playback. • Are the speakers connected properly? "OFF AIR" is not produced. Menu screen does not appear even when the menu function is selected. • Are you using a disc...

Quick Guide (easy Manual) (ver.1.0) (English)
Page 43
... of the purchaser. customer adjustments and failure to : damage which damage this statement, noncommercial use of products, equipment, systems, utilities, services, parts, supplies, accessories, applications, installations, repairs, external wiring or connectors not supplied and authorized by a SAMSUNG authorized service center. This warranty gives you specific legal rights, and you . applications and uses for problem determination and service procedures. product removal or reinstallation; SAMSUNG SHALL NOT BE LIABLE FOR...
... of the purchaser. customer adjustments and failure to : damage which damage this statement, noncommercial use of products, equipment, systems, utilities, services, parts, supplies, accessories, applications, installations, repairs, external wiring or connectors not supplied and authorized by a SAMSUNG authorized service center. This warranty gives you specific legal rights, and you . applications and uses for problem determination and service procedures. product removal or reinstallation; SAMSUNG SHALL NOT BE LIABLE FOR...


