User Manual (ENGLISH)
Page 4
...■ Check Points before Requesting Service 65 APPENDIX ■ Troubleshooting 66 ■ Installing the Wall Mount Kit 67 ■ How to the Sound of Screen Burn 54 ■ Setting the Function Help 54 ■ Wall- Contents GENERAL INFORMATION ■ List of Features 5 ■ Accessories 5 ■ Viewing the...Analog Channels 41 ■ Checking the Digital-Signal Strength 42 ■ LNA (Low Noise Amplifier 42 PC DISPLAY ■ Using Your TV as a Computer (PC) Display 43 ■ Display Modes 43 ■ Setting up the TV with your PC 44 ■ Setting the Home ...
...■ Check Points before Requesting Service 65 APPENDIX ■ Troubleshooting 66 ■ Installing the Wall Mount Kit 67 ■ How to the Sound of Screen Burn 54 ■ Setting the Function Help 54 ■ Wall- Contents GENERAL INFORMATION ■ List of Features 5 ■ Accessories 5 ■ Viewing the...Analog Channels 41 ■ Checking the Digital-Signal Strength 42 ■ LNA (Low Noise Amplifier 42 PC DISPLAY ■ Using Your TV as a Computer (PC) Display 43 ■ Display Modes 43 ■ Setting up the TV with your PC 44 ■ Setting the Home ...
User Manual (ENGLISH)
Page 7
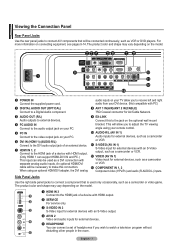
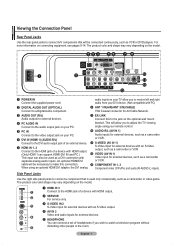
... shape may vary depending on the model. 1 HDMI IN 3 Connect to adjust the TV viewing angle using an optional HDMI/DVI adapter, the DVI analog audio inputs on your TV allow you wish to the jack on the optional wall mount bracket. An optional HDMI/DVI cable will allow you to receive left and...
... shape may vary depending on the model. 1 HDMI IN 3 Connect to adjust the TV viewing angle using an optional HDMI/DVI adapter, the DVI analog audio inputs on your TV allow you wish to the jack on the optional wall mount bracket. An optional HDMI/DVI cable will allow you to receive left and...

User Manual (ENGLISH)
Page 31
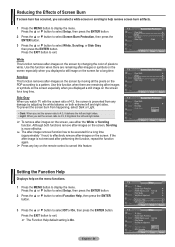
... SW Upgrade ► Move Enter Return T V Setup ▲ More Screen Burn Protection HDMI Black Level : Normal Film Mode : OOff f Wall-Mount Adjustment On PIP Function Help : On SW Upgrade Move Enter Return Setting the Blue Screen Mode If no signal from all sources and adjusts the... Watching TV Energy Saving : Off ▼ More Move Enter Return Setting the HDMI Black Level Use this function to adjust the Black Level of the Blue Screen Setting. English - 31 T V Setup ▲ More Screen Burn Protection HDMI Black Level : Normal Film Mode : Off Wall-Mount Adjustment...
... SW Upgrade ► Move Enter Return T V Setup ▲ More Screen Burn Protection HDMI Black Level : Normal Film Mode : OOff f Wall-Mount Adjustment On PIP Function Help : On SW Upgrade Move Enter Return Setting the Blue Screen Mode If no signal from all sources and adjusts the... Watching TV Energy Saving : Off ▼ More Move Enter Return Setting the HDMI Black Level Use this function to adjust the Black Level of the Blue Screen Setting. English - 31 T V Setup ▲ More Screen Burn Protection HDMI Black Level : Normal Film Mode : Off Wall-Mount Adjustment...

User Manual (ENGLISH)
Page 32
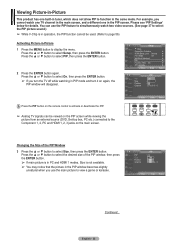
...see 'PIP Settings' below for details. Press the ▲ or ▼ button to select On, then press the ENTER button. ➢ If you turn the TV off while watching in the same mode. T V PIP Size Position Channel PIP : On : : : DTV Air 3 - 0 Move Enter Return Continued... You...Picture-in-Picture 1 Press the MENU button to display the menu. T V Setup ▲ More Screen Burn Protection HDMI Black Level : Normal Film Mode : Off Wall-Mount Adjustment PIP Function Help : On SW Upgrade Move Enter Return T V PIP Size Position Channel PIP : OOfff : On : : DTV Air 3 - 0 Press the...
...see 'PIP Settings' below for details. Press the ▲ or ▼ button to select On, then press the ENTER button. ➢ If you turn the TV off while watching in the same mode. T V PIP Size Position Channel PIP : On : : : DTV Air 3 - 0 Move Enter Return Continued... You...Picture-in-Picture 1 Press the MENU button to display the menu. T V Setup ▲ More Screen Burn Protection HDMI Black Level : Normal Film Mode : Off Wall-Mount Adjustment PIP Function Help : On SW Upgrade Move Enter Return T V PIP Size Position Channel PIP : OOfff : On : : DTV Air 3 - 0 Press the...
User Manual (ENGLISH)
Page 53
...for pixel shift; T V Setup ▲ More Screen Burn Protection ► HDMI Black Level : Normal ► Film Mode : Off ► Wall-Mount Adjustment ► PIP ► Function Help : On ► SW Upgrade ► Move Enter Return T V Screen Burn Protection Pixel Shift White ... ▲ More Blue Screen Melody : Off ► : Medium ► PC ► Home Theater PC : Off ► Light Effect : In Watching TV ► Energy Saving : Off ► ▼ More Move Enter Return T V Setup ▲ More Blue Screen : Off Melody : Medium PC Off ...
...for pixel shift; T V Setup ▲ More Screen Burn Protection ► HDMI Black Level : Normal ► Film Mode : Off ► Wall-Mount Adjustment ► PIP ► Function Help : On ► SW Upgrade ► Move Enter Return T V Screen Burn Protection Pixel Shift White ... ▲ More Blue Screen Melody : Off ► : Medium ► PC ► Home Theater PC : Off ► Light Effect : In Watching TV ► Energy Saving : Off ► ▼ More Move Enter Return T V Setup ▲ More Blue Screen : Off Melody : Medium PC Off ...
User Manual (ENGLISH)
Page 54
... left and right sides. English - 54 T V Setup ▲ More Screen Burn Protection HDMI Black Level : Normal Film Mode : Off Wall-Mount Adjustment PIP Function Help : On SW Upgrade Move Enter Return T V Setup ▲ More Screen Burn Protection HDMI Black Level : Normal Film Mode :... Off Wall-Mount Adjustment PIP Function Help : OOnff SW Upgrade On Move Enter Return Side Gray When you watch TV with the screen ratio of 4:3, the screen is On. If the after-image is more ...
... left and right sides. English - 54 T V Setup ▲ More Screen Burn Protection HDMI Black Level : Normal Film Mode : Off Wall-Mount Adjustment PIP Function Help : On SW Upgrade Move Enter Return T V Setup ▲ More Screen Burn Protection HDMI Black Level : Normal Film Mode :... Off Wall-Mount Adjustment PIP Function Help : OOnff SW Upgrade On Move Enter Return Side Gray When you watch TV with the screen ratio of 4:3, the screen is On. If the after-image is more ...

User Manual (ENGLISH)
Page 55
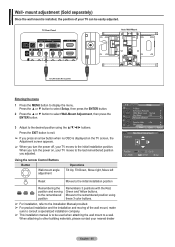
... dealer T V Setup ▲ More Screen Burn Protection HDMI Black Level : Normal Film Mode : Off Wall-Mount Adjustment PIP Function Help : On SW Upgrade Move Enter Return Wall-Mount Adjustment Position1 Position Adjust 1 2 INFO Center 3 Exit English - 55 TV Rear Panel Auto Wall-Mount EX-LINK Cable (Not supplied) Entering the menu 1 Press the MENU button to the...
... dealer T V Setup ▲ More Screen Burn Protection HDMI Black Level : Normal Film Mode : Off Wall-Mount Adjustment PIP Function Help : On SW Upgrade Move Enter Return Wall-Mount Adjustment Position1 Position Adjust 1 2 INFO Center 3 Exit English - 55 TV Rear Panel Auto Wall-Mount EX-LINK Cable (Not supplied) Entering the menu 1 Press the MENU button to the...
User Manual (ENGLISH)
Page 56
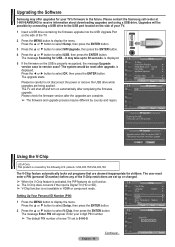
...TV. 1 Insert a USB drive containing the firmware upgrade into the USB Upgrade Port on the USB is properly recognized, the message Upgrade version xxxx to 30 seconds. The upgrade starts. T V Setup ▲ More Screen Burn Protection ► HDMI Black Level : Normal ► Film Mode : Off ► Wall-Mount...the ▲ or ▼ button to receive information about downloading upgrades and using a USB drive. Please contact the Samsung call center at 1-800-SAMSUNG to select Setup, then press the ENTER button. Please check the firmware version after upgrade. T V V-Chip Enter ...
...TV. 1 Insert a USB drive containing the firmware upgrade into the USB Upgrade Port on the USB is properly recognized, the message Upgrade version xxxx to 30 seconds. The upgrade starts. T V Setup ▲ More Screen Burn Protection ► HDMI Black Level : Normal ► Film Mode : Off ► Wall-Mount...the ▲ or ▼ button to receive information about downloading upgrades and using a USB drive. Please contact the Samsung call center at 1-800-SAMSUNG to select Setup, then press the ENTER button. Please check the firmware version after upgrade. T V V-Chip Enter ...
User Manual (ENGLISH)
Page 67
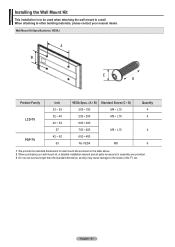
... This installation is to be used when attaching the wall mount to the inside of the TV set. English - 67 Wall Mount Kit Specifications ( VESA ) Product Family LCD-TV PDP-TV inch 23 ~ 26 32 ~ 40 46 ~ 52 57 42 ~ 50 63 VESA Spec. (A * B) Standard Screw (C * D) 200 * 100 M4 * L10 200 * 200 M6 * L10 600 * 400 700 * 400...
... This installation is to be used when attaching the wall mount to the inside of the TV set. English - 67 Wall Mount Kit Specifications ( VESA ) Product Family LCD-TV PDP-TV inch 23 ~ 26 32 ~ 40 46 ~ 52 57 42 ~ 50 63 VESA Spec. (A * B) Standard Screw (C * D) 200 * 100 M4 * L10 200 * 200 M6 * L10 600 * 400 700 * 400...
User Manual (ENGLISH)
Page 4
...■ Check Points before Requesting Service 65 APPENDIX ■ Troubleshooting 66 ■ Installing the Wall Mount Kit 67 ■ How to the Sound of Screen Burn 54 ■ Setting the Function Help 54 ■ Wall- Analog.. 36 ■ Automatic Volume Control 36 ■ Selecting the Internal Mute 36 ... Analog Channels 41 ■ Checking the Digital-Signal Strength 42 ■ LNA (Low Noise Amplifier 42 PC DISPLAY ■ Using Your TV as a Computer (PC) Display 43 ■ Display Modes 43 ■ Setting up the TV with your PC 44 ■ Setting the Home Theater ...
...■ Check Points before Requesting Service 65 APPENDIX ■ Troubleshooting 66 ■ Installing the Wall Mount Kit 67 ■ How to the Sound of Screen Burn 54 ■ Setting the Function Help 54 ■ Wall- Analog.. 36 ■ Automatic Volume Control 36 ■ Selecting the Internal Mute 36 ... Analog Channels 41 ■ Checking the Digital-Signal Strength 42 ■ LNA (Low Noise Amplifier 42 PC DISPLAY ■ Using Your TV as a Computer (PC) Display 43 ■ Display Modes 43 ■ Setting up the TV with your PC 44 ■ Setting the Home Theater ...

User Manual (ENGLISH)
Page 7
...to the DVI audio output jack of an external device. 7 HDMI IN 1, 2 Connect to the HDMI jack of headphones if you to adjust the TV viewing angle using an optional HDMI/DVI adapter, the DVI analog audio inputs on your remote control. 0 AUDIO-R/L (AV IN 1) Audio inputs for... input for Air/Cable Network. 9 EX-LINK Connect this connection. For more information on the optional wall mount bracket. This will be used only occasionally, such as a camcorder or VCR. ! When using your TV allow you wish to connect a component that will be connected continuously, such as VCR or DVD players...
...to the DVI audio output jack of an external device. 7 HDMI IN 1, 2 Connect to the HDMI jack of headphones if you to adjust the TV viewing angle using an optional HDMI/DVI adapter, the DVI analog audio inputs on your remote control. 0 AUDIO-R/L (AV IN 1) Audio inputs for... input for Air/Cable Network. 9 EX-LINK Connect this connection. For more information on the optional wall mount bracket. This will be used only occasionally, such as a camcorder or VCR. ! When using your TV allow you wish to connect a component that will be connected continuously, such as VCR or DVD players...

User Manual (ENGLISH)
Page 31
...the ENTER button. T V Setup ▲ More Screen Burn Protection ► HDMI Black Level : Normal ► Film Mode : Off ► Wall-Mount Adjustment ► PIP ► Function Help : On ► SW Upgrade ► Move Enter Return T V Setup ▲ More Screen Burn Protection...; More Blue Screen : Off ► Melody : Medium ► PC ► Home Theater PC : Off ► Light Effect Energy Saving : In Watching TV ► : Off ► ▼ More Move Enter Return T V Setup ▲ More Blue Screen Melody : OOfff : MOendium PC Home Theater PC :...
...the ENTER button. T V Setup ▲ More Screen Burn Protection ► HDMI Black Level : Normal ► Film Mode : Off ► Wall-Mount Adjustment ► PIP ► Function Help : On ► SW Upgrade ► Move Enter Return T V Setup ▲ More Screen Burn Protection...; More Blue Screen : Off ► Melody : Medium ► PC ► Home Theater PC : Off ► Light Effect Energy Saving : In Watching TV ► : Off ► ▼ More Move Enter Return T V Setup ▲ More Blue Screen Melody : OOfff : MOendium PC Home Theater PC :...
User Manual (ENGLISH)
Page 32
... PIP feature to simultaneously watch one TV channel in the main screen, and a different one built-in tuner, which does not allow PIP to display the menu. T V Setup ▲ More Screen Burn Protection HDMI Black Level : Normal Film Mode : Off Wall-Mount Adjustment PIP Function Help : On... SW Upgrade Move Enter Return T V PIP Size Position Channel PIP : OOfff : On : : DTV Air 3 - 0 Press the PIP button on the remote control to activate or deactivate the PIP. ➢ Analog TV signals can use the main ...
... PIP feature to simultaneously watch one TV channel in the main screen, and a different one built-in tuner, which does not allow PIP to display the menu. T V Setup ▲ More Screen Burn Protection HDMI Black Level : Normal Film Mode : Off Wall-Mount Adjustment PIP Function Help : On... SW Upgrade Move Enter Return T V PIP Size Position Channel PIP : OOfff : On : : DTV Air 3 - 0 Press the PIP button on the remote control to activate or deactivate the PIP. ➢ Analog TV signals can use the main ...

User Manual (ENGLISH)
Page 53
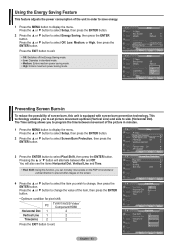
...Enter Return T V Setup ▲ More Blue Screen : Off Melody : Medium PC Off Home Theater PC : OLfof w Light Effect : InMWidaetcuhming TV Energy Saving : OHffigh ▼ More Move Enter Return Preventing Screen Burn-in minutes. 1 Press the MENU button to change , then press the ...On and Off. T V Setup ▲ More Screen Burn Protection ► HDMI Black Level : Normal ► Film Mode : Off ► Wall-Mount Adjustment ► PIP ► Function Help : On ► SW Upgrade ► Move Enter Return T V Screen Burn Protection Pixel Shift White ...
...Enter Return T V Setup ▲ More Blue Screen : Off Melody : Medium PC Off Home Theater PC : OLfof w Light Effect : InMWidaetcuhming TV Energy Saving : OHffigh ▼ More Move Enter Return Preventing Screen Burn-in minutes. 1 Press the MENU button to change , then press the ...On and Off. T V Setup ▲ More Screen Burn Protection ► HDMI Black Level : Normal ► Film Mode : Off ► Wall-Mount Adjustment ► PIP ► Function Help : On ► SW Upgrade ► Move Enter Return T V Screen Burn Protection Pixel Shift White ...

User Manual (ENGLISH)
Page 54
... Function Help : On SW Upgrade Move Enter Return T V Setup ▲ More Screen Burn Protection HDMI Black Level : Normal Film Mode : Off Wall-Mount Adjustment PIP Function Help : OOnff SW Upgrade On Move Enter Return To prevent the screen burn from any key on the screen for a long time...on both functions remove after-images on the screen, use either the White or Scroling function. Use this feature. Side Gray When you watch TV with the screen ratio of 4:3, the screen is not removed after performing the function, repeat the function again. ➢ Press any damage...
... Function Help : On SW Upgrade Move Enter Return T V Setup ▲ More Screen Burn Protection HDMI Black Level : Normal Film Mode : Off Wall-Mount Adjustment PIP Function Help : OOnff SW Upgrade On Move Enter Return To prevent the screen burn from any key on the screen for a long time...on both functions remove after-images on the screen, use either the White or Scroling function. Use this feature. Side Gray When you watch TV with the screen ratio of 4:3, the screen is not removed after performing the function, repeat the function again. ➢ Press any damage...
User Manual (ENGLISH)
Page 55
... dealer T V Setup ▲ More Screen Burn Protection HDMI Black Level : Normal Film Mode : Off Wall-Mount Adjustment PIP Function Help : On SW Upgrade Move Enter Return Wall-Mount Adjustment Position1 Position Adjust 1 2 INFO Center 3 Exit English - 55 TV Rear Panel Auto Wall-Mount EX-LINK Cable (Not supplied) Entering the menu 1 Press the MENU button to the...
... dealer T V Setup ▲ More Screen Burn Protection HDMI Black Level : Normal Film Mode : Off Wall-Mount Adjustment PIP Function Help : On SW Upgrade Move Enter Return Wall-Mount Adjustment Position1 Position Adjust 1 2 INFO Center 3 Exit English - 55 TV Rear Panel Auto Wall-Mount EX-LINK Cable (Not supplied) Entering the menu 1 Press the MENU button to the...

User Manual (ENGLISH)
Page 56
...SAMSUNG to select OK, then press the ENTER button. It may take up to version xxxx? Press the ◄ or ► button to receive information about downloading upgrades and using a USB drive. T V Setup ▲ More Screen Burn Protection ► HDMI Black Level : Normal ► Film Mode : Off ► Wall-Mount...the firmware upgrade. is 0-0-0-0. The upgrade starts. Please be different by connecting a USB drive to display the menu. The TV will appear. patents : US4,930,158 US4,930,160 The V-Chip feature automatically locks out programs that are set is...
...SAMSUNG to select OK, then press the ENTER button. It may take up to version xxxx? Press the ◄ or ► button to receive information about downloading upgrades and using a USB drive. T V Setup ▲ More Screen Burn Protection ► HDMI Black Level : Normal ► Film Mode : Off ► Wall-Mount...the firmware upgrade. is 0-0-0-0. The upgrade starts. Please be different by connecting a USB drive to display the menu. The TV will appear. patents : US4,930,158 US4,930,160 The V-Chip feature automatically locks out programs that are set is...

User Manual (ENGLISH)
Page 67
When attaching to the inside of the TV set. Wall Mount Kit Specifications ( VESA ) Product Family LCD-TV PDP-TV inch 23 ~ 26 32 ~ 40 46 ~ 52 57 42 ~ 50 63 VESA Spec. (A * B) Standard Screw (C * D) 200 * 100 M4 * L10 200 * 200 M6 * L10 600 * 400 700 * 400 M8 * L15 600 * 400 No ...VESA M8 Quantity 4 4 4 6 1 We provide the standard dimensions for wall mount kits as shown in ...
When attaching to the inside of the TV set. Wall Mount Kit Specifications ( VESA ) Product Family LCD-TV PDP-TV inch 23 ~ 26 32 ~ 40 46 ~ 52 57 42 ~ 50 63 VESA Spec. (A * B) Standard Screw (C * D) 200 * 100 M4 * L10 200 * 200 M6 * L10 600 * 400 700 * 400 M8 * L15 600 * 400 No ...VESA M8 Quantity 4 4 4 6 1 We provide the standard dimensions for wall mount kits as shown in ...
User Manual (ENGLISH)
Page 4
...65 ■ Check Points before Requesting Service 65 APPENDIX ■ Troubleshooting 66 ■ Installing the Wall Mount Kit 67 ■ How to the Sound of Screen Burn 54 ■ Setting the Function Help 54 ■ Wall- Digital.. 35 ■ Choosing a Multi-Channel Sound (MTS) Track - Analog.. 51 ■... Analog Channels 41 ■ Checking the Digital-Signal Strength 42 ■ LNA (Low Noise Amplifier 42 PC DISPLAY ■ Using Your TV as a Computer (PC) Display 43 ■ Display Modes 43 ■ Setting up the TV with your PC 44 ■ Setting the Home Theater ...
...65 ■ Check Points before Requesting Service 65 APPENDIX ■ Troubleshooting 66 ■ Installing the Wall Mount Kit 67 ■ How to the Sound of Screen Burn 54 ■ Setting the Function Help 54 ■ Wall- Digital.. 35 ■ Choosing a Multi-Channel Sound (MTS) Track - Analog.. 51 ■... Analog Channels 41 ■ Checking the Digital-Signal Strength 42 ■ LNA (Low Noise Amplifier 42 PC DISPLAY ■ Using Your TV as a Computer (PC) Display 43 ■ Display Modes 43 ■ Setting up the TV with your PC 44 ■ Setting the Home Theater ...
User Manual (ENGLISH)
Page 7
... an external device. 7 HDMI IN 1, 2 Connect to the HDMI jack of headphones if you to adjust the TV viewing angle using an optional HDMI/DVI adapter, the DVI analog audio inputs on the optional wall mount bracket. This will allow you to receive left and right audio from your PC. 5 PC IN Connect... that is used as VCR or DVD players. English - 7 An optional HDMI/DVI cable will be necessary to make this to the jack on your TV allow you wish to watch a television program without disturbing other people in the room. The product color and shape may vary depending on the model...
... an external device. 7 HDMI IN 1, 2 Connect to the HDMI jack of headphones if you to adjust the TV viewing angle using an optional HDMI/DVI adapter, the DVI analog audio inputs on the optional wall mount bracket. This will allow you to receive left and right audio from your PC. 5 PC IN Connect... that is used as VCR or DVD players. English - 7 An optional HDMI/DVI cable will be necessary to make this to the jack on your TV allow you wish to watch a television program without disturbing other people in the room. The product color and shape may vary depending on the model...


