

User Manual (user Manual) (ver.1.0) (English)
Page 3
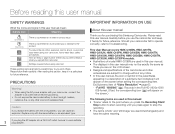
...not be exposed to qualified service personnel. POWER SOURCES: The CAMCORDER should not be placed in a built-in any way, such as powersupply cord or plug is intended to be operated from the unit. 20. Important safety instructions 14 Refer all servicing to dripping or splashing and...GROUNDING: CAMCORDER, be blocked or covered. If you are unable to protect it from the type of antenna-discharge unit, connection to the operating instructions. 18. VENTILATION: Slots and openings in wire to an antenna discharge unit, size of grounding to conductors, location of power source ...
...not be exposed to qualified service personnel. POWER SOURCES: The CAMCORDER should not be placed in a built-in any way, such as powersupply cord or plug is intended to be operated from the unit. 20. Important safety instructions 14 Refer all servicing to dripping or splashing and...GROUNDING: CAMCORDER, be blocked or covered. If you are unable to protect it from the type of antenna-discharge unit, connection to the operating instructions. 18. VENTILATION: Slots and openings in wire to an antenna discharge unit, size of grounding to conductors, location of power source ...
User Manual (user Manual) (ver.1.0) (English)
Page 6
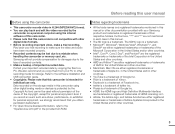
... the LCD screen. • Designs and specifications of the camcorder and other source of fire, explosion, electric shock, or personal injury when using a function. If you plug the AC adapter into a 240V AC outlet, be exactly the same as those you operate the camcorder. Settings required before you for future reference. Please read this user manual Thank you use a suitable 2 plug adapter. IMPORTANT INFORMATION ON USE About this user manual...
... the LCD screen. • Designs and specifications of the camcorder and other source of fire, explosion, electric shock, or personal injury when using a function. If you plug the AC adapter into a 240V AC outlet, be exactly the same as those you operate the camcorder. Settings required before you for future reference. Please read this user manual Thank you use a suitable 2 plug adapter. IMPORTANT INFORMATION ON USE About this user manual...
User Manual (user Manual) (ver.1.0) (English)
Page 7
... digital video formats. • Before recording important video, make sure the video and audio have been recorded properly. • Recorded contents may be used without permission of the owner of the copyright, except for individual use only. Before reading this user manual Before using this camcorder • This camcorder records video in H.264 (MPEG4/AVC) format. • You can play back and edit the video recorded by the camcorder on the storage media in this camcorder using the internal software...
... digital video formats. • Before recording important video, make sure the video and audio have been recorded properly. • Recorded contents may be used without permission of the owner of the copyright, except for individual use only. Before reading this user manual Before using this camcorder • This camcorder records video in H.264 (MPEG4/AVC) format. • You can play back and edit the video recorded by the camcorder on the storage media in this camcorder using the internal software...

User Manual (user Manual) (ver.1.0) (English)
Page 12
... SETTING THE TIME ZONE AND DATE/TIME FOR THE FIRST TIME 28 SELECTING THE OSD LANGUAGE 29 Getting ready to start recording 30 INSERTING/EJECTING A MEMORY CARD (NOT SUPPLIED)...... 30 SELECTING A SUITABLE MEMORY CARD (NOT SUPPLIED) ..... 31 RECORDABLE TIME AND CAPACITY 33 USING THE GRIP BELT 34 ADJUSTING THE LCD SCREEN 35 Basic recording 36 RECORDING VIDEOS 36 RECORDING PHOTOS 38 8 RECORDING WITH EASE FOR BEGINNERS (SMART AUTO)...... 39 ZOOMING 40 Basic playback 41 CHANGING THE PLAYBACK MODE 41 PLAYING VIDEOS 42 VIEWING PHOTOS...
... SETTING THE TIME ZONE AND DATE/TIME FOR THE FIRST TIME 28 SELECTING THE OSD LANGUAGE 29 Getting ready to start recording 30 INSERTING/EJECTING A MEMORY CARD (NOT SUPPLIED)...... 30 SELECTING A SUITABLE MEMORY CARD (NOT SUPPLIED) ..... 31 RECORDABLE TIME AND CAPACITY 33 USING THE GRIP BELT 34 ADJUSTING THE LCD SCREEN 35 Basic recording 36 RECORDING VIDEOS 36 RECORDING PHOTOS 38 8 RECORDING WITH EASE FOR BEGINNERS (SMART AUTO)...... 39 ZOOMING 40 Basic playback 41 CHANGING THE PLAYBACK MODE 41 PLAYING VIDEOS 42 VIEWING PHOTOS...
User Manual (user Manual) (ver.1.0) (English)
Page 13
... 73 Date/Time Set 73 Date Type 73 Time Type 74 Beep Sound 74 Shutter Sound 75 Auto Power Off 75 Quick On STBY 76 Switch Grip 77 Format 77 Default Set 78 Language 78 Demo 79 Connecting to a TV 80 CONNECTING TO A HIGH DEFINITION TV WITH HDMI 80 CONNECTING TO A REGULAR TV 81 VIEWING ON A TV SCREEN 82 Dubbing videos 83 DUBBING TO A VCR OR DVD/HDD RECORDER 83 Printing photos 84 DIRECT PRINTING WITH A PICTBRIDGE PRINTER 84 Using with a Windows...
... 73 Date/Time Set 73 Date Type 73 Time Type 74 Beep Sound 74 Shutter Sound 75 Auto Power Off 75 Quick On STBY 76 Switch Grip 77 Format 77 Default Set 78 Language 78 Demo 79 Connecting to a TV 80 CONNECTING TO A HIGH DEFINITION TV WITH HDMI 80 CONNECTING TO A REGULAR TV 81 VIEWING ON A TV SCREEN 82 Dubbing videos 83 DUBBING TO A VCR OR DVD/HDD RECORDER 83 Printing photos 84 DIRECT PRINTING WITH A PICTBRIDGE PRINTER 84 Using with a Windows...

User Manual (user Manual) (ver.1.0) (English)
Page 18
... camcorder includes the user manual CD and printed quick start guide (AD68-05905A) Model name HMX-Q10BN/HMX-Q100BN/ HMX-Q130BN HMX-Q10TN/HMX-Q100TN/ HMX-Q130TN HMX-Q10UN/HMX-Q100UN/ HMX-Q130UN HMX-Q10PN/HMX-Q100PN/ HMX-Q130PN Color Black Internal memory Lens Titan Silver Blue No X10 (Optical) X20 (Digital) Pink Although some features of these items is not responsible for memory cards compatible with your accessories Battery (BP125A) (AD43-00197A) AC power adaptor (AA-MA9) (AD63-04924A) Audio/Video cable...
... camcorder includes the user manual CD and printed quick start guide (AD68-05905A) Model name HMX-Q10BN/HMX-Q100BN/ HMX-Q130BN HMX-Q10TN/HMX-Q100TN/ HMX-Q130TN HMX-Q10UN/HMX-Q100UN/ HMX-Q130UN HMX-Q10PN/HMX-Q100PN/ HMX-Q130PN Color Black Internal memory Lens Titan Silver Blue No X10 (Optical) X20 (Digital) Pink Although some features of these items is not responsible for memory cards compatible with your accessories Battery (BP125A) (AD43-00197A) AC power adaptor (AA-MA9) (AD63-04924A) Audio/Video cable...

User Manual (user Manual) (ver.1.0) (English)
Page 21
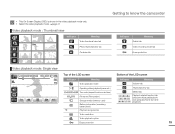
... the LCD screen Indicator / / Meaning Smart Auto mode/Manual mode /Art Film mode Video/Photo recording mode tab Right of the LCD screen Indicator Meaning Storage media (Memory card) Battery information (remaining charge level) JAN/01/2011 12:00AM Zoom tab Playback tab Optical zoom/Digital zoom bar Video resolution Tele Macro Center of the LCD screen Indicator STBY / z/ Meaning Operating status (standby/recording /pause) 00:00:00 Time counter (video recording time) [253Min] Remaining recordable time Time Zone (Visit) JAN/01/2011 12:00 AM Date/Time OIS...
... the LCD screen Indicator / / Meaning Smart Auto mode/Manual mode /Art Film mode Video/Photo recording mode tab Right of the LCD screen Indicator Meaning Storage media (Memory card) Battery information (remaining charge level) JAN/01/2011 12:00AM Zoom tab Playback tab Optical zoom/Digital zoom bar Video resolution Tele Macro Center of the LCD screen Indicator STBY / z/ Meaning Operating status (standby/recording /pause) 00:00:00 Time counter (video recording time) [253Min] Remaining recordable time Time Zone (Visit) JAN/01/2011 12:00 AM Date/Time OIS...
User Manual (user Manual) (ver.1.0) (English)
Page 23
...the camcorder Indicator Meaning Delete tab Video recording mode tab Erase protection Video playback mode: Single view 00:00:20/ 00:01:03 100_0001 Top of the LCD screen Bottom of the LCD screen Indicator Meaning Indicator Meaning Video playback mode Volume tab X / Operating status (playback/pause etc.) 00:00:00/00:00:55 Time code (elapsed time/recorded time) 100_0001 File name (File number) Storage media (memory card) Battery information (remaining battery level) Playback progress bar Thumbnail view tab MENU tab Playback related function tab (skip/search/pause/playback/ slow...
...the camcorder Indicator Meaning Delete tab Video recording mode tab Erase protection Video playback mode: Single view 00:00:20/ 00:01:03 100_0001 Top of the LCD screen Bottom of the LCD screen Indicator Meaning Indicator Meaning Video playback mode Volume tab X / Operating status (playback/pause etc.) 00:00:00/00:00:55 Time code (elapsed time/recorded time) 100_0001 File name (File number) Storage media (memory card) Battery information (remaining battery level) Playback progress bar Thumbnail view tab MENU tab Playback related function tab (skip/search/pause/playback/ slow...
User Manual (user Manual) (ver.1.0) (English)
Page 28
... when you charge it. - Temperatures that you use the AC power adaptor to replace the battery with the expectation that for the battery Battery type Charging time Video resolution Continuous recording time Playback time BP125A Using the AC power adaptor: approx. 120 min. Full HD SD Approx. 105 min. If this reference if you use the recording start/stop, the zoom, and the playback functions. Each battery's life is limited. - Using an AC power source We...
... when you charge it. - Temperatures that you use the AC power adaptor to replace the battery with the expectation that for the battery Battery type Charging time Video resolution Continuous recording time Playback time BP125A Using the AC power adaptor: approx. 120 min. Full HD SD Approx. 105 min. If this reference if you use the recording start/stop, the zoom, and the playback functions. Each battery's life is limited. - Using an AC power source We...

User Manual (user Manual) (ver.1.0) (English)
Page 30
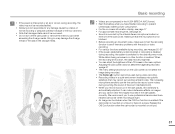
... Recording start/stop button in STBY mode. STBY 00:00:00 [253Min] Switching to the playback mode You can switch to the playback mode by touching "Album" on the Home menu. ¬page 47 • You can also switch the operation mode directly into the playback thumbnail display by touching the Playback ( ) tab in the playback mode. • You can also switch directly to the desired recording mode by touching the tabs on the screen. USING...
... Recording start/stop button in STBY mode. STBY 00:00:00 [253Min] Switching to the playback mode You can switch to the playback mode by touching "Album" on the Home menu. ¬page 47 • You can also switch the operation mode directly into the playback thumbnail display by touching the Playback ( ) tab in the playback mode. • You can also switch directly to the desired recording mode by touching the tabs on the screen. USING...
User Manual (user Manual) (ver.1.0) (English)
Page 41
... or fixed on -screen information display, see page 17 • For approximate recording time, see ¬pages 50~57 • If the power cable/battery is disconnected or recording is disabled during recording, the system is recorded by the internal stereo microphone located on the front of the camcorder. Basic recording • Videos are compressed in the H.264 (MPEG-4.AVC) format. • Eject the battery when you to the data recovery mode...
... or fixed on -screen information display, see page 17 • For approximate recording time, see ¬pages 50~57 • If the power cable/battery is disconnected or recording is disabled during recording, the system is recorded by the internal stereo microphone located on the front of the camcorder. Basic recording • Videos are compressed in the H.264 (MPEG-4.AVC) format. • Eject the battery when you to the data recovery mode...

User Manual (user Manual) (ver.1.0) (English)
Page 43
...) 3 To record the video or photo, press the Recording start/stop button. 4 To cancel the Smart Auto mode, press the Home ( ) button Š touch "Manual". • Most settings are automatically adjusted in the frame. • The camcorder automatically detects the scene (Landscape, etc.) and adjusts the camcorder settings accordingly. • The appropriate scene icon appears on your subject in the Smart Auto mode. To set or adjust functions on the LCD screen. STBY...
...) 3 To record the video or photo, press the Recording start/stop button. 4 To cancel the Smart Auto mode, press the Home ( ) button Š touch "Manual". • Most settings are automatically adjusted in the frame. • The camcorder automatically detects the scene (Landscape, etc.) and adjusts the camcorder settings accordingly. • The appropriate scene icon appears on your subject in the Smart Auto mode. To set or adjust functions on the LCD screen. STBY...

User Manual (user Manual) (ver.1.0) (English)
Page 51
... want . • The White Balance function of the recorded image is used at the same time, or may be grayed out. For more information, see Troubleshooting on page 103 • For easy understanding, the menu setting procedures on the Home menu. • The items of the selected category appears. • If you select "Smart Auto", the Smart Auto mode is switched to. • If you...
... want . • The White Balance function of the recorded image is used at the same time, or may be grayed out. For more information, see Troubleshooting on page 103 • For easy understanding, the menu setting procedures on the Home menu. • The items of the selected category appears. • If you select "Smart Auto", the Smart Auto mode is switched to. • If you...

User Manual (user Manual) (ver.1.0) (English)
Page 57
... video recording mode. ¬page 26 1 Press the Home ( ) button p touch "Manual" p touch the Focus ( ) tab. 2 Touch the desired submenu item. The camcorder applies the adjusted value right after you touch the ( ) or ( ) tab. • The Auto Focus (AF) setting is useful when you operate the zoom function because you might not be able to keep accurate focus after the zoom ratio has been changed. • In the manual focus setting menu screen...
... video recording mode. ¬page 26 1 Press the Home ( ) button p touch "Manual" p touch the Focus ( ) tab. 2 Touch the desired submenu item. The camcorder applies the adjusted value right after you touch the ( ) or ( ) tab. • The Auto Focus (AF) setting is useful when you operate the zoom function because you might not be able to keep accurate focus after the zoom ratio has been changed. • In the manual focus setting menu screen...
User Manual (user Manual) (ver.1.0) (English)
Page 73
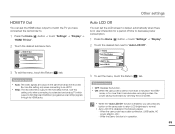
... power consumption. 1 Press the Home ( ) button p touch "Settings" p "Display". 2 Touch the desired item next to a standard and analog TV which supports SD (Standard Definition) progressive scan (480p) signals through its HDMI jacks. 3 To exit the menu, touch the Return ( ) tab. When the camcorder has a cable connection. (USB cable, AC power adaptor, etc.) - Use this setting only when connecting to "Auto LCD Off". > Display Date/Time Display TV Display ON HDMI TV Out Auto LCD...
... power consumption. 1 Press the Home ( ) button p touch "Settings" p "Display". 2 Touch the desired item next to a standard and analog TV which supports SD (Standard Definition) progressive scan (480p) signals through its HDMI jacks. 3 To exit the menu, touch the Return ( ) tab. When the camcorder has a cable connection. (USB cable, AC power adaptor, etc.) - Use this setting only when connecting to "Auto LCD Off". > Display Date/Time Display TV Display ON HDMI TV Out Auto LCD...
User Manual (user Manual) (ver.1.0) (English)
Page 74
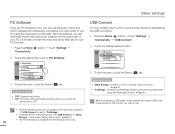
... Storage : Connect to a PC to transfer videos or photos. ¬page 91 • PictBridge : Connect to a PictBridge printer to print photos directly (when using the PictBridge function). ¬page 84 Before connecting a USB cable, check whether the current USB mode is compatible with the Windows OS's only. 70 USB Connect You can download stored video and photo images from the camcorder to "PC Software". > Connectivity PC Software ON USB Connect TV Connect Guide Anynet+ (HDMI-CEC) ON 3 To exit the menu, touch...
... Storage : Connect to a PC to transfer videos or photos. ¬page 91 • PictBridge : Connect to a PictBridge printer to print photos directly (when using the PictBridge function). ¬page 84 Before connecting a USB cable, check whether the current USB mode is compatible with the Windows OS's only. 70 USB Connect You can download stored video and photo images from the camcorder to "PC Software". > Connectivity PC Software ON USB Connect TV Connect Guide Anynet+ (HDMI-CEC) ON 3 To exit the menu, touch...

User Manual (user Manual) (ver.1.0) (English)
Page 75
... Home ( ) button p touch "Settings" p "Connectivity". 2 Touch the desired item next to "Anynet+ (HDMI-CEC)". > Connectivity PC Software ON USB Connect TV Connect Guide Anynet+ (HDMI-CEC) ON 3 To exit the menu, touch the Return ( ) tab. If you turn on the camcorder and it is connected to a TV that supports Anynet+, you can view the TV Connect Guide for instructions before you control all connected Samsung AV devices with the supplied Audio/Video cable. Anynet+ is...
... Home ( ) button p touch "Settings" p "Connectivity". 2 Touch the desired item next to "Anynet+ (HDMI-CEC)". > Connectivity PC Software ON USB Connect TV Connect Guide Anynet+ (HDMI-CEC) ON 3 To exit the menu, touch the Return ( ) tab. If you turn on the camcorder and it is connected to a TV that supports Anynet+, you can view the TV Connect Guide for instructions before you control all connected Samsung AV devices with the supplied Audio/Video cable. Anynet+ is...
User Manual (user Manual) (ver.1.0) (English)
Page 76
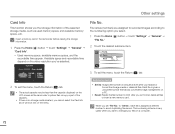
When you replace or format the storage media or delete all files or insert a new memory card. Submenu items • Series: Assigns file numbers in the camcorder before viewing the storage information. 1 Press the Home ( ) button p touch "Settings" p "General" p "Card Info". • Used memory space, available memory space, and the recordable time appear. Available space and recordable time depend on the video resolution you select. 1 Press the Home ( ) button p touch "Settings" p "General" p "File No." 2 Touch the...
When you replace or format the storage media or delete all files or insert a new memory card. Submenu items • Series: Assigns file numbers in the camcorder before viewing the storage information. 1 Press the Home ( ) button p touch "Settings" p "General" p "Card Info". • Used memory space, available memory space, and the recordable time appear. Available space and recordable time depend on the video resolution you select. 1 Press the Home ( ) button p touch "Settings" p "General" p "File No." 2 Touch the...
User Manual (user Manual) (ver.1.0) (English)
Page 87
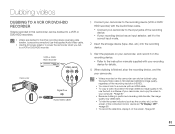
... DVD/ HDD recorder) with the Audio/Video cable. • Connect your camcorder to the input jacks of the recording device. • If your recording device has an input selector, set it to a VCR or DVD/HDD recorder. Dubbing videos DUBBING TO A VCR OR DVD/HDD RECORDER Videos recorded in software of the connected monitor device set "TV Display: OFF". ¬page 68 • To record the date/time, display it on the recording device. • Refer to the instruction manuals supplied with your recording device for details. 4 When dubbing is finished, stop...
... DVD/ HDD recorder) with the Audio/Video cable. • Connect your camcorder to the input jacks of the recording device. • If your recording device has an input selector, set it to a VCR or DVD/HDD recorder. Dubbing videos DUBBING TO A VCR OR DVD/HDD RECORDER Videos recorded in software of the connected monitor device set "TV Display: OFF". ¬page 68 • To record the date/time, display it on the recording device. • Refer to the instruction manuals supplied with your recording device for details. 4 When dubbing is finished, stop...
User Manual (user Manual) (ver.1.0) (English)
Page 103
.... Use a new memory card or format the storage media. ¬page 77 Or remove unnecessary images. ¬page 58 99 Set the "Date/Time Display" to On. ¬page 68 • Set your camcorder to record on the LCD screen looks dark. Back up important files on the LCD screen. During recording, the date/time does not display. • "Date/Time Display" is exposed to "Off". Troubleshooting Display Symptom An afterimage remains on your PC and format the storage media or delete...
.... Use a new memory card or format the storage media. ¬page 77 Or remove unnecessary images. ¬page 58 99 Set the "Date/Time Display" to On. ¬page 68 • Set your camcorder to record on the LCD screen looks dark. Back up important files on the LCD screen. During recording, the date/time does not display. • "Date/Time Display" is exposed to "Off". Troubleshooting Display Symptom An afterimage remains on your PC and format the storage media or delete...


